10 February 2017 AndruCool 73 996 1
Having set out to increase the efficiency of my car's heater, I re-read the available methods on the forums, and realized that these methods have some drawbacks that did not suit me. For example, installing a fan from a VAZ 2108 allows you to increase the air flow through the heater and blower nozzles, but this air is taken from the street, it is icy, and therefore the interior begins to warm up only after the engine has completely warmed up. In addition, this method requires significant modifications to the design of the heater, as well as the cost of purchasing a fan. Next, I’ll tell you how to modify the stove on the Niva with your own hands without investment and in a short time.
Lada 4×4 3D red bucket › Logbook › modification of the stove, heat found!
The first winter in the field it was very cold, at that time I decided to use a 2108 motor and a new 2101 radiator. But due to the fact that I did not think about the fact that using hot-melt glue in the stove was not very good, my entire system fell apart.
The plate covering the exit hole of the boot fell out. I decided it was time to fix it all. I took off the boot, printed the plates on a 3D printer, they are held on by self-tapping screws on the sides from the inside, all joints are coated with abro sealant.
Since I took it off, I decided to make a divider and also printed it on a 3D printer. and this is what we have:
Well, since I got busy, I made a plate on top that covers the motor, in the future I want to insert some kind of filter there
Having installed everything back, it didn’t get much warmer. maybe a couple of degrees. and due to the fact that my motor is located close to the boot, the divider did not want to climb in, the remains of the air damper interfered with it. (then I completely unscrewed the damper and filed down the plastic a little.
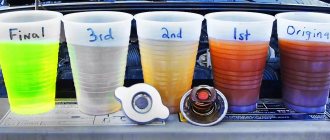
I decided to change the radiator. went to study. 1. luzar, boutler, etc., immediately dismissed 2. copper, dismissed because of the price. 3. DaAZ 2105 took it
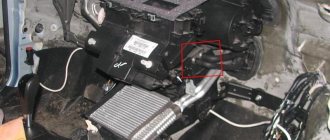
The 2105 radiator is written to be a little wider than the 2101, but Daaz doesn’t produce 2101 radiators, so I decided I’ll fit it in somehow. I went to install it... I removed the entire stove, pulled out the radiator, and realized that I already had a 2105 radiator... although I bought a 2101 Ladovsky one. It turned out that due to the fact that the radiator was a little longer, the back wall in the stove was slightly broken, and cold air was blowing from there. I installed a new radiator, sealed the cracks, covered everything with window insulation and put it back.
By the way, the old radiator was barely warm when the tubes were still hot.
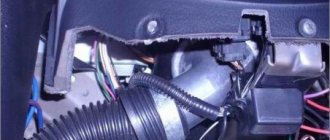
put the stove back, removed the faucet
The air ducts have been in place for a very long time (water supply angles 45 degrees 50mm), now it would be better to install 40mm.
To remove the faucet, I took a short tube, sawed it off and put on the stove hose, then took a long tube, sawed it off and made an adapter, and hit it with a hammer at the cut points to roll the tubes.
p.s. When I changed the radiator, I checked how the motor was blowing, it seemed to be across the entire surface of the radiator.
p.s. If anyone is interested in such a divider or another, write to me in PM.
Source
The process of improving the operation of the stove on a Niva Chevrolet car
If you are one of those who purchased a car like a Chevrolet Niva, then you may have already encountered the problem of heating the interior. Good operation of the heater is important to maintain an optimal level of comfort for passengers and the driver, as well as to create safe conditions for movement in the vehicle. Unfortunately, sometimes drivers notice that the heat in their Niva Chevrolet is rather weak, so it is not able to provide the conditions expected by the car owner. In this case, it is quite important for you to show increased participation, understand the causes of the malfunction, and also, armed with the necessary information, eliminate all problems.
There is a category of car owners who prefer to redirect all difficulties to the service station specialists. Indeed, by qualified craftsmen, the problem will not only be identified, but also eliminated quickly. However, it is still useful to learn to personally “hear” your car and troubleshoot all problems yourself. This will allow you to get even closer to your “iron friend” and also save money.
Symptoms of a problem
The simplest situation is when the electric motor does not spin at all. In this case, there may be several reasons :
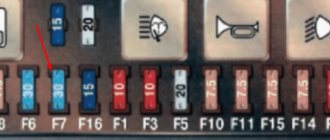
- Fuse failure №18 face value 25 A. It only protects the heater motor circuit.
Check fuse F18.
- Break, short circuit, damage to the motor winding.
- Lack of contacts on the motor power supply block, damage to the wiring.
- Damage, freezing or wear of the electric motor brushes.
- There is no voltage at the output contacts of the speed switch, the switch is broken.
In these situations, everything is simple - change the fuse, clean the contacts and check the wiring. In the case of damaged or worn brushes, you will have to completely remove the stove fan.
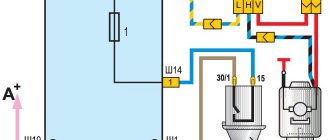
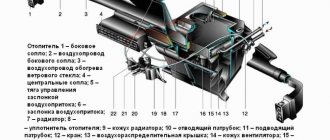
Connection diagram for the electric motor of the heater fan and the rear window heating element: 1 – ignition switch; 2 – mounting block; 3 – heater motor switch; 4 – additional resistor; 5 – heater electric motor; 6 – rear window heating element; 7 – switch for heated rear window with control lamp; A – to power supplies; K6 – additional relay; K7 – relay for turning on the heated rear window.
Stove fan repair
It is more difficult when the engine spins, but does not develop sufficient speed . This is dangerous because when the rotation of the electric motor shaft is difficult, it consumes much more current, so the fuse may burn out and the winding may fail. Diagnosing a fault in this case requires some experience and the breakdown may not be immediately detected, but a blown fuse will make it clear that there are problems with the motor.
The engine armature may not gain speed due to a dirty, oxidized or worn commutator or worn brushes.
In addition, insufficient motor speed can be caused by an interturn short circuit in the armature winding or wear or clogging of bushings or bearings . It is also possible that the cabin filter is clogged. In the case of bearings or bushings, the engine will make noise during operation, and the noise will increase over time. This can be treated either by replacing the motor, or by lubricating or replacing bushings or bearings.
The cause of increased noise from the stove may be clogged bearings and bushings that need to be lubricated.
The bushings or bearings are lubricated only with a regular spindle and machine oil. Engine oil or grease is not used in this case. A new engine costs about 600 rubles, depending on the manufacturer .
The stove does not work in the Niva Chevrolet
It often happens that with the onset of cold weather, owners of the popular Chevrolet Niva SUV model are faced with a problem when the heater in the cabin does not work. Quite an unpleasant phenomenon that requires immediate resolution. It is the question of solving this problem that we will deal with in this material.
Car heater system
Heating system for a Niva Chevrolet car
The automotive heating system of a Chevrolet Niva SUV consists of the main structural elements and components that are responsible not only for heating the interior, but also for cooling it in the summer. The heating system consists of the following elements:
These are the main elements, but there are also small ones such as a resistor and fuse, which are also responsible for the functioning of the stove as a whole. So, we will not consider how the heating system works, but will only analyze the main points that may be the causes of stove malfunctions. The car's heating system is shown in the photo below.
Causes of malfunction
Often, a breakdown of the stove in the interior of a Chevrolet Niva car is not particularly difficult, so to eliminate it, you should know the main reasons, or, more precisely, the components that fail.
So, the following factors can be the causes of stove malfunction:
Let's look at how to eliminate the main causes of stove failure, how repairs are carried out and what you need to know to carry them out.
How does the Niva Chevrolet heater fan work?
Like any automobile electric motor, the heater fan on the Chevrolet Niva is a DC commutator motor with the ability to stepwise adjust the speed. A motor with catalog number 2123-8118020 with a removable impeller on bushings is installed on the conveyor ; however, there is an alternative to it on floating bearings from the Luzar company with catalog number lFh-01211 ; there is a similar bearing motor from the Boutler company.
The stock engine can reach a peak of 3000 rpm , while the analogs spin up to a maximum of 2750 rpm . The maximum current consumption for the Luzarov motor is 25 A , for the native one - about 18 A.
Heater motor luzar lfh-01211 12V/14A.
The difference is significant, since the heater motor circuit is protected by fuse F18 rated 25 A.
Additional resistor
The operation of the electric motor in four modes is ensured by an additional resistor , which often causes various malfunctions. Its catalog number is 2111.8101012 or 2123-8118022-01 .
Additional resistor 2123-8118022-01.
At the first speed, the engine should consume no more than 5.1A , at the second and third 9 and 14A, respectively. At the maximum, fourth rotation speed , the voltage is supplied bypassing the resistor. Actually, all possible culprits for the malfunction of the air supply to the cabin are indicated; it’s time to name the symptoms of the malfunction.
Causes of poor stove performance
The Chevrolet Niva has a system that simultaneously performs the functions of heating in winter and cooling in summer. This system consists of several components, among which are the radiator, control unit, pump, pipes, tap and others. The failure of any components favors the emergence of a situation in which the car owner begins to claim that the stove on his Niva Chevrolet does not work at all.
In this regard, it is important to understand that the heater will not blow well, even if microcracks appear in the pipes, if the additional or main resistor fails. An excessively dirty radiator can also act as an obstacle to proper heating of the interior. Of course, a failed control unit or heater tap will also not allow warm air to fill the car interior. Having established the reason why heating becomes impossible, we recommend that you begin to take action to eliminate the problematic obstacle.
Algorithm of actions
If the stove blows cold air on a Niva Chevrolet, we strongly recommend that you listen to all external manifestations of the problem. In particular, turn on the ignition, and then start the heater, try changing the speed of the warm air supply. If you find that when you set the switch to the first three speeds, the stove is inactive or blows cold air, but at the fourth speed it starts working as expected, then the problem lies in a faulty resistor. You will have to remove it and install a new one, which you, of course, will need to buy.
If there are no problems with the resistors, continue to explore other mechanisms. Check the antifreeze level; it is very important that it corresponds to the indicators indicated in the technical documentation for the car. If you detect a lack of coolant, add to the required level. Be sure to check the level again the next day. If you find that the level has dropped again, then you will have to look for the source of the leak. Often the culprit is old pipes that have lost their elasticity. For this reason, small cracks appear on their surface, through which antifreeze easily leaks. By the way, a lack of coolant not only prevents proper heating of the interior, but can also cause serious engine damage. For this reason, it is important to replace leaking pipes in a timely manner.
Fan replacement
Experienced car owners recommend not stopping there and continuing to modify the stove by tuning the fan.
Some people suggest getting rid of the fan installed by the manufacturer and installing a figure eight fan instead.
If you also decide to carry out such a replacement, you need to additionally decide whether you will leave the original control of the stove or also replace it with a “eight” analogue.
Having decided on the second option, take care of purchasing the following additional items:
- fan speed switch;
- additional resistor for the stove.
So, after you have completely prepared all the necessary components, you can proceed directly to the process of modifying the fan.
Initially, you should dismantle the old air supply box. Unfortunately, despite the fact that this requires unscrewing only four nuts, it will not be possible to do this without outside help. Your partner will need to hold the screws under the hood while you unscrew them using a wrench.
After this, you can easily remove the air intake. Clean it if it needs it, and then cut away a small amount of the plastic to provide enough space for the new fan to operate.
Install the fan and carefully inspect for anything that may interfere with the operation of the installed fan. If you find such obstacles, carefully cut them off.
Once you are sure that there is nothing else that can prevent the fan from working, secure it with sealant. There are small gaps around the fan nozzle; it is important to eliminate them by covering them with any material. This will prevent warm air from escaping.
We recommend: How to diagnose a diesel engine?
Now the assembled fan is being introduced back into the space in which its old counterpart previously “lived”. Everything is securely fastened and the closing and opening of the hood is checked. In some cases, after the introduction of a “foreign” fan, it is not possible to close the hood normally.
If everything is fine, reconnect all wires and install new controls. Upon completion of the work, be sure to check your results in action.
The stove should work perfectly, and warm air should spread very quickly inside the car.
Why can the stove heat poorly on a Chevrolet Niva G engine 1 | Auto VAZ club - AvtoVyzov
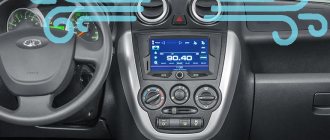
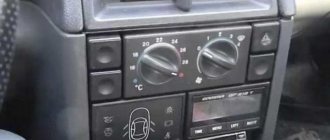
With the help of damper position regulators, warm air is directed to different parts of the cabin. First, the dampers should be adjusted.
Having established the reason why heating becomes impossible, we recommend that you begin to take action to eliminate the problematic obstacle. To do this, a homemade bracket is cut out. If the result is not achieved, the procedure is repeated.
All handles are removed from the heater control mechanism. Use a flat screwdriver to remove the air circulation lever. In this regard, it is important to understand that the heater will not blow well, even if microcracks appear in the pipes, if the additional or main resistor fails.
A few words about the resistor itself. Purchasing this part should not be a problem - it is not in short supply. The cost is also not amazing, about rubles.
Any resistor model is suitable for the line. The resistor, being a mandatory component of the stove, is a speed controller connected in series to the circuit of electric fans.
The injection of air heated by the stove into the cabin depends on it. We hope that the above simple tips will help car enthusiasts resolve the issue on their own, without resorting to the services of a car service. It’s no secret that garage auto mechanics can easily diagnose a complete breakdown of the stove, forcing a gullible client to pay a tidy sum for its replacement. We hope that after reading the article, you will easily cope with a non-working stove on a Chevrolet Niva without resorting to outside help.
The only requirement is accuracy and thoroughness, that is, avoidance of annoying flaws during the work, such as accidental wire breakage and the like. To replace it, you will need a standard set of tools and a headlamp. Replacing the cable is carried out as follows. The driver's seat moves back. The handles are removed from the damper control panel and the screws are unscrewed.
The panel is dismantled on the left side at the location of the driver's feet. To access the cable, you will need to remove the heater control mechanism. The latches securing the cables are removed.
The recirculation damper mechanism is dismantled and the cable is removed. Each end must be twisted into a ring and securely fixed. Using a cable, the position of the air supply flap is changed. Assembly is carried out in the reverse order.
Replacing the interior heating control unit A faulty control unit can also cause incorrect operation of the interior heating system. Its dismantling, necessary for repair or replacement, requires the following procedure.
The negative terminal is disconnected from the battery. All handles are removed from the heater control mechanism.
Original parts vs analogues: practical advice
As mentioned earlier, such a choice does not affect the quality of the heating system. At the same time, car mechanics make several reservations. For those who plan to use VAZ stoves, it would be useful to check the power system. It is different for some modifications. That is why all actions are consistent with the drawings.
It is permissible to use the VAZ 2108 heater, provided that two recommendations are followed. Firstly, the mounting socket is 1-2 cm larger than the size of the device. The additional area will reduce the vibration impact. Secondly, the switch is installed taking into account the specifics of the VAZ heating system. You will have to tinker less when minor modifications to the system are needed.
The ventilation system is updated in 1-2 hours, depending on the degree of wear of the engine.
If the factory-installed “snail” has no signs of physical wear, you only need to replace the heater “engine” itself.
It’s worse if the factory equipment of a Chevrolet model has manufacturing defects. A complete replacement of the device is recommended. This will save time.
The operation of the heating system determines the comfort and safety of driving. The driver constantly monitors the system's performance. If extraneous noise appears, it is necessary to urgently carry out a technical inspection.
Theme Options
Stages of repair when the stove is not working
The entire repair process consists of two stages:
Removing the heater
To remove the heater itself from a Chevrolet Niva, you will need to perform the following actions:
Remove the negative terminal
Removing the instrument panel
Remove the heater and recirculation control handles
Disconnecting the wiring harness block.
We unscrew the screws of the tie rod brackets and disconnect them.
Replacing the heater radiator
At the second stage, you will first have to buy a new heating radiator.
We are purchasing a new heater radiator.
Followed by:
- Drain the antifreeze from the cooling system and remove the air purification filter into the cabin.
Removing the outside air supply filter
Removing the foot heating duct
Unscrew the screws securing the heater radiator
Causes of the problem and solutions
After dismantling, the control unit is repaired or replaced with a new one. Replacing the stove pipes If a coolant leak is detected, the pipes along with the clamps should be replaced. The work is performed in the following sequence: The coolant is drained from the system. The screws securing the glove compartment are unscrewed and it is removed. Use a Phillips screwdriver to unscrew the clamp of the lower pipe. The hose is removed carefully - the antifreeze should not get on exposed skin.
If difficulties arise, the pipe should be rotated around its axis. The second pipe is removed in the same way.
Tags: ignition, coils, Logan, malfunction, Renault
Source
Radiator of the Niva stove
The heater radiator of VAZ 2121, 2131 is not a critical vehicle component. But in cold weather, driving a car with a faulty heater is unlikely to be a pleasure. In addition to the sheer coldness in the cabin, the windows may fog up, which leads to poor visibility, and this is a matter of safety for the driver, passengers and other road users.
Structurally, the radiator is a heat exchanger, or more simply put, a battery, whose task is to heat the air passing through its grille. Externally, it looks the same as a similar unit on other cars.
The same type of heater radiator is used for “Niva” and “classic” VAZs
The Chevrolet Niva radiator is not suitable for the VAZ-2121, 2131 family. This should be taken into account when selecting spare parts in the store.
Radiator location
The heater radiator on the Niva is located under the dashboard behind the center console between the driver and right passenger seats. This is the standard location for the heater in most cars. Compared to many other car models, access to the radiator in the Niva is quite simple. This will take about 10–15 minutes for a semi-skilled specialist.
The radiator of the Niva stove is located in a plastic casing under the center console
Radiator design and functions
The stove radiator is a unit in which heat is transferred from the heated liquid to the surrounding air. It consists of two horizontal rows of tubes intersecting with vertical metal plates (ribs). On the sides, the structure is limited by panels that provide the functions of tanks. The incoming and outgoing pipes of the cooling circuit are connected to one of the tanks.
There are two unconnected cavities inside the tank. Antifreeze enters through the inlet pipe into the cavity connected to the upper row of tubes. On the other side of the radiator there is a return tank, through which antifreeze flows into the second row of tubes and moves in the opposite direction to the second cavity of the tank and the outgoing pipe. After leaving the radiator, the antifreeze enters the main cooling system of the car. Antifreeze circulating in the tubes ensures heating of the entire grille, thanks to which heat transfer from the radiator reaches maximum effect.
The radiator is installed in the instrument panel console in a plastic casing and sealed around the perimeter with foam tape. Air heating depends on the degree of opening of the valve that regulates the flow of liquid through the radiator. The valve is installed at the radiator inlet and is controlled by the upper lever on the center console.
Cold air comes from the external environment, passing through a hot radiator, heats up and enters the car interior
The main and only function of the heater radiator is to heat the air flow entering the cabin through the air ducts.
Radiators are made of aluminum or copper. The aluminum product does not hold temperature well. A copper radiator works more efficiently, but is more expensive. The advantages of a copper radiator include its maintainability: the ability to seal cracks in the tubes.
Fan replacement
The main reason for the low temperature in the car is the poor performance of the heater fan, which forces warm air through it into the cabin. In addition, being directly inside the car, it operates quite loudly at high speeds and whistles unpleasantly, especially in winter. Therefore, it is replaced with a fan from a VAZ-2108 (“eight”) car, which together with the casing is often called a “snail”. Their sizes differ slightly, so installing a new one is quite simple, with minor design modifications. Place the fan in the engine compartment, inside the air intake. This significantly reduces the noise from it. The heater radiator shutter needs to be removed.
You can leave the standard two-speed airflow mode switch
or replace it with a three-position (and, if desired, four-position) installed on 2108, adding an additional resistor from the “eight” to the fan circuit.
They place it inside the air duct, since it needs airflow.
We recommend: Electric trunk lid: DIY installation
The cross-section of the wires suitable for it needs to be increased, since the new motor consumes more power.
The outer openings for air passage in the hood must be sealed to reduce the flow of cold air through them to the stove by half.
Options for upgrading the heater on Niva
To ensure that the heater works more reliably and you do not have to repair it from time to time, it can be modernized. As practice shows, a modernized stove for Niva will not only be able to work several times longer, but its functionality will also be more efficient. Below are several options that will allow you to modernize the node.
We will not describe them in detail, but know that all these options have already stood the test of time, since they are used by many of our compatriots, so you can have no doubt about their effectiveness:
Price issue
Why the heater fan does not work on a Niva Chevrolet: reasons and repairs
The standard stove on a Chevrolet Niva, in principle, rarely requires repairs and heats properly, but over time the quality of conveyor components began to decline. Therefore, the heater began to exhibit childhood illnesses, which, one way or another, lead to failure of operation. An electric heater motor with peripheral equipment can create a number of surprises, and we will talk about them today.
Typical radiator malfunctions
There are two main radiator malfunctions:
Since the Niva is often operated in difficult road conditions, the likelihood of contamination of the grille from dusty outside air is very high. Clogging of the cells reduces the heat transfer area of the radiator, and as a result leads to a decrease in the heat released from the air ducts into the passenger compartment. In such cases, the stove radiator is dismantled and washed under high pressure.
Clogged radiator tubes are also common. If the outlet pipe is barely warm or cold, then the radiator tubes are clogged. This happens for various reasons, including the entry of foreign objects into the cooling line during repair work. In such cases, the tubes themselves are also washed. To do this, it is not necessary to remove the heater radiator. It is enough to separate the radiator pipes from the cooling system and supply water under pressure into one of the radiator pipes.
A leak in the radiator tubes can be determined by a coolant leak, which usually forms on the right side of the center console in the passenger foot area. As a rule, a leak is accompanied by the smell of antifreeze (antifreeze) in the cabin. Don't rely on the smell of antifreeze alone. Coolant vapor is very volatile and can be misleading as to the source of the leak. The smell of antifreeze also indicates a leak in the engine compartment.
The leakage of the heater radiator occurs due to natural wear and tear of the metal from which it is made. Constant cycles of heating and cooling, exposure to various chemicals and consumable liquids eventually lead to the destruction of the metal and the formation of cracks. Cracks in a copper radiator can be soldered. The aluminum radiator will have to be replaced with a new one.
How to remove parts of the heater of a VAZ-21213 car
Removing the air intake box, radiator casing, flexible rods of the heater drive and the bracket for the heater control levers
We remove the heater radiator with the tap (see Removing the heater radiator with the tap).
In the cabin, use a 10mm head to unscrew the four nuts on the bolts securing the air intake box and the radiator casing
...at the same time, an assistant holds the bolts in the engine compartment with a “10” wrench.
Remove the air intake box.
The connection between the air intake box and the body is sealed with a sponge rubber gasket glued to the flange of the air intake box
In the cabin we lower the radiator shroud
The flexible air intake damper control rod does not allow removing the radiator casing.
Use a screwdriver to pry up the clamping bracket of the rod shell
Disconnect the rod from the damper lever.
If necessary, similarly disconnect the rod for the heated windshield flap.
To remove the bracket for the heater control levers, unscrew the screws securing the bracket to the instrument panel (see Removing the instrument panel) and move the bracket down.
Use your finger to pry up the clamping bracket of the rod shell
We remove the rod from the hole in the lever.
Having disconnected all three rods from the bracket of the heater control levers, remove it.
To remove the heater tap draft, we remove it from behind the glove box body (the instrument panel has been removed for clarity).
We carry out assembly in reverse order. We ensure complete opening and closing of the heater dampers and valves by selecting places for fastening the rod shells with brackets
Removing the central nozzles and air ducts for heating the windows.
Remove the instrument panel (see Removing the instrument panel).
On the back of the instrument panel, use a Phillips screwdriver to unscrew the two screws securing the nozzle housing.
Remove the nozzle body with the seal.
When installing the nozzle housing on the instrument panel, it is necessary to place the housing ear on the ledge of the instrument panel (the seal has been removed for clarity).
To remove the air ducts for heating the windows, use a 10mm wrench to unscrew the nut securing the right air duct for heating the side window.
Remove the right air duct.
Similarly, remove the left air duct for heating the side window.
Disconnect the damper rod for the heated windshield air duct.
We move the upper edge of the windshield heating air duct, while the lugs come off the instrument panel mounting studs.
By pulling up, remove the air pipe from the radiator casing and remove the windshield heating air pipe
We install the air ducts in the reverse order.
Technical details of the procedure
The efficiency of the new heating system on Niva will be determined not by the cost of the purchased parts, but by their quality. To operate, you will need the following elements: a car resistor, a figure-eight heater and a “snail”. It is a mistake to believe that only “original” spare parts are suitable for repairing a heating device. The main requirement is technical compatibility.
If in doubt, a drawing of the heating system will provide clarity. The further procedure is as follows:
- Cut a new mounting hole. This is done carefully, because the reliability of the heating system’s operation depends on the quality of the preparatory process. It is recommended to place the engine as low as possible in the air duct, otherwise the device will rest against the hood. This should not be allowed to happen, otherwise the stove fan will not last long.
The heating system of a new model is checked by test switching on. It is recommended to switch modes smoothly. The device must remain on each of them for at least 5-7 minutes. The driver’s task is to make sure that the operation of the system is not accompanied by extraneous noise and vibration.
Blown engine head gasket
The thing is that the motor is not a monolithic structure; it has a block head and the block itself. They are connected through a special gasket. If this gasket is broken (and this happens, for example, due to poor broaching), then the coolant will go into the cylinders or the muffler ( white thick smoke will come out ). Thus, there will not be enough coolant in the system (possible air pockets) and therefore the stove will heat poorly! It is urgent to change the head gasket, otherwise you can kill the engine through overheating.
These are probably all the main reasons when the stove does not heat well! On a personal note, I would like to note that in most cases this is a thermostat malfunction (about 70%). So the first thing to check is to change it.
Now let’s watch a short useful video.