Indication symbols
As you know, all the lights on the control panel come on when the ignition is turned on, and then, when the engine is already running, most of them go out. But when one remains on or blinks, this cannot but be alarming, because not everyone can immediately figure out what malfunctions this indicates, which of the systems needs urgent repairs.
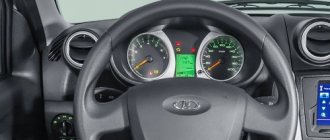
Let's look at the designations of the instrument panel of the VAZ 2110. You should know that regardless of whether the panel is new or old on your car, the designations are almost the same, but the indicators may be located slightly differently.
Instrument panel VAZ 2110
What functions does it perform?
Depending on the modification of the device, the onboarder performs many different functions. However, regardless of the model of the device, its main task remains the ability to notify the driver about malfunctions and the condition of all car systems. Such a computer can monitor fuel consumption, oil levels in the engine and transmission, monitor voltage in the on-board system, etc.
Many motorists are confident that it is possible to drive a car without all this data. The oil level is checked using a dipstick, the temperature of the cooling system is indicated by the corresponding arrow on the dashboard, and a speedometer is installed to determine the speed (how it works is described here). For this reason, many are sure that BC is more a whim of lovers of all sorts of electronic goodies than a necessity.
However, if you dig deeper into this issue, standard indicators on the dashboard do not always reflect the real condition of the car. For example, the coolant temperature arrow may point not to a number, but to a scale mark. What the real temperature in the system is remains a mystery. Electronics records these parameters much more accurately. It has a smaller error. Another situation is when the driver installs tuning wheels with an increased diameter. In this case, the mechanical speedometer and odometer cannot be reprogrammed to accommodate the changed wheel size.
Also, by connecting the carputer to the on-board system, standard checking of the vehicle's vital signs is greatly simplified. Thus, the driver does not need to waste time walking around the car with a pressure gauge, measuring the tire pressure, checking the oil level in the engine or gearbox with a dipstick, monitoring the volume of brake and coolant, etc. Simply turn on the ignition, and the on-board system will perform all these manipulations in a matter of seconds. Of course, the scope of the parameters being checked depends on the availability of specific sensors.
In addition to displaying information about the car itself, modern computers integrate multimedia systems, so that with one device you can control the operation of units, turn on music, watch a movie or photos. In traffic jams or in a parking lot, these options will help pass the time.
In addition to entertainment options, the bookmaker may have the following functions:
- In addition to the visual notification, the driver can set up a voice message about the required parameters;
- Built-in diagnostics of the on-board system allows you to not only find out about a problem in a timely manner, but also immediately determine what the problem is, without going to computer diagnostics;
- Fuel at gas stations may be of different quality; the computer may report non-compliance with the standards set for a particular power unit. This will prevent premature failure of the fuel system or avoid poor-quality refills in the future;
- In addition to the odometer readings, the device independently records trip (daily mileage). Depending on the device model, the trip may have several modes, thanks to which the driver can measure the distance of different trips;
- Can be synchronized with an immobilizer (how it differs from an alarm system is discussed in another review);
- Can monitor fuel consumption and calculate the remaining fuel in the tank, helping the driver choose the most economical driving mode;
- Display the temperature inside and outside the car;
- The navigation system can contain detailed trip statistics. This information can be saved on the device so that in the future you can plan in advance the costs of an upcoming trip (the on-board system can even indicate at what point in the road you need to plan to fill up);
- In addition to navigation, you can connect parking sensors with cameras to the BC, which will make parking in crowded parking lots easier;
- Decipher error codes coming to the ECU.
Of course, these and other functions may not be present in the overboard. For this reason, when going to the store, you first need to determine for what purpose you plan to purchase a computer.
One of the common questions regarding the use of on-board vehicles is how much they drain the battery. When the motor is running, the device receives energy from the generator. When the internal combustion engine is inactive, the equipment can also continue to operate, but for this it uses a minimum of energy (if completely turned off, then even less than the alarm). True, when the driver turns on music, the battery will be discharged depending on the power of the audio preparation.
Top part
So let's start from left to right. First, the top part of the control panel:
- Side scale from 50 to 130 and arrow. Shows the temperature of antifreeze (antifreeze) in the engine cooling system;
- Almost round scale (0 – 80) and arrow. Tachometer showing engine speed;
- Two arrows at the top, almost in the middle of the control panel - turn signals (right, left);
- Speedometer. Well, this device, probably everyone knows, shows the speed at which the car is moving;
- A side scale with an arrow and, most often, two images of a filling column (white and red). Instead of a red column there may be a yellow light. This is an indicator of the fuel level in the tank. If the red column (yellow light) lights up, it means that there is very little fuel left in the tank - no more than 7 liters, urgent refueling is required.
General diagram of devices
Dashboard for Niva 2121
If you look from the back of the instrument panel, here it is in sequence - from top to left to right:
- Fuel level indicator;
- Combination of instrument lighting lamps;
- Right turn control;
- Left turn control;
- Tachometer;
- Next is the block, there are a lot of plugs in it;
- And the top part of the dashboard is completed by an antifreeze temperature indicator.
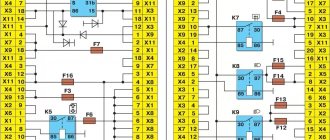
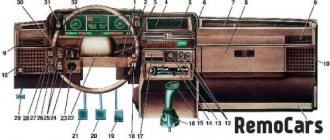
VAZ 2110 dashboard connection diagram
The lower part of the dashboard (also from left to right and from the back of the dashboard). The following part of the instruments is located here:
- high beam controller (bulb);
- alarm controller;
- brake fluid level control lamp;
- speedometer;
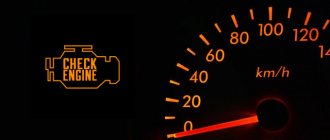
- CHECK ENGINE controller;
- battery charge control;
- parking brake controller;
- oil pressure controller;
- air damper controller in the carburetor;
- outdoor lighting controller.
White block
The connector number, wire color and the unit (assembly) to which it goes are located in the white block as follows:
- The first connector has a black wire. Its purpose is the body (mass);
- In the second - red-brown - this is a low-voltage supply from the electronic control unit - tachometer;
- The third, yellow one is also a tachometer, but this is a high-voltage supply from a coil;
- The fourth, red-blue is Const from the battery + 12V, going through the sixth fuse;
- The fifth, green-white - it is intended to indicate the coolant temperature;
- Sixth, green-yellow – for size fuse F1;
- The seventh connector does not have its own color and goes to the “choke”, the throttle valve;
- Eighth, red and white - CHECK ENGINE light;
- In the ninth and tenth there are 2 orange wires each, leading to 2 power fuses F19+12V;
- In the eleventh there are 2 blue-brown wires leading to the “BK” terminal of the parking brake;
- The twelfth, brown-white is the output “D” of the generator;
- Thirteenth, gray and blue – for the oil pressure sensor.
White block (X1) and Red block (X2) of the VAZ 2110 instrument panel
Red block
The number is the connector according to the account, followed by the color of the wire and an indication of the device to which it goes in the red block of the VAZ 2110:
- Blue and red go to the sensor showing the external temperature;
- Orange - power fuse F19+12V;
- Black, 2 wires – ground, body;
- White - light switch for all devices;
- Blue - right direction indicator;
- Blue and black - left turn signal;
- Blue with pink - TJ level;
- Brown – leading to the trip computer;
- Gray - speed indicator;
- Pink - Fuel gauge (terminal “T”);
- 2 black-green wires - high beam fuse (F3);
- Blue and white - emergency light switch;
- White - leading to the ignition switch (terminal 50).
Bottom part
Let's look at the indicators at the bottom of the control panel. If they don’t light up, it means the machine is working normally, and when any of them lights up, this indicates a malfunction in certain components. Most often, this is a signal that repairs are needed, and the sooner the better. From left to right:
- The indicator on the far left at the bottom is the air damper light (if you have a carburetor engine);
- Icon in the form of an oil can. If this light comes on, it means there is insufficient oil pressure in the engine. An alarming signal. You need to stop, find the reason;
- A round icon with the letter P inside on the control panel indicates that you have the parking brake on, which, as you know, should be turned off when moving away;
- Indicator of a fault related to the generator or battery (a symbolic image of the battery is shown on the indicator). Perhaps the battery is not charging from the generator, there is an open circuit, or the generator belt is loose or broken. In any case, your intervention and repairs are needed, otherwise troubles cannot be avoided;
- If the engine is running and the Check Engine indicator is on on the control panel, this is the most unpleasant thing for the driver, since it indicates serious malfunctions in the engine. In general, when this indicator lights up, it is recommended to stop driving and turn off the engine. Most likely it needs repairs;
- Typically there is a red triangle above the Check Engine. It lights up when the “hazard light” is on - an emergency signal sign;
- The headlight light indicates that the high beam is on. Designed to control headlights: when an oncoming car appears, do not forget to switch to low beam;
- A very important indication icon on the front panel (in a red circle) is a signal that there is not enough brake fluid. Perhaps it is leaking somewhere, which it is advisable to find out as soon as possible and, if necessary, carry out urgent repairs and replenish the level;
- The icon of a burning light is a control for turning on the dimensions;
- In addition to the indicated lights, the front control panel has time indicators (and a button for setting hours and minutes) as well as a display that shows the total and daily mileage. On the new panel, this display may be narrow.
Tidy error codes
Standard errors in car self-diagnosis do not accurately indicate a breakdown. Due to the simplicity of the on-board computer, the device can only indicate the direction where to look for the problem. The decoding of standard errors looks like this:
- 0 – no errors detected – the system is in perfect order;
- 1-2 the voltage in the on-board network is exceeded or too low;
- 3 – malfunction of the float sensor in the gas tank;
- 4/5 malfunction in the antifreeze and ambient temperature sensor circuits, respectively;
- 6 – critical overheating of the power plant, it is necessary to wait for the antifreeze to cool down;
- 7 – not enough oil in the engine crankcase;
- 8 – the problem lies in the brake system;
- 9 – the battery is dead or the part is damaged;
- E – error in the firmware, EEPROM data packet is broken.
It should be taken into account that in some cases, the error code may be two-digit. For example, if 15 is displayed on the display, this may indicate a breakdown in circuits No. 7 and 8.
Once you know what each error means, you can independently determine the source of the problem and fix the problem.
Additional panel
The additional front panel of the new-style BSK control has indicators:
- An oil can is shown. If the light works, check the oil level;
- An icon lights up, which, with some imagination, can be “identified” as working wipers. This indicates that there is not enough windshield washer fluid in the tank;
- Conventional image of a thermometer over a container with liquid - high temperature of antifreeze;
- A crossed out light, which the arrow points to, is a sign that the brake light or parking lights are not working;
- If the light with the image of a wheel with brake pads lights up, it is quite possible that the pads are worn out and require replacement;
- The sign of a man with a seat belt indicates that the seat belt should be fastened.
Panel BSK VAZ 2110
Priora panel
Some people prefer the Priora's dashboard. You need to know that you won’t be able to change it with your own hands “in a hurry” - there are differences: in the wiring, in the mounting of the ECU.
It should also be taken into account that the Priora has the same “propensity” for unnecessary squeaks as the “native” one, so you should also think about sound insulation in order to “fit” the Priora panel without unnecessary gaps and cracks. Another drawback of the Priora is the small glove compartment. In addition, you must definitely purchase a mount in the ECU area, specifically from Priora.
Panel from Priora in VAZ 2110
Or maybe you even liked the electronic panel, the installation of which is also possible. However, before you decide, do not forget to calculate how much such a replacement will cost you.
It is quite possible that tuning the lighting you already have, carried out with imagination and invention, will cost you much less. In this case, tuning yourself will become a source of pride for you, and will not only decorate the interior of your VAZ 2110, but also improve the lighting, make it brighter and more comfortable.
Removal and modification
Here's a quick look at the device and control panel icons. If for some reason she refuses, don’t immediately panic. Most often, the reason is the absence of contacts in some place in the wiring. But of course, if you wish, you can completely change or tune the panel.
For example, remove the cover and replace the light bulbs with brighter LEDs. Such a panel works brighter and the signals sent by the car will be more noticeable to the driver. If desired, you can install a more solid europanel, which will transform the interior.
To remove the panel you need:
- Disconnect the “-” wire from the battery;
- Remove the shield by unscrewing the screws;
- Remove the fastenings of the control panel to the trim, remove the instrument cluster from the socket;
- Remove the glass mask;
- Disconnect the wires from the block;
- Make changes to the instrument panel or replace it with a new one. Reassemble everything in reverse order.
The instrument panel of the VAZ 2110, as in any car, both imported and Russian, must determine the general condition of the car, and must show all information about: the amount of fuel, engine temperature and the presence (quantity) of engine lubricants.
In addition to the above data, the VAZ instrument panel displays all the errors (current malfunctions) of the car.
Further in the article, I will give you a complete description of the VAZ 2110 dashboard and tell you about the description of buttons, lamps, light indicators, and tell you about common errors that may appear on your display while on the road.
On-board unit installation
If you buy the State device after purchasing the machine itself, you can install it yourself. At the same time, you do not need to worry about the supposed “failure” of the warranty of the purchased car, since the Lada panel has a corresponding connector for such an on-board device. When installing it, the panel will not be disturbed or damaged.
The on-board computer is installed by releasing the recess in the panel from under the button cover. The State on-board computer with the wiring already connected to it is inserted into the freed niche. The end of the wiring is brought out and connected to the diagnostic block below, near the passenger seat, where the passenger's foot is usually located.
Not too high a price, compactness, ease of use, ease of installation - these are significant factors for buying a State on-board computer for a Lada and making the operation of the car completely convenient and safe. A video on how to operate the on-board computer will help you get acquainted with the device in more detail.
However, the VAZ 2190 car can be equipped with other similar computer installations, for example, Multitronics routers. Their various modifications are considered universal, since they allow the driver to attach and install them in places where it is convenient for the car owner (on the windshield, inside, on the panel, etc.).
During installation, you will need to remove the dashboard to cut the appropriate hole.
Installing the Multitronics on-board computer on Granta in the Din-place (in the panel) will be complicated by the fact that here you will have to very carefully route the wiring to the diagnostic block. In this case, it will be necessary to remove the dashboard and make holes for the wires. In this case, it is convenient to use a heated knife to minimize the deformation of the panel. The wires must be secured in the panel itself to avoid the noise they make when the car is moving. It is better to secure the on-board computer to the panel with liquid nails.
After the on-board connector is connected to the diagnostic block, it is necessary for the computer to identify all on-board settings. If this does not happen within a certain time, it is necessary to change the computer firmware so that it supports the CAN protocol. Therefore, this will require reflashing the Multitronics, and this is already a significant disadvantage.
Description of the VAZ 2110 dashboard buttons
Well, let’s immediately move on to the description of the buttons on the dashboard of the VAZ 2110.
Instrument panel of a VAZ 2110 car - the buttons located on it are marked on the arrows
As you can see from the screenshot, there are only 4 buttons on the instrument panel of the VAZ 2110 - let's move on to their description.
- Button to turn on/off the front fog lights.
- Turn on/off outdoor lighting.
- Heated rear window
- Button for turning on/off the rear fog lights.
In addition to the buttons located on the dashboard, there are others that are located under the stove, next to the radio in the cabin. Let's find out their functions:
Instrument panel VAZ 2110 - description of the buttons next to the stove
Many VAZ 2110 owners wonder why these 4 buttons, which are located on the dashboard under the stove, are needed. The answer will seem rather banal to you:
These buttons actually do not play any function; I think the engineers working on the ten wanted to add electric windows to the car, but for some reason they forgot to do this.
Okay, it was a joke! In fact, these buttons are responsible for the following:
- Turning recirculation on/off
- Button for installing additional equipment (for example, power windows)
- Turning the hazard warning lights on/off
- Button for installing additional equipment (for example, power windows)
How to replace dashboard lights
- The steering wheel lowers to the down position.
- The two upper screws are unscrewed and the decorative trim is pulled out.
- Unscrew the three screws securing the dashboard.
Tip: The speedometer cable prevents you from pulling out the dash. To turn it off, it is first unfastened from the box, the locking ring is pulled to the side and the cable chip is pulled up, which is then pushed into the cabin. Part of the tidy is pulled out towards you, and the cable is conveniently unfastened from the speedometer.
- The cable remains in place, the device is pulled out, all electrical connectors are disconnected.
- The socket is rotated counterclockwise and removed along with the lamp. Baseless light bulbs.
- After replacing the light bulbs in the instrument panel of the VAZ 2110, assembly of the unit is performed in the reverse order.
How to replace the center console light bulbs
When operating the vehicle, the lamps located on the center console of the VAZ 2110 may fail. In this case, replacing the lamps on the instrument panel of the VAZ 2110 is easy to do with your own hands. The cost of the work is low. For this you will need:
- The screwdriver is flat.
- Phillips screwdriver.
- New light bulb.
Work instructions:
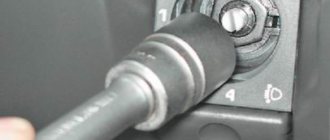
- The negative terminals are disconnected from the battery and from the speedometer cable drive to the gearbox.
- The outdoor lighting switch is pulled out. To do this, you need to pry off the element with a flat screwdriver. The connector is disconnected from the switch and pushed inside the dashboard trim.
- Replacing the VAZ 2110 dashboard light bulb to illuminate it is done by squeezing the socket antenna with a screwdriver, which is then removed from the switch. The lamp is pulled out of the socket and replaced with a new one.
- Use a flat screwdriver to pry up the hazard warning switch, which is then pulled out. The connector is disconnected from the switch and pushed into the panel trim.
- Unscrew the two self-tapping screws with a Phillips screwdriver, which secure the dashboard console trim, and the trim is removed. The heating element and ashtray are pulled out of the socket.
- The car radio is pulled out of the socket. The spring brackets securing the panel to the cover are pressed out with a screwdriver, and the shield is pulled towards itself. Use a screwdriver to release two plastic antennae from the lower fixation of the shield to the dashboard. The shield is raised and the third spring bracket for its fastening is pressed out.
Removing the panel on the center console
- The connectors for connecting the cigarette lighter (see VAZ 2110: replacing the cigarette lighter yourself), the backlight for it, and the lamp for the hazard warning switch are disconnected. The instrument panel panel is removed.
- Replacing the VAZ 2110 instrument panel light to illuminate the hazard warning switch on the inside of the instrument panel is done after removing it with its socket. To do this, they are rotated in the holder.
- The antennae of the cartridge holder are compressed and the element is removed from the cigarette lighter. The cigarette lighter blades are compressed, the part is pulled out, the light bulb is removed from the dashboard trim and changed if necessary.
- Use a Phillips screwdriver to unscrew the two screws that secure the instrument cluster to the panel. The instrument cluster is moved to the side. The union nut of the speedometer cable is unscrewed from the speed sensor. The cable is disconnected from the speedometer, then removed and routed through the hole in the front panel.
- The connectors are disconnected and the instrument cluster is removed. To replace the instrument panel bulbs on a VAZ 2110, the socket must be turned counterclockwise and the instrument cluster removed from the device. New lamps are being installed. Assembling and installing the combination is carried out in the reverse order.
- The battery is connected.
- The operation of the light bulbs on the instrument panel is checked.
How to replace light bulbs in buttons
- To replace the backlight bulb of the hazard warning light button, the panel with deflectors is removed, after which the hazard warning light button is pulled out of it.
- The deflectors are directed as high as possible.
- On the left and right below them there are mounting ears. Using a slotted screwdriver, they are pulled down and the panel is pulled towards itself.
- The hazard warning button is pulled out.
- There is a socket with a lamp on the side. You need to turn it counterclockwise with tweezers and pull it out.
- The contacts on the light bulbs are wrapped around the sides of the socket. The light bulbs are the same size as a matchbox.
- In order to replace the lamps in the instrument panel of the VAZ 2110 fog lamp, you need to carefully pry the panel with the button with a screwdriver and pull it towards you.
- The remaining operations are performed similarly to the same actions as replacing the instrument panel bulbs of a VAZ 2110 emergency system.
The light bulb for the headlight adjustment wheel is changed in the same way:
- Pry it up with a screwdriver and pull out the wheel.
- Using a small screwdriver, the socket is rotated along with the lamp and pulled out.
- The light bulb changes.
The VAZ 2110 instrument panel is clearly shown in detail in the video.
Description of indicators and lamps on the instrument panel of the VAZ 2110
Well, we laughed, now let's move on to the main thing: a description of the indicators and lamps on the instrument panel of the VAZ 2110.
Description of instrument panel indicators BA3 2110
- Oil in fuel indicator
- Handbrake indicator
- Automatic battery charging indicator
- Engine health indicator
- Additional engine health indicator
- Enable left turn
- Enable right turn
- High beam indicator
- Brake fluid level indicator
- Fuel indicator
- Indicator of the warning lamp for turning on the dimensions
All of the indicators described above (except for the turn indicators and high beam headlights) are warning in nature. If they light up, then there is a problem in the car system.
How are the icons on the installed instrument panel deciphered?
In addition to the instruments, the panel also has various icons that light up when there is a malfunction in the form of electronic indicators. They have the following meanings for the driver:
- ABS sign. This indicator lights up only when the engine starts and immediately goes out. It can also light up if there are problems with the operation of the anti-lock elements in the brake system.
- Front airbag indicator. Will light up when there is a malfunction with the airbags attached to the front panel of the car.
- An indicator that reminds you to put on your seat belt. It will light up when you start the engine and will remain on until you fasten your seat belt.
- Airbag warning light. Lights up when the airbag of the front pair of passengers is turned off.
- Heated rear window indicator. It will light up before turning on the heating on the rear window.
- Low beam icon.
- High beam indicator.
- Sign for turning on the rear fog lights.
- Front fog lamp sign.
- An indicator that turns on when there is a malfunction in the electric amplifier.
- Signal lamp that operates when the doors are not closed.
- Lamp for adjusting the fuel level in the tank. It lights up only if there is fuel for 15-20 minutes of driving.
- Indicator for left and right turn signals of the vehicle.
- An indicator that turns on when the engine cooling system overheats.
- Indicator lamps that turn on when the batteries are low charged.
- A light called “CHECK ENGINE.” Lights up when a malfunction occurs with the engine control system.
- Signal indicators that turn on when the parking brake is used or when a breakdown occurs in the brake system.
- Indicator of low pressure and level of engine oil in the lubrication system.
- The preheating system malfunction light (specifically responsible for the glow plugs).
- A warning light that appears when the electronic engine starting system of a car is blocked.
Advice: if one of the indicators associated with the wheels lights up, then first bleed the brakes on the VAZ-2110, and then check the system again. If the indicator on the on-board panel disappears, it means that the problem was solved by repairing the brake system.
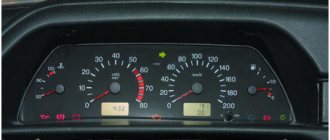
Information indicators of the VAZ 2110 instrument panel
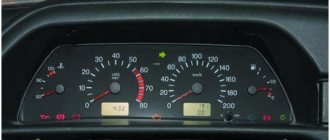
All information indicators of the VAZ 2110 car system are indicated by arrows, here they are in the photo:
Information indicators of the VAZ 2110 dashboard
- Availability and temperature of coolant
- Tachometer (shows the number of engine revolutions, remember to multiply by 100)
- Speedometer (shows the speed of the car. There is no need to multiply anything here.
- This display shows the vehicle's total/daily mileage.
- Engine oil indicator.
As you can see, the instrument panel of the VAZ 2110 is not that difficult to study. But very often situations arise when errors appear on the dashboard. Let's now look at these errors in more detail.
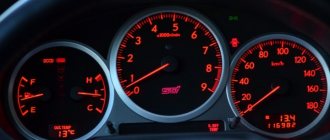
Speedometer and tachometer
The speedometer on the instrument panel (2) is a dial instrument, but not with a mechanical drive, as was the case in older cars, but with an electric one. Essentially, it is a voltmeter that responds to an impulse generated in the speedometer sensor, and it is installed in the gearbox. The higher the voltage at the sensor output, the higher the speed the device displays. The factory error is approximately 5 km/h, but it is necessary to take into account the diameter of the wheels, which greatly affect the accuracy of the electric speedometer.
The tachometer on the instrument panel is indicated by the number 5 and it is also an electrical device that responds to an impulse generated by the crankshaft speed sensor. The sensor first transmits the readings to the electronic engine control unit for analysis and correction, after which the pulse is sent to the tachometer control circuit. The red zone of the tachometer scale indicates unacceptably high speeds, at which rapid wear of engine parts, incorrect operation and an increase in coolant temperature are possible. Long-term operation of the engine in the red zone of the tachometer is extremely unacceptable.
Errors displayed on the dashboard of the VAZ 2110 and how to eliminate them.
As an example, I will take a screenshot of the dashboard indicators, which I have already shown in this article.
Errors and methods for eliminating them displayed on the dashboard of the VAZ 2110
- If the oil in fuel indicator lights up, we recommend that you check it. To do this, open the hood of the car and look at the horn. If it is in the oil level, then most likely a chip has come off in the instrument panel itself.
- Your parking brake indicator (manual) has come on, most likely the problem is a broken cable.
- The battery charging indicator shows you errors associated with the generator. If it catches fire, I recommend checking your alternator belt (for a break). In general, this icon on the instrument panel indicates a malfunction in the vehicle's electrical system circuit.
- An engine malfunction (Check Engine) tells you that the engine is unstable.
- Additional engine health indicator
- Turning on left turn - information indicator
- Activation of right turn – information indicator
- High beam indicator - information indicator
- This indicator shows the brake fluid level. If a malfunction occurs, check for the presence of a fuel tank in your vehicle.
- This indicator shows the presence of fuel. If it catches fire, you have approximately 5 liters of gasoline left in the tank. I recommend you refuel.
Tidy indicator lamps 2110
Lamps 3 and 4 indicate that the direction indicators on the outside of the vehicle are turned on and they light up and flash immediately after the right or left indicators are turned on. At the end of the maneuver, the power key returns to its original position and the pointer should turn off automatically. If this does not happen, you should look for the reason in the return mechanism of the pointer switch key.
The lamp that deserves special attention is located in the center of the tidy and is indicated by the number 14 in our diagram. This is a warning lamp that signals malfunctions and incorrect operation of the electronic engine management system; it is otherwise called the Check Engine lamp, by analogy with imported cars. When this warning light is activated, computer diagnostics of the engine should be carried out and error codes identified. Some errors are removed by software, while others require intervention in the engine control systems: the power supply system, ignition and other systems that could lead to errors.
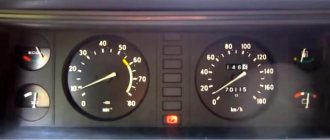
Number 12 in the diagram shows the digital odometer display and the daily mileage indicator, which is reset by a button located directly on the instrument panel. The top line shows the total mileage of the car, and the bottom line, which can be reset, shows the mileage for a certain period.
The instrument panel of the VAZ 2110 is a description of the lamps and indicators of which we will complete with simple and familiar warning lamps for any car:
- position 8 indicates the lamp for turning on the outside light;
- lamp number 9 indicates that the brake fluid level in the reservoir is reduced to a minimum;
- high beam - lamp 10;
- triangle under the number 13 - hazard warning lamp;
- position 18, as a rule, remains in reserve, and in cars equipped with airbags, there is a sensor activation lamp in this place.
The remaining warning lamps: handbrake, emergency oil pressure in the lubrication system and critical battery discharge are located in the bottom row in order. Let the hazard lights light up less often on your dashboard, better and cleaner roads for everyone!
Designations on the MK screen
The trip computer (MC), shown in the figure, is installed in a variant version instead of a clock. MK has 15 functions, divided into 3 groups. The group is selected using buttons 1, 2 and 3.
In each group, functions are divided into basic and additional. The main functions are navigated through the ring using buttons 1, 2 and 3. Additional functions are navigated through button 5. When the ignition is turned off, the computer is always in the “Current Time” mode. When the battery is removed, the clock progress and all accumulated parameters are retained for at least 1 month.
ADJUSTING THE COMPUTER FUNCTION Correcting the clock rate Press button 4 in the “Current time” mode. At the sixth signal of the exact time, press button 1, this resets the seconds and rounds the clock readings.
Setting the current time (calendar) Press button 4 in the “Current time” (“calendar”) mode. Use buttons 5, 6 to set the desired hour (day). Press button 4. Use buttons 5, 6 to set the desired value for minutes (month). Press button 4 to complete the time (calendar) setting.
Click on the picture to enlarge.
Setting an alarm
Press button 4 in Alarm mode. Use buttons 5, 6 to set the desired hour value. Press button 4. Use buttons 5, 6 to set the desired minute value. Press button 4 to complete the alarm setting. In the “Current time” mode, the alarm symbol will light up (the alarm is on).
Turning off the alarm
Press button 4 in Alarm mode. Press button 1 to turn off the alarm. “—.—” will appear in the digital digits, and in the “Current time” mode the alarm symbol will not light up (the alarm is turned off).
Adjusting the brightness of the indicator backlight
When the side lights are on, the illumination level is adjusted using the instrument scale illumination regulator. When the side lights are turned off, the backlight level is adjusted by software: - press button 4 in the “Traveling time with stops” mode. All single segments (pictograms) will be displayed on the indicator, which is a sign of the backlight level adjustment mode, and the digital digits will display a number corresponding to the backlight level as a percentage of the maximum value; — use buttons 5, 6 to set the required level of backlight brightness; — press button 4 to end the brightness adjustment mode.
Calibrating the fuel level sensor
To carry out the correction, it is necessary to drain all gasoline from the tank. Press and hold button 4 for more than 2 s in the “Fuel level” mode. A flashing number “0” will appear on the indicator. Press and hold button 3 for 1 s until a confirmation beep appears. After this, a flashing number “3” will appear on the indicator. Fill the gas tank with 3 liters of gasoline using a measuring container, wait the time necessary for the fuel level sensor to calm down, press and hold button 3 for 1 s until a confirmation sound appears. Continue this procedure until the maximum value is 39 l, after which the computer automatically exits the mode.
Installing an overspeed warning light
Press button 4 in the “Medium speed” mode. Use buttons 5, 6 to set the required speed threshold. Press button 4 to exit the overspeed alarm setting.
Options for replacing the standard BC
There are many models from different manufacturers on the car computer market. Unfortunately, most of them cannot be used for Lada Vesta due to incompatibility. But there are BC models that are adapted to various AvtoVAZ models and have proven themselves well. Such brands include Multitronics. The company produces on-board computers for a wide range of cars, with advanced diagnostic functions, navigation, audio and TV systems.
The models produced have various mounting options, and at the owner’s request they can be placed on a dashboard or secured in other convenient places. Below are Multitronics BC models with different types of mounting.
In addition to the above functions of a standard computer, Multitronics has very useful additional ones:
- Displays information about vehicle malfunctions, errors, their codes, and also duplicates this message in voice mode.
- Sends a voice notification to the driver about the need to refuel the car.
- Conducts quality control of the filled fuel and displays an alert on the screen.
- Reminds the driver to turn off the lights or low beams.
- It is a full-fledged navigator.
- Allows you to use multi-channel television.
- Automatically maintains the set temperature in the cabin.
The Multitronics on-board computer has a fairly large convenient screen, simple controls and a user-friendly interface. For owners of domestic cars and, first of all, for owners of various modifications of the Lada, a special model “Multitronics Comfort” has been developed.
Along with the BC models presented above, there is also computer equipment of the domestic brand "STAT" (Tolyatti), widely used on AvtoVAZ models. All of the company's products are adapted for installation on domestic cars, primarily Lada. The SHTAT brand BC has a backlit liquid crystal display and a convenient mount on the car dashboard. Below is a model of an onboarder from this company.
Connection of on-board computers is carried out by connecting the standard cable of the electronic control unit (ECU) to the OBD-II diagnostic connector in accordance with the instructions. After successfully installing the BC and connecting it to the ECU, you need to configure the onborder.
To do this, you need to start the engine and select a “custom” mode from the two offered on the display so that the type of ECU unit is automatically detected. To read sensor readings, you need to set “automatic selection” in the menu, and the computer will begin to receive information about all components of the car. Diagnostics will be carried out in accordance with the protocol corresponding to the machine model. The next stage is entering data into the BC that allows the computer to fulfill its functional purpose: the desired temperature in the cabin, the route and other parameters according to requests that will be displayed on the screen.
What standard trip computers exist?
Option 1. In the instrument cluster.
Option 2. Installed instead of a small plug next to the ACS unit
These were installed on “luxury” dozens. There are models AMK 211000 without diagnostics, and AMK 211001, AMK 211002 with diagnostics. You can find out which one you have by looking at the numbers on the back cover. To do this, naturally, the MK must be removed. If on the back there are the inscriptions AMK-211001 or AMK 211002, and in clock mode, when you press the “clock” button, the inscriptions Err appear and then two more - great. You have a full-fledged bookmaker.
If these are the inscriptions:
Unfortunately, this is a BC that either lacks diagnostic capabilities or has “cut-off” firmware.” Craftsmen resolder and reflash such models, but in my opinion they are not worth it.
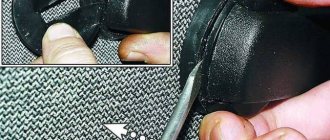
It is very easy to remove such a MK. Disconnect the negative cable terminal from the battery terminal. We pry it off with a screwdriver...
remove the MK from its seat....
....disconnect the wire block from it.
WHAT DOES THE ON-BOARD COMPUTER CAN DO?
To say that the on-board computer is capable of much would be to say nothing. The number of functions of the on-board trip computer measures in the dozens, and for some models exceeds a hundred. But let’s not be unfounded and let’s go through at least the main ones.
INSTANT TRIP COMPUTER PARAMETERS
The very first thing the on-board computer is capable of is displaying instantaneous parameters: current time, vehicle speed, engine speed, engine temperature, cabin temperature and outside air temperature, remaining fuel in the tank, on-board voltage, etc.
Many will argue that most of these values can be seen from the indicators on the instrument panel, and they will be wrong. The accuracy of readings from standard systems leaves much to be desired, and most importantly, cannot be corrected.
Let's say, when installing wheels of larger diameter, the speed of your car at the same engine speed will be higher. However, the stock speedometer doesn't know anything about your new wheels and will display incorrect information. While most on-board computers will allow you to make adjustments to the work and tell you the true speed value.
ROUTE PARAMETERS
With the on-board computer, information about current fuel consumption, average consumption per 100 km, fuel consumption for the current trip, travel time, and distance becomes available. Some bookmakers can not only display information about an already completed trip, but also help you plan a new one. For example, they will tell you the time required to cover a given path, calculate the recommended speed, tell you the required amount of gasoline or the number of kilometers that can be covered with the remaining fuel in the tank.
CONTROL OVER THE SITUATION
Being able to see a number of parameters on the screen is nice
However, it is important not only to see, but also to react in time to an emergency situation. Here, the ability of the on-board computer to constantly monitor a number of parameters and, if necessary, promptly signal their changes will be extremely useful.
For example, if the cooling system malfunctions or just on a very hot day, you may not notice that the engine temperature has exceeded the norm. In this case, there is a high risk of “boil”, which will ultimately result in serious problems for you and your car. The on-board computer will not lose control of the situation for a second and will immediately warn you about engine overheating with an audible signal.
In the same way, the on-board computer will monitor and warn about exceeding the recommended speed, about the value of the on-board voltage, about the danger of ice formation on the road, about the need for regular maintenance.
SERVICE FUNCTIONS AND ENGINE DIAGNOSTICS
For carburetor engines, a number of on-board computers allow you to perform the function of an octane corrector: introduce an advance angle correction when starting the engine and in operating mode, quickly change the angle when switching from gasoline to gas, use a multi-spark mode to facilitate engine starting, etc.
And for owners of cars with injection engines, the on-board computer turns into a personal auto mechanic who, before each trip, will diagnose the engine and car components and report the presence of problems and the reasons that caused them.