Replacement
The replacement procedure should not cause much difficulty for those who have independently repaired their car more than once, especially the suspension and chassis.
If you have no experience, then we recommend contacting a service station. Only proven and reliable.
Dismantling works
Replacement has its own nuances depending on the pillows for each engine in question. We will separately talk about the repair of 8 and 16 valve engines.
8 valve engines
- Select a flat surface for repairs, place chocks under the rear wheels, and turn on the handles.
- Remove the engine protection.
- Unscrew the bolts of the generator belt tensioner, after which this belt must be removed. You will need a 13mm wrench.
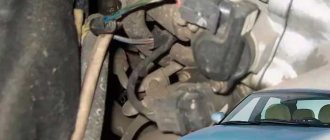
- Place a jack under the car, place a strong wooden board on top and lift the engine until it releases the load from the supports.
- Using a 15 wrench, unscrew the central fastening nut of the worn pillow.
- Now use a 13mm wrench to unscrew the airbag fixing bolts mounted on the bracket.
- From below, near the right arch, 3 more bolts are unscrewed. They are responsible for connecting the bracket to the spar. You need a 17mm wrench.
- The bracket is removed, the pillow is removed and replaced with a new one.
- Next, perform assembly in reverse order.
- Place the jack under the transmission and then lift it up.
- Using a 15 wrench, unscrew the nut of the central fastening of the left pillow.
- Using a 13mm wrench, unscrew a pair of bolts securing the support, after which it is removed.
- Replace the damaged element, and then carry out the reassembly procedure.
- Remove a pair of nuts with a 17mm wrench. They secure the cushion to the body. Then a couple more nuts connecting the cushion to the gearbox are unscrewed.
- Remove the rear support.
- Using a 17mm wrench, remove the fastening nut connecting the bracket to the cushion. A new rubber part is installed in place of the old element.
- The rear support is returned to its original state by reassembly.
16 valve engine
If you have a 16 valve engine under the hood, then there are some nuances for replacement.
On 8 and 16 valve engines, dismantling and replacing the side cushions is carried out in a similar manner, there is no difference. But the front lower ones change differently.
To change the front lower mount on a 16 valve engine, you need:
- Unscrew the front lower support rod fixing bolts in relation to the front suspension cross member. For these purposes, arm yourself with a 15 key;
- Unscrew the fastening nut that holds the support to the engine bracket. You will need a pair of keys at once and both are 15. The bolt is removed;
- Remove the support, change the cushion on it or replace the entire assembly;
- Reassemble;
- In the engine compartment, unscrew the fastening bolt of the upper front support to the car body, while holding its nut by hand. This is where the key for 17 comes in handy;
- Remove the bolt and nut;
- Remove the fastening bolt of the front upper support in relation to the power unit bracket using 15mm wrenches. The bolt and nut are removed;
- The support can now be removed, the pillow or the entire assembly can be replaced;
- Assembly is performed in reverse order.
Assembly of the unit
Additional support
Additional support
To mount an additional support on the 8-valve power unit installed under the hood of your VAZ 2110, you will need to purchase a special bracket used to transfer the ignition module.
Reviews from those who have performed such operations claim that when starting off the car does not jerk, the engine does not become loose, which has a positive effect on the wear of the cushions.
There are a lot of opinions regarding reducing vibrations. Some consider this a useless exercise, while others, on the contrary, note significant improvements in the behavior of the car.
Prevention measures
To prevent breakdowns, it is best to carry out periodic maintenance. This way you will spend much less effort and time on repairs.
Preventive measures include:
- Periodic check of bolt tightness;
- Removing dirt and oil traces from the rubber elements of the engine mounts with a dry rag;
- Regular repetition of these activities every 4 months.
In practice, even a relative beginner in the field of do-it-yourself repairs takes no more than 5 hours to replace engine mounts. But this allows you to develop your own skills, as well as save a decent amount of money on the services of service stations.
The lever is loose: do-it-yourself repair
To determine why the handle is loose, it must be removed. The work is carried out according to the following scheme:
- The lever holds the housing, so it must be removed, but the lever must remain in place. This operation is performed using the key at “13”;
We pull the casing, it is not secured by anything - Next, you need to unscrew the lever fastenings - two nuts. Sometimes the lever dangles due to weak bolt tension, so you should pay attention to this when dismantling;
- The next step is to remove the bolt, washer and bushing. These parts need to be lubricated with lithol;
- These elements must be inspected for deformation, chips or cracks. Most often the washer breaks. You can make it yourself, the main thing is that it matches the parameters of the bushing. It is best to cut washers from thick rubber;
Lever removal diagram - After checking the assembly, the lever can be assembled. If after assembly it still dangles, then the cushions are damaged.
Engine mount replacement process
We remove the protection from the engine to make it easier to reach the necessary parts. First of all, you need to fix the engine with a jack; this can be easily done in the inspection hole by placing a crossbar from a large board so that it supports part of the weight of the engine. This is done so that when you unscrew the support, the engine will sag and there will be nothing to support it.
Raising the engine as much as possible so that it is convenient to unscrew the mounting bolts, remove the mount. In the reverse order, we install the new pillow, tighten the bolts well and move on to the rear pillow, this is where the dance with the tambourine begins, since as the car moves, it bears the heaviest load. As a result, not only the fastener itself, which is not the same in shape as the previous ones, bends, but also the fastening bolts are deformed.
It will no longer be possible to lift the engine; it is better to tie it to a beam from above or put a crossbar on the glasses and tie the engine to it, having previously lifted it with a jack. Some vehicles will require you to remove pants or other parts that may interfere with replacement. If the fastening bolt is severely deformed, you will have to cut it off with a grinder, otherwise there is no way to unscrew it, some drivers straighten the bolt, but this does not last long, after a while you will have to align it again or replace it with a new one.
In order to remove the cushion from its seat, lubricate it with oil or WD-40; often, due to dirt, the cushion can simply rust to the frame. An important point is the installation; on the rear cushion there is a guide, or in other words, an arrow that indicates the direction of movement of the car; it should not be confused, as after a while it may break again. Having assembled everything in reverse order, we move on to the right engine mount. This support also has a problem with deformed bolts, but the main problem is the generator or air conditioning compressor. As we remember, it is not recommended to remove the air conditioning compressor, since as a result of depressurization all the freon will come out, and refilling will cost even more than the airbags and replacement.
For most foreign cars, the right airbag is located closer to the right front, so the right headlight and radiator grill are often removed, thus simplifying the replacement procedure.
Having made room for removing the cushion, we are faced with the problem of deformation of the bolts; there is no way to cut it with an angle grinder, as it can damage adjacent parts or you simply won’t be able to reach the bolts. I would advise you to take a hacksaw and slowly cut off the bolt; although the procedure is long, it will still not damage the adjacent parts. Having removed the pillow, install a new one in the reverse order; be careful with the radiator, as you can cut your hands on its honeycomb.
Replacement features
If the vibration from the engine is very noticeable, then you need to change the pillow. Some car owners neglect this procedure, believing that the vibration can be tolerated, but this will not make the car drive any worse. This is a fundamentally wrong position, since constant vibration will lead to the destruction of engine attachments, as well as to breakdown of the gearbox.
When replacing engine mounts, you can go to a service station, but it will cost a decent amount. For those who want to save money, it is recommended to replace the engine mounts yourself.
Checking the performance of engine mounts
The engine mounts must not show any visible damage.
Before you begin work on replacing the engine mounts, you need to make sure that they are the cause of the engine vibration. To do this you need to do the following:
- The car must be placed on special supports.
- Place a jack under the oil pan. To avoid breaking through the oil pan, you need to place a board or timber on the jack platform.
- Next you need to lift the engine up. Lifting must be continued until the cushions are completely freed from the weight of the engine.
- To avoid injury, you need to place another support next to the jack. This will hold the engine if the jack comes off.
- Next you need to check the condition of the engine mounts. Both the metal base of the pillow and the condition of the rubber are checked.
- If everything is visually in order, you need to check if there is any play between the frame and the plates.
If you're lucky, the repair may be limited to tightening the fastening nuts. In more complex cases, the pillows will need to be replaced, since they cannot be restored.
Selection of engine mounts
Buying new engine mounts for the eight-valve VAZ-2110 engine is not difficult. Any auto store will provide you with a catalog where you can find both original parts and their analogues. Here is a list of original mountings for an 8-valve engine:
- The right side pillow has the article number 21100-1001204-82.
- Left side pillow - 21100-1001240-82.
- Rear cushion - 21100-0-1001280-82.
Do I need to change
There are no recommendations for replacing pillows depending on their service life, but once you determine that they are faulty, you should not delay replacing them. Vibration processes can not only worsen the comfort of the driver and passengers, but also lead to destructive processes in the engine or gearbox itself.
Having decided to repair the engine mounting elements, you need to decide whether you will change the cushions themselves or the mounts assemblies. In principle, if the metal support itself is not damaged, it can be left, replacing only the pillow.
The price of a set of pillows for a VAZ 2110 costs around 1,300 rubles. The cost of a complete set of supports is about 2,500 rubles.
For the work of replacing engine mounts or mounts at a service station, you will be charged at least 300 rubles for each.
Alternative supports
Considering the long-standing problem of Samara and a dozen, the manufacturer immediately released a whole series of alternative pillows:
- OJSC-BRT;
- SS-20;
- "Assomi".
Let's now consider their features:
- The support of JSC-BRT and the peculiarity of its structure is contained in a hinged product, which replaced the bearing in this place. At first glance, it looks like a panacea, since the general principle of operation seems to be clear: the creators of this technical innovation used an element that has increased rigidity in the radial direction. At first glance, the sounds should disappear and the car should become silent on uneven roads, however, conflicting reviews from the motorists themselves do not allow us to completely agree with this fact.
- An alternative to OAO-BRT is SS-20, where a steel bushing was installed in place of the standard bearing, which was completely welded into a rubber damper. The manufacturer of this new product claims that the SS-20 will completely eliminate the appearance of elevators and extraneous sounds. Moreover, the manufacturer directly promises that the SS-20 will be able to guarantee the classic behavior of the rocker (see Replacing the rocker on a VAZ 2110 on your own): regardless of the topography of the road surface, the lever will be stable and without extraneous sounds.
- The developers of "Assomi" boldly claim that the use of a special prescription rubber mixture will completely smooth out all impacts and sound noise, thereby significantly increasing the overall level of comfort of the car.
So, you need to choose who to trust, because there are a huge number of manufacturers to choose from, who all guarantee the high quality of their products. And most importantly, they guarantee that they managed to create a universal high-tech product that is most effective from a practical point of view.
Note. But it’s not entirely clear why some manufacturers of backstage cushions use rubber ears that quickly break?
Practical Feature of Alternative Choice
Unfortunately, “Assomi” and SS-20 are quite difficult to find in local stores; in the future they will go on wide sale, however, it is impossible to answer exactly when this will happen. It all depends on the store owners. The motorist is mainly offered imported products, as well as from national manufacturers, but only standard ones. It should be objectively understood that the quality of imported products varies significantly in comparison with national standard factory models, as does the price. Therefore, if you are pressed for time, it is best to order your own national alternative via the Internet, which is much lower in price than its foreign counterpart, and the quality is almost identical.
When to change your pillow
Factors that indicate the need to replace the wing cushions:
- extraneous sound during movement, the irradiation of which can even spread to the body of the vases;
- traces of hardening or cracking of the rubber cushion are visible, as well as if it is separated from its metal base;
- there is a pronounced increasing vibration that has not previously been observed;
- in case of unsatisfactory backlash length, etc.
Signs of breakdown
In fact, it is not difficult to determine that the backstage is the culprit of all the troubles. After all, there are a number of characteristic signs that indicate this.
You can prepare to work on adjusting or replacing the rocker if:
- The first gear does not want to stubbornly engage or disengage, or move to another position;
- When you engage first gear, initially the gearshift knob behaves normally, but then the box spontaneously jumps into reverse gear;
- You cannot engage first and/or fifth gear, while changing to other speeds is no problem.
At the first sign of a problem, you should go to a service station or your own garage to have the problem repaired.
| Sign of breakdown | Explanation |
| There is play on the gear lever | Most likely the linkage is worn out. In this situation, the problem can only be solved by replacing the worn element |
| The ringing of the scenes | It occurs most often when there are problems with the gearbox on a VAZ 2110. The ringing can be caused by defects in factory production, or by poor-quality repairs |
| It’s hard to engage the gearbox, it gets knocked out | In such a situation, you can try two methods - adjustment and replacement. If the adjustment does not help, change the element |
| Instead of first gear, reverse gear is engaged | Everything is fine with the lever, but the rocker let you down. Make a replacement. Although repairs using a repair kit can also help |
| Lever vibrates excessively | Check the condition of your transmission handle joints. Most likely, there was a serious backlash in them |
READ Where is the alarm on the VAZ 2110
Signs and causes of malfunction of VAZ 2110 engine mounts
- A strong hum in the cabin while the engine is running often indicates hard contact of the power unit with body elements. This phenomenon usually indicates the destruction of one of the supports on which the motor and gearbox connected together should rest. If their rubber cracks or even breaks away from the metal base, then the power unit receives an additional unwanted degree of freedom, creating noise.
- A dull knock can also be heard when driving away sharply, due to the engine being misaligned on torn mounts.
- In turn, the torn support is “given away” by a dull knock. every time you press the accelerator and every time you release the gas and switch to engine braking mode.
Sometimes the problem of extraneous sounds lies in the pressed, deformed crankcase protection. After going outdoors, dirt may accumulate in the gap between the adjacent protective sheet and the pan, which also leads to the appearance of an extraneous hum.
The appearance of so-called fatigue cracks in the engine support, which form over time, is also considered critical. They are usually identified by careful inspection of the pillows.
Are the instructions useful? Yes 2 No
Comfort inside a car depends on many factors, one of which is sound insulation. Body vibration is an important component, which depends on the suspension, the quality of the road surface, and also on engine operation. Engine mounts are designed to reduce vibrations on the body. Let's figure out how to replace engine mounts with your own hands.
Replacing the right engine mount for VAZ 2110, 2111, 2112
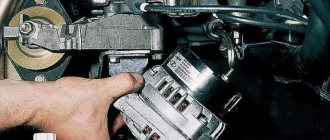
Removing the engine mount is shown using the example of a VAZ-2112 engine. For VAZ-2110, -2111 engines the process is similar. Remove the alternator belt, loosen the bolt securing the alternator to the engine (key 13). We loosen the bolt that secures the tensioner bolt and loosen the generator belt tensioner. We install a jack under the engine crankcase and jack it up.
- Unscrew the nut securing the pillow (Wrench 15).
- We unscrew the two bolts securing the pillow to the bracket (key 13).
- We unscrew the three bolts securing the bracket to the right side member (head 17).
- Remove the bracket (photo taken with the engine removed).
Having unscrewed the nut, as shown in photo 1, remove and replace the pillow.
Replacing the left engine mount for VAZ 2110, 2111, 2112
We install a jack under the gearbox and thereby raise the engine:
- Unscrew the nut of the left support of the power unit (with a 15 wrench). Holding the gearbox, lower it to the stop.
- Remove the upper cushion stop.
- We unscrew the two bolts securing the pillow to the body (using a 13 key).
- We remove the pillow.
We remove the lower stop of the cushion and take out the pin with flats that prevent it from turning in the gearbox bracket.
Replacement of rear engine mount VAZ 2110, 2111
Installing a jack under the gearbox:
- We unscrew the two nuts securing the rear support to the body (head 17).
- We unscrew the two bolts securing the support to the gearbox (with two 19mm wrenches) and remove the support.
- To disconnect the rear support bracket and the cushion, unscrew the bolt (with a 19mm wrench) and hold the bracket in a vice.
- We take out the bolt. We assemble the bracket and pillow in the reverse order, observing the perpendicularity of their mating surfaces and the correct location of the stops.
By the way, the absence of this gearbox support on a 16kL engine significantly increases the rattling of the gearbox lever.
Replacing the front lower engine mount of a VAZ 2112
- Remove the engine splash guard. We unscrew the bolt securing the front support rod to the front suspension cross member (with a 15mm wrench).
- We unscrew the nut of the bolt securing the rod to the front support bracket (with two 15mm wrenches), remove the bolt.
- We remove the support. Installing the front support is not difficult if the remaining supports of the motor unit are secured in place. You only need to rock the engine slightly to align the holes.
This airbag is not installed on VAZ 2110 engines.
Replacing the front upper engine mount of a VAZ 2112
- We unscrew the bolt securing the rear support rod to the body (Using a 17 wrench), holding the cage nut so that it does not fall out of the box.
- We take out the nut and bolt.
- Unscrew the nut of the bolt securing the rear support rod (with two 15mm wrenches), remove the bolt
- We remove the barbell.
This airbag is not installed on VAZ 2110 engines.
Anyone who has at least once encountered minor car repairs can remove engine mounts on their own. The main thing is to follow the sequence of actions and, in some cases, jack up the gearbox.
By the way, in addition to the standard engine mounts, you can install additional support.
Purpose of additional support
Car enthusiasts install an additional engine mount, the price of which is acceptable for most drivers in our country. Russian automakers advertise the product as a product of the AvtoVAZ design bureau and position the product as a necessary component of the Tens engine mount. It is activated when the brake system is used and when the vehicle is quickly started.
Experts believe that the use of such an additional rod leads to an increase in the overhaul life of the front wheel drive complexes and the exhaust system, and also enhances the dynamic performance of the vehicle during acceleration. This additional support for the VAZ 2110 engine serves to limit the displacement of the engine in the longitudinal plane.
Replacing the wing cushion with your own hands
Begin:
- we place the car on the overpass;
- we go into the salon;
- remove the cover and the plastic handle on top;
- Use special pliers (platypus) to remove the retaining ring;
- we climb under the car;
- The rocker pad is held in place by four nuts that need to be unscrewed.
Note. It is worth noting that the standard ring can be removed very easily, because it has special lugs. If you bought a new imported set of backstage cushions, then there is another locking ring without ears, but it is better not to install it, but to use the old one.
After replacement, defects in the backstage support are not detected in most cases. Assembly is carried out strictly in the reverse order: a support is installed, which is secured with nuts. It is necessary to consolidate the above listed theoretical aspects of replacing the backstage cushion with the help of photo and video materials. Instructions on how to do the replacement yourself will be most effective if you have some visual reinforcement. In most cases, the price of the issue is small, but everything depends directly on the quality of the part itself. You can also find out about replacing the short-stroke rocker on our website.
Replacing engine mounts on a VAZ 2110
Tolyatti "tens" were equipped with engine mounts of good quality. The average service life before repair could be 100-150 thousand km. Today, these cars have several times more mileage and some still have their original bearings. The main thing is that the importance of the functionality of damper parts is underestimated by car owners. As a result, replacing the VAZ 2110 engine mounts has been shelved. Some drivers don't realize that in addition to discomfort from vibration, damage to the transmission can be caused. And this will entail more serious expenses for repairs.
On a note! It is possible to replace the airbags with your own hands on a VAZ 2110 (engines with 16 and 8 valves) in 6 hours. The repair schemes are almost completely identical. The only difference is the number of parts. V-1.6 engines have 4 supports, instead of 3 on the simpler V-1.5 engine.
Signs and causes of malfunction of VAZ 2110 engine mounts
- A strong hum in the cabin while the engine is running often indicates hard contact of the power unit with body elements. This phenomenon usually indicates the destruction of one of the supports on which the motor and gearbox connected together should rest. If their rubber cracks or even breaks away from the metal base, then the power unit receives an additional unwanted degree of freedom, creating noise.
- A dull knock can also be heard when driving away sharply, due to the engine being misaligned on torn mounts.
- In turn, the torn support is “given away” by a dull knock. every time you press the accelerator and every time you release the gas and switch to engine braking mode.
Sometimes the problem of extraneous sounds lies in the pressed, deformed crankcase protection. After going outdoors, dirt may accumulate in the gap between the adjacent protective sheet and the pan, which also leads to the appearance of an extraneous hum.
The appearance of so-called fatigue cracks in the engine support, which form over time, is also considered critical. They are usually identified by careful inspection of the pillows.
Are the instructions useful? Yes 2 No
Comfort inside a car depends on many factors, one of which is sound insulation. Body vibration is an important component, which depends on the suspension, the quality of the road surface, and also on engine operation. Engine mounts are designed to reduce vibrations on the body. Let's figure out how to replace engine mounts with your own hands.
Replacing the right engine mount for VAZ 2110, 2111, 2112
Removing the engine mount is shown using the example of a VAZ-2112 engine. For VAZ-2110, -2111 engines the process is similar. Remove the alternator belt, loosen the bolt securing the alternator to the engine (key 13). We loosen the bolt that secures the tensioner bolt and loosen the generator belt tensioner. We install a jack under the engine crankcase and jack it up.
- Unscrew the nut securing the pillow (Wrench 15).
- We unscrew the two bolts securing the pillow to the bracket (key 13).
- We unscrew the three bolts securing the bracket to the right side member (head 17).
- Remove the bracket (photo taken with the engine removed).
Having unscrewed the nut, as shown in photo 1, remove and replace the pillow.
Replacing the left engine mount for VAZ 2110, 2111, 2112
We install a jack under the gearbox and thereby raise the engine:
- Unscrew the nut of the left support of the power unit (with a 15 wrench). Holding the gearbox, lower it to the stop.
- Remove the upper cushion stop.
- We unscrew the two bolts securing the pillow to the body (using a 13 key).
- We remove the pillow.
We remove the lower stop of the cushion and take out the pin with flats that prevent it from turning in the gearbox bracket.
Replacement of rear engine mount VAZ 2110, 2111
Installing a jack under the gearbox:
- We unscrew the two nuts securing the rear support to the body (head 17).
- We unscrew the two bolts securing the support to the gearbox (with two 19mm wrenches) and remove the support.
- To disconnect the rear support bracket and the cushion, unscrew the bolt (with a 19mm wrench) and hold the bracket in a vice.
- We take out the bolt. We assemble the bracket and pillow in the reverse order, observing the perpendicularity of their mating surfaces and the correct location of the stops.
By the way, the absence of this gearbox support on a 16kL engine significantly increases the rattling of the gearbox lever.
Replacing the front lower engine mount of a VAZ 2112
- Remove the engine splash guard. We unscrew the bolt securing the front support rod to the front suspension cross member (with a 15mm wrench).
- We unscrew the nut of the bolt securing the rod to the front support bracket (with two 15mm wrenches), remove the bolt.
- We remove the support. Installing the front support is not difficult if the remaining supports of the motor unit are secured in place. You only need to rock the engine slightly to align the holes.
This airbag is not installed on VAZ 2110 engines.
Replacing the front upper engine mount of a VAZ 2112
- We unscrew the bolt securing the rear support rod to the body (Using a 17 wrench), holding the cage nut so that it does not fall out of the box.
- We take out the nut and bolt.
- Unscrew the nut of the bolt securing the rear support rod (with two 15mm wrenches), remove the bolt
- We remove the barbell.
This airbag is not installed on VAZ 2110 engines.
Anyone who has at least once encountered minor car repairs can remove engine mounts on their own. The main thing is to follow the sequence of actions and, in some cases, jack up the gearbox.
By the way, in addition to the standard engine mounts, you can install additional support.
What is needed for repairs
Content
First, you need to determine which support on the VAZ 2110 engine should be changed (if you do not want to change all the damper mounts at once). To do this, you need to do an independent inspection of these parts. Sometimes, the power plant seems to be tilted horizontally on one side or tilted along the central axis of the car. This is the first sign to replace the damper mounts.
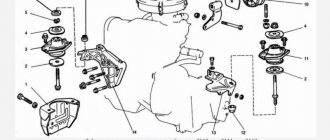
| Locksmith kit | Rolling jack |
| A couple of short boards | Angle grinder (grinder) |
Two cushions (side) secure the engine to the left and right side members in the engine compartment. And one (rear) fixes the motor to the bottom. Therefore, it is necessary to lift the machine on a lift or install it on a viewing hole. The wear is immediately visible. The rubber has tears and core failure. Depending on the result of visual diagnostics, you should purchase the required number of parts for installation.
You will need a tool. In most cases, a standard locksmith set consisting of open-end and box-end wrenches with heads will be sufficient. In addition, to replace engine mounts on a VAZ 2110 you will need a rolling jack and a pair of short boards. It is advisable to have electricity and a cutting machine with a disc, since you may have to cut off the mounting bolts.
Helpful information! A couple of hours before repairs, it is strongly recommended to apply universal lubricant “Liquid Key” to the threaded connections. Damper supports are changed very rarely, therefore, unscrewing them without prior preparation is quite difficult.
Left support - removal and replacement
- We drive the car into a pit or onto an overpass;
- Remove the engine splash guard (protection);
- We install a jack under the gearbox (it is better to place a small wooden block between the jack and the gearbox) and lift the box slightly, thereby freeing the left support;
Take a 15mm socket wrench with an extension and unscrew the support stud nut;
Remove the upper support stop;
We release the jack a little so that the box drops slightly and remove the support pin;
After this, using a 13mm socket wrench, you need to unscrew the 2 bolts that secure the support cushion to the body bracket;
Slightly move the cushion towards the engine and remove it;
Remove the lower support stop.
Installation of the new left support (cushion) must be done in the reverse order. To prevent the pin from turning, you need to make sure that its protrusions fit into the oval hole in the gearbox housing bracket.
Auto repair school – DIY car repair
Jun 25, 2021 VAZ 2108, VAZ 2109, VAZ 2110, VAZ 1117 Kalina, VAZ 2170 Priora by admin
On VAZ-2110, VAZ-2111, VAZ-2112 cars, when unpleasant rattling, vibration and increased play in the gearshift knob appear, the happy owners of these vehicles should pay attention to the condition of the ball joint race of the gear shift link or as it is also called in common parlance gear shift pad . There is another option - backstage butterfly . But, I personally like the second option))). Due to the fault of this very pillow (ball joint cage) being completely broken, the clarity of gear shifting may also disappear. Yes, I know that all the listed symptoms also include a broken cardan (joint) of the gear selection rod. What kind of cardan is this and how to replace it you can find out from this article. But we’re not talking about him now and let’s assume that everything is ok with him. Or, as another option, the cardan was replaced, but the rattling and play of the rocker did not disappear. This also happens; not everyone immediately pays attention to the backstage cushion. But, it exists and it periodically fails (breakage of rubber “ears”, ejection of metal bushings, breakage of a plastic bushing or spring). The destruction of the rubber part of the cushion (ball joint race) of the rocker is not difficult to replace (see photos 1 and 15). And if you find them, then it’s time for you to get ready for work. Let me reassure you right away, it’s not complicated. But for everything to go smoothly, you need to be thoroughly prepared. That is, buy the necessary spare parts, decide on the location of the work, assemble the necessary tools and, of course, familiarize yourself with and remember in what sequence you should replace the cushion (ball joint race) of the gear shift lever on VAZ-2110, VAZ-2111, VAZ- 2112 . And I will try to help you with this, and I invite you to further read this material.
Spare parts. Here the choice is obvious. I recommend choosing the ball joint clip for the gearshift mechanism of VAZ 2110-2112 cars - BRT (Balakovo) . As they say, time-tested quality. Photo 2.
List of tools that you will need to replace the cushion (ball joint race) of the gearshift slides of VAZ-2110, VAZ-2111, VAZ-2112 cars : a 13-socket and socket wrench, a 10-size combination wrench, pliers, a flat-head screwdriver and a small ratchet with with a cross attachment (photos 3 and 4). The need for a ratchet with an attachment will be shown a little later. And you should immediately decide on the location of the work. It is advisable to replace the cushion in an inspection pit, overpass or lift. Why is it desirable? Because this work can be done “from the ground”, but believe me, it will take more time and effort. And it will still be a pleasure.
And so, into battle! Let's proceed to independently replacing the cushion (ball joint cage) of the gearshift mechanism of VAZ-2110, VAZ-2111, VAZ-2112 :
1. Let's start working inside the car. Use a screwdriver to pry up the frame of the decorative cover of the gearshift slide (photo 5). Pull the lever handle up and remove it along with the cover.
2. Using a 10mm spanner, unscrew the two fastening nuts and the bolt of the reverse lock bracket lining and remove it (photos 6 and 7).
3. Using a 13mm wrench, unscrew the lever axle nut (photo 8). After this, use a wrench with an attachment (in my case it’s a ratchet) to unscrew the axle locking screw (photo 9). Without such a key, this screw will be difficult to unscrew. We take out the axle (photo 10). We remove the set of bushings from the lever, otherwise we risk losing them (photo 11). All. Now the work inside the car is finished, let's climb under the car.
4. Using a 13 mm socket wrench, unscrew the two nuts of the rocker pad bracket (photo 12). And remove the bracket.
5. Next, you should disconnect the reaction rod from the cushion (ball joint cage) of the rocker. We use a spanner wrench (hold the nut on top with it) and a 13mm socket wrench (photo 13).
6. Pull down the pillow along with the lever (photos 14 and 15). Remove the retaining ring (photo 16) and remove the lever along with the plastic bushing (photos 17 and 18).
7. That's it. We clean the lever hinge from dirt, lubricate it, and put on a plastic bushing. We place this whole thing in the pillow body and secure it with a locking ring (photos 19 and 20). We return this entire structure to its place (photo 21). Don't forget to put a cover on the pillow (photo 22).
Ready. We carry out the rest of the assembly in reverse order. The work on replacing the butterfly cushion (ball joint cage) of the gearshift gates of VAZ-2110, VAZ-2111, VAZ-2112 cars has been completed. I hope it’s successful))).
When using an article or photographs, an active direct hyperlink to the website www.avtorem.info is required!
Did you like the article? Share it on your page!
We repair competently: how to change the damper mounts of a VAZ 2110 engine and video of work processes
Replacing bearings is, of course, more troublesome than adjusting the clutch. but if you have the skills and a minimum set of tools, it is quite feasible without the help of car service specialists. To work, you will need a jack and a set of wrenches; you also need to take WD-40 fluid in advance - it is possible that the connecting elements are covered with rust. To perform a cycle of work, you need an inspection hole or a lift.
Replacing the right damper support
Before changing the right engine mount of a VAZ 2110 car following the video example, you should install wheel chocks and also disconnect the negative terminal from the battery. The further process is carried out according to the following scheme:
- Loosen the generator fasteners with a 13mm wrench and remove the belt drive.
- Loosen the tensioner bolt.
- Jack up the right side of the car.
- Using a 15mm wrench, unscrew the nut securing the support.
- Using a 13mm wrench, unscrew the two bolts securing the support to the bracket.
- Using a 17mm socket, unscrew the three bolts securing the bracket to the right side member.
- Remove the bracket and install the new support in the reverse order.
Replacing the left damper support
The procedure for changing the engine damper on the left side of the car is performed in the following order:
- Remove the car crankcase protection.
- Place a jack under the car in the area of the gearbox, place a wooden beam and lift the car, removing the load from the support.
- Using a 15mm socket and a wrench, unscrew the support pin fasteners.
Release the support stop. Lower the jack slightly to freely remove the support pin. Using a 13mm socket, remove the fasteners of the engine support to the body. Pull the support towards the motor. Remove the lower support stop and install the new part in the reverse order.
Replacing the rear damper mount
Read how to change the rear engine mounts on a VAZ 2110 car and watch the video - that’s half the battle
It is important to strictly adhere to the order of repair work:
- Remove the engine crankcase protection.
- Using a 17mm socket, unscrew the two nuts securing the support to the car body.
- Using two 19mm wrenches, unscrew the two bolts securing the gearbox and remove the support.
- Clamp the removed bracket in a vice and use a 19mm wrench to unscrew the bolt securing the support.
- Remove the bolt and install a new rubber support in the bracket.
- Assembly of the unit is performed in the reverse order while maintaining the perpendicularity of the mating planes.
Based on practical experience, it can be argued that the process of replacing the damper supports of the power unit on the “ten” is not particularly difficult. Usually, after repair, vibrations disappear, but if everything remains unchanged, then the solution to the problem may lie in a different plane. It makes sense then to look for a problem in the suspension or in the CV joint components.
Design and technological features
Since in the “fourteenth” model the entire load from the engine falls on the front suspension, accordingly, the chassis is made of materials with an increased margin of safety, and its design must strictly comply with established standards. Durable rubber mounts of the VAZ-2114 engine are used as a damper for vibrations of the power unit under various loads.
Since high demands are placed on this part, it is extremely important to purchase only original and certified supports, since only they are suitable for use in our conditions.
In the design of the front part of the car frame and its suspension, the engine mount is one of the important elements, while its independent replacement is quite within the capabilities of a car owner who has even the most minimal concepts in plumbing.
The main thing in the repair process is to complete the entire technological sequence of actions, then the installed part will serve for a long period of time.
The appearance of sound, play and creaking
Generally speaking, the appearance of sound in the wings indicates either wear or the initial low quality of the cushion, and both options are essentially equivalent, since there is only one way out - replacing the wing cushion of the VAZ 2110. Many VAZ cars, due to the structural features of the design, often have the support is, to put it mildly, not of high quality. This fact becomes obvious when the car is not driving on a level surface. The sound is so noticeable that it becomes noticeable even to the driver who is in relative sound isolation.
Note: If you hear a sound in your car that was not there before, you should visit a technical service department or your own garage as soon as possible to determine the cause of the defect. Since if the defect is not identified immediately, the economic costs will be many times higher. Because the best way to fight is prevention in the first place.
The insidiousness of knocks lies in their irradiation onto the body, and often they even reach directly into the cabin itself. In this case, the gearshift knob rattles so much that it is not very pleasant. Propagation of sound and ways to solve the problem is a separate technical chapter. This article is devoted to the rocker pad, which creates many unnecessary technical problems, including poor gear engagement.
Diagram, design of the VAZ 2110 gearbox. Replacing the airbag, signs of malfunction.
Manual gearboxes have proven themselves to be reliable and unpretentious devices, but even such “hardware” can have faults. Finding the problem can be quite difficult, since there are a lot of parts in the VAZ 2110 gearbox. After reading this material, motorists will be able not only to identify a defect in the operation of the gearbox, but also to independently study how the circuit is designed, the design of the VAZ 2110 gearbox and solve the problem. As an example, we will consider the most common malfunctions that owners of “cans” have to face.