After replacing the wheel bearing, an important moment comes - tightening. It is necessary to clamp not with “bare” hands, but using a special device - a torque wrench. Since the service life of the equipment and the quality of control of the technical equipment directly depend on the completeness of the tightening.
Each vehicle has its own wheel bearing tightening torque. It is clearly described in the instruction manual. If for some reason the manual is lost, you need to use the Internet or contact the nearest auto repair shop for clarification.
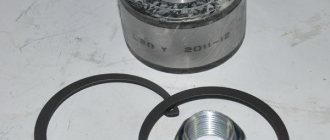
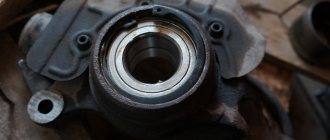
Wheel bearing tightening
The wheel bearing tightening torque is the actual force with which the hub nut is clamped. Force is measured in N/m or kg/m, depending on the magnitude and conversion task.
Each bearing in its design has a slight axial clearance. It is necessary for the correct operation of the mechanism, namely:
- to prevent sideways movement;
- reducing the actual friction force;
- uniform distribution of thermal expansion;
- voltage distribution;
- increasing the contact area.
How are alloy wheels tightened?
To perform such a scrupulous procedure, a special tool is used - a torque wrench. Mechanics also use pneumatic impact wrenches at service stations. And at home, drivers use a wheel wrench.
In order for the casting to fit perfectly on the car, it is necessary to select wheels according to individual parameters. For example, in the online store DiskiPlus.ru you can use a special search field by size and make of car and buy alloy wheels that are optimally suited for your “iron beast”.
First of all, you should pay attention to the diameter of the wheel, its width, and then to the design. The number of holes along the rim is also important. They must necessarily have cone-shaped recesses, which are necessary for centering the disk on the hub with bolts and nuts. The number of such holes can be different - from 4 to 6. Some models have more than six.
For different types of alloy wheels, the tightening of wheel fasteners is not the same. It differs in the sequence of actions. So, rims with 4 holes must be installed in the order 1-3-4-2, and rims with five bolts are secured in the order 1-4-2-5-3, but for rims with six nuts the option 1-4-5 is suitable -2-3-6.
Disc tightening rules
First try on the disc, make sure it fits completely. Then slide it onto the tab in the center of the hub and guide the studs into the corresponding holes. Then feel free to tighten the bolts by hand as tightly as you can and tighten them with a wheel wrench.
The parts are tightened strictly in the order that corresponds to the number of holes in the rim.
It is better to install the disk on a suspended wheel. Using a standard tool, all fasteners are tightened, taking into account the torque.
After removing the wheel from the jack, we carry out a final check.
- ✅ Contents of the article:
- 1. At what torque should you tighten and adjust the hub nut?
- 2. Tool for properly tightening the hub nut
- 3. Tightening method without a torque wrench
- 4. Useful videos on the article
The front wheel bearing torque is the force with which the hub nut is tightened. Units of measurement – N*M (or kgf*m). The front bearings have internal axial clearance, which is necessary for proper operation of the bearing, namely:
- preventing angular displacement of rings;
- reduction of friction of rolling elements and raceways;
- correct distribution of internal stresses on separators and cages.
- compensation of thermal expansion.
- increasing the contact angle for axial loads.
In turn, the axial internal clearance of a double-row ball bearing is the amount by which the inner rings move relative to the outer one. In order for the axial clearance to be within the tolerance, the ball bearing (or roller) is adjusted, this is done by correctly tightening the hub nut.
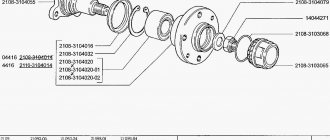
Familiarize yourself with the mounting and arrangement of the bearing with the front hub, as well as with the design of the wheel ball bearing.
The video also shows the process of adjusting the backlash by the locknut tension level:
How to properly tighten a wheel bearing
The tightening value of the front and rear bearings is calculated based on a number of factors, such as:
- Minimum and maximum allowable size (parameter) of the bearing.
- The amount of axial clearance.
- Type of thread pitch (large or small).
The above list of data is of a template nature and in each specific situation may be supplemented by new factors. However, the above reasons remain the same, regardless of the situation.
Selecting the type of tapered roller bearings in different sizes
First of all, it is worth looking at the nature of the load: the more directions in which it is perceived, the more reliable the mechanism will work. It is also important to take into account the strength of the tension: the least dangerous is what is distributed evenly, but with heavy impact impacts, you need the most durable assembly unit.
The next key parameter is speed: in general, the higher the number of revolutions per minute (while maintaining accuracy), the better. In this case, it is necessary to pay attention to how the movement occurs, oscillatory or in one direction, and at what speed it is carried out, constant or variable.
Naturally, you need to focus on how long the selected tapered, single-row or double-row roller bearings will last. Looking at the resource declared by the manufacturer, it is worth understanding that this is a complex indicator that depends on a number of factors. These include friction, rigidity, distortion compensation, resistance to shock and vibration.
When choosing, be sure to take into account that during operation, all of the above types of assembly units are relatively noisy. Think about how acceptable this is for the mechanism used, and whether this fact will interfere with the work process. Also check whether the model you like can be used as a floating or fixed element - versatility has never been superfluous.
All other things being equal, also focus on the breadth of applications and cost - saving without losing quality is quite possible.
For clarity, we present important parameters in comparison format:
| Bearing type | CR Single row angular contact conical | CRD, CRI, CRO Double row sludge four row thrust conical roller | CRT Single thrust tapered roller | CRID Double thrust roller conical |
| Perceived load | Radial one-sided axial, combined | Radial, double-sided axial, combined | Single-sided axial | Double-sided axial |
| Speed, nxd | up to 400,000 (normal accuracy) up to 1.25 million (highly specialized) | up to 350,000 | — | — |
| High rotation accuracy | + | + | 0 | 0 |
| Low noise | + | + | 0 | 0 |
| High rigidity | ++ | +++ | ++ | ++ |
| Resistant to vibration and shock | + | ++ | ++ | ++ |
| Compensation for distortions | 0 | 0 | 0 | 0 |
| Use as a floating bearing | X | 0 movement along the inner or outer ring | X | X |
| Use as a locating bearing | +++ Axial fixation in one direction only | +++ Axial fixation in both directions | ++ Axial fixation in one direction only | ++ Axial fixation in both directions |
| Application | Automobiles, mechanical transmissions, machine tools, etc. | Automobiles, mining equipment, metal rolling machines | Mining equipment and metal rolling machines, pulp and paper and oil production equipment, energy, polymer production, etc. | |
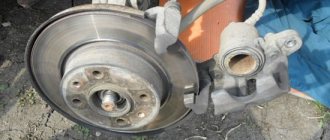
How to tighten a wheel bearing
To carry out preventive and repair work, it is customary to use a torque wrench. This practice exists in service stations. A device with a scale is built into the design of the key. Knowing the required indicator, you can easily tighten the nut. The main thing is not to overdo it, as you can break the thread on the fastener.
Recommendations for use
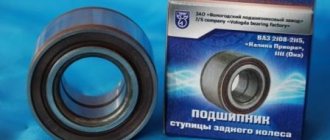
Replacing the rear wheel wheel bearing
Reviews from motorists clearly show that torque wrenches are a really useful thing in the garage. If you don't repair the car yourself, there's not much point in buying it.
In addition to the fact that you need to be able to work with the key correctly, verification and calibration must also be carried out regularly.
Calibration involves checking the readings of the instrument, adjusting it and reconfiguring it if necessary. And the same verification is called verification. That is, you need to periodically check whether the torque set on the key actually corresponds to the tightening torque. If the scale says 100, then it should tighten with a torque of 100 Nm. Over time and with frequent use, the setting gets lost.
Remember that the scale wrench, that is, our DMK, cannot be used as a regular wrench. Otherwise, you will soon have to buy a new tool.
It is also important to set the values to 0 after each use. Leaving the key in a compressed state will cause torque accuracy to deteriorate over time.
Each DMK has its own characteristics on how to tighten the thread.
Snap keys
A good combination of price, quality and accuracy make them the most popular. To set the force and tighten the connection with the desired torque, you need to:
- loosen the nut (lock);
- set the load on the scale, which is done using a movable handle;
- Use a lock nut to secure this position;
- start puffing and when a characteristic click sounds, stop.
Instructions for self-tightening wheel bearings.
- Place the vehicle in gear or parking brake. Place something under the wheels, such as wheel chocks. This is necessary to prevent the car from flying off the jack.
- Take the balloon from the kit in the trunk (if there is one) and loosen the bolts securing the wheel. The vehicle must not be raised.
- Prepare a place to install the jack (from the kit). It should be firm and even. You can place boards under the jack if necessary. Raise the wheel until it no longer touches the ground. Place a block of wood under the lever just in case. Suddenly the jack is unreliable.
- Unscrew the bolts completely and remove the wheel.
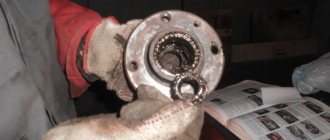
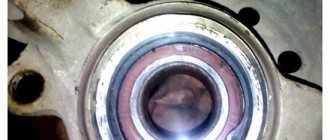
Removing the hub cap
Unscrew the old nut
You need to tighten the nut
- Fill the cap with new lubricant and reinstall. Remember that if the wheel bearings are adjusted incorrectly, the wheel alignment changes, as a result of which the vehicle's handling deteriorates, fuel consumption increases, and tires wear out quickly and unevenly.
The described process can be clearly seen in the following video: Do not forget to periodically check the bearings. This ensures your safety on the roads. Best regards, PodshipnikTsentr.RU team
Signs that a bearing is out of adjustment
It is easy for the driver to notice an unadjusted, worn-out unit. The signs are:
- sharp, sudden noise from a specific rear, front wheel or pair;
- increase in extraneous sounds from the chassis during further operation;
- when turning, the noise decreases, and then recovers and intensifies;
- play in the vertical plane after hanging the body on a jack.
Important:
If the listed signs are detected, further operation of the vehicle is unsafe. Unregulated pairs experience increased load, overheat, and quickly wear out the clips.
Must read:
To study the topic, it is recommended to read the article: How to check wheel bearings.
How hard should you tighten the wheel nut on your car?
For each car, torque standards are established, since the tightening force for the locknut depends on the following factors: - Bearing dimensions; — Regulated axial clearance; — Diameter and thread pitch; The following are the force indicators for properly tightening the nut. The database will be gradually replenished.
Tightening torques for the front wheel bearing on a VAZ (LADA)
| No. | Automobile model | Force, N•m | Hub nut diameter/thread size |
| A | B | IN | G |
| 1 | VAZ 2101 - 2107, OKA | 196 – 199 | M18x1.5 |
| 2 | NIVA VAZ 21213 and 21214 | 196 – 199 | |
| 3 | Kalina, Granta, Priora, Largus, Vesta | 226–247 | M20x1.5 |
| 4 | VAZ 2108, VAZ 2109 - 2110, 2111 - 2115 | 226–247 |
Tightening torques for the front wheel bearing on Ford
| A | B | IN | G |
| 1 | Focus 1 | 45 (further tighten another 90 degrees) | M18x1.5 |
| 2 | Focus 2 | ||
| 3 | Focus 3 | ||
| 4 | Mondeo | 35 (then tighten another 90 degrees) | |
| 5 | Fusion | 35 (then tighten another 90 degrees) | |
| 6 | Transit | 53 | M20x1.5 |
Tightening torques for the front wheel bearing on a Chevrolet
| A | B | IN | G |
| 1 | NIVA | 191 – 195 | M18x1.5 |
| 2 | Lanos | 184 - 204 (then weakens and tightens 15.3 - 18.4) | M20x1.5 |
| 3 | Aveo | ||
| 4 | Lacetti | 254–300 |
How to tighten the hub nut to the correct torque
To tighten threaded connections, where it is recommended to maintain a certain torque, use special torque wrenches . Inside the tool there is a dynamometer with a scale or a special device with a limiter, which is activated when the required tightening force is reached. Keys also come with value intervals, for example 5-25 (minimum 5 N•m, maximum 25 N•m). The threaded connection is tightened until the arrow shows the required value or the limiter operates. There are also expensive and exact analogues - with an electronic display, but for the operation and repair of passenger cars a mechanical version is suitable.
The photo shows the main types of such keys.
- With preset torque, not adjustable.
- With preset torque value, adjustable.
- With tightening force indicator.
- With digital display of applied torque.
Watch the video on how to use a torque tool:
What is tightening torque
The tightening torque of the wheel bolts on the Lada Grant is the force that must be applied when tightening these elements. That is, these parts should be twisted with such force for the desired effect. And this value is determined with a torque wrench.
How to measure tightening torque
The tightening torque for Lada Granta wheels can be indicated in the instruction manual. It can be found on websites or forums. It is often indicated on the fasteners themselves.
You can also determine it yourself. This requires thread sizes. And special tables available in the public domain will help you find this value. It can also be determined using a torque wrench.
What does tightening torque affect?
The tightening torque, including the wheels of the Lada Granta, affects the reliability of the fastening. The force should be such that the wheel is well fixed. Maintaining the required torque allows you to avoid over-tightening or under-tightening, which is equally dangerous and bad. In the first case, damage to car parts is possible, and in the second, fixation will be insufficient.
What happens if you overtighten or undertighten wheel nuts or bolts?
If the bolt is tightened with enough force, it will not be able to unscrew on its own. Damage to the disc or brake system parts is also excluded. This is very important as it affects safety. Therefore, you should know exactly the tightening torque of the Lada Granta wheel bolts.
Insufficient tightening of fasteners
If over-tightened, there is a high risk of damaging the threads. For wheels - this is the hub, drums. In addition, such a bolt will be difficult to unscrew. But an overtightened bolt can sometimes come loose. The fact is that in this case the sealing belt on the disk may become deformed. The bolt will be delivered to the hub. And the belt will lose its springing effect. As a result, the wheel may become unscrewed while driving. There is a high probability of plastic deformation of the disc, especially if it is too soft.
Is it possible to determine the moment “by eye”
With experience, you can learn to determine the approximate tightening torque of the Grant wheels without any special tools. But it is almost impossible for a novice motorist to do this. Therefore, it is better to use a torque wrench.
When tightening wheels, many experienced car enthusiasts can do it even without this tool; they feel by the force how tightly the threads are tightened.
What exactly is being tightened on wheels?
The wheel bolts and nuts, if any, are tightened on the wheels. Each of them must be tightened with the same and sufficient force. In this case, the procedure is carried out crosswise.
Is there a difference in the tightening torque of wheel bolts and hub nuts?
Tightening the wheel bolts and hub nuts on the Lada Granta, as on other cars, is performed with different torques. But at the same time, the tightening torque of the hub nut of the rear wheel of the Lada Granta and the front wheel are equal.
Tightening wheel bolts and hub nuts on Lada Granta
Indicator - when tightening, it shows the applied force digitally on the display or using an arrow on the scale. But it is worth considering that indicator torque wrenches have an error of 6 to 8%.
Digital - it is a child version of the indicator wrench, but its distinctive feature is that it shows the tightening torque on the LCD screen. They can also be equipped with sound alerts, data export to a computer and other gadgets and features. The error of this type of torque wrench is up to 1%. Limit - a distinctive feature of this wrench is that after setting the required tightening torque limit and reaching it, a click mechanism is used and tightening stops. The error of this type of key is 4%.
How to tighten a hub nut without a torque wrench
Many car enthusiasts, when repairing their car, consider it not advisable to purchase torque wrenches or other specialized devices (pullers, etc.). There is a good way to tighten the fastener to the required torque without using a torque gauge. The following devices will be required: 1. Ratchet with a head for a lock nut; 2. Pipe for extending the ratchet to create the required “shoulder”; 3. Roulette; 4. Marker; 5. A weight that can be hung on the “shoulder” (for example, a 32 kg weight).
The essence of the method is to calculate the moment using the formula from elementary physics classes:
P is the applied force, N; l is the distance from the hub to the point of application of force - the “shoulder”, m. The ready-made formula for our case will be as follows:
P1 = (M2•100)/(M1•10) ( • 10 (or • 9.8) - translated into Newtons), where
P1 is the distance at which the sinker is attached to the “shoulder” relative to the torsion point, cm; M1—cargo mass, kg; M2—required torque, N•m.
Calculation example for a Ford Focus 2 car
P1 = (M2•100)/(M1•10) (•10 (or •9.8) = (45•100)/(32•10) = 4500/320 = 14 cm. Conclusion: to ensure a tightening torque of 45 N•m will require a sinker weighing 32 kg, located on the pipe at a distance of 14 cm.
- First screw on the locknut and tighten it slightly.
- We mark a distance of 14 cm, where the rod should hang;
- We hold the ratchet with one hand and hang the sinker with the other, thereby tightening the fastening;
- The operation continues until the fasteners stop tightening under weight, which means that we have achieved the required force. Accuracy +/- 5%.
Adjusting Wheel Bearings
Home » Repair Tips » Adjusting Wheel Bearings
The bearings that are installed on car wheel hubs wear out over time. We will try to independently adjust these components and change products.
The bearing adjustment procedure involves the following stages:
- First, the car is placed on a level site, secured with a handbrake. At the same time, you can place anti-recoil devices.
- Then we lift the axle from behind using a jack.
- We remove the axle shaft of the car to clarify the rotation of the wheels. Having discovered difficulties, we find out the source of the disease. There may be “sticking” at the oil seal and contact at the brake pads.
- Next, unscrew the locknut and remove the stop washer. When we slightly unscrew the fastening nut on the bearing, we will re-check the rotation on the wheel. Adjustment procedures are permitted if the component moves easily.
- Let's use a torque wrench to tighten the nut. The force on the structure should not exceed 100 Nm (at the same time we turn the wheels). Then the rollers will be evenly placed on the bearings.
- Unscrew the nut again. To maintain the rotation angle, we make turns on the washer by a couple of positions and holes. We mount the stopper nut, controlling the entry of the pin into the slot.
- We tighten the locknut, maintaining a force of up to 200 Nm.
- When making adjustments, we control the free rotation of the wheel and the absence of axle play.
- We install the axle shaft with spring washers. We re-tighten our nuts to secure the studs.
- We lower the wheel until it touches the ground. We make a trip and test the equipment. Sometimes, when moving, the hub begins to heat up, reaching 700 degrees. Then the adjustment procedure will have to be repeated.
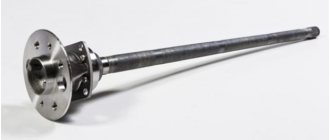
Now we try to pull out the hub on the rear wheel when we change the bearing.
We carry out the manipulations:
- Let's turn the flange by tightening the mounting bolts on the hub (in contact with the bracket). We act through the hole on the body part - we compare it with the bolts of the element.
- Then we remove the fasteners holding the mechanism.
We also advise you to read: Vote, did you like the article?
(2 votes, rating: 5.00 out of 5)