The Lada Kalina-2 and Granta cars have similar fuse blocks. The electrical circuit of these cars contains the so-called TsBKE. The central block of course electronics is responsible for the operation of turn signals, window lifts and some other systems. But the relay that turns on the turn signal lamp is missing in the electrical circuit. Note that many modern cars use a similar solution.
- Basic information about the electrical circuit
- Fuses, list and description
- List of contact relays
Replacing fuses
Lada Kalina first generation: technical characteristics of the model.
weight of Lada Kalina station wagon In order to remove the Lada Kalina fuses from the socket, there are 2 tweezers in the mounting block. The larger size is for relays, the smaller size is for fuses. You can understand the serviceability of what is being described by looking at the fusible insert. If this insert is melted, then the latter must be replaced.
When replacing, it is necessary to use exactly the same fuses that were installed on the Kalina by the manufacturer. It is strictly forbidden to use a fuse with a higher or lower rated current value. If you replace it with an element of a lower value, it will simply burn out immediately, because will not be designed to pass the necessary current to turn on the electrical appliance. If you replace it with a fuse of a larger value, then in the event of a short circuit it will not stop the flow of current. In the best case, under such circumstances, it will burn out and disable the electrical appliance for which it is responsible. At worst, there is a possibility that the wiring, and along with it the car itself, will catch fire.
Very important! Before manipulating the fuses of a Lada Kalina or another car, you must remove the terminal from the battery. Fuses are long-lasting components of a car. Therefore, if you have to change them often, then you need to seek help from electricians at a service station
Therefore, if you have to change them often, then you need to seek help from electricians at a service station
Fuses are long-lasting components of a car. Therefore, if you have to change them often, then you need to seek help from electricians at a service station.
The fuses and relays for the fuel pump and engine cooling fan are not located in the main unit, but in the additional unit. Moreover, there are even two of them. One of them is located under the cover near the gearshift lever, just below the ashtray. You can open it by simply prying it with a flat screwdriver:
Let's take a closer look at what it all looks like and which element is responsible for the operation of which device:
The numbers in the picture correspond to the numbering below:
- Main relay power circuit
- Fuel pump
- ECU constant power supply circuit
- ECM diagnostic connector
If one of the fuses fails, remove it with tweezers and insert a new one. The battery must be disconnected while this work is being carried out.
The second additional fuse and relay box is located on the right side of the instrument panel at the very bottom near the heater air duct, under the cover. Look clearly at the photo below:
First, unscrew the screw, which is located in the very industrial corner, and then remove this cover completely.
Now, to remove this relay block, we need a 10mm open-end or socket wrench.
After this, we move the wires to the side and carefully remove the entire block with the relay and fuse. Removing it is quite inconvenient, since rather voluminous wiring harnesses will get in the way. This is what it looks like after removal:
Now let's look at this mounting block in more detail:
- Turning on the engine cooling fan (low speed)
- Main relay
- turning on the engine cooling fan (high speed)
- fan fuse
- fuel pump relay
If one of the above elements fails, remove the burnt one and put a new one in its place. We put everything back in the reverse order.
Hello everyone. Yesterday, when I was driving home from work, something bad happened. I see the engine temperature needle shows 100 degrees and does not drop. I was traveling with a Conder. I drove for about 20 minutes and the temperature did not drop. While I was waiting for the person, the temperature dropped. She drove again, 100 degrees, drove through traffic jams until she exceeded 100, I immediately stopped the car and raised the hood. I realized that the cooling fan is not spinning, only the air conditioner fan is spinning. At least it’s something, of course, but it’s not enough in traffic jams, and even more so with the A/C on. I waited about 15 minutes and drove on, fortunately there were no more traffic jams. On the way, I stopped at a Lada part and bought a relay just in case. I arrived home, my brother had just arrived and we started to figure out what the problem was. First, I spent a long time looking for a picture of where the relay for turning on the cooling fan on a viburnum is located. I found this photo.
In short, this is the 3rd relay. To get to it, remove the plastic cover on the passenger side. Unscrew one screw there. Then you need to use a 10mm wrench to unscrew the strap with the relays. There, unscrew one nut and remove the strip from under the panel. Replacing the relay did not help. They began to understand further. It turned out that the contacts on the connector that connects to the fan were burnt. We adjusted the contacts and everything works. I think this connector will need to be replaced with a new one.
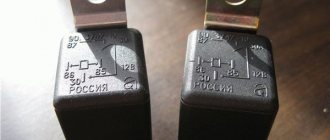
How to test a relay
If the electric fuel pump does not show any signs of life when the ignition is turned on, this does not mean that it has burned out. The cause of the malfunction may also be a relay. The easiest way to check the RB by ear is that when you turn on the ignition, the relay should click. If you don’t hear a click, there is a high probability that the “relay” is faulty.
But not everything is so simple - the problem can be “tricky”, for example, the car does not start the first time. The cause of the malfunction may be hidden in burnt relay contacts. It’s quite simple to check the functionality of the pump itself; proceed as follows:
- remove the protective casing, under which there is a block with relays and fuses;
- we unscrew the fastenings of the block, remove it, it remains attached to the wires;
- we pull the RB out of the block, place a jumper between two opposite contacts, thus directly supplying power to the BN;
- If, with such a connection, the electric motor of the pump begins to make noise, it means that the BN itself is working, most likely, the malfunction is hidden in the relay.
If there is no voltage on any of the contacts on the RB block, you should look for a break in the wiring; there may also be poor contact at the place where the wire is attached to the terminal.
Repair parts
Technical characteristics of Lada Kalina hatchback. Lada Kalina hatchback tank volume
It is worth carrying out independent equipment repairs if you are completely sure that the malfunction lies precisely in it. A large number of plastic elements make the pump very fragile. For this reason, care must be taken when disassembling.
- Using a screwdriver, you need to pry up and remove the drain module of the part.
- The ground wire will be disconnected from the equipment.
- The intermediate wire connector is disconnected (from the inside).
- The pressure regulator is removed.
- The gasoline element module is removed by pressing the plastic retainer.
- The filter mesh is removed from the housing. If it is dirty, it can be cleaned. But it is more advisable to install a new mesh.
Damaged elements must be repaired or replaced with new parts. At the same time, it is advisable to replace the fine fuel filter. It is located near the jack cup in the right rear wheel arch. The equipment is assembled in the reverse order.
If Kalina's fuel pump does not work, the reasons often lie in a malfunction of the part itself. This equipment is inexpensive. It is quite possible to remove the unit and replace it with a working one yourself. It is better to purchase original spare parts.
Replacing the fine fuel filter
The fuel pump on the Lada Granta does not work. How to replace the fuel filter on a Lada Kalina with your own hands. installing a new fuel pump strainer
To remove the old filter, you need clear access to the rear of the car. To do this, it should be driven into a viewing hole or overpass. In addition to the tool used to replace the mesh, you will need a small container to drain the fuel.
The procedure for replacing FTO is as follows.
- The pressure is released through a valve on the ramp or by starting the engine with the fuel pump fuse removed.
- Under the car, the wire clamp on the return fitting (located on the right) is released.
Then the hose is removed and directed into a previously placed container. To remove the tube from the fitting, you need to slightly bend the clamp - After draining the fuel, the operation is repeated on the supply hose. As a result, 150-300 ml of gasoline should drain out.
- The nut of the fastening clamp is loosened and the filter housing is pulled out.
In this case, you need to remember the direction of the arrow on the filter. To remove the FTO, you need to loosen the fastening clamp. - The new filter is installed taking into account the direction of fuel movement. Wire clips snap into place on the hoses that are put on.
After replacement, the operation of the filter under pressure is checked. To do this, the ignition is turned on and the fuel lines are checked for leaks. Then the verification is repeated with the car running. The replacement algorithm does not depend on the number of engine valves.
List of contact relays
Removing the instrument panel assembly with heater Lada Kalina
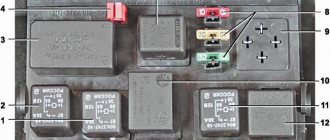
If we open the main fuse box of Kalina 2, we will see a set of electrical relay housings. There are no other blocks containing relays in the car. We list the elements used in the “Lux” package (21927/21947):
- K1: radiator fan relay;
- K2: relay switching on door locks;
- K3: additional starter relay;
- K4: additional relay (switches current 50A);
- K6: wiper relay;
- K7: relay that turns on the high beam;
- K8: signal relay;
- K9: relay that turns on the low beam;
- K10: rear window heater relay;
- K11: main ignition relay;
- K12: relay turning on the fuel pump;
- K13: additional relay;
- K14: radiator fan relay 3;
- K15: windshield heater relay 1;
- K16: windshield heater relay 2;
- K17: relay that turns on the air conditioning compressor.
You can compare the layout of elements in “Lux” and in “Norm/Standard”:
This is how the relays are located in different configurations, 21927 and 21925
Let's consider the data relevant for the “Normal/Standard” configurations:
- K1-K12: as above;
- K13: radiator fan relay 3;
- K14: windshield heater relay 1;
- K15: windshield heater relay 2;
- K16: air conditioning compressor relay.
The last list is also relevant for Kalina Cross Norma. And in more expensive trim levels of the crossover, the “Lux” scheme will probably be used.
Lada Kalina dashboard diagram
1,2,3,4 – blocks of the instrument panel wiring harness to the blocks of the rear wiring harness; 5,6 – blocks of the instrument panel wiring harness to the blocks of the front wiring harness; 7 – block of the instrument panel wiring harness to the block of the wiring harness 8 – block of the instrument panel wiring harness to the block of the front wiring harness; 9 – lighting control module; 10 – ignition switch; 11 – on-board computer mode switch; 12 – windshield wiper switch; 13 – sound signal switch; 14 – light signaling switch; 15 – instrument cluster; 16 – evaporator temperature sensor; 17 – interior air temperature sensor; 18 – air conditioner switch; 19 – controller of the automatic climate control system; 20 – heater damper gearmotor; 21 – rear window heating switch; 22 – alarm switch; 23 – brake signal switch; 24 – cigarette lighter; 25 – electric amplifier control unit; 26,27 – blocks of the instrument panel wiring harness to the radio; 28 – backlight lamp for the heater control panel; 29 – illuminator; 30 – mounting block: 31 – heater electric motor switch; 32 – heater electric motor; 33 – additional resistance of the heater electric motor; 34 – glove box lighting; 35 – glove box lighting switch; 36 – control unit of the APS-6 automobile anti-theft system; 37 – driver airbag module; 38 – passenger airbag module; 39,40 – blocks of the instrument panel wiring harness to the blocks of the ignition system wiring harness.
KZ – additional starter relay; K4 – additional relay; K5 – relay-interrupter for direction indicators and hazard warning lights; K6 – windshield wiper relay; K7 – headlight high beam relay; K8 – sound signal relay; K9 – relay for turning on fog lights; K10 – relay for turning on the heated rear window; K11 – electric seat heating relay; K12 – air conditioner compressor clutch activation relay;
Instrument panel wiring harness – 11186-3724030-20.
Pinout of fuel pump VAZ 2107
1 – radiator fan drive motor; 2 – mounting block block; 3 — idle speed sensor; 4 – engine ECU; 5 – potentiometer; 6 – set of spark plugs; 7 – ignition control unit; 8 – electronic crankshaft position sensor; 9 – electric fuel pump; 10 – indicator of the number of revolutions; 11 – lamp for monitoring the health of electronic systems and the brake system; 12 – ignition system control relay; 13 – speedometer sensor; 14 – special factory connector for reading errors using the BC; 15 – injector harness; 16 – adsorber solenoid valve; 17, 18, 19,20 – fuse box for repairing the mounting block that protects the injection system circuits; 21 – electronic fuel pump control relay; 22 – electronic relay for controlling the exhaust manifold heating system; 23 – exhaust manifold heating system; 24 – fuse protecting the heater circuit; 25 – electronic air sensor; 26 – coolant temperature control sensor; 27 – electronic air damper sensor; 28 – air temperature sensor; 29 – pressure control sensor and low oil pressure lamp.
You can check the fuel pump on a VAZ 2107 simply by checking the voltage at its connection block with a tester. The presence of voltage will indicate a malfunction of the electric motor. Instead of a tester (multimeter), you can use a test lamp to diagnose a malfunction.
In the absence of one, this can be done by disconnecting the connection block for the fuel pump and fuel level control and applying voltage with wires from the battery to the place where the gray wire is connected +12 and to the place where the black wire is connected - minus. A humming pump will indicate a faulty fuse, power circuit or ECU.
How to replace the fuel pump Lada Kalina Blog
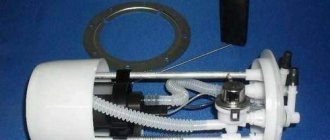
In order to get to the location of the fuel pump on the Lada Kalina, you must first recline the rear seats and remove the insulating trim on the floor.
We find the lace between the rear seat belt buckles and pull it up, raising both seats. Below I will tell you what tools may be needed for this repair:
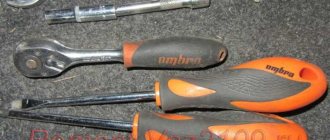
- Phillips and flathead screwdrivers
- Hammer
- Pliers
Removing and installing the fuel pump Lada Kalina:
Under the floor covering there will be a metal cover, black, as shown in the photo below. You need to unscrew 4 bolts on it:
Next, when all the screws are unscrewed, you can safely remove it with a slight movement of your hand:
After which the following picture opens, where we see the upper part of the Kalina fuel pump and all the fittings that are connected to it:
Now you can begin to remove the wires and hoses and the fuel pump. First, disconnect the power plug, which is located on the left side. Push the plastic lock up a little and pull the plug to the side.
Disconnect the fittings one by one. The lower one is removed as follows: with one hand we press on the metal locking clamp, and with the other hand or pliers we pull the fitting to the side:
The top one is removed in the same way, only there is a slightly different latch - green. You need to press on it with one hand and pull the tip to the side with the other.
- It is advisable to clean everything around the fuel pump thoroughly so that when dismantling, no dust, dirt or other debris gets inside the tank.
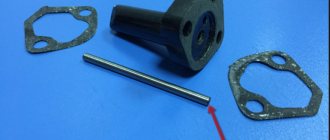
- Next, you can begin to remove the large metal ring that secures the pump. The factory uses a special puller for these purposes, but you can do without unnecessary devices. Simply place a flat-head screwdriver on the end of the ring and slowly tap it in a counterclockwise direction with a hammer until the ring comes out of the mounting grooves.
The Jonnesway screwdriver coped well with this test, its body remained intact and undamaged after numerous hammer blows! After the clip has popped out, it can be removed:
Now you can start removing the fuel pump. Take it by the top and gently lift it up. You should be very careful not to bend the structure on which the float is attached. To do this, while lifting the pump (closer to the very top), tilt its upper part slightly towards the right rear door. And take it out, as if diagonally, so as not to catch the float.
The photo below shows the result of the work done to remove the Kalina fuel pump:
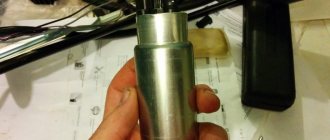
If this part needs to be replaced, then install a new pump and perform the installation in the reverse order. Be sure to wipe the rubber and around the seat dry before doing this so that no debris gets into the tank.
What is a fuel pump
In each model, the design and location of the fuel pump is unique; for the Lada Kalina, this device is located on the opposite side of the power unit.
On the one hand, this arrangement allows you to benefit from the technical capabilities of the machine, but on the other hand, the device requires more powerful operation than models in which the fuel pump is located closer to the engine.
In order for Kalina’s fuel pump to cope with its job, it is presented in an electric version. Its advantages are:
- simplicity of design;
- good fuel supply;
- safety.
But, as one might expect, Kalina’s electrics are not yet a strong point; they often break down, which is the main disadvantage.
In addition, the disadvantages of the Lada Kalina gas pump include increased noise levels, sensitivity to the quality of gasoline, and the fact that it requires cooling.
Filters become clogged, which disrupts the operation of the entire mechanism and ultimately leads to pump failure.
This is why filters, or meshes as they are also called, need to be changed regularly.
We’ll talk about this, but first, let’s figure out what malfunctions happen with the Kalina fuel pump?
Types of faults:
- One of the most common pump malfunctions is a rapid decrease in pressure after the engine starts. This fact indicates serious violations that can be caused either by a valve defect or a breakdown of the pressure level regulator; it is quite possible that the injectors are also clogged. A sharp drop in pressure leads to problems in starting the engine, which, if the breakdown is not corrected, can even lead to engine failure.
- It also happens that the engine loses power, or the engine does not start at all, even when cold or hot. All this happens when a membrane or spring breaks, a rod wears out, or filters become clogged, and the latter happens more often than anything else.
- In any case, having discovered that there is something wrong with the fuel system, you should first check the condition of the filters, because, due to low-quality gasoline, they become clogged quite quickly, and it is better to change them in a timely manner, without waiting for problems. Now let’s talk about how to change the mesh from the pump yourself.
Why is there no power to the fuel pump?
A gasoline pump is necessary to supply fuel from the gas tank to the fuel rail, creating the necessary pressure.
Electrical circuit for controlling a fuel pump.
The fuel pump is an electromechanical device, so its breakdown can be due to both insufficient power supply and mechanical damage. It is not difficult to detect a lack of tension.
- To do this, turn on the ignition and listen.
- When you turn the key, the fuel pump starts, which creates a slight hum . If you don’t hear a buzz, then most likely the device is de-energized . You have already found out that there is no voltage supplied to it.
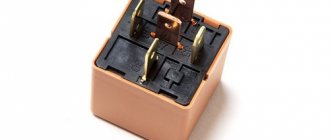
Kalina fuel pump relay: where is it located?
The Kalina fuel pump relay is an important element for ensuring stable operation of the car. The internal combustion engine is the main unit for the movement of road transport. With the advent of electric vehicles, the share of cars with internal combustion engines is decreasing, but the vast majority will be provided with cars powered by hydrocarbon raw materials for the coming decades. For stable operation of the flaming engine of any car, including the Lada Kalina, a stable supply of a sufficient amount of fuel is necessary.
The main element of the fuel system on Kalina is the fuel pump. The fuel tank on the Lada Kalina is located in the rear of the body, therefore, the delivery of gasoline through the supply pipes to the injector sprinklers must be constant and forced. Other elements of the car's fuel system, in addition to the tank and fuel pump, are a fine filter and fuel supply pipes.
Possible causes of fuel supply system failure
The fuel pump on Kalina is electric. The use of this design and operating principle is justified by a number of advantages. These are simplicity and reliability, compliance with the required characteristics in terms of fuel supply volumes and a high level of safety ensured by turning off the system when the engine stops running. On the other hand, for high-quality work you need excellent gasoline and cooling of the fuel pump, and the process is also accompanied by an increased noise level.
- As a rule, poor quality gasoline and dirty filters lead to incorrect operation of the gasoline pump or its failure.
- If there is no response from the engine when you turn the ignition key, the problem may be due to a broken fuel pump.
- Since the main unit of the fuel system is powered by current, to troubleshoot it is necessary to check the electrical circuit going to the fuel pump.
Replacing the fuel pump relay
The Kalina fuel pump relay is located in the cabin just below the dashboard near the air duct grille. To access the fuel pump relay, you need to remove the cover by prying it off with a regular flat-head screwdriver.
How to remove the fuel pump relay? Before replacing the relay, you should check the fuse box, which is located next to the gear lever and the ashtray. By opening the cover, you can visually evaluate the fuel pump fuse based on the integrity of the jumper. To remove parts, it is convenient to use tweezers, which can firmly and accurately fix the fuse.
While maintaining the integrity of the jumper, for final confirmation of operability, the part must be tested with an ohmmeter, since the point of contact of the wire with the legs may be open. If the fuel pump fuse is good, then the relay is not working. There are some nuances here. The fuel pump relay is removed using a socket wrench.
Having verified the integrity and operability of the electrical network and made the necessary replacements of parts, the Kalina fuel pump should start working again. If the fuel system still does not work, then the car owner will have to become more familiar with the components of the Kalina fuel supply system.
Troubleshooting the Kalina fuel pump
If the electrics are working correctly, the fuel pump remains the object of close study. Replacing the fuel pump assembly is an extreme, and not at all mandatory, measure.
Electrical diagram for connecting a fuel pump
If the fuel pump does not turn on during normal electrical operation, remove the device to check the fuel pump. To check the functionality of the fuel pump, you need to remove the cover, which is located in the rear of the car, and remove the unit itself.
If the pump does not pump or pumps intermittently, it may be necessary to replace the Kalina fuel pump mesh. We remove the cover, disconnect the hoses and wires, use screwdrivers to press out the retaining ring and gain access to the pump. The device itself is located in the gas tank and takes gasoline directly from the tank.
Why doesn't the fuel pump deliver gasoline?
One of the most important elements of the fuel injection system of a gasoline engine is the electric fuel pump, which is located in the fuel tank of the car. The fuel pump pumps fuel into the system from the gas tank, creating a certain pressure.
Auto repair experts identify the following common fuel system problems that are related to the fuel pump:
- The fuel pump pumps poorly and does not create the required pressure;
- the fuel pump does not pump when the ignition is turned on;
Considering that the fuel pump is an electromechanical device, the most common fuel pump malfunctions are related to both the mechanical and electrical parts. Next, we will look at what signs indicate a breakdown of the fuel pump and why the fuel pump stops pumping partially or completely.
Signs of fuel pump malfunctions
The main symptoms of fuel pump failure, as well as malfunctions in its operation, are:
- the car starts with difficulty, the engine runs unstable, there are dips, jerking when pressing the gas pedal, etc.;
- the pump does not pump after turning on the ignition, does not turn the starter and does not pump the fuel pump, the engine does not start;
There have also been cases when the fuel pump stops pumping while driving. In such a situation, the engine begins to malfunction and stalls immediately after the remaining gasoline in the fuel line is used up. The problem can occur either regularly or periodically.
The fuel pump does not pump: causes and diagnostics
Let's start with the fact that if the gas tank is full, the battery is charged, the spark plugs are dry and there is a spark, the starter turns the engine normally, but the engine does not seize, then you should pay attention to the gas pump. A common problem is that there is no power to the fuel pump after the ignition is turned on. In a similar way, the malfunction manifests itself in motion, when the power to the fuel pump is lost and the engine suddenly stalls.
An equally important point is how much the fuel pump pumps. In other words, the pump may hum and buzz (power is being supplied), but not create the required pressure in the fuel line. The pressure in the fuel system with a working fuel pump must be more than 3 bar (which depends on the specific car model). The indicated pressure is accumulated in the fuel rail and has an indicator of 300 kPa and above.
To check, you need to measure the pressure in the fuel rail with a pressure gauge, taking into account the indicators that are the norm for a specific car model. Using the example of injection VAZs, the pressure when the ignition is turned on is 3 atmospheres, at idle the figure is 2.5 atmospheres, when you press the gas 2.5-3 atmospheres. This method will help you accurately determine:
- malfunction of the fuel pressure regulator in the rail;
- breakdown of the fuel pump or a noticeable decrease in its performance due to wear;
- severe contamination of filters (fuel filter and/or fuel pump mesh);
In the second case, when you press the gas, the pressure does not increase; in the latter case, the pressure gauge needle rises, but very slowly or jerkily.
A decrease in pressure below the norm will lead to the fact that the engine may not start or start with difficulty, stall, jerk, operate unstably and with failures. If this happens due to the fault of the pump and not the fuel filter, then there is a high probability that the coarse filter screen of the fuel pump is clogged. In this case, there is no need to change the fuel pump itself, since it will be enough to replace or even clean the mesh.
We also recommend reading the article on how to clean the fuel pump stack yourself. From this article you will learn how and what means you can clean the fuel pump filter with your own hands.
If you suspect that there is no voltage to the fuel pump, there is a quick way to check. It is enough to turn the ignition key and listen, as when you turn the key you should hear a slight hum from the fuel pump. If such a buzzing noise is not heard, it means there is no power to the fuel pump, there are problems with the wiring, etc.
We add that this method of determining the operation of the pump by sound is not suitable for all cars. On some models (especially premium ones), sound insulation is at a high level and the fuel pump turns on immediately after opening the driver's door, and not when turning the key in the lock. In this case, it may seem that the fuel pump does not work when the ignition is turned on, and the sound of the pump may simply not be heard.
Also in the general list of possible reasons why the fuel pump does not pump, the following are noted:
- failure of the fuel pump fuse;
- fuel pump relay failure;
- problems with the ground of the fuel pump;
- malfunction of the electric motor of the fuel pump;
- oxidation or damage to fuel pump contacts and terminals;
- the fuel pump itself is faulty;
Features of replacing fuses on the Lada Kalina with your own hands
The Lada Kalina has earned a reputation as a comfortable and reliable car. But, like all vehicles, it is not immune to various types of breakdowns. Quite often one or another electrical equipment fails. Some breakdowns are not critical, for example, the cigarette lighter does not work, but there are also those that can completely render your vehicle immobile.
This is, first of all, the failure of such an important component as the fuel pump. It is not always necessary to change the consumer in order to restore its functionality; very often it is enough to replace the fuse and the relay responsible for it to restore its functionality
Car Lada Kalina
Let's say right away that on the Lada Kalina car the electrical circuits are protected by electrical fuses and relays located in several compartments. For example, the fuse for the cigarette lighter is located in the main compartment under the panel, and the fuel pump is located in the additional compartment.
All blocks with electrical fuses are installed in easily accessible and convenient places, so changing and checking protective elements will not cause difficulties even for a novice car enthusiast.
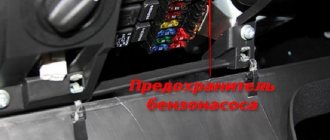
Where is the fuse box?
The largest compartment, which houses most of the fuses and relays, is located on the left side of the instrument panel and is covered with a cover. The second, in which the elements responsible for the power unit control systems are located, is located in the lining of the floor tunnel. This is where the fuel pump fuse is located.
Location of the fuse and relay box on the Lada Kalina
Removal and replacement instructions
Replacing and identifying an unusable element in both the first and second blocks occurs in approximately the same way, so let’s consider the replacement process using the example of the one installed to the left of the dashboard.
Diagram on the back of the cover
Preparation
Be sure to remember that before you carry out work on electrical equipment, it doesn’t matter whether the cigarette lighter or the fuel pump has failed, the first thing you need to do is turn off the power to the system. To do this, turn off the engine and remove the negative terminal of the battery.
This video shows how you can quickly solve a problem with blown fuses on a Lada Kalina.
- We find the location of the block, it’s not difficult - the designers placed it on the left side of the dashboard under the cover.
- Open the lid.
- Using the diagram and table, we establish the location of the protective element we need.
- The block contains tweezers, with the help of which we extract the required element.
- Let's examine it.
- We check with an ohmmeter or lamp.
- If the spiral is burnt out, install a new one of equal value.
- We connect the removed battery terminal.
- We start the car.
- Let's see whether our consumer has earned money or not.
- If everything is in order, then the work is finished. If the consumer does not work or the electrical fuse has blown again, then everything is more serious. It may be necessary to check the circuit or dismantle the consumer and check it.
Layout of relays and electrical fuses
Explanation of the diagram shown in the photo.
The request returned an empty result.
Work with the block, which contains the element protecting the fuel pump and other elements responsible for the operation of the engine, is carried out in a similar way.
The request returned an empty result.
The protective element designed for 15 amperes, responsible for the fuel pump of the Lada Kalina, is designated F2 in the photo. To remove it, you need tweezers. All other work is carried out in the same way as in the large compartment.
Recommendations for use
- If you are a responsible car owner, then be sure to carry with you a set of electrical fuses of various ratings. Perhaps they will help you out at some point.
- Under no circumstances should you install wires or bugs. This can lead not only to failure of the electrical consumer, but also to a fire.
- Replacement only with an element of the same value is acceptable.
- Before work, do not forget to turn off the power to the system.
Sorry, there are no surveys available at this time.
This video shows what danger awaits the driver if he decides to save money and install a cheap Chinese electrical fuse. When a short circuit occurs, the conductive part in it does not burn out, but it simply begins to smoke. Such savings can lead to fire. Buy components and consumables only from reputable stores, otherwise you risk losing your car.
Fuel pump does not work
If the starter of your car turns normally, but the car does not start, the first thing you need to do is check that the fuel pump is turned on. On domestic cars, its operation can be heard from the passenger compartment; when the ignition is turned on, a characteristic buzzing sound comes from under the rear seat or trunk.
If the fuel pump does not work, you need to check the integrity of the fuses and the activation of the main relay of the engine management system and the fuel pump relay. On the VAZ-2107, VAZ-2108, VAZ-2109 and their modifications, relays and fuses are located on the shelf under the glove compartment or under it.
On VAZ-2110 and similar ones, you should look in the heater console on the passenger side by unscrewing the fastening screws and removing the side cover. On GAZ cars they are located under the hood on the front wall of the cabin, closer to the passenger side.
Fuel pump relay does not turn on
If the fuel pump does not work, then first of all you need to check the attraction of the main relay and the fuel pump relay. If the main relay does not click, then it is necessary to check its switching circuit and its serviceability. How to do this is described in the article the main relay does not turn on,
In the case when the main relay turns on, but the fuel pump relay does not, it is necessary to check the power at pins 85 and 86. When using a test lamp, its current consumption should not exceed 0.25A, otherwise damage to the controller may occur. If the control lamp does not light up on any terminal, then the relay is not receiving power. This may be caused by a blown fuse or a broken power cord.
In the case when the lamp burns brightly on one terminal, and at half-glow on the second, and the relay may be activated, you should remove the relay from the socket and connect terminals 85 and 86 with a test lamp. When the ignition is turned on, the control lamp should light up and go out after approximately 20 - 30 seconds. If the lamp lights up and there is poor contact in the connection between the block and the fuel pump relay. If the lamp does not light up, there may be a break in the wire connecting the relay to the controller or the controller itself may be faulty.
Checking relay power
In the case when the fuel pump relay turns on when the ignition is turned on, but the pump itself does not work, you need to check the power at terminal 87 of the fuel pump relay. To do this, touch terminal 87 of the relay socket with the output of the control lamp connected to the vehicle ground, and the lamp should light up. If the lamp does not light, it means the fuse has blown or there is a break in the wire.
If there is power at terminal 87, you should remove the relay from the socket, and instead place a jumper between pins 87 and 30. In this case, if the pump and connecting wires are working properly, the pump should start working and if this happens, the relay should be changed. If the pump does not start working, then, without removing the jumper, you need to touch the power wire on the fuel pump with a test lamp connected to the vehicle ground.