It will be much easier to repair a VAZ 2109 yourself if you use the catalog of materials. This is, in a way, a repair manual for the VAZ 2108 and VAZ 2109, only in a modern format - with video and photo instructions, as well as question/answer cards. All instructions are adapted for drivers with any experience to help even beginners understand.
Among the materials presented, there are those that are most often needed by the owners of these car models. In order for the repair and maintenance of the VAZ 2108 or 2109 to be carried out without any problems, it is worth familiarizing yourself with them in advance. Frequent repair procedures for the "eight" include: replacing the VAZ 2108 stove and replacing the VAZ 2108 timing belt. As for the "nine", there are much more popular instructions. Very often, replacing a VAZ 2109 starter or replacing a VAZ 2109 carburetor helps bring a car back to life. Replacing a VAZ 2109 hub will certainly help solve problems in the chassis. Replacing a VAZ 2109 pump and replacing a VAZ 2109 clutch will certainly help to prevent dangerous consequences for the car and its passengers.
Each of the listed procedures has its own separate instructions. However, it may not be enough to repair a VAZ 2108 with your own hands. There are specific problems that only more experienced motorists and specialists can help resolve. get advice or clarification on any issue directly on the site. All you have to do is leave a question and wait a bit for an answer.
Brief history of the VAZ 2108
The model began its history back in 1971, long before production began. For a long time, workers at the Volzhsky plant created only prototypes, until the technical specifications were approved by the government in 1978. Despite this, the model itself went into production only in 1984 and did not leave the assembly line until 2003.
The special features of the VAZ 2108 include one type of body – a 3-door hatchback. The front-wheel drive car could be equipped with one of 5 types of engines ranging from 1.1 to 1.5 liters. As for the gearbox, the car was equipped with either a 4- or 5-speed gearbox.
For the VAZ 2108 model, the repair manual was created so simple that each owner could independently diagnose many breakdowns and fix them without outside help.
Do-it-yourself engine repair VAZ 2109
RepairDo-it-yourself engine repair VAZ 2109
THIS IS INTERESTING: Misfire in cylinder 1 of VAZ 2114
Do-it-yourself VAZ 2109 engine repair
Author of the article June 02, 2014
If suddenly the fuel consumption of a VAZ 2109 sharply increases, knocking noises appear, power is lost, and black smoke is released from the exhaust pipe, most likely the engine life has been exhausted. But you shouldn’t despair, repairing a VAZ 2109 engine is not expensive, and besides, you can even do it yourself. To do this, you need to know how the engine works, and have some money to buy spare parts.
Even a beginner can repair the engine of a VAZ 2109 only if it is an old carburetor engine. If it is an injector, then much more skills are required in understanding the principle of its operation.
The VAZ 2109 has an in-line, four-piston, 8-valve engine. The principle of its operation is very simple, it is only important to adhere to some rules when assembling.
Before deciding to remove and repair the VAZ 2109 engine, you need to determine whether it needs it. First of all, you need to measure the compression; if it is low, the piston needs to be changed. However, low compression may be the result of burnt-out valves or a broken cylinder head gasket.
You also need to look at the oil pressure; if it is low, then the bearings are worn out or the oil pump has failed.
Engine repair
The heaviest load in the VAZ 2109 engine is placed on such components as piston and plain bearings. When the piston wears out, compression drops, and oil begins to pass into the combustion chamber, so its consumption increases. The piston rings wear out first, so sometimes the entire piston repair consists of replacing them. If the piston is very worn, shells or grooves are visible on the liners and pistons, the piston is replaced.
As for the plain bearings, with high mileage and loads, the crankshaft journals wear out. In this case, either the crankshaft is changed, or its necks are sharpened to a smaller size. After this, repair size liners are used.
The next important system of the VAZ 2109 engine is the gas distribution system. When repairing, the cylinder head must be disassembled and the valves removed. They must first be numbered to be installed back in the same order.
The valves may have carbon deposits, chips, or shells. If there are any, the valve is changed. To ensure that the valve closes tightly, it is ground in a rotating motion using special grinding pastes.
Some craftsmen do this using a drill and a small piece of hose.
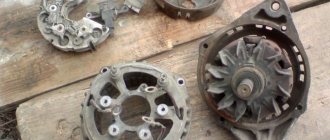
Attachments VAZ 2109
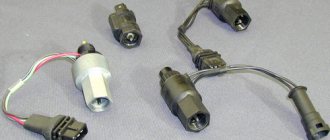
When repairing a VAZ 2109 engine, the serviceability of all other additional devices is also diagnosed. This includes the carburetor, generator, starter, fuel and oil pump, and so on. Most often, the fuel pump and starter break down on the VAZ 2109.
Since the fuel pump is relatively inexpensive, during a complete overhaul it is best to replace it with a new one. As for the starter, it can be repaired quite successfully.
In it, only bushings and brushes can be replaced, which can be purchased at any auto store.
As for the oil pump, it also needs to be disassembled and inspected. If necessary, you need to change the gasket.
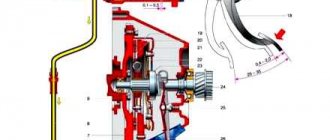
When repairing an engine on a VAZ 2109, it is mandatory to disassemble and adjust the carburetor. In principle, there is nothing to break here.
All you need to do is disassemble the carburetor, wash it, blow it out and put it back together in exactly the reverse order, without mixing up the jets. Before assembly, you need to set the correct gasoline level in the float chamber.
If the carburetor is already very old, it is best to purchase a repair kit to replace the gasket, accelerator pump diaphragm and jets.
In general, engine repair on a VAZ 2109 is quite simple, you just need to know exactly to what point to tighten the nuts on the plain bearings. For these purposes, it is best to purchase a torque wrench. Repairs must be carried out in perfect cleanliness, and all nuts, bolts and bearing caps must be placed clearly in their original places.
“Likes” on social media networks:
Brief history of VAZ 2109
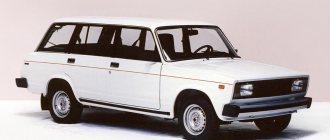
The continuation of the series after the VAZ 2108 was the VAZ 2109 or “Nine”. Its production began in 1987, exactly 3 years after the G8. The first representatives of the series were equipped with one of three engines (1.1 l, 1.3 l or 1.5 l), were gasoline in type and had a 4-cylinder 8-valve mechanism. An important element was the carburetor, which contributed to the operation of the car.
In 1991, the design of the model changed slightly, and from 1994, the VAZ 2109 began to be equipped with injection analogues of 1.5 liter engines. As with its predecessor, the VAZ 2109 repair manual, as a rule, helped solve any problem.
Engine overhaul
Unstable engine operation, the occurrence of extraneous noise, knocking, high fuel consumption, and a decrease in power may indicate the need for a major engine overhaul. On a VAZ 2108, engine overhaul includes restoring the technical characteristics of the unit to the indicators indicated in the operating instructions. Overhaul of the VAZ 2108 engine is carried out after removal from the vehicle and complete disassembly of the unit.
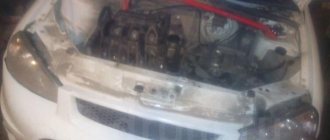
Removing the engine from the car
- The battery is removed.
- Oil and cooling fluid are drained from the engine crankcase from the system.
Tip: The engine must be removed together with the gearbox. You need to lower it down from the engine compartment. It is more convenient to carry out work on a lift.
- The bolts are unscrewed and the engine crankcase protection is removed.
- The exhaust pipe of the muffler is disconnected.
- The air filter is removed.
- The vacuum hose intended for the brake booster is disconnected from the inlet pipe of the device.
- The ground wire is disconnected from the clutch housing.
- The hoses are disconnected from the thermostat.
- The high-voltage wire is released from the distributor cover.
- The block with low-voltage wires is disconnected.
- The hose for supplying fuel from the fuel pump is released.
- The cable end attached to the clutch release lever is removed.
- The block with the wire is disconnected from the traction starter relay.
- The block with the wire is disconnected from the generator output.
- The wires are disconnected from the carburetor valve.
- The hose for return drainage from the fuel carburetor is removed from the clamp.
- The choke rod is released from its control lever.
- The air damper drive cable is disconnected.
- The clamp holding the accelerator drive cable is removed from the damper drive sector.
- The air spring for the throttle valve drive is removed. The drive cable is removed from the latter sector.
- The bracket holding the accelerator drive cable is disconnected from the valve cover.
- The sensor that controls the coolant temperature is released from the connection.
- The oil pressure sensor is turned off.
- The heater inlet and outlet hoses are disconnected.
- The drive rod is released from the joint tip to change gears.
- The speedometer turns off.
- The switches for the vehicle's reverse lights are disconnected on the gearbox.
- The right and left braces are moved to the sides so that they do not interfere with removing the engine from the car.
- The cotter pin is pulled out, securing the nut holding the ball joint of the steering linkage and the swing arm.
- The nut holding the steering rod ball joint is unscrewed.
- Using a special puller, the steering link joint pin is pressed out of the strut lever.
- The ball joint for the suspension arm is disconnected from the steering knuckle.
- Using a pry bar, the shank of the inner CV joint of the gearbox drive shaft is pressed out and moved to the side.
- Having secured the side gear from turning, the second CV joint is disconnected like the first.
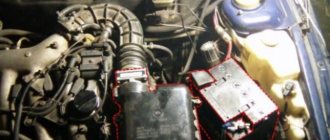
- The engine clings to the frames and the hoist cables are pulled as shown in the photo.
Slinging a VAZ 2108 car engine
- The nuts securing the rear engine mount to the body are unscrewed.
- By slightly lifting the engine, remove the bolt holding the right front support of the unit.
- The left front support is released in the same way.
- The engine is lowered onto stands, the car is raised and the engine is pulled out from under it.
Tip: Before lowering the engine, make sure that all wires and hoses are disconnected from it.
Overhaul of the VAZ 21083 engine begins with disassembling it and drawing up a defect list. After a thorough examination of all parts and measurements of the dimensions of the mating parts, the stages of repair and its cost are determined. Parts that can be repaired are subject to restoration, those that have become unusable are replaced with new ones. According to the rules for the VAZ 2108, major repairs are carried out after 150,000 kilometers of the vehicle. Repairs begin with replacing piston rings and pistons and boring the cylinder block. The crankshaft journal is ground. A visual inspection of the starter, generator, and ignition distributor is carried out. In the cooling system, hoses, thermostat, drive belts and pump are replaced. The radiator is washed and cleaned.
overhaul of VAZ-21083 engine - questions for specialists
Hello!
The patient is 12 years old, mileage is 75,000 (reliably - the car has been in the same hands all this time).
Why I went to disassemble it was because the sounds made by the engine frightened me. In addition, oil was rushing out of the crankcase ventilation with terrible force - I removed the air filter cover - everything was in the oil, there was already a puddle in the “pan”, with the engine running, a column of gases and oil reached the hood. Where I looked before is a separate question, not about it now. The car was considered a suicide bomb, and now there was a need for resuscitation. I tossed the engine around and various questions arose. For convenience, I will divide them into groups. I apologize that everything is in one topic, but this is probably better than many different ones. At least the overall picture will be visible.
Yes, I'm not an expert. I’ve been repairing cars myself for about 10 years now, but mostly chassis, electrical, and attachments. This is my first time getting into the engine itself. And one more thing: apart from a caliper, there are no measuring instruments, and no skills to use them either. I want to do it properly, not for sale.
1. Piston group.
On two pistons, pieces of the bridges between the rings were broken. Accordingly, there are marks on the cylinder mirrors. Of course, sharpen the block, and it’s good, if not immediately through the size. I'm thinking of installing a piston from 2110, so as not to bother with pressing the pins in while it's hot.
Now there are four classes of cylinders: A, B, E, B. What happens after boring? Will the breakdown by class still remain, or will they all be the same size and reduced to one class? I just don't know how it's organized. Will the size of each cylinder increase by exactly 0.4 from the current one, or will it somehow be reduced to the same diameter? Will it be possible to buy, say, a Kostroma set of pistons for the first repair size of class B (the numbers and classes are relative), or is the selection of each piston individually inevitable? I know that they should still be of the same weight class.
By the way, do rings also differ in size and grade?
2. Crankshaft and connecting rods. Visually, I don’t see any scuffs on the necks. But the axial play of the knee is about 1 mm. (obviously not 0.6-0.26 allowed by the primer).
Can crankshaft axial play be treated only by replacing two thrust half-rings? According to the primer, they come in nominal and 0.127 larger sizes - is that correct? How to proceed - select experimentally?
As for the connecting rod and main journals. Apparently, the knee also needs to be taken to specialists, since I have nothing to measure it with. At the same time, they will check the curvature. How are liners selected? If, say, the connecting rod and main journals are within tolerance, should we just install new nominal bearings (the connecting rods will still need to be replaced if we switch to parts 2110)? And if, say, you grind it at 0.25, then the repair liners will be at 0.25, no problem? Or is it more complicated?
3. Cylinder head and camshaft. Last winter the valves were changed (not by me), but not ground in. They didn't do anything to the head at all - they just replaced the valves and changed the gasket. Now the head, of course, has been removed, as well as the camshaft. The valves are still dry. There is an annular mark on the first camshaft bed, on the cover and on the camshaft itself. It was as if a grain of sand had gotten in and chewed out a groove. Unfortunately, I can’t insert a photo now - only in the evening. Is there any way to treat this, or is it easier to immediately buy a new head and distributor?
There are still questions about the cylinder head, but I will ask them after a decision has been made on the issue of buying a new one/repairing the old one, so as not to describe all the possible options.
Anticipating possible questions: on the one hand, I want to understand the issue myself as much as possible, so the option of taking the entire engine to specialists and picking up the capitalized one does not suit me - I need to touch everything myself and understand it. On the other hand, it is clear that for measurements (since, as already mentioned, there is not only the skill to use an indicator, bore gauge, micrometer and prisms, but also them themselves) and boring-grinding-milling, it will be inevitable to turn to them. Well, plus lack of time and limited funds. As a result of all these factors, a certain line of behavior must be built.