Nowadays, the heat is not always clear, and corrosion products, waste or excess water are accumulated in the reservoir in carburetor structures. If this can lead to problems in the work, either the device itself or the car as a whole, it is very important to stay in control. How can you flush the carburetor and how often it is necessary to work, as we know in our statistics.
Signs of strong laughter
The carburetor becomes difficult at both ends and in the middle. Obvious signs of intense laughter:
- difficulty starting the power unit in a car;
- impaired functioning of the engine at idle;
- with sharp pressure on the “gas”, failures are avoided;
- the car needs more tires.
It is not possible to turn off other faults that can also lead to the appearance of these signs of breakdown, unless the carburetor is not flushed, then in any situation it will not work. Before you start working, you must replace the exhaust filter in the system, so that after washing the installation in the device, including cleaning gasoline.
How to properly clean a carburetor without removing it
First of all, every owner of a carburetor car must have and always carry with him a special aerosol spray for cleaning the carburetor (the so-called “carb cleaner”). In some cases, it is enough to simply remove the air filter cover and spray carburetor cleaner on the device, after which engine operation returns to normal. Note that this approach does not always help to clean the carburetor channel, but sometimes it gives results. Let's look at this cleaning in more detail.
- In addition to the above aerosol can with a cleaning composition, you will need keys to remove the air filter cover;
- After removing the filter housing, you may need to unscrew the carburetor solenoid valve or the fuel jet holder plug responsible for the idle mode (which depends on the design of the metering device);
- After unscrewing, we gain access to the hole in the carburetor cover. Through this hole, the cleaner can be supplied to clean the channels of the idle system, as well as the transition system of the first chamber.
- In parallel, the carbicleaner should be sprayed into the first and second chambers, and also injected into the holes of the channels of the air jets of the GDS (main dosing system).
- The correct application of an aerosol is considered to be when the product is applied to the walls of the chambers themselves and diffusers, and the air and throttle valves are also treated. The nozzle in the form of a thin tube that comes with the cleaner can allows you to treat the most difficult to reach elements.
- Additionally, you should spray the cleaner where in the carburetor there is an air damper drive lever and a throttle valve drive for the first chamber, other levers and accessible drive elements. This removes dirt from the controls, allowing the carburetor injection to function properly.
- After applying the cleaner, you must pause for about 5 minutes. During this time, the product softens deposits and washes away dirt;
- The engine can now be started. After starting, by pulling out the “choke” handle (this will allow the engine to idle without a solenoid valve), you should also accelerate a little.
- Some drivers also forcibly increase the speed above idle, after which, with the engine running at higher speeds, they additionally spray cleaner into the carburetor chambers, into the openings of the air channels of the gas pump, as well as into the installation site of the solenoid valve;
- After this, you can gas again, then the cleaning procedure is repeated 2-3 times. The final stage can be considered the installation of the solenoid valve or plug in place, after which the suction handle retracts.
Please note that the valve should be tightened while the motor is running. This is done carefully, first tightening by hand, and only then using an open-end wrench. The key also turns the valve no more than 1/4 turn. It is necessary to ensure that when the wire tip is removed from the valve, the power unit begins to stall.
In other cases, it is not possible to clean the device with only one cleaner without disassembling the carburetor. The fact is that debris, as a rule, accumulates in the carburetor float chamber. As a result, the jets become clogged and the air supply channels become clogged. At the same time, the answer to the question whether it is possible to clean the carburetor without removing and disassembling it will still be in the affirmative.
Quick carburetor cleaning without cleaner
To implement the task, it is necessary to use a well-known method of cleaning the carburetor, which consists in swapping two high-voltage spark plug wires (for example, the wire from the first cylinder is placed on the 4th cylinder, and the wire from the 4th cylinder on the first). Then the engine can be started. The power unit will start, but the engine will “shoot” and “sneeze” into the carburetor. This rearrangement allows you to knock debris out of clogged jets back into the float chamber.
This is due to the fact that after starting the engine with rearranged wires, the ignition timing is disrupted and a certain pressure will be created from untimely ignition of the mixture in the combustion chambers. Having cleaned the dosing system in this way, the high-voltage power wires should be put back in place and the operation of the internal combustion engine should be checked. In many emergency cases, this cleaning method allows you to drive a car to the repair site.
Let us add that then the carburetor will still need to be removed and cleaned, since the debris that flew into the float chamber from the channels has not gone away and will clog the jets again after some time. For this reason, it is recommended to clean and adjust the carburetor for preventive purposes, that is, in advance, and not only in case of malfunctions.
To carry out the procedure, you need to know how to clean the carburetor by disassembling the device. It should also be noted that after cleaning, additional carburetor adjustment may be required, which should be performed by an experienced technician.
What is more beautiful: carefully or blown away?
The carburetor is a folding device with a large number of different parts. It is possible to remove the obstruction by washing not only the body and cover, but also the internal parts, including jets, in which channels the diameter is no more than 2 mm. It will be difficult for household minds to understand such obstructions, and the best solutions will be to blow through thin channels, for which a stream of tightly compressed air is used. It would be better to treat the cobs with an aerosol method, in order to break apart the parts of the pond, and make the channels soft and pliable, so that later blowing will be more effective.
Materials and equipment
The internal surfaces of carburetor chambers are well cleaned with acetone. You can also use diesel fuel, or buy a special aerosol. The instructions will indicate how many minutes the composition is left to sit before washing it off. Having a can of compressed air won't hurt either.
Typically, carburetor cleaning composition is supplied in the form of an aerosol. The product is sprayed, left for several minutes and washed off with gasoline. The word “washing”, moreover, may mean starting the engine. This means that assembly will need to be done in 1-2 minutes. We will leave the choice to the owner.
There is a huge selection of products on the market that help you clean the carburetor yourself. But most of the chemical compounds offered even by well-known brands are made on the basis of acetone.
Aerosols with flexible tubes - carburetor cleaners
Be careful: in addition to acetone, aerosols contain methane and propane. These substances are highly flammable.
Basic ways to flush a carburetor and cleaning methods
The two most effective ways to flush a carburetor:
- I’ll add some to the private ones. Partial disassembly is the most popular option for servicing a carburetor at home. To do this, remove the filter, then remove the cover and pull together all the available elements in order to remove the debris from them and put the structure back together. The effectiveness of such cleaning is high, since you can visually determine how clean the parts are.
- Outside sorting out. This is the most effective, but at the same time labor-intensive method. After disassembling the structure, soak other parts in gasoline, acetone or shampoo for cleansing. After this, you can blow through all the other elements with a strong jet.
Washing methods and products used for it
There are three ways to flush the carburetor yourself:
- without removing the engine or disassembling it;
- by partial disassembly;
- by complete disassembly.
The first option involves adding chemically active liquids (additives) to the fuel. In other words, you need to pour a certain amount of cleaning agent into the tank and continue driving your car quietly, without wasting your time. Gasoline with an additive, moving through the fuel system, will itself dissolve and remove dirt. Of course, this method cannot be called effective, and everything that we tried to get rid of will inevitably end up in the engine cylinders.
To flush the carburetor without dismantling it, special additives are used
Flushing the carburetor by partial disassembly is the most popular type of maintenance. We will have to remove the air filter, cover, remove all elements that may be dirty, wash them and put the device back together. The efficiency of this method is quite high, and we can visually determine how clean the unit has become.
To flush, you will need to remove the air filter and carburetor cover.
Well, if you remove and disassemble the device completely, soak all its parts in cleaning liquid, and then rinse them manually and blow them with a stream of air, we will get a practically new carburetor.
Not so long ago, car owners cleaned the carburetors of their cars using liquids that can usually be found at home:
- refined gasoline;
- kerosene;
- diesel fuel;
- solvent.
Yes, they do a good job of removing various types of dirt and deposits on the internal walls of the device, especially if you have the opportunity and time to soak the necessary parts in them for a while. But today there is no need to use such means. It is better to purchase a special liquid from a car store.
- Hi-Gear is a line of products for flushing the fuel system and carburetor. It has high dissolving abilities. Does not harm system elements. Available both in the form of additives and in the form of an aerosol;
Additive "Hi-Gear" for filling into a car tank
- Mannol Vergaser Reiniger is an aerosol carburetor cleaner.
Used for cleaning carburetors and injectors. Copes well with soot, oily deposits, and other contaminants; Carburetor cleaner "Mannol Vergaser Reiniger" - Jet 100 Ultra is a spray for quick cleaning of carburetors. It has the same properties, however, it acts faster.
Aerosol “Jet 100 Ultra”
Read more: Do-it-yourself design, adjustment and repair of the DaAZ VAZ 2105 carburetor, setup instructions with photos and videos
How to effectively flush a carburetor?
It’s enough to use a vikorist for home washing of standard areas, like at home for every motorist:
- high quality gasoline purifications;
- Gus whatever type;
- general officials;
- Diesel doesn't burn.
Such people cannot cope well with these tasks, it is much better for them to use aerosols. A bottle for cleaning the carburetor can be purchased at auto stores or on our website.
Why is the most popular spray for cleaning the carburetor?
Car sprays for cleaning carburetors (for example, Belife Karb & Choke Cleaner) are the most effective method. If you maintain them regularly, you can avoid a large number of problems associated with clogged carburetor parts. The warehouse contains such chemicals, organic compounds, inorganic elements and various components. Some are used as an additional language, while others are used as the main means for cleaning.
The most basic words in this book penetrate into every detail of the device, and can interfere with complex obstructions, including resinous elements on the walls and parts of the carburetor. In addition, this is the simplest way to clean carburetors. However, in folding models, a can for cleaning the carburetor will not help, and other handy tools are required. Time after time, the car carburetor still cries out for professional service, and you have to go to a car repair shop.
Review of popular cleaners among domestic motorists
The German mixture for carburetors called Vergaser-Aussen-Reiniger, which is produced by the world-famous concern Liqui Moly, has successfully passed more than one test. This company specializes in the production of innovative auto chemicals (about six thousand types of various products), popular throughout Europe.
The product we are interested in from Liqui Moly makes it possible to remove paint and varnish deposits on the carburetor body, clean all the channels of the unit, throttle valves and its other elements. The composition is made in the form of an aerosol and is approved for use without the need to disassemble the mechanism being treated. An international test has proven the high effectiveness of this composition. It easily copes with cleaning and degreasing the injection system (injection cars) and carburetor.
Article on the topic: Sign of a railway crossing without a barrier and other road signs in this place
The 3M mixture also gets good reviews. It guarantees the destruction of all contaminants without exception, has a lubricating effect on the components of the fuel mechanism, and includes about 75–80 percent of environmentally friendly volatile organic compounds. The advantage of this composition is that it is, in fact, universal, since it can be used to clean the crankcase ventilation mechanism, as well as the intake tract temperature indicator.
Products under the Hi Gear brand deserve special words. Cleaners under this brand are actively sold in European countries. Russian drivers also highly appreciate their quality. A test of various Hi Gear products has shown that they cope well with carbon deposits and all types of soot due to the fact that they are created using a unique synthetic formula, which is characterized by high activity.
The following cleaning compounds for carburetors are currently sold under the Hi Gear brand:
- HG3177: the most gentle cleaning of the system in a few minutes;
- HG3121 and HG3116: compositions that provide minimal toxicity of car engine exhaust, and are also capable of restoring the initial technical parameters of the fuel system;
- HG3201 and HG3202: processing the carburetor without removing its individual parts, reducing exhaust toxicity;
- HG3208: gentle removal of contaminants, elimination of problems that arise when using low-quality fuel.
All of these compounds are recommended to be used every five thousand kilometers of the vehicle.
Also, based on the test results, we can recommend Jet100 Ultra aerosol, designed to treat the carburetor inside and out. This mixture is very active, which allows it to cope with dust, carbon deposits, greasy films and varnishes. Jet100 Ultra is safe for oxygen indicators; in some cases, its use leads to increased engine power and improved throttle movement.
Expert opinionRuslan KonstantinovExpert on automotive topics. Graduated from Izhevsk State Technical University named after M.T. Kalashnikov, specializing in “Operation of transport and technological machines and complexes.” More than 10 years of professional car repair experience. The modern auto chemical market offers a wide range of different products, for every taste and color, from the most expensive to budget options. It is quite difficult to answer the question: which carburetor cleaner is better. The thing is that the manufacturers of these products are constantly experimenting with their compositions, giving the cleaners new characteristics. In fact, you can use almost any product that has positive reviews on the Internet and does not look like an outright counterfeit.
The cleaner must contain active components that will help clean even the most inaccessible places where it is impossible to use a nozzle. The components of such products must combat tarry contaminants. Both purified gasoline and compounds of organic origin can be used as a base.
The list of positive characteristics of carburetor cleaners is quite extensive, but you need to understand that such products are not a substitute for comprehensive maintenance of the mechanism. Cleaning products are mainly suitable for preventive purposes; if the device malfunctions due to contamination, it is too late to clean it; it is necessary to carry out full diagnostics and mechanical cleaning of the parts.
How to clean the carburetor without removing the engine?
Many manufacturers use this method because they are not able to carry out partial disassembly of the carburetor.
For such washing without dismantling, a special device for cleaning the carburetor structure (NOT AEROSOL) is installed and one cans for one washing procedure are completely filled.
Algorithm for action in cases of similar problems:
- We know a reliable gas station to sell acidic gasoline;
- remove the plug from the fuel tank;
- carefully open the jar in which the produce is sold;
- The liquid is poured into the tank using a special watering can;
- Next, we fill the tank in the car until it’s full with gasoline (burning).
After this you need to drive until the fire stops. The procedure for accepting someone is complete. This makes it easier to start the engine at the start, and also reduces the toxicity of exhaust gases. In addition, I think that by cleaning the carburetor, doing this can save fuel as much as 7%, which can be of great importance. Researchers of such treatments recommend performing this procedure after skin lesions of 3000 km. However, if you compare with other methods of cleaning the carburetor, it is not very effective, and it may be considered a quick fix.
The Importance of Carburetor Cleaning
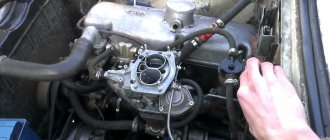
Experienced owners know where to look for a carburetor. It is located under the hood, and right on the engine intake manifold there is a carburetor injection that constantly interacts with gasoline and air. This important power system component includes several exposed parts that are susceptible to contamination. Read about how to clean the intake manifold here.
When the car is actively used, the internal and external surfaces of the carburetor are covered with a layer consisting of particles of engine oil. Engine temperature changes also negatively affect its operation. All this ultimately leads to the appearance of contamination on both the internal and external surfaces of the carburetor. This manifests itself in the formation of deposits of soot, dust, oil and gasoline film. And the longer this situation persists, the more dust will form on the surfaces of this unit.
Promyvannya with private investigations
Independent partial washing includes the dismantling of the equipment and the initial disassembly of the structure into parts. To clean the structure, a special aerosol spray is used to clean the carburetor; one can is enough for one time. Also necessary for carrying out this procedure at home:
- original nut wrenches, as well as slotted and cross screws and pliers;
- aerosol can with cleansing agent;
- compressor device or tire pump, with an additional narrow tip;
- no need for a toothbrush or toothpicks;
- dry and clean fabric, rather rough, so as not to lose lint;
- a wooden spatula or frosty stick.
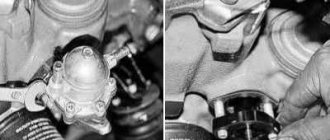
The procedure is simpler, at first glance. To do this, you need to open the hood and remove the filter, then unscrew the nuts with wrench 10, and then release the special spring bolts. Next, connect all the hoses and the tip to the wire on the solenoid valve. Only then can you unscrew the screws in the center of the carburetor body to remove it.
When removing the carburetor, you must be very careful to prevent damage to the gasket. Using a key number 13 in the device, unscrew the installed solenoid valve, as well as the plug on the carburetor filter. It will be necessary to remove all the jets, as well as remove the dispenser from the structure and the diffuser from the carburetor chambers.
After this, you can apply an aerosol sealant to all internal surfaces and treat the carburetor again. Use a toothbrush to clean the lid from the inside, and to remove serious blockages you can use a wooden spatula. After wiping it with dry, clean gantry, you can place the lid in a bowl and begin processing other parts.
Next, all jets must be purged, as well as the filter on the sample. The dispenser is also purged in a high-speed pump and emulsion tubes, as well as diffusers. If the pump or compressor is stuck, or if there are any serious blockages in the channels, then you need to remove them with toothpicks.
There is no need to wipe the internal surfaces and parts when folded with a gantry cloth, but only for the body from the outside side. Reassemble the carburetor in reverse order.
Important! You can only apply the aerosol to clean the carburetor using gloves and dry eyepieces. It contains aggressive chemicals and if it comes into contact with the skin or mucous membranes, it can cause toxicity.
How to clean a VAZ 2106 carburetor: flushing, tuning, repair
VAZ model 2106 cars were also equipped with carburetor engines, so problems with idling or malfunctions in the throttle valve are very common for them. Therefore, many people decide to clean the VAZ 2106 carburetor with their own hands and replace the repair kit. And this procedure is not easy, so before starting work you need to study the manual or advice from experts on how to clean the carburetor of a VAZ 2106.
When should you clean your carburetor?
Before you clean the VAZ 2106 carburetor, you should study its design and become familiar with the main signs of failures that arise specifically because of this unit. After all, the car also has valves and a fuel pump; defects in them can also affect the stability of the internal combustion engine.
The main symptoms of a malfunction include:
- There is no idle, that is, the engine runs at high speeds of more than 800 rpm.
- The engine only runs when the gas pedal is pressed, and when released it stalls.
- The internal combustion engine operates unstably, jerkily, and vibrates strongly.
- The car will not start, although there is fuel in the pump and there is a spark.
- The smoke changed from white to black.
- Loud popping noises are heard during operation.
- Fuel consumption has increased (here is a summary table of fuel consumption for carburetor cars)
If any of the above is found on your car, then you should not put off repairing the VAZ 2106 carburetor until later. It is entirely possible to do it yourself; you just need to have the service manual in front of you when disassembling the unit.
All of the above symptoms may be the result of clogging and coating of its parts with soot, especially in front of the intake manifold. When contaminated with carbon deposits, the air damper may not close or open completely, which is why jerking occurs or the engine stalls.
In order to return the car to its previous performance characteristics, the carburetor must be thoroughly cleaned of carbon deposits and rinsed from small debris that got in with the fuel or through a clogged air filter; I reviewed the cleaning products here.
Good to know: There are several ways to repair a carburetor, but each of them involves a different level of maintenance, which can be performed in different situations. If the engine runs normally, but there are slight jerks, then cleaning is not necessary. Can be washed without disassembly. But if the internal combustion engine vibrates strongly and there is no idle speed at all, then repairs are required with disassembly and replacement of carburetor parts from a repair kit consisting of gaskets and jets.
↑
Types of carburetors
The technology for flushing and adjustment after repair depends on the design. Therefore, the first thing you need to do is determine which model of device is installed on your car.
Throughout the history of the existence and production of the VAZ 2106 and VAZ 2107, 3 types of carburetors were used:
Photo of carburetorName and description
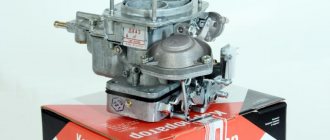
| DAAZ Weber - Dimitrovgrad plant produced a carburetor under license from Weber. They provided high speed, but consumed too much fuel. More than 10 per 100 km. |
| DAAZ model “Ozone” is a second generation carburetor. It is more economical, environmentally friendly, but also complex in design, as it is equipped with a second combustion chamber. It uses a pneumatic valve, which can block the operation of the unit if it is dirty or incorrectly adjusted. Provided consumption of less than 10 liters per 100 km. |
| DAAZ is the third modification of 21053. The device was produced under a Solex license. It is even more complex in design, since in addition to the second camera it also has feedback, which made it even more economical. But they were capricious about the quality of the fuel, because of which the jets quickly became clogged. |
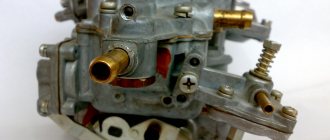
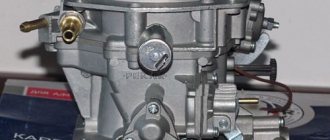
Good to know: Regardless of the model, the carburetors used on the VAZ 2106 are two-chamber and consist of 3 main parts: the device cover (protects the fuel fittings from dirt), the housing (it contains chambers, diffusers, from which the mixture is transferred to the engine), lower part (the float chamber and throttle valves are located).
It is the small parts of the carburetor that play a very important role. Thanks to them, fuel enters the cylinders in certain proportions and is correctly mixed with air to form a high-quality fuel mixture.
But during operation, due to contamination with small particles or dirt, especially with regard to the accelerator pump and jets, the operating modes of the carburetor are disrupted, which leads to malfunctions and failures when pressing the gas or “sneezing” of the carburetor. Flushing consists of removing dirt from all channels and jets, thereby ensuring their stable operation.
↑
How is a carburetor repaired and flushed?
Many problems can be eliminated by flushing the carburetor, but for it to be effective, the unit must be removed from the car. After which you will need to disassemble it to the required level so that you can gain access to absolutely all elements of the mechanism.
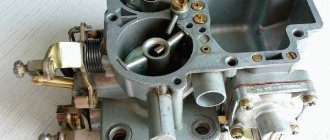
Parts of the carburetor body 2107-1107010 in the diagram: 1 - rod of the pneumatic drive of the second throttle valve; 2 — pneumatic drive housing; 3 - diaphragm; 4 — pneumatic drive cover; 5 — fuel jet of the transition system of the second chamber; 6 — fuel nozzle body; 7 — small diffuser of the second chamber; 8 — accelerator pump nozzle; 9 — screw valve of the accelerator pump; 10 — main air jet of the second chamber; 11 — emulsion tube of the second chamber; 12 — main air jet of the first chamber; 13 — emulsion tube of the first chamber; 14 — main fuel jet of the second chamber; 15 — main fuel jet of the first chamber; 16 — accelerator pump adjusting screw; 17 — fuel jet of the idle system; 18 — fuel nozzle body; 19 — return spring of the accelerator pump; 20 — accelerator pump diaphragm; 21 — accelerator pump cover; 22 — small diffuser of the first chamber; 23 — lever return spring; 24 — three-arm air damper control lever; 25 — connection rod with the throttle valve; 26 — throttle valve return spring bracket
Repair consists of the following steps:
- Dismantling the device.
- Flushing, which includes cleaning and purging of carbon deposits and adhering dirt.
- Replacement of faulty parts.
Important: You need to remove the carburetor if you are 100% sure that the problem is in the carburetor, because the problem in other components of the car’s fuel system is also possible.
↑
Where does carburetor repair on a VAZ 2106 car begin?
Do-it-yourself repair of a VAZ 2106 carburetor begins with its removal. To do this, you will need to remove the air filter, which will still have to be replaced with a new one, and dismantle its housing.
It is recommended to first seal the openings in the chambers with rags to prevent small objects from getting into them. After this, the hose going to the brake vacuum is removed from the pneumatic valve, the choke installation cable is unscrewed and the rod is removed from the gas pedal lever that controls the throttle valve.
If you have the latest Solex carburetor, then the wires from the throttle valve, air damper and economizer are disconnected, providing forced idle.
Next, remove the fuel supply and return hoses and the ventilation pipe. After disconnecting all suitable and supply elements, you can begin to remove the block itself. To do this, you need to unscrew the 4 fastening nuts and carefully remove the device from the studs. It is highly recommended to plug the hole in the collector with a soft rag.
Step-by-step instructions for removing the carburetor
For your convenience, I have compiled detailed step-by-step instructions for removing the carburetor from the photo:
Important to remember: Be sure to replace the gasket under the carburetor with a new one. To avoid air leaks.
↑
What is included in the repair kit for carburetor VAZ 2106, 21061, 2121
Spare parts included in the carburetor repair kit for the VAZ 2106:
- Trigger diaphragm
- Jet body
- Idle jet - 2 pcs.
- Main air jet - 2 pcs.
- Main fuel jet - 2 pcs.
- Needle valve assembly
- Accelerator pump diaphragm
- Filter element
- Carburetor cover gasket
- Starter gasket
- Return spring
- Accelerator pump diaphragm spring
- Idle speed screw (adjustment needle)
- Ring sealing
- For R/K 2105-10, 2105-20, 2106, 2107-10, 2107-20:
- Acceleration pump nozzle
- Spray Valve
- Sprayer gasket - 2 pcs.
- Screw M5x0.8x20
- Screw M4x0.7x15
↑
How to clean a VAZ 2106 carburetor without removing it
The first cleaning method is to do it without disassembling the mechanism. The fact is that not every car enthusiast is able to disassemble and reassemble the unit. A special technique was developed for its washing. For this purpose, a special aerosol product in cans is used. Common cleaners include “ABRO”, “Mannol”, here I made an overview table of carburetor cleaners, perhaps it will be useful to you when choosing.
To clean, you will need to perform the following steps sequentially:
- Warm up the engine and turn it off.
- Remove the filter and its housing.
- To effectively flush, remove the solenoid valve by unscrewing it from the housing.
- Special nozzles are sold with the cans, which effectively distribute a powerful stream of product. All visible parts are treated with the substance.
- Afterwards, process the external parts of the device.
- Next, you need to wait from 5 to 8 minutes, which depends on the manufacturer. During this time, the product dissolves carbon deposits, after which it is easily washed out with gasoline and the dirt burns in the cylinders along with the fuel.
Cleaning a VAZ 2106 carburetor is usually accompanied by replacing the gasket, which is located between the carburetor body and the manifold. The manufacturer produced several types of gaskets made of paronite, metal and heat-resistant special cardboard. If you are not sure about modifying your carburetor, then take it to the market with a real material example.
To replace the gasket, the seating area should be thoroughly cleaned of dirt and wiped with a rag. Lay the new one in the same way as the old one was laid, install the mechanism on it and tighten the fastening nuts.
↑
How to clean the carburetor on a VAZ 2106 using a solvent
One of the most accessible ways to flush the carburetor on a VAZ 2106 is to flush the carburetor with a solvent. The washing process is clearly shown in this video:
How to quickly blow out a carburetor with your own hands
If you do not have a compressor or any other specialized equipment for purging, you will need a regular car compressor, which can be bought in a store for pennies. How to blow through a carburetor on a VAZ 2106 with a car compressor in this video:
Carburetor settings
After flushing and disassembling the VAZ 2106 carburetor, you will need to adjust the engine performance characteristics.
There are several points for this:
- Float mechanism tongue - when the float stroke is less than 8 mm, consumption and toxicity increase, power decreases.
- Quality screw – allows you to adjust the amount of incoming air to prepare the mixture.
- Quantity screw – adjusts the amount of the finished mixture.
These two screws adjust the idle speed according to the manual. But initially they are both screwed all the way and unscrewed 3 turns.
To adjust the thrust, you will need to set the thrust; there should be a distance of 80 mm between the guides. With these settings, the throttle should open fully when the gas pedal is pressed to the floor. If this does not happen, then the throttle assembly must be cleaned.
↑
Carburetor technicians who will help with cleaning and adjusting the carburetor
Also, if you have problems cleaning and adjusting the carburetor, I have put it on the map where you can have the carburetor cleaned by a professional, I will also be glad to see your recommendations in the comments, and I will also put them on the map. I made the selection based on reviews on the Internet and specialized forums.
Carburetor mechanic in Moscow
↑
Carburetor mechanic in Yekaterinburg
↑
Carburetor mechanic in Krasnoyarsk
Author of the article: Yuri Veselov
Publication date: 11/27/2017
How often should you clean the carburetor?
As has already been said, it is recommended to pour special agents into the system through every 3-5 thousand km. A comprehensive method for cleaning automobile carburetors, which is transferred to external disassembly, is relevant once in a while, and since it does not require any special skills, it will be better to return to a service station. Since the car owner has no way of going to a service station to replace the filter and thoroughly clean the carburetor system, then you can do the cleaning yourself with frequent disassembly of the equipment - this is the easiest option for home cleaning.
Step-by-step cleaning instructions
The power system can be cleaned in two ways: with dismantling or without removal.
With removal
To clean the carburetor by dismantling, you must:
- remove the unit and unscrew all jets;
- put the rubber elements aside so that the cleaning agent does not get on them;
- place the part in a prepared container with cleaning liquid and leave for 12 hours;
- after cleaning, thoroughly blow out the mechanism with compressed air;
- assemble the unit and install it on the car;
- set idle speed.
When disassembling, it is important to remember the location and numbers of the jets.
Without removal
To wash the carburetor without removing it, you need to unscrew the air filter cover, remove the filter element from the housing, and spray a carburetor cleaning aerosol into the chambers of the unit. Then use a special nozzle to process all the holes of the power unit. If desired, the procedure can be repeated. It is necessary to ensure that there is no debris or scale left on the equipment.
Then you need to start the engine, let it run for 5-7 minutes at idle and apply the product to all cavities of the carburetor while the power unit is running. Turn off the engine and continue processing for 5-10 seconds. The last cleaning step is to adjust the idle speed, replace the filter element and screw on the cap.
There is another way to clean the fuel supply system without dismantling the elements. To do this, you need to pour a special substance into the fuel tank and refuel with gasoline. The product penetrates the unit and eats away various contaminants.
Prevention of congestion
To prevent the carburetor system from becoming clogged, it is necessary to remove the mixture, including the clear ash. For this reason, only refuel at reputable gas stations, and sell it clean and undiluted. Once a season, it is necessary to check the exhaust, exhaust and air filters, and, if necessary, replace them - this allows for greater cleanliness of the exhaust in the system, and does not allow congestion to enter the carburetor. Stable functioning of the engine and combustion system requires cleaning the carburetor using a method without dismantling the equipment once every at least 3 months.
We clean
Before you begin cleaning, remember a few important tips:
- The carburetor can be cleaned and flushed without removing it from the car;
- To gain access to diffusers and other important elements, simply remove the air filter;
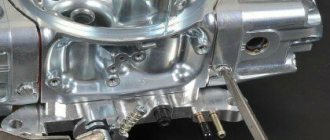
- It is better to leave the float chamber cover in place. However, if it is not dismantled, access to the fuel nozzles will be blocked.
This is what a VAZ carburetor looks like (the air filter has been removed)
https://www.youtube.com/watch?v=eBpQyH2Yf7c
The following elements are now available:
- Air jets (two identical parts in the center);
- Diffusers;
- Air dampers.
When cleaning the jets, you can unscrew them, but it is better to leave all the elements in place. Use compressed air or a special aerosol (see below). But cleaning moving parts must be done with caution: the standard factory lubricant should not be washed off.
After dismantling the strainer, you can wash it in acetone or diesel fuel and also “blow it out” with compressed air. Having installed the element in place, tighten the nut and check how tight the connection is.
Fuel filter with plug nut
To perform this check, fuel is pumped in to the maximum, rotating the fuel pump shaft by hand. The shut-off needle should block the inlet. If the cork remains dry, then no mistakes were made.
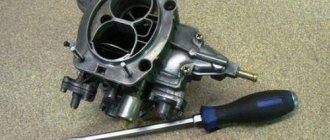
If you decide to remove the float chamber cover, you must first do the following:
- Loosen the clamps securing all fuel hoses;
- Remove each hose from the fitting;
- Disconnect electrical connectors (if any).
Float chamber cover
Reassembling the unit after cleaning it is carried out in the reverse order.
How can you flush a car carburetor at home and without special tools?
If it is possible to use special equipment for flushing a car carburetor every day, then you can do without them. To do this, you need to soak the parts overnight in gasoline or acetone (the extinguishing agent will go away) and then you can start cleaning the structural elements and blowing them off. The effect in this case will be like this. It is not recommended to pour acetone directly into the tank, as this will lead to wear of the seals and gaskets, as well as the valves formed by the rubber. It is difficult for a carburetor to flush a carburetor at home, and it is necessary to work regularly to ensure stable and reliable operation of the car.
How to use an aerosol cleaner
Despite the high effectiveness of this product, each owner must first learn how to clean the carburetor using this spray.
A special feature of the aerosol cleaner is that it has a special dispenser and a tube, thanks to which you can adjust the direction of the liquid when cleaning the required surface, regardless of the difficulty of accessing it. But to use this method, you will first have to completely or partially disassemble the power supply system itself. It is recommended to completely disassemble the carburetor. In this case, all the necessary conditions will be created to clean every surface of the working unit from contamination.
In order to better understand exactly how to clean this part, you should consider this process in the following steps:
- The first step is to find the fuel hoses and disconnect them from the carburetor. Next, you need to do the same with the air filter housing;
- after this they begin to clean the outer surface of the working unit;
- at this stage it is necessary to completely disassemble the case into several parts;
- the main internal elements of the power unit are cleaned, including membranes, diffusers, jets, etc.;
- The cleaning procedure is completed by installing new gaskets.
After the working unit has been cleaned, it is necessary to install new air and fuel filters. Additionally, you should check that the crankcase gas cleaning system is in working order. If this is not done immediately, then within a couple of months the carburetor will become dirty again and will require unscheduled cleaning.
Washing with partial disassembly
Let's consider the process of flushing a carburetor with its partial disassembly using the example of a Solex carburetor and Jet 100 Ultra. You don't need to buy a lot of it. One 200 ml can will be enough. The cost of this product is 450–500 rubles. In addition to the special liquid, you will also need:
- set of wrenches;
- Phillips and slotted screwdrivers;
- pliers;
- a container with a wide “neck” with a volume of 2–3 liters (for soaking the carburetor lid);
- a container with a wide “neck” with a volume of 0.2–0.5 l (for soaking small parts);
- kerosene (refined gasoline, acetone);
- tire pump or compressor with a tapering tip;
- toothpicks;
- old toothbrush;
- a clean, dry, lint-free cloth (preferably rough);
- a small wooden spatula (like an ice cream stick).
- Open the hood. Remove the air filter cover by unscrewing the nut with a 10mm wrench and opening the 4 spring latches.
To remove the cover you need to unscrew the nut and press the latches
Removing the air filter housing
The power wire is connected to the solenoid valve
To remove the cover, you need to unscrew five screws
The cover must be carefully removed so as not to damage the gasket.
The valve is unscrewed with a 13 key
The fuel filter is located under the plug
The jets are unscrewed with a slotted screwdriver. Below them are emulsion tubes
To remove the sprayer, you need to pry off its upper “proboscis”
Fuel jets are unscrewed with a thin slotted screwdriver
Diffusers are removed using pliers
Before cleaning, it is recommended to soak the parts in kerosene or acetone.
Apply liquid to the internal surfaces of the carburetor
The lid must be removed first from the inside, then from the outside.
After washing, the jets must be blown out with a stream of air.
Video: do-it-yourself carburetor flushing
Other washing methods
Sometimes it happens that there is no special means for cleaning the working unit nearby. In such cases, solvent No. 646 can help. Although you shouldn’t rely too much on it. The effectiveness of this cleaning method is quite low, and it only allows for a short period of time to remove contaminants from the surface of the carburetor.
The proper operation of this part depends not only on the frequency of its cleaning, but also on the product used. In order not to make a mistake in choosing this product, you need to carefully familiarize yourself with its composition and properties in the store. It is imperative to take into account the activity of using the cleaning agent. We should also not forget that all elements of the fuel system require regular cleaning. To ensure proper operation of the carburetor, it is recommended to clean it of dirt every 10-15 thousand km.
Trouble-free operation of a vehicle depends on many components, not least of which is the carburetor. Every car owner should regularly check its condition. This is especially true for those who use low-quality fuel. This factor increases the likelihood of clogging by an order of magnitude. But you can avoid the negative consequences caused by a dirty carburetor if you clean it regularly.
Every car owner can handle this task with his own hands, so you don’t even have to turn to specialists for help. When disassembling this power unit, it is only necessary to remember the location of the main parts. But first you need to understand what is the best way to flush the carburetor.
This must be a special composition designed to remove contaminants from the internal and external surfaces of the working unit. It is not recommended to save on the purchase of cleaning fluid, otherwise this may soon result in new, even more serious problems for the car owner, the elimination of which will require not only more time, but also financial costs.
Carburetor structure
The structure of the carburetor is designed approximately in such a way that there are many lines in which air and gasoline flow. For a specific engine operation, a separate system is provided in the carburetor, in which a certain mixture composition is present. The channels have a very small diameter, so small debris can get stuck in them. If this happens, the operation of the carburetor is disrupted. In this case, you will have to disassemble the carburetor and blow it with compressed air to clean all the dirty channels.
Carburetor structure
Signs that the carburetor is clogged:
1. Non-periodic engine speed. The engine runs poorly. 2. Dark smoke comes out of the exhaust pipe. 3. Spark plugs are covered with a dark coating. 4. Fuel consumption has increased.
SOLVENT CLEANING
The process is long, it will take a couple of months, but the result is worth it. Required: four jars of solvent. any grease remover for stoves and ovens. carburetor cleaner. We take the solvent, pour it into a container and soak the carburetor in it for two or three months. Observing periodically. The solvent will slowly evaporate, so it will be necessary to drown the carburetor in sufficient quantities so that after a couple of months it is still covered with solvent. The main deposits will be removed, but a layer of fat will still remain. We remove it using a grease remover for conventional gas stoves (when using a grease remover, read the instructions) Take the carburetor and place it on some surface so that it is easy to wash off the remaining solvent from it (wash off with warm water) Take the grease remover (observe precautions) and spray the product on We wait for the carburetor according to the instructions for ten, fifteen minutes. Next, we take the brush and clean it a little and we can already see the result. Remains of grease stains disappear. If it is not completely cleaned, the procedure can be repeated until the dirt completely disappears. Carburetor cleaner is used for jets and all small parts. After drying, there is not much residue left, but it comes off very quickly, you just need to wipe everything with a dry, clean cloth.