Replacing the oil pump
There is nothing difficult about replacing an oil pump. We drive the car into the pit, prepare the tools and get to work.
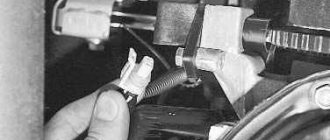
Removing the battery terminal for repair
The plug is unscrewed with a key
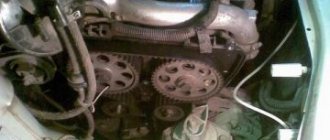
Timing belt without casing.
The location of the 6 bolts that secure the oil pump is marked with arrows
Reassemble the oil pump in reverse order.
The pan and oil pump gaskets must be replaced with new ones. Also, the new oil pump should be washed out of preservative grease and filled with oil (to prevent it from running dry during the first start after repair).
Why is an oil pump needed?
Pump appearance
The oil pump in the engine is designed to build up pressure in the oil system, for the necessary lubricating effect of all rubbing parts of the internal combustion engine. If the pressure in the system is insufficient, the lubrication effect will be ineffective, which in turn will lead to the engine being unsuitable for operation. In this case, the low oil pressure warning light on the instrument panel should light up. Therefore, you should not delay repairing the oil pump.
You are left with two options. Take the car to a service station and lose a lot of time and money, or change the oil pump yourself.
Pump diagnostics
Oil pump removed for diagnostics. Symptoms: oil leak.
Secondly, you need to check whether power is supplied to it correctly or whether a wire is broken somewhere. And only after these procedures, if the light does not go out, will you have to change the oil pump.
Why might it break prematurely?
An oil leak from the oil pump can lead to expensive engine repairs.
Replacement of the oil pump can also be caused by poor quality oil, which will lead to rapid clogging of the oil receiver grid and subsequent lack of oil pressure in the system. It is not uncommon for an oil pump to become wet and oil to leak from underneath it. In these cases, you can get by by replacing the gasket and cleaning the oil receiver mesh.
VAZ 2112: changing the oil is not a difficult job even for a beginner
Oil change VAZ 2112
Changing the oil in a VAZ 2112 is not difficult even for a non-professional, so you should not take your car to a car service center for this procedure, of course, if it is not under warranty. Changing the oil for the VAZ 2112 is quite simple, the main thing is to follow the order of work. In this case, you will need to stock up on the necessary tools and consumables in advance.
When to change the oil
This question is quite important and this work should be done according to certain rules. You shouldn’t simply replace it every certain period of time. You just need to do this on time:
- It is recommended to change the oil for the VAZ 2112 after a mileage of about 8,000 or 10,000 km. But this again depends on operating conditions (long idling - winter periods), it is recommended to change the VAZ 2112 oil at lower mileage. A dark color of the oil, as a rule, will signal the need for this procedure; this indicates that combustion products are present in the oil, and accordingly will negatively affect the performance of the oil (washing out combustion products and mechanical wear, heat removal and transfer, lubrication) .
- Changing the oil on a VAZ 2112 must be done after a trip, until the engine has cooled down. If the engine is cold, you need to start it and warm it up to operating temperature. This must be done in order to reduce the viscosity of the oil in order to drain it as completely as possible from the crankcase.
Attention: When replacing, it is necessary to use the same brand of oil and fill in the oil that was previously in the engine. If you decide to change it to another, you will need to select an oil that is acceptable for this engine. Since in certain cases, when mixing oils of different manufacturers and names, it may foam and, accordingly, the main performance qualities are lost (heat removal of wear and heat products, lubrication). If you still decide to change the brand of oil, you should flush the engine lubrication system with flushing oil or the oil that will be used.
- If you are changing the fluid, after draining the old oil, you must fill in new oil to the lower oil level mark. Start the engine and let it idle for ten minutes. Drain the oil and only then change the oil filter. Now you can safely fill in new oil to the required level. If the minimum level is on the dipstick, there is a risk of insufficient pressure and lubrication, and overheating is also possible. If, on the contrary, the maximum level, then this can result in squeezing out the seals and causing a leak through them.
On our website you can find many detailed photos, as well as videos in which you can examine the processes in detail. Below are detailed instructions on how to change the oil in a VAZ 2112 with your own hands.
There are two methods for changing the oil
Changing the oil in a VAZ 2112 with engine flushing
After the old oil is drained, flushing oil is poured into the engine and the car is idled for about 10 minutes, after which the flushing oil is drained and new engine oil is poured in (the disadvantage is that the remains of the flushing oil remain and as a result they can cause engine operation have a negative impact). Since then the remains of the flushing oil will be mixed with the working oil, and the properties and tasks of these oils are different, which will accordingly have a negative effect on the performance characteristics.
Changing the oil in a VAZ 2112 without flushing the engine
After draining the old oil, new engine oil is immediately poured in (the disadvantage is that the remnants of used engine oil with the presence of combustion products will mix with the new engine oil, thereby reducing the working life of the oil).
Why do you need oil at all?
I often hear that oil is the lifeblood of the engine. This is not entirely true, of course, the comparison is very rough, but still, the engine will not function without oil (or it will, but not for a very long time).
Modern motor oils lubricate and protect all rubbing parts, and these are pistons (with their rings), shafts, bearings, etc. Let's just say that good oil extends the life of the engine by many thousands of kilometers.
BUT oil must flow through the system, just like blood itself through human vessels, if the oil is simply poured in a pan and does not go to the rubbing parts - IT IS USELESS!
Work order
Any job requires the right approach and competent execution. And this one is no exception. When performing, you should follow some rules:
- It is necessary to change the oil with the engine fully warmed up. It is advisable to carry out work on an inspection ditch or lift. Unscrew the plug from the filler neck. This will prevent vacuum from forming in the upper part of the engine and will ensure excellent oil drainage.
Oil change VAZ 2112
- We unscrew the oil pan plug with a 17 key and pour the oil into a container whose volume should be at least 4 liters. This operation should be performed carefully, as the oil may burn the skin on your hands. It is best to unscrew it using a wrench with a handle (open-end or socket) and allow the unscrewed plug to fall into the container for drained oil and then catch it after cooling. The oil drains for at least 10 minutes; you must wait until the oil has completely drained from the crankcase.
- Unscrew the oil filter using a puller
Replacing the VAZ 2112 oil filter
- If there is no puller for the oil filter, you can use a screwdriver or a large nail. In a convenient place perpendicular to the fitting in the filter, the filter housing is pierced and unscrewed by rotating the resulting handle of the device. We also allow the oil to drain completely from the engine fitting.
- Before installing a new oil filter, you need to fill it with new engine oil approximately half of its volume and lubricate the filter O-ring with engine oil. This will prevent the lubrication system from becoming airy when starting the engine after replacement.
- After this, tighten the drain plug on the engine crankcase with a wrench. The plug has a self-sealing conical thread and does not require the installation of any additional sealing gaskets.
- Then add the rest of the oil. In order to control the oil being poured, you must use a dipstick (oil level indicator). The oil level should be 2/3 of the lower acceptable oil level mark on the dipstick. We slowly fill the oil to prevent overflow; it is necessary to constantly monitor the level, since due to the increased viscosity the level will slowly rise.
- After you fill in the oil, you need to tighten the oil plug and install the dipstick in place.
- We start the engine. And then, as soon as the oil pressure warning light on the instrument panel goes out, we turn off the car. Check the oil level again. If necessary, add more. This completes the oil change in the VAZ 2112; in order to understand this process in more detail, you need to watch the video.
Engine diagram and structure
Many motorists know the structure of the main power unit, but not everyone remembers it. In order to understand how the process itself occurs, let us recall how the engine works.
Engine diagram
1 - channel in the cylinder block for supplying oil to the oil line of the cylinder head; 2 — channel in the cylinder head; 3 — pipe for exhausting crankcase gases into the air filter housing; 4 - oil filler cap; 5 — exhaust hose pipe; 6 — pipe for removing crankcase gases into the throttle space; 7 - oil line in the cylinder head; 8 - camshaft; 9 — oil supply channel to the camshaft bearing; 10 — oil pressure indicator sensor; 11 — pressure reducing valve; 12 — channel for supplying oil from the filter to the main oil line; 13 - oil pump drive gear; 14 — driven gear of the oil pump; 15 — oil supply channel from the pump to the filter; 16 — anti-drainage valve; 17 — cardboard filter element; 18 — oil sump; 19 — oil receiver; 20 - drain plug; 21 - bypass valve; 22 — oil filter; 23 — oil supply channel from the crankshaft main bearing to the connecting rod; 24 — oil supply channel to the crankshaft main bearing; 25 - main oil line
How does engine lubrication occur (diagram and explanation)
Engine lubricant circulation diagram
So, when the issue of engine design has been considered, we can proceed directly to the consideration of lubrication. The system itself is considered combined.
Using pressure, the following are lubricated: main and connecting rod bearings of the crankshaft, camshaft bearings, cylinder walls (using splashing), pistons and oil scraper rings, the camshaft itself, valves and pushers.
The oil pump is located inside the engine, and only the cover cap is visible from above. The oil pump drive is mechanical, forced.
Schematic representation of oil circulation
Replacing lubricant
In order to change the oil, you will need a tool, 5 liters of oil (about choosing oil here) and an oil filter.
Shel Helix oil recommended for filling into the 10 series Lada engine
So, let's look at the sequence of actions:
We remove the lower engine protection (if there is one, of course). Unscrew the oil pan drain plug.
We wait for the oil to drain. While the liquid is leaking out, it is necessary to replace the filter.
To do this, use a special tool to unscrew the filter element. You need to pour a little oil into the new filter and screw it in place of the old one.
It is worth noting that between the motor and the filter there is a copper o-ring, which also needs to be replaced. We tighten the drain plug. Unscrew the filler plug
We tighten the drain plug. Unscrew the filler plug.
Using a funnel, we pour new oil into the system until the fluid indicator on the dipstick is between the MIN and MAX indicators.
Changing the oil in the box in a VAZ 2112
Changing the oil in the box on a VAZ 2112
The oil in the box on a VAZ 2112 should be changed at least every 40,000 km. You can do this work with your own hands, especially since you don’t need any special tools or specific skills. You can, of course, contact car services, but in some you will pay a lot of money for this operation, since their price for such work is quite high. For such an operation as changing the oil in a VAZ 2112 box, only an inspection hole or overpass is needed, since it is quite inconvenient to change the oil in a car that is standing on stands or jacks.
Work order
All work is performed in a certain sequence. Drain the old oil:
- In a process such as changing the oil in a box in a VAZ 2112, the oil should be drained strictly onto a warm car, then it is not so viscous and flows well from the box. For this you will need a plastic canister, cut lengthwise or a bath; its volume should be about two liters.
- Then you need to unscrew the drain plug using a 12mm wrench, after which oil will begin to flow into the bath, which must be kept as close to the drain hole as possible.
- Then, to speed up the process, you can use a 17 key to unscrew the filler neck. You need to be careful at the moment - the oil pressure from the gearbox will increase greatly. When the oil is completely drained, it is necessary to wipe the seat and drain plug with a rag or a dry ordinary rag, then firmly tighten the plug.
Attention: When performing an operation such as changing the oil in a VAZ 2112 gearbox, it is strictly prohibited to use any solvents or detergents.
Fill the gearbox with new oil:
- To fill the gearbox with new oil, you will need a special pump or syringe, but since not everyone has them, you can also use traditional methods. To do this, you will need a large plastic syringe with a thick hole coming out (you need to know that in a gearbox with four gears there is 1.3 liters of oil, and in a five-speed gearbox - 1.5 liters).
- A tightly flexible hose or long tube about 20-25 cm must be attached to the spout of the plastic syringe; the tube or hose must be tied to the outlet of the syringe with tape or tape to prevent leakage.
- Then draw oil from the canister and drain it through the filler neck into the gearbox. Periodically it is necessary to monitor the oil level using improvised means - a wire hook or your finger. The oil level in the lower part of the filler neck corresponds to the normal level. After the oil has been changed in the VAZ 2112 box, we also wipe the filler plug dry and tighten it tightly.
Attention: I would like to note one more point. If you bought a used VAZ 2112 car, you need to change the oil in the gearbox immediately - as a rule, the cheapest oil is poured before sale, which does not protect the gearbox parts well from wear.
One more fact needs to be noted. If you purchased a used VAZ 2112 car, then you need to immediately change the oil in the VAZ 2112 gearbox - before selling, as a rule, they fill in the cheapest oil, which does not protect the gearbox parts well enough from wear.
Characteristics of the motor 2112
The main task of the designers when creating the ICE 2112 was to improve the technical characteristics to the world standards that had increased at that time, so a gas distribution scheme with two DOHC camshafts and a four-stroke engine diagram with 16 valves were adopted. For the safety of the valves, pistons with grooves were used by default, which in theory should not bend them if the timing belt breaks.
Design 2112
However, if the first two design solutions in the engine are not satisfactory, then there was a flaw with the pistons that was not corrected by the designers:
- a groove depth of 3 mm and a gasket thickness of 1.3 mm were not enough for a valve stroke of 7.5 mm;
- Due to the “extra” 1.8 mm, the piston bends the valve.
In subsequent modifications, the deficiency was corrected by installing pistons 21124 with a groove depth of 5.5 mm. The basic version of the 21120 motor remained defective, so the engine is characterized by the following performance properties:
| Manufacturer | AvtoVAZ |
| Engine brand | 2112 |
| Years of production | 1998 – 2006 |
| Volume | 1499 cm3 (1.5 l) |
| Power | 68.4 kW (93 hp) |
| Torque moment | 133.3 Nm (at 3400 rpm) |
| Weight | 120 kg |
| Compression ratio | 10,5 |
| Nutrition | injector |
| Motor type | in-line |
| Injection | electronic multipoint |
| Ignition | separate coil for each spark plug |
| Number of cylinders | 4 |
| Location of the first cylinder | TVE |
| Number of valves on each cylinder | 4 |
| Cylinder head material | aluminum alloy |
| Intake manifold | integrated with the receiver, the module is made of polymer |
| An exhaust manifold | exhaust pipe combined with the converter |
| Camshaft | 2 pcs. |
| Cylinder block | cast iron, weight 28.8 kg |
| Cylinder diameter | A class – 82 – 82.01 mm B class – 82.01 – 82.02 mm C class – 82.02 – 82.03 mm D class – 82.03 – 82.04 mm E class – 82.04 – 82.05 mm |
| Pistons | groove 3.5 mm deep |
| Rings | steel 21083-1004029 or cast iron 21083-1000100-10 |
| Piston diameter | A class –81.94 – 81.95 mm B class – 81.95 – 81.96 mm C class – 81.96 – 81.97 mm D class – 81.97 – 81.98 mm E class – 81.98 – 81.99 mm |
| Crankshaft | base from 21083, added torsional vibration damper |
| Number of main bearings | 5 |
| Piston stroke | 71 mm |
| Fuel | AI-95 |
| Environmental standards | Euro-3 |
| Fuel consumption | highway – 5.9 l/100 km combined cycle 7.5 l/100 km city – 9.4 l/100 km |
| Oil consumption | maximum 0.5 l/1000 km |
| Engine oil for 2112 | 5W-30, 5W-40, 10W-40, 15W-40 |
| Engine oil volume | 3.5 l |
| Operating temperature | 90° |
| Motor life | declared 150,000 km, real 250,000 km |
| Adjustment of valves | hydraulic pushers |
| Cooling system | forced, antifreeze |
| Coolant quantity | 7.8 l |
| water pump | with polymer impeller |
| Candles for 2112 | BCPR6ES or AU17DRVM, thread length 19 mm, diameter 14 mm, key 16 mm |
| Gap between spark plug electrodes | 1.1 mm |
| timing belt | DOHC |
| Timing belt | 136 teeth, belt width 25.4 mm |
| Cylinder operating order | 1-3-4-2 |
| Air filter | Nitto, Knecht, Fram, WIX, Hengst |
| Oil filter | with check valve |
| Flywheel | 128 teeth 10.1 mm high, clutch surface size 256.7 mm |
| Flywheel mounting bolts | M10x1.25 mm, length 26 mm |
| Valve stem seals | code 90913-02090 inlet light, code 90913-02088 exhaust dark |
| Compression | cylinder pressure from 12 bar nominal, pressure difference in individual cylinders within 1 bar |
| XX speed | 800 – 850 min-1 |
| Tightening force of threaded connections | spark plug – 30.7 – 39 Nm flywheel – 61 – 87 Nm clutch bolt – 19 – 31 Nm bearing cap – 68 – 84 Nm (main) and 43 – 53 Nm (connecting rod) cylinder head – four stages 20 Nm, 69 – 86 Nm + 90° + 90° |
Information on what oil to use in internal combustion engines is relevant for owners, since hydraulic valve compensators are sensitive to the quality of the lubricant, therefore the manufacturer recommends semi-synthetic engines from Manol, Mobile, Lukoil, Shell and TNK.
Depending on the season, the manual recommends which oil to pour into the engine:
- winter – 5W30 or 5W40;
- summer – 20W30 or 20W40;
- all-season lubricant - 10W30.
Changing the oil receiver of the oil pump VAZ 2112
Replacing the oil receiver VAZ 2112
Attention: If there is no operating oil pressure in the engine even after changing the oil in your VAZ 2112. When the internal combustion engine is running at idle or under load. Which is reflected on the instrument panel by a never-fading red lamp with the image of an oil can. Your car may need to replace the VAZ 2112 oil receiver or replace the oil pump. You have two options - either go to a car service center and leave your “swallow” there for at least half a day, and pay a decent amount for the work. And the second option is to do everything yourself, and besides, there is nothing super complicated there.
What is the oil pump for?
The oil pump is designed to ensure oil circulation through all parts and components of the internal combustion engine to ensure their uniform lubrication and increase their service life. It is driven by the engine and is structurally divided into two types, according to the method of coupling with the crankshaft. In our case, it is directly connected to the crankshaft, that is, it rotates with it. A similar scheme for the operation of the oil pump is found in VAZ cars with front-wheel drive.
Common faults
- The VAZ 2112 pump quite often begins to leak through the oil seal, which then needs to be changed.
- Also, the oil receiver often fails, especially if you use low-quality oil, or did not replace it on time, or the oil does not meet the technical specifications (quite thick).
- Also, too much liquid will not be pumped and the low pressure signal will immediately start to light.
- In this case, the oil receiver mesh becomes dirty, oil circulation through the engine becomes difficult, oil starvation occurs, and as a result, the service life of the engine is reduced.
- This can also include a malfunction of the pressure relief valve: either it is stuck in the open position, and then the oil pressure drops, or it does not bypass, and then oil will be squeezed out through the oil seal.
The right tool tool
- Hexagon set
- Two flat-head, durable screwdrivers
- Set of ratchets and sockets
- A set of wrenches (preferably spanners and open-end wrenches).
Filming
- First you need to disconnect the negative cable from the battery.
- Draining the oil from the engine
- We take out the camshaft drive belt
Attention. After removing the timing belt, you should not turn the crankshaft or camshaft, otherwise the valve pistons will be bent, in which case you will add more repair work and the cost will increase significantly.
- We take out the crankshaft toothed pulley, then its key, using two flat-head screwdrivers.
- Then remove the oil sump.
- Unscrew the oil intake mount.
- Using a 10mm socket with a ratchet and an extension, unscrew the six bolts securing the oil pump to the cylinder block.
- Remove the unit from the engine.
Note. There is a sealing gasket between the cylinder block and the oil pump.
- Be sure to wash the new oil pump with gasoline to remove grease for preservation.
- We fill it with oil before installation so that it does not rotate dry when starting.
- It is also important to turn the drive gear in order to place the pump on the crankshaft: so that the protrusions on the gear coincide with the groove on the crankshaft.
- Lubricate the seal lip with oil before putting the pump back.
- Carefully tuck the working edge of the oil seal onto the shaft journal using a wooden stick.
- Be careful and attentive when tightening the bolts so as not to strip the threads.
- Proceed in reverse order, install the remaining parts.
As can be seen from the above, this is not such a difficult job. The main thing for her is to approach it correctly and creatively. After all, proper lubrication is the basis for the longevity of a car.
Disassembly and repair
After completing the dismantling work, you can proceed in two ways:
- Replace the old pump with a new one;
- Repair the old oil pump.
Repair allows you to identify worn elements and replace them with new ones, which will restore functionality. If the breakdown is more serious than simple wear and tear of consumables, the optimal solution would be to completely replace the oil pump.
Where does withdrawal begin?
To disassemble the pump, follow the instructions.
Divide the pump into two parts. To do this, we have already unscrewed 6 bolts securing the cover to the body and used a screwdriver to pry off this cover. It came out of the pins on the body. So we remove the element and put it aside. Inside the pump housing there are driven and drive gears, which need to be removed and placed aside for now. Then we will check their condition. Next, the pressure reducing valve is removed. To do this, first unscrew the valve plug and remove the spring from the hole, and then the valve. In some cases, problems may arise with removing the valve. If you encounter this situation, gently tap the oil pump body against a piece of wood or use a wooden cone-shaped pin. It is inserted into the valve hole, the valve is hooked and removed. Having disassembled your oil pump on the VAZ 2109, thoroughly wash all its components using clean kerosene
Don't forget to wipe the parts dry afterwards. Check the condition of the cover and body of your pump for mechanical defects, chips, cracks. Pay special attention to the landing spots of the gears, where there should be no signs of wear or other mechanical defects. If they are, the pump will have to be replaced.
Condition assessment
In many ways, the performance and maintainability of the old oil pump depends on the results of checking the characteristics of the cover and body of the device. It is necessary to take measurements of the gaps.
Check location
Requirements
Driven gear seat diameter
The diameter may increase as the pump operates and friction occurs. The normal diameter of this place for the VAZ 2109 is 75.1 millimeters. If there is a deviation in the direction of increasing diameter, the pump must be replaced.
Thickness of the mating wall
Under normal conditions, this parameter is 3.4 millimeters. If the gap is less than specified, the pump is replaced completely
Drive gear thickness
The normal value is 7.42 millimeters. When the size is reduced, the pump goes to a landfill, and a new one is installed in its place.
Driven gear thickness
For her, the normal parameter is a thickness of 7.35 millimeters. As with the drive gear, deviation from the norm means replacement
Drive gear axial clearance
To measure, take a metal ruler and feelers of 0.12 and 0.15 millimeters. The gap is checked as follows: a gear is placed in the pump housing and a ruler is placed on top with its end. The gap between the end of the ruler and the plane of the feeler gauge is measured. For the drive gear, the gap is 0.12 millimeters
Axial clearance of driven gear
The method for checking the gap is exactly the same. Only for the driven one the normal indicator is 0.15 millimeters
Condition of the pressure reducing valve and socket
Assessing these parameters is very important. If you find mechanical damage on the surface, the element cannot be used further.
If the spring is bent or stretched more than normal, then replace the element. There is no need to completely change the entire pump.
Determining which gear is which is not difficult. The leading one has an external tooth, and the driven one has an internal one, that is, the element is smooth on the outside.
driven gear
Reassembly
Having completed the repair and reassembly of the old oil pump, or having decided to completely replace it, pay attention to several important nuances of reassembly
- Before installation, rotate the pump gear so that the lugs match the flats on the crankshaft.
- Be sure to lubricate the working edge of the oil seal with engine oil. This will allow you to easily slide the oil seal onto the crankshaft journal.
- When installing, be sure to trim the edges of the seal using a thin piece of wood. After this, you can fix the pump and return to their places all the elements dismantled at the stage of preparation for repair.
- After completing assembly of the unit, be sure to adjust the tension of the generator belt and camshaft belt.
Oil pump VAZ 2112
Engine oil pump, a device necessary for injecting oil from a running engine, which is under pressure to the moving surfaces of the engine mechanisms. It is designed to increase the pressure in the internal system of the engine, and is thus used to provide lubrication to all operating parts of the internal combustion engine.
Malfunctions
Most often, the pump of the VAZ 2112 and other VAZ models with front-wheel drive leaks through the seal, which has to be changed.
The oil receiver also often fails, especially if you use low-quality oil, or missed replacing it in a timely manner, or the oil does not meet specifications (too thick).
Too liquid simply will not be pumped and the pressure sensor will immediately light up.
In this case, the oil receiver mesh becomes clogged, the circulation of oil through the engine becomes difficult, causes oil starvation, and as a result, the service life of the engine is significantly reduced.
This includes a malfunction of the pressure reducing (bypass) valve: either it is stuck in the open position, and then the oil pressure drops. Either it does not bypass, and then the oil will squeeze out through the oil seal
Replacement
The order of dismantling work:
First of all, it is necessary to drain the oil from the engine crankcase;
After all the oil has drained onto the pan, you need to remove this very pan;
Remove the oil sump;
Then you need to unscrew the oil receiver mounting bolts;
Now you can remove the oil receiver itself;
Remove the sealing gasket of the oil receiver;
Remove the camshaft drive belt;
Remove the crankshaft pulley;
Unscrew the bolts and remove the oil pump together with the sealing gasket;
First you need to thoroughly clean the oil receiver mesh from dirt, and then rinse it with white spirit. If the mesh cannot be cleaned or damage is visible on it, then it is necessary to replace the oil receiver itself. Our industrial portal provides the opportunity to all registered customers to purchase or order any vehicle part from a special catalog from manufacturers;
The new device is installed on a VAZ 2114 car in directly proportional order from removal. And before installing it, do not forget to replace the old sealing gaskets with new ones.
After you have replaced the VAZ 2114 oil pump, you need to fill in new oil.
A very important point when working to troubleshoot a car's oil pump is the tightening torque. In particular, if you tighten the pan, the tightening torque of which is only 0.5-0.8 kg, then the gasket will come out. As a result, oil will leak. Do not allow the gasket to be squeezed out from under the pan. Therefore, for a VAZ 2114 car, the tightening torque of the oil receiver mounting bolts is 10 N•m, and the tightening torque of the mounting bolts of the unit itself is 12 N•m.
Removing the engine oil receiver of the VAZ 2110, 2111 and 2112 is performed to replace it or when carrying out other work in which the presence of the oil receiver will interfere.
Prepare a standard set of tools and perform the following sequence of actions:
- Remove the oil pan (see “Removing the oil pan”).
- Using a 10mm wrench, unscrew the two bolts securing the oil receiver to the second main cover and one bolt to the oil pump housing.
- We remove the oil receiver.
Before installing the oil receiver, clean its mesh, rinse it with solvent and blow it with compressed air.
We replace the sealing ring of the oil receiver tube with a new one and lubricate it with engine oil.
The oil receiver is removed in the following cases: to replace the tube ring, oil pump and clean the oil receiver mesh.
We remove the oil pan of a VAZ 2110 engine
Using a spanner or socket, unscrew the 2 bolts securing the oil receiver to the main cover
and 1 mounting bolt to the pump housing VAZ 2112
we remove the oil receiver
Before installation, it is necessary to clean the mesh, wash it with solvent and blow it with air.
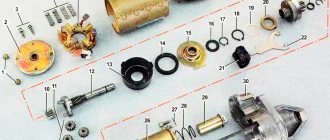
Step-by-step instructions for repairing and inspecting oil pump parts:
VAZ 2112: repair and replacement of the oil pump
1. For a detailed inspection, it is necessary to remove the oil pump.
2. First, you need to unscrew the bolt (1) and remove the crankshaft position sensor (2), which is only available on engines with a fuel injection mechanism.
3. When disassembling the pump, you need to unscrew the six bolts and remove the pump cover.
4. Using two screwdrivers, you need to lift the pump housing so that the pins on the housing can come out of the holes located in the cover of the VAZ 2110 oil pump. Now remove the housing itself by disconnecting it from the cover.
5. We take the gears out of the cover: first the driving one, and then the driven one.
6. Now you need to unscrew the pressure reducing valve plug. An O-ring must be installed under this plug. Inspect the ring - if it is too compressed, it needs to be replaced.
7. Having unscrewed the plug, we take out the spring of the pressure reducing valve.
8. Now we take out the valve itself, gently tapping the body on a clean wooden stand. If the valve does not come out, it must be removed using a thin pointed object, preferably also wooden, so as not to damage the surface.
9. Now you need to carefully inspect the aluminum cover for visible signs of wear, mechanical damage, deep scratches in the contact areas of the gears. If found, the cover must be replaced with a new one.
11. The size of the maximum permissible diameter of the driven gear socket is 75.1 mm, so we measure the diameter, and if it exceeds the permissible one, we will also have to replace the housing.
12. Now you need to measure the width of the body segment in the middle part. If the measured value is less than 3.4 mm, the VAZ 2110 pump housing must be replaced.
13. Check the gears. The thickness of the drive should not be less than 7.42 mm. We measure: if it is less, we replace the gear.
14. The same applies to the slave. If the thickness is less than 7.35 mm, the gear must be replaced.
15. Then we check the axial clearances of the gears. It is necessary to install the drive gear back into the housing, after which we apply a steel ruler to the housing and use a feeler gauge to measure the gap between the gear and the ruler.
16. In the same way, measure the axial clearance between the attached ruler and the driven gear. For the drive and driven gears, the maximum permissible axial clearance is 0.12 mm and 0.15 mm, respectively. In cases where these values are exceeded, the gears must be replaced with new ones.
17. Through calculation, more accurate values of axial clearances can be obtained. To do this, a micrometer is used to measure the thickness of the oil pump housing along the outer surfaces, as well as the thickness in the area of the sockets for the drive and driven gears along milled surfaces in several places. The axial clearance is calculated based on the difference between the arithmetic mean of the socket depth and the measured thickness of the gears.
18. The next stage of repair is to inspect the pressure reducing valve seat to detect rough scratches and other deep mechanical damage on the inner surface. If found, the cover must be replaced.
19. If burrs and deep mechanical scratches are detected on the pressure reducing valve itself, it must also be replaced with a new one.
20. We also replace a bent, broken/broken or cracked pressure relief valve spring. The height of the spring in its free state is normally 44.72 mm; the same parameter under a load of 4±0.24 kgf is 31.7 mm. If there is a discrepancy, the spring must be replaced.
21. Assembling the oil pump. We install the driven gear with the chamfers on the teeth towards the housing.
22. Then install the drive gear in the same way - with the chamfers on the teeth facing the body. The gears must be lubricated with engine oil before installation.
23. Now you need to install the cover on the body and tighten the fastening bolts.
24. Before installing the pressure reducing valve into the seat with the bottom down, it must be lubricated with engine oil. Then you need to install the spring and tighten the plug with the aluminum O-ring of the oil receiver tube, also pre-lubricated.
25. It is necessary to pour engine oil into the pump through the oil receiver tube.
26. At the end of the repair and complete assembly of the car’s oil pump, turn the gears several turns so that the working surfaces of the gears are well lubricated.
Replacing the oil pump
There is nothing difficult about replacing an oil pump. We drive the car into the pit, prepare the tools and get to work.
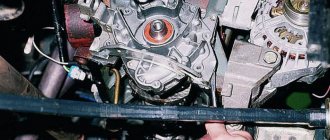
Removing the battery terminal for repair
The plug is unscrewed with a key
Timing belt without casing.
The location of the 6 bolts that secure the oil pump is marked with arrows
Reassemble the oil pump in reverse order.
The pan and oil pump gaskets must be replaced with new ones. Also, the new oil pump should be washed out of preservative grease and filled with oil (to prevent it from running dry during the first start after repair).
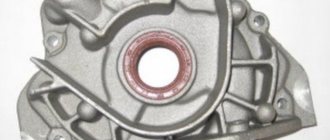
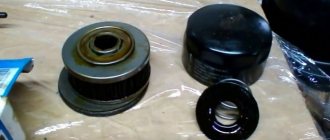
Why is an oil pump needed?
Pump appearance
The oil pump in the engine is designed to build up pressure in the oil system, for the necessary lubricating effect of all rubbing parts of the internal combustion engine. If the pressure in the system is insufficient, the lubrication effect will be ineffective, which in turn will lead to the engine being unsuitable for operation. In this case, the low oil pressure warning light on the instrument panel should light up. Therefore, you should not delay repairing the oil pump.
You are left with two options. Take the car to a service station and lose a lot of time and money, or change the oil pump yourself.
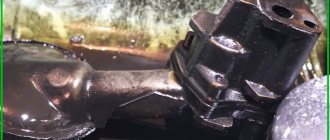
Pump diagnostics
Oil pump removed for diagnostics. Symptoms: oil leak.
Secondly, you need to check whether power is supplied to it correctly or whether a wire is broken somewhere. And only after these procedures, if the light does not go out, will you have to change the oil pump.
Why might it break prematurely?
An oil leak from the oil pump can lead to expensive engine repairs.
Replacement of the oil pump can also be caused by poor quality oil, which will lead to rapid clogging of the oil receiver grid and subsequent lack of oil pressure in the system. It is not uncommon for an oil pump to become wet and oil to leak from underneath it. In these cases, you can get by by replacing the gasket and cleaning the oil receiver mesh.
Causes of poor engine pressure
There may be several reasons for this. The most common are:
- The oil level in the engine is lower than it should be, and therefore it does not completely enter the system.
This is how the oil in the editorial car was drained. Through the O-ring of the oil dipstick. - The oil pickup is cracked. Through such a crack, air enters the system, and viscous oil cannot reach components and sensors.
- The oil pump does not work well due to worn parts.
- There is oil loss in the lubrication system.
- Inoperative oil filter.
- The oil is diluted. A replacement is required, we have already written in more detail about the choice of oil for the 16-valve VAZ-2112 engine.
The light may also come on when the oil pressure sensor is broken or a wire has simply come off it. In this case, you need to play it safe and double-check everything.
Low engine oil level
Checking the oil level
Oil cannot be sucked into the oil pump. In this case, there will be air at the outlet. In the VAZ-2112 engine, the oil receiver is located in the lowest part of the crankcase so that it is always immersed in oil.
If you do not regularly add oil and do not control its level, this can negatively affect the operation of the engine. The oil will also lose its properties. It will not be able to wash the rubbing parts, and will also fall on them in the form of sediment. A particularly thick mixture will clog the oil receiver mesh, preventing it from sucking in full oil.
The solution in this situation is to constantly monitor the oil level and add it. It is also necessary to carry out a complete oil change in accordance with the regulations. It is not recommended to drive more than 15,000 kilometers on one oil. The oil change on the VAZ-2112 should be done every 10,000 - 15,000 km.
Oil pickup cracked (clogged)
Cleaning a clogged oil receiver
An oil receiver is located between the pump and the oil. When it cracks, a vacuum occurs in the tube and oil cannot enter the system. The cause of such a breakdown may be engine vibration, which results in the formation of a crack. It can increase during operation, taking less and less oil. This could also be caused by a manufacturing defect. This will require a complete replacement of the part.
We recommend: Possible malfunctions and their independent elimination on Eberspacher autonomous heaters
Oil pump failure
Oil leak from oil pump
In this option, the pump will pump less oil into the system than it may need. As a result, the pressure in the system will not be sufficient. This will be especially noticeable when starting the engine.
Losses in the lubrication system
To distribute the oil evenly between all components that require lubrication, one pump will not be enough. This will require coordinated work of other parts. Among these we can note:
- Oil nozzles.
- Crankshaft bearings.
- Gaps at the oil filter mounting location.
- Broken bushing on the balance shaft.
Oil dilution
Since liquid oil passes through all the cracks that are in the system, the pump cannot create sufficient pressure in it. Such unsuitability of the oil may occur due to the fact that it loses its performance properties. Its additives stop working, and it can additionally be diluted with gasoline.
Oil filter failure
In the context in the literal sense of the word. Look how much dirt it filtered out. Here is the answer to the question about his role!
The filter has valves and an element that cleans the oil. When the latter becomes clogged with dirt during operation, it can no longer pass oil through itself. Then the bypass valve helps him. It is normally in the closed position. When the filter becomes clogged, oil begins to flow through the valve. But if the valve hangs in the closed position, then there is nowhere for the oil to come from in the system. In this case, the engine begins to starve of oil. The way out of this situation is to timely change the oil and filter.
Replacing the Oil Pump VAZ 2112 16 Valves
replacing oil pump
VAZ 2110 in the house
Replacement of
oil pump is required in case of its complete or partial breakdown. In most cases, a faulty oil pump can be detected by certain characteristics, such as excessive or very low oil pressure at idle.
Where is the VAZ 2110 oil pump located?
Residence pump For many, this is a mystery, because it is located in the engine oil, and to get to it, you need to drain the engine oil. The oil is poured into a clean canister after it is made. replacement
oil pump refilled into the engine. Replacing the VAZ 2110 oil pump is necessary in case of its complete or partial breakdown. When replacing the timing belt on a VAZ 2114 car, one of the stages of work is replacing the pump - the cooling system pump. Replacing the oil pump is carried out at the inspection hole or lift using a standard tool box. Manual replacement of the VAZ 2112 alternator belt with 16 valves. In this article I will tell you how to replace the oil pump on a VAZ 2110 at home when necessary.
replacing the oil pump VAZ - step-by-step guide
1. VAZ 2110 with engines 8 and 16 valves and the operation of the oil pump. There is a pump replacement. You need to drain the oil before you start removing the pan, but it is best to do this “hot”. To do this, warm up the engine to operating temperature, replace the oil tank, unscrew the drain hole and wait until the oil is completely drained.
2. Replacing the water pump (Pump) on a VAZ 2113, VAZ 2114, VAZ 2115. When draining the oil, unscrew the three locking bolts for protection. “8” it closes the flywheel near the crankcase.
Troubleshooting
Direct connection of the pump to the crankshaft avoids damage associated with its drive. This, however, does not exclude the possibility of other malfunctions.
The main malfunctions of the VAZ 2110–12 oil pump include:
- clogging of the oil receiver mesh;
- damage to the device body;
- wear of gear seats in the housing and cover;
- wear of the drive or driven gear;
- damage to the pressure reducing valve;
- deformation or damage to the valve spring.
A constantly burning warning light in the form of an oil can indicates a drop in pressure in the lubrication system to a critical level
Signs of oil pump failure may include:
- critical oil pressure warning light on the dashboard;
- engine overheating;
- high-frequency knocking (clattering) at the pump location.
The design of the VAZ 2110–12 engine does not provide for the installation of an oil pressure sensor. Like most modern cars, representatives of the tenth family are equipped only with an emergency (critically low) pressure sensor. When the pressure in the system drops, a warning light in the form of a red oil can lights up on the instrument panel. However, this lamp can also light up in the event of other malfunctions (failure of the sensor, break in its electrical circuit, oil leak, etc.).
Engine overheating also cannot be attributed only to symptoms of a faulty oil pump. It usually occurs due to problems in the cooling system.
As for the knocking coming from the oil pump, not everything is clear here either. Sometimes, when gears or housing elements wear out, the device may produce a high-frequency knocking sound. As a rule, it is associated with the formation of play between the gears and the housing (cover) and is most clearly audible at idle. However, similar sounds can also be produced by worn bearings (tension or guide rollers, pumps, crankshafts).
The process of replacing the oil pump on a VAZ 2110-12 is quite simple and does not involve the use of any special tools. However, to do this you need to buy a new pump and spend some time. Therefore, before replacing the device, you should make sure that it is the one that is faulty. This can be done using the following algorithm.