Optimal operation of a car engine depends on many parameters and devices. To ensure normal performance, VAZ engines are equipped with
Electronic engine control unit
The VAZ 2107 engine control unit is the main element responsible for the proper operation of the entire internal combustion engine. The block processes a huge number of different processes. All sensors that are installed on the “seven” are directly connected to the computer. It is he who reads information from the sensors and sends signals to fuel injection with the required amount of gasoline and fuel concentration. If the ECU breaks down, the car may stop starting or have problems similar to signs of failure of any of the sensors.
The engine block is located under the glove compartment on a special bracket.
VAZ sensors - the main sensors on injection VAZ cars
So, dear visitors, today we will tell you about the main sensors on the VAZ. Since the operating principle of injection engines in the AvtoVAZ line is the same, in principle we have put together a manual on the sensors that are installed on injection VAZs by the manufacturer, and have prepared a brief description of the operating principles and purpose of each of the sensors below. Indeed, in essence, the very principle of operation of an injection engine is the interconnected work of the “brains” (ECU) and various kinds of sensors; there is a constant exchange of information between them and, depending on the totality of certain indicators of the sensors, the controller prepares the mixture and ensures stable and correct operation of the engine.
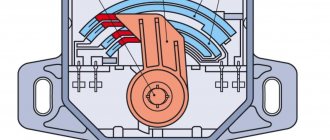
So let's start with the crankshaft position sensor DPKV . (pictured above)
Without this extremely important sensor and if it malfunctions, the car simply will not start. DPKV generates signals to the ECU using a special toothed disk, on which, upon careful examination, you can see what appears to be a “missing” tooth; this disk is installed directly on the crankshaft. DPKV on VAZs is located on the oil pump cover. The sensor is quite reliable and its failure is rare. But nevertheless, if it fails, you will have problems. We recommend carrying it with you in the glove compartment just in case.
Let's move on. Another important sensor is the throttle position sensor TPS .
This sensor works in conjunction with the idle air control valve to determine how open the throttle valve is. If this sensor begins to fail or fails altogether, then we will not see a stable idle and the engine speed will live its own life. Dips may also be felt, the engine will pull jerkily, in general it is not pleasant.
Now we are presented with a phase sensor, or camshaft position sensor DPRV .
It determines the position of the camshaft. Not used on 8 valve engines of early injection VAZs. Participates in the formation of phased injection, that is, the desired injector of a particular cylinder works at the right moment. If the sensor is faulty, then the system works as if it were not there, and fuel is supplied in pairs-parallel mode, which leads to excessive consumption of gasoline with all that it entails. That is, you can drive, but it is not necessary; it is better to replace the faulty sensor.
Now let's look at the DD Knock Sensor .
It is installed directly on the engine block between the third and second cylinders. There are two types - resonant and broadband. These two types of sensors are not interchangeable. It corresponds entirely to its name, monitors engine detonation and, depending on the presence and strength of detonation, helps the “brains” adjust the ignition timing (ignition timing). If the sensor fails, the engine will slow down and gas consumption will increase.
phase sensor
#1 apex
- Users
- 7 messages
- Car: vaz2103
#2 DAN
Users305 posts
- City: Garazhik
- Interests: Fussing with the injection brick MegaOvashch
- Auto: Injection brick MegaOvashch
#3 koshelev
Users95 posts
- City: 86
- Auto: 21061
#4 Snoor
Users27 posts
- Car: VAZ-21074
Post edited by Snoor: 28 August 2010 - 02:59
Sensor check
In order to make sure that the crankshaft position meter is working properly, it is necessary to check it. On injection VAZ-2107 cars, the crankshaft position sensor is located on the camshaft cover bracket.
There are 3 ways to check.
- The first way to check is to measure the resistance of the inductor. To do this, the sensor must be removed, having previously set marks that determine its correct position. Using a multimeter, you need to measure the resistance at the coil terminals. A resistance of 500 to 700 Ohms indicates the serviceability of the part. Lower resistance is a sign of failure.
- The second method will require measuring the inductance of the coil itself. To do this, you need a multimeter with a similar function. The measurement is carried out similarly to the resistance measurement. The performance of the part will be indicated by a value from 200 to 400 Gn.
- The third method is the most difficult, but also the most reliable. To check you will need an oscilloscope. The oscilloscope can be used either analog or digital. But for digital you will need a computer with accompanying software. The check is carried out while the engine is running. The test contacts of the oscilloscope must be connected in parallel to the coil leads. A straight line on the oscilloscope screen will indicate proper operation. Jumps, interruptions or waves on the screen will indicate a sensor malfunction.
A quick check can be done using a screwdriver and a multimeter. Connect the probes of the device to the coil terminals. Set the measuring device to the “continuity” position. Place a metal screwdriver in front of the magnetic core. While the screwdriver is in front of the core, the multimeter will show the moment the contacts open.
It is important to remember that before removing the part, you must disconnect the “-” terminal of the battery. Don't forget about setting tags. This will help you easily install the sensor and start the engine.
Symptoms of malfunction and performance check
The design of the knock sensors is almost the same; they are also identical in principle of operation. As mechanical stress increases, energy production increases. If the sensor operates normally, small electrical impulses are generated that are not passed by the resistor installed in the sensor design.
The cost of this element is usually low. The price differs depending on the quality of the sensor and the manufacturer. On average, it costs between 250 and 500 rubles.
Sensor malfunctions are quite capable of affecting the performance of the entire engine. If the sensor is faulty, the control unit immediately switches the engine to emergency mode. In order to identify a malfunction in time, you need to know the main signs of a breakdown:
- unstable engine operation when driving;
- reduction in power unit power indicators;
- increased fuel consumption;
- Difficulty starting the engine.
Signs of a faulty knock sensor on a VAZ-2107 are similar to all VAZ cars. Therefore, before replacing, it is necessary to check its performance.
To check and subsequently replace this element, you need to know exactly where the sensor is located, and also learn how to determine its serviceability.
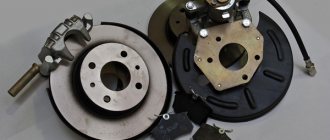
In the VAZ-2107, the knock sensor is located near the exhaust manifold, structurally designed as a massive washer that is attached to the car engine with a bolt.
The knock sensor can be checked in two ways:
- technical
- mechanical.
Verification method Actions to be performed
| Technical | Measuring the sensor resistance with a device. If it is working properly, the indicator should be no more than 2 kOhm. |
| Mechanical | It is more efficient. To do this, you need to start the engine, then you need to take a small hammer and lightly tap the sensor. If the sensor is fully operational, a decrease in engine speed should be observed, since the control unit will interpret these actions as detonation. |
Replacing the sensor yourself is quite easy. You need to use a wrench to unscrew the bolt that secures the sensor to the engine, first disconnecting the wiring. After this, a new sensor should be installed in place of the old one.
As a result, it should be said that in order to prevent such a phenomenon as detonation in a VAZ-2107 car, you should periodically check the performance of the knock sensor (like all other sensors) and, in case of failure, immediately replace it with a new one. This way you can protect yourself from unnecessary financial costs.
Speed sensor
A speed sensor is needed to read the readings and transmit them through the ECU to the car's dashboard. The sensor counts the number of rotations of the gearbox shaft and transmits them to the speedometer, which converts the rotations into km/h and shows the speed at which the car is moving.
Signs of malfunction:
- The speedometer does not work;
- Does not display vehicle speed correctly;
Fuel sensor of VAZ 2107 does not work
Replacing the fuel level sensor on a VAZ 2101-VAZ 2107
The fuel gauge performs only one important function in a car and that is the same sensor detects how much gas is left in the tank and then sends a signal to the fuel gauge located on the dashboard and you will know how much gas is left in the gas tank.
To replace the fuel gauge, you will need to stock up on a basic set of wrenches, which will have a "7" wrench and a "10" wrench, and should also have a screwdriver with you!
Where is the fuel gauge located?
One part is located inside the gas tank itself, and the other part is removed and secured to the gas tank with nuts. After unscrewing the mounting nuts and disconnecting all the wires, clamps and hoses, the sensor can be removed from the hole in which it is located, but more on that below.
For more details on the location of the sensor, see the photo below. As you can see from the photo on it, this sensor has been removed (the sensor is marked with a red arrow) and the photo shows the same hole with the fuel sensor part inserted into it.
When should I change the fuel gauge?
When the float is worn out or the sensor itself is faulty, the following situations may occur with the fuel sensor on the panel:
Firstly, the pointer will not move when the tank is full, and its needle will only be at the min mark.
Secondly, when driving or just when starting the engine, the indicator may give incorrect instructions due to wear on the sensor, for example, the tank is filled with gasoline, and the indicator needle moves or stands near the middle or almost o.
The fuel sensor on the dashboard of the VAZ 2107 does not work
Golf Mine no
young, but performs his duties properly. This is our first car, but it has become our favorite.
The fuel level sensor does not work. We fix
sensor
fuel
level , overview of the internals, why lie, some tips for setting it up. Vkontakte community:.
Not all cases are specific, but the fuel gauge is due to the gauge from it being broken, because it doesn't work, or it could even be in the wiring running from the gauge to the gauge! (If you are not sure whether a particular sensor has failed, see the article entitled "Testing sensors for VAZ performance" and this article contains a detailed description of how it can be tested. Fuel gauge or not)
How to replace the fuel level sensor, this is FLS on a VAZ 2101-VAZ 2107?
1) Remove the gas tank itself from the car first, otherwise the sensor cannot be removed for you as it will be pressed against the back of the car when you remove it. (For information on how to remove the gas tank, see the article “Replacing the tank on a VAZ”)
2) Next, unscrew the 6 nuts (several nuts have already been removed in the photo, but one nut is not visible), which strengthen the fuel level indicator flange, then remove the indicator and thereby remove it from the car.
3) After this, note to the place where the sensor flange was secured with nuts, but after you removed the sensor, the sensor flange gasket, which also needs to be removed, remained on the gas tank.
In this case, if this gasket is compressed too much, then cracks will appear on it or something else is the case, change the gasket to the newest one!
1) The new sensor and the gas tank itself are installed in the reverse order of removal, in other words, the sensor is first installed in the tank, and then the tank is installed in its place.
Tighten all 6 nuts that tighten the sensor flange crosswise, otherwise the sharp and rough movements of the flange gasket may be damaged, and as a result, the gasoline in the tank will leak through the gasket!
Before purchasing a new sensor in your car, pay special attention to the markings attached to the sensor and hence purchase a new precision sensor just like the old one!
Another method for replacing the fuel level , watch the video below:
This video clip covers all aspects of cars for the Classic family!
Replacement
If you are convinced that the problem is with the Hall sensor, then you can replace it yourself. This is not difficult and any motorist can handle it if desired. There is no point in overpaying the service station technicians; you can check it yourself and handle the replacement yourself.
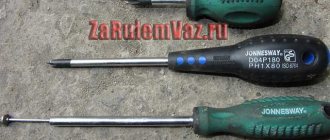
Tools
screwdriver;
You will need this screwdriver
boxes for parts to be removed.
Stages
It is advisable to carry out work in a well-lit room.
Correct connection of the block
- First of all, it is necessary to remove the distributor itself from the car and then unscrew the cover.
- Next, pull up a little and remove the slider.
- Remove the plastic cover.
- The plug is secured with a bolt and needs to be unscrewed.
- Let's take him out.
- The sensor plate is held on by bolts that need to be unscrewed.
- The vacuum corrector is fixed with bolts, we also unscrew them.
- Remove the retaining ring.
- We remove the traction and the corrector itself.
- To get the wires you need to move the clamps apart.
- Remove the support plate.
- Now all that remains is to unscrew a couple of bolts and remove the Hall sensor.
- We install a new one.
- Assembly work is performed in reverse order.
Important! If any signs of breakdown occur, do not delay repairs. Check the Hall controller immediately and replace it if necessary.
As you can see, everything is very, very simple. It is worth spending just an hour of your time to save several thousand rubles, which you will have to pay to the service station.
How to replace an adsorber on a classic
Removal: 1) At the beginning of the operation, remove the negative terminal from the terminal of the battery to which it is connected, if you do not know how to do this, then read the article called: “Replacing the battery on a VAZ”, in this article find the first paragraph, everything is described in detail in it .
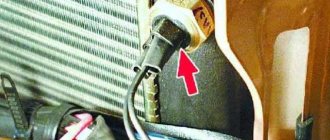
2) Now disconnect the wiring block that is connected to the canister purge valve as shown in the photo under number 1 and then, taking a screwdriver in your hands, completely unscrew the hose that connects to the pipe that comes from the purge valve (see photo 2).
Note! If you are unable to remove the hose from the pipe, then you can remove the purge valve itself, to do this, pry it from the edge as shown in the figure, thereby it will come out with the tendrils that are present on it (indicated by a red arrow) from engagement with the holes (indicated by a blue arrow ) into which these antennae rest!
When the valve is removed, start rotating it clockwise or counterclockwise (as is convenient for you) and thereby remove the hose from it at this time and move it aside so that it does not interfere with the removal of the adsorber itself from the car!
3) Then, using the same screwdriver, you will need to loosen the clamp and remove another hose, but only this time you will have to remove the vapor supply hose, which is located just below the hose that you previously disconnected from the purge valve.
4) After this, take a wrench and use it to unscrew the bolt of the clamp clamp that secures the adsorber itself (This means that it is secured by the clamp clamp, not the bolt) and when the bolt is unscrewed, remove the adsorber from the car by pulling it out through the top of the car.
Installation: This unit is installed in its place in the reverse order of removal.
How to check the functionality of the canister purge valve?
Checking the absorber valve
In order to notice and correct problems in time, regular checks of the adsorber valve are necessary. In this case, a breakdown can be identified by certain indirect signs. When the engine is idling or in cold weather, the vapor absorption system makes characteristic sounds, like the canister valve clicking. Some people confuse this sound with a faulty timing belt, rollers or other parts. You can check this by sharply pressing the gas pedal. If the sound has not changed, it means the canister valve is clicking. Experts can explain what to do if the canister valve knocks too loudly. To do this, you need to tighten the adjusting screw, and first it is cleared of epoxy resin.
The absorber valve can be adjusted.
The screw turns approximately half a turn. If you tighten it too much, the controller will generate an error. This adjustment of the adsorber valve will make its operation softer and the knocking noise quieter. However, how to check the adsorber valve for damage? Valve failure can be determined using an error diagnostic system or mechanical testing. Electronic error codes are stored in the controller's memory and indicate electrical damage. To check the valve, it is recommended to pay attention to errors generated by the controller, such as “open circuit of the canister purge valve control circuit.” Signs by which a malfunction of the adsorber valve can be mechanically determined:
- The appearance of dips at idle speed of the engine.
- Very low engine thrust.
- There is no sound of valve operation when the engine is running.
- A hissing sound when the gas tank cap is opened indicates a vacuum in the system. This is a sure sign of a malfunction in the adsorber ventilation.
- The appearance of a fuel smell in the car interior. However, its appearance can also be caused by other reasons.
Read, it may come in handy: Repair of VAZ 2107 starter
Video “Briefly about replacing the camshaft sensor on a VAZ”
You can learn more about where the VAZ camshaft sensor is located and how to replace it in a garage from the video below (the author of the video is Vitashka Ronin).
The domestically produced car VAZ-2107 is rightfully considered one of the most popular models of the Soviet automotive industry.
Not every model can boast of such a long presence on the automotive market and such high demand. This vehicle is distinguished by its versatility and is a favorite of many Russian motorists.
ATTENTION! A completely simple way to reduce fuel consumption has been found! Don't believe me? An auto mechanic with 15 years of experience also didn’t believe it until he tried it. And now he saves 35,000 rubles a year on gasoline! Read more"
It should be noted that the VAZ 2107 has proven itself excellent when driving around the city and no worse in the countryside. It is perfectly adapted for driving on the roads of the CIS countries, which, as you know, do not have high-quality road surfaces.
The first VAZ-2107 car was produced in 1982. It created a real sensation on the automobile market among Soviet motorists who were not accustomed to the variety of models. This car was superior in design to its predecessor. Compared to the VAZ-2105, it had a more solid appearance, and significant changes were made.
Replacing the camshaft position sensor
Repairing a faulty DPRV is impractical. The electronics are located in a hermetically sealed case; it cannot be disassembled without damage.
Important! To replace, you should purchase the exact sensor for your car model. Statements that it is better to install a sensor from BMW on the Priora are meaningless.
Even if you manage to find a third-party unit with suitable mounting eyes, it still will not work correctly. In the photo the DPRV of the VAZ 2112 car has 16 valves.
The fact is that the Hall element consists of two parts, calibrated with each other. If you install the wrong sensor, it will not be compatible with the mating part mounted on the camshaft. Therefore, purchase a spare part in accordance with the “Parth Number” of the vehicle’s VIN number. The manufacturer does not matter, the main thing is that it is not counterfeit.
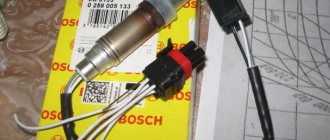
Mass air flow sensor
An air flow meter is used to count the air intake into a car engine. The fuel, before entering the combustion chamber, is mixed with air to form a fuel mixture. To properly prepare the mixture, you need to know the amount of air that has passed through the intake receiver; the mass air flow sensor helps calculate this air.
The air flow sensor is located on the intake corrugation and is screwed to the air filter housing.
Signs of malfunction:
- Uneven idle speed;
- Increased fuel consumption;
- The car stalls;
- Loss of engine thrust;
- Detonation;
Signs that a VAZ 2107 temperature sensor needs to be replaced
As stated above, replacement is necessary when there is a malfunction in the sensor readings. For a carburetor engine, you can take your time with replacement, but for an injection engine it is not advisable to postpone it. If the sensor is faulty, the incorrect operation of the injection engine manifests itself in increased fuel consumption. The sensor is inexpensive, so it is cheaper to replace it than to overpay for additionally burned gasoline.
Incorrect coolant temperature data leads to unstable engine operation, increased or excessively low idle speed. There may even be problems with starting the engine due to an inappropriate proportion of the fuel-air mixture entering the cylinders.
Oil pressure sensor
The oil pressure sensor is necessary to indicate to the driver that there is no pressure in the internal combustion engine. The oil necessary to lubricate the engine's rubbing parts is located in the crankcase, but some rubbing parts that need lubrication are located much higher than the crankcase. To provide them with lubrication, the engine has an oil pump that pumps oil into the cylinder head and lubricates the camshaft, crankshaft and much more.
Installed on the cylinder head.
Signs of malfunction:
- The oil pressure lamp does not light up when the ignition is turned on;
- The lamp is constantly on;
Adjustment process
After connecting the laptop to the car’s on-board computer, you have the opportunity to monitor all the parameters of the vehicle in its various systems and see a list of errors that negatively affect the operation of the internal combustion engine. To identify errors, the data obtained in this way must be checked against the basic parameters. In most cases, the program itself indicates a deviation from the norm. If not, then you need to look for the error by its code in the catalog.
After determining the causes of deviations from the norm, errors can be easily eliminated by adjusting certain parameters that affect the operation of the injector.
Features of replacing the VAZ 2107 temperature sensor
Replacement of the sensor should only be done on a cold engine. Before removing the sensor, it is necessary to drain the coolant, which is unsafe to do on a hot engine. When heated, the pressure in the cooling system increases and when you try to drain the antifreeze, it can escape and splash out under strong pressure. This may cause burns. If the engine is hot, it is better to open the hood and wait for the coolant to cool to an acceptable temperature.
You can only replace the VAZ 2107 temperature sensor with a similar one. Therefore, before purchasing, you should check the markings on the case. Typically, the VAZ 2107 uses T 106 sensors. If you use another type of sensor, it may provide the electronic control unit with incorrect temperature data, and accordingly, the injectors will supply a non-optimal mixture to the engine.
To avoid a short circuit, before starting work on replacing the sensor, you must remove the ground wire from the battery.
Removing the temperature sensor VAZ 2107
Remove the protective cover of the sensor and carefully disconnect the wire connector.
Use a socket wrench, socket wrench or regular wrench to unscrew the sensor, holding it by the threaded nut that is part of its body
Note: If the coolant has not been drained, it must be replaced as quickly as possible. Using a key, you only need to “tear” the sensor out of place. Then it is better to put the tool aside and unscrew the part by hand. Immediately after dismantling the old sensor, you need to plug the hole with your finger or quickly screw a new one into it. It is even safer to drain some of the antifreeze before removing the sensor.
Coolant temperature sensor
A coolant temperature sensor is necessary to transmit readings about the temperature of antifreeze or antifreeze. It also participates in the formation of the fuel mixture necessary for engine operation. Creates a richer mixture while the engine warms up. This can be noticed by paying attention to the engine speed during the warm-up period.
Located between the cylinder head and the thermostat.
Signs of malfunction:
- There are no high speeds when warming up;
- Difficulty starting the internal combustion engine;
- High fuel consumption;
Show all sensors VAZ 2107 operating principle. Engine management system
To perform the work of checking the VAZ 2107 coolant temperature sensor, you will need: a multimeter, a thermometer (with a measurement limit of at least 100 °C), a small heat-resistant container with a volume of about 0.5 liters for water and about 0.2 liters of water heated to boiling point.
The sequence of work to check the coolant temperature sensor of the VAZ 2107
1. We prepare the VAZ 2107 car for the operation (see “Preparing the VAZ 2107 car for maintenance and repair”). 2. Release the clamp of the wiring harness block and disconnect it from the coolant temperature sensor.
3. We connect the “negative” voltage probe of the engine of the VAZ 2107 car. 4. Having turned on the ignition on the VAZ 2107 car, use a voltmeter to measure the voltage at terminal “A” of the coolant temperature sensor wiring harness block. The voltage at the coolant temperature block terminal must be at least 12 V. If voltage is not supplied to the block, this indicates a malfunction in the power circuit or the computer. 5. Turn off the ignition on the VAZ 2107. 6. Using a 19 mm wrench, unscrew the coolant temperature sensor and remove it together with the sealing washer from the engine cooling system pipe housing.
7. Connect an ohmmeter to the terminals of the coolant temperature sensor. 8. Fill the container with hot water and immerse the working part of the coolant temperature sensor into it. We record the readings of the device at a temperature of about 90 'C. As the water cools, we measure the resistance of the coolant sensor at temperatures of 80, 60, 40, 30 and 20 °C.
The resistance of a working coolant sensor should approximately correspond to the data indicated in the table: Coolant temperature, °C Resistance of the coolant temperature sensor, Ohm 90 80 60 40 30 20 250 340 670 1500 2250 3500 If there are large discrepancies in the data, replace the coolant temperature sensor.
Installing a coolant temperature sensor on a VAZ 2107 car
1. Installation of the coolant temperature sensor on a VAZ 2107 car is performed in the reverse order. 2. We start the engine of the VAZ 2107 car and make sure that there is no coolant leakage from under the sensor. If necessary, additionally tighten the sensor. If it was not possible to eliminate the leak in this way, reinstall the coolant temperature sensor by applying a heat-resistant sealant to its threaded part.
The coolant temperature sensor allows you to find out the current temperature of the antifreeze located in the car's cylinder head. This sensor is sometimes called the “engine temperature sensor”, but this is incorrect. In certain parts of the engine, the temperature may differ significantly from the coolant temperature.
If the sensor fails, which creates certain problems for the operation of the injection engine: emissions of harmful substances and fuel consumption increase. The fact is that data on engine temperature is received not only by the indicator on the dashboard, but also by the electronic control unit. Depending on the temperature, the optimal composition of the mixture supplied to the cylinders is established. A cold engine needs a richer mixture, a hot one needs a leaner mixture. Also, when the engine is cold, higher idle speeds are maintained. If the sensor is faulty, the ECU will receive incorrect information about the temperature; accordingly, an over-rich mixture will enter the warmed-up engine, making the exhaust more “dirty.”
New VAZ 2107 models are equipped with injection engines, so a faulty sensor needs immediate replacement.
What are the differences?
Still, the total mass is the SAME. They may have different names, but the essence remains the same. BUT in some modern cars, instead of a mass air flow sensor (explanations and explanation will be below), DBP + DTV can be installed.
Also, some cars have an improved gas distribution system on which phase shifters are installed; they can be hydraulic or electric, both of which can have control “points”
If you don’t take complex engines, like SKYACTIV from MAZDA, because they also have “ion sensors” and don’t take into account turbocharged engines (there are a few more added), otherwise the similarity is very great.
That is, we will consider ordinary atmospheric engines without phase control systems.
Which is exactly what a large number of simple motors are. Well, let's start and look at each one individually.
Advantages and disadvantages of the VAZ 2107i
Advantages
With the introduction of injection power plants on the VAZ 2107, motorists undoubtedly felt a positive difference compared to carburetor engines:
- gasoline consumption has decreased, power has increased with the same engine size, and accordingly, efficiency is higher due to better mixture formation;
- using the on-board computer, stable and smooth idle operation and easy engine starting at sub-zero temperatures were achieved;
- the ignition system is unpretentious, does not require frequent adjustments and maintenance (no moving parts or contacts);
- a catalyst is installed in the exhaust system, which controls the level of harmful exhaust gases, this data is used by the ECU to adjust the preparation of the fuel-air mixture of the optimal proportion (less pollutes the external environment);
- There is no manual adjustment of the gas distribution system; for this purpose, there is a hydraulic chain tensioner and hydraulic valve clearance compensators. The engine became quieter;
- possibility of installing the latest generation gas equipment.
Flaws
Along with advantages, there are always disadvantages, also in the case of the injection Lada of the seventh model. Here are a few of them in comparison with carburetor counterparts:
- due to the placement of additional equipment in the engine compartment, access to some components and mechanisms is difficult;
- the catalyst is very vulnerable, it is installed under the bottom of the body, where there is little clearance and can easily be damaged when driving off-road and on deep-rut roads;
- the presence of injectors requires high-quality gasoline, otherwise it threatens to clog the fuel system;
- If the fuel supply system breaks down, repairs are required at a service station, where special equipment and specialists are available.
Change of software calibrations (ECM modification)
ECM modification
This type of injector adjustment involves making changes to some factory settings to optimize the software in order to improve the technical characteristics of the internal combustion engine. At the same time, owners of cars on which incorrectly working software was installed note a decrease in fuel mixture consumption to the values specified by the manufacturer. If the software works correctly, fuel consumption remains at the same level. Experts note the fact that ECM modification does not reduce the service life of the engine, however, the quality of the fuel used after adjustment must be at a high level.
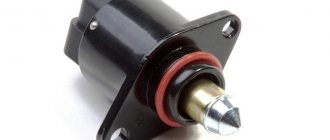
How to replace idle air control
To replace the regulator, you can go in three ways:
- with complete disassembly of the throttle valve;
- partial;
- without removal.
I changed the regulator with complete disassembly, as I discovered clogged tubes, and a dropped plug rattled inside the receiver. When disassembling and cleaning I used carburetor cleaner. Although this is the same acetone and could have been saved.
Carburetor cleaner, if it is not needed under pressure, can be easily replaced with simple acetone
In the second option, the replacement is made without removing the tubes, but with removing the throttle. In this case, the air duct clamp is loosened, the throttle is unscrewed and, by moving it a little, removed from the studs. You need to turn it a little, this will give access to the sensor mounting bolt.
In the third option, you need a special screwdriver capable of unscrewing the sensor mounting screw. Typically, this is a flexible screwdriver for hard-to-reach places or an angled attachment for a screwdriver.
Necessary tool
To replace the sensor you will need:
- Flathead screwdriver.
- Crosshead screwdriver.
- Socket or open-end wrench size 13.
Replacing the idle speed sensor
To avoid getting burned, carry out the replacement on a cool or warm engine.
- disconnect the damper control cable;
- remove the block from the throttle position sensor;
- remove the block from the XX regulator;
- disconnect the coolant supply pipes from the throttle body;
- remove the crankcase ventilation pipe.
- disconnect the air supply pipe;
- pull the fuel supply hose to the throttle valve;
- unscrew the screws and remove the IAC.
Removed VAZ regulator
Removing the faulty regulator
Remove and replace the plug
Cleaned throttle body
Assembly is carried out in reverse order.
After replacing the regulator, do not start the engine immediately. Simply turn on the ignition, wait 10 - 30 seconds and turn off the ignition. After that you can start it. This time is necessary to calibrate the new idle air control ECU.
Ideally, when starting on a cold car, the speed should rise to 1500 rpm and drop to 800 as it warms up.
DD (Knock Sensor)
Usually installed on the cylinder block, between the second and third cylinders. At the moment there are two options:
- Detonation-resonant (barrel-like).
- Broadband (tablet-like)
They are not interchangeable; they cannot be used instead of another, because they work according to slightly different algorithms.
Structurally, it is very reliable (again, there is nothing special to break). The principle of operation is this - (can be compared with a piezo lighter for a stove), the more the motor oscillates (impacts), the more it increases the voltage. Thus, detonation knocks are monitored. The ECU reads the readings and sets the ignition timing. There is a large detonation - a later ignition is installed.
PROBLEMS: If it fails, the engine does not develop power (stalls), operation is not smooth, and fuel consumption also increases.
Price about 250 - 400 rubles + installation.
What is the knock sensor on the VAZ 2107 responsible for?
Detonation is an extremely undesirable phenomenon. During normal operation of a vehicle engine, the flame front moves at a maximum speed of up to 30 m/s, and when the fuel detonates, the speed sometimes reaches 2000 m/s.
As a result of the impact of such force on the pistons, as well as the cylinder head (cylinder head), there is a high probability of serious damage after the car has driven 6,000 km.
Due to detonation, first of all, the gas distribution mechanism of the car (timing mechanism), as well as the piston group, suffers. To prevent this from happening, a knock sensor is used. The fuel mixture should begin to ignite before the piston reaches the top position. The ignition process must end when the piston returns.
During detonation, premature combustion begins before the moment when a spark occurs between the electrodes of the car spark plug. There is a strong impact on the piston, as a result of which the engine loses power, while fuel consumption increases significantly.
In the case of forced engines, detonation occurs at high speeds and can damage the engine in just a few seconds.
Detonation occurs for several reasons. Of them:
- the octane number of the fuel does not correspond to the recommended one;
- failure to comply with operating conditions;
- failure of the knock sensor.
Detonation sometimes occurs even when the ignition is turned off. The engine continues to run even though the spark supply has stopped. The reason for this phenomenon is the strong heating of the parts of the CPG, or, more simply, “glow ignition”.
A feature of an engine with an injector is the ability to change the advance angle using a distributor. All modern cars are equipped with injection engines.