How to set timing marks in Niva Chevrolet
An internal combustion engine is a complex mechanism consisting of a large number of parts. The Chevrolet Niva is equipped with a four-cylinder, four-stroke internal combustion engine of 1.7 and 1.8 liters with a chain drive gas distribution mechanism. The power system is electronic distributed fuel injection. The car model 2123 was produced from 1998 to 2002, later the model 21213. The condition of the gas distribution mechanism (GRM) is of no small importance for successful operation.
Purpose of timing marks
To ensure timely opening and closing of valves, a gas distribution mechanism is used , designed to synchronize the rotation of the engine crankshaft and camshaft. The filling of the cylinders with the air-fuel mixture and the completeness of exhaust gases depend on this. The timing belt consists of dozens of parts, the main ones of which are valves controlled by the camshaft.
The camshaft is rigidly connected to the crankshaft via a chain or belt . There can be several camshafts, depending on the number of valves. The Niva Chevrolet is equipped with engines with two valves per cylinder and one camshaft, with a chain drive.
You can find out whether the mechanism is working correctly by checking the coincidence of special marks called timing marks. Their combination is a criterion for setting the correct valve timing.
Why are chain marks set?
Valve timing has a direct impact on engine performance. As indicated, modern engines have 4 strokes :
- inlet of the air-fuel mixture. The inlet valve is open, the outlet valve is closed;
- compression. The valves are closed;
- working stroke. The valves are closed;
- release. The inlet is closed, the outlet is open.
In a situation where the timing and duration of valve opening are mismatched with the engine operating cycles , the engine will not start. This is a case of incorrect installation or open circuit.
Attention! If the piston does not have a special recess that prevents it from coming into contact with a valve that does not close in time, they occur when the chain breaks. This leads to the need for a major engine overhaul. On a Chevrolet Niva, despite special grooves, the piston and valve are deformed when broken.
If the alignment is carried out with a small but not critical error , the engine loses power and fuel consumption increases. The error is caused by wear of parts, or gear displacement by one tooth. With prolonged use of such an engine, valve burnout, increased wear due to detonation, and other malfunctions are possible.
Toothed gears are installed at the ends of the camshaft and crankshaft , onto which the chain is mounted. To prevent beating and weak tension, a damper and chain tensioner are installed between them. At the location of the upper gear under the valve cover there is a casting in the form of a weapon front sight, with which the mark on the sprocket should coincide. The marks must coincide when the piston of the first cylinder is at top dead center.
Upper mark (on camshaft sprocket)
On injection engines, the marks on the crankshaft pulley should be located opposite the core of the crankshaft position sensor.
Aligning the bottom mark with the crankshaft sensor
Misalignment by one tooth will not immediately lead to fatal consequences, but will sharply worsen the driving properties of the car. Therefore, it is necessary to set the marks accurately. If the marks do not match by half a tooth or so and cannot be aligned, it is necessary to troubleshoot the timing parts.
How to set Niva Chevrolet injector tags
Let's consider the sequence of actions when setting timing marks step by step:
- The machine is installed on an overpass or pit and secured to it with a parking brake or wheel chocks.
- In the engine compartment, you must turn off the cooling fan by disconnecting the electrical connector. The radiator is freed from its mountings and moved to the side without draining the antifreeze.
- The fasteners in the valve cover are unscrewed. After dismantling it, access to the upper pulley, timing mark and timing chain opens.
- Then rotate the pulley until the top marks coincide. The gearbox must be in neutral.
- Check the coincidence of the lower marks without displacing the shafts. If everything matches, the timing mechanism does not need adjustment; the chain tension is checked. Otherwise, the mismatch must be eliminated.
- The chain tension is weakened. The tensioner is removed.
- First gear is engaged to avoid spinning of the shafts.
- The antennae of the lock washer are released.
- The bolt securing the sprocket is unscrewed.
- The tensioner is removed. If there is no need for replacement, you can remove the chain by pressing the plunger.
- In the same sequence, the crankshaft gear mounting bolt is unscrewed. It is important not to drop it into the tray.
- The crankshaft sprocket is removed along with the chain. To do this, you need to pull it towards you.
- The position of the sprocket relative to the chain changes. As a rule, for one tooth.
- The sprocket together with the chain is installed back.
- The tensioner is installed if it was dismantled. The bolts are tightened and the washers are bent.
- If the marks coincide, the car is removed from gear, the crankshaft is rotated several revolutions.
- If the marks have not moved, the chain is finally tensioned.
At this point the operation can be considered completed . The valve cover is installed, and the gasket must be replaced. The radiator is installed in place.
Timing marks on a Niva Chevrolet, including the injector, how to set it correctly + photo
The chain also has better technical characteristics, which affects the transmission torque.
We independently set the timing marks on the Chevrolet Niva
If loosening the belt leads to slippage of the pulley teeth, the weakened chain does not allow this to happen. But with the operation of the car, the gas distribution chain also tends to wear out, stretch, burst and become unusable, which requires its replacement. At the stage of replacing the chain, it is important to carry out the installation following the marks.
This article will tell you what tags are, their purpose and how to display them on a VAZ. What are marks and their purpose in the pulley mechanism Marks in the timing system on a Chevrolet Niva car are special types of notches and holes that are located on the gas distributor pulleys. The photo shows pulleys with marks along which the timing chain is aligned.
Marks on the Chevrolet Niva set the crankshaft ignition To reduce fuel consumption on the Shnivy, you just need to align the chain with marks so that it is better fixed and holds the gas distribution mechanism itself.
If you install the chain without observing the marks, the operation of the pulleys will be uncoordinated and will subsequently lead to their rapid wear. Therefore, it is important each time when replacing a chain or parts of the gas distribution mechanism, install them in accordance with the marks.
The timing system may malfunction if the chain tension is loosened or stretched. In order to correctly set the timing mechanism according to special marks, we will consider the procedure for installing the valve timing on a VAZ. Installing the phases of the gas distribution mechanism on a special Chevrolet Niva set the ignition. So, setting the phases in the timing system on a special Chevrolet Niva set the ignition on a Niva Chevrolet car includes the following sequence of actions: Initially, we make sure the necessary tools are available: You will also need a special tool with which you will need to turn the crankshaft.
Also ensure that the marks on the bearing housing and on the gears of the camshaft pulley match. Next, you need to dismantle the front cover of the engine and pull out the chain guide, and also unscrew the oil pump screw. But you don’t need to pull it out, just loosen it.
Then you should remove the element tension mechanism. To do this, dismantle the MM line, replace the pressure sensor and unscrew the nuts of the device. After this, the tensioner can be removed.
Remove the screw on the timing pulley gear. The gear can be removed. This completes the analysis of the device. So, the procedure is as follows: To correctly adjust the ignition, the engine must be warmed up. First, using a special key to manually rotate the crankshaft, install the piston of the first Chevrolet Niva and set the ignition so that it is at top dead center.
To do this, follow the special marks that are located on the crankshaft pulley and on the timing cover.
The location of the piston can be considered correct if the mark on the pulley is aligned with the middle mark on the cover. Next you need to remove the cover of the distributor sensor to determine whether the slider is positioned correctly.
If it is directed towards the first cylinder, then the piston position corresponds to the compression stroke. If necessary, adjust the position of the slider by turning the crankshaft.
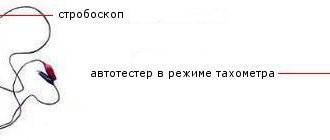
Now you should check and, if necessary, set the optimal ignition moment of the combustible mixture - prepare a strobe light for this operation. The sensor clamp should be connected to the high voltage contact intended for igniting the mixture in the first Chevrolet Niva and set the ignition. During operation, it should coincide with the middle mark on the timing cover.
We change the chain and install timing marks on the Niva Chevrolet
If alignment is ensured, then your vehicle has the correct advance angle, otherwise you will have to make an adjustment. How to remove it correctly can be found in articles about the hydraulic chain tensioner of a Niva Chevrolet car. It is possible to do without removing the chain tensioner, but for this you need to have the appropriate skills. Chevrolet Niva set the ignition
If you decide not to remove the tensioner, then you need to press out the tensioner plunger using a screwdriver. We proceed to removing the crankshaft sprocket along with the chain.
Preparing spare parts and tools for timing belt replacement
To adjust the marks you will need the following tools:
- screwdriver;
- wrenches for 8, 13, 10, or heads;
- device for turning the crankshaft;
- sealant;
- shoes for wheels (preferably).
The condition of the mechanism greatly depends on the driving style. The chain is much stronger than the belt, but it also does not like jerking or high speeds . Therefore, driving in a sporty style, with sharp gear changes and acceleration in extreme modes, quickly “sentences” the timing belt. And the engine, transmission, the car as a whole. The condition of the chain depends on the condition of the oil, tension, and alignment of the rotating parts. Therefore, when the mileage declared by the manufacturer expires, it is necessary to change not only the chain, but the accompanying parts.
Instructions for setting the ignition
Installing the ignition on a Chevrolet Niva is done using a strobe light.
The order of work is as follows:
- First you need to disconnect the vacuum regulator.
- Ignition timing (ITT) is checked by connecting the positive clamp to the positive terminal of the battery, and the ground clamp to the negative terminal of the battery.
- Next, you need to remove the tip of the high-voltage wire from the spark plug of the 1st cylinder. It should then be connected to the strobe sensor.
- Then the rubber plug is removed from the clutch housing hatch.
- Next, you need to start the engine and direct the flow of light from the strobe into the hole in the clutch housing.
- MZ can now be displayed. If it is set correctly, the mark on the flywheel should be between the previous scale mark and the middle mark. If this is not the case, the MH needs to be adjusted.
- To increase the ignition timing, the sensor housing must be turned clockwise. To decrease the angle, the sensor must be turned counterclockwise.
- When the alignment is completed, you need to tighten the sensor mounting nuts. Next, you need to check the correctness of the set MH. If necessary, the procedure should be repeated.
The ability to make adjustments yourself makes it possible to save money on service stations and improve the quality of car operation.
The effect is tight, sporty handling: the car steers less into corners and the tendency to understeer continues to decline. This allows for increased lateral acceleration and therefore faster curve travel. The front and rear stabilizer can be adjusted independently. This active distribution of stabilizer torques between the front and rear axles has a positive effect on driving behavior. The increased accuracy and maneuverability of the vehicle are greatly improved. It can be more powerful, it works faster and more efficiently due to its ability to recover, and it activates at low speed.
You will need: a screwdriver, keys “8”, “10”, “13”, a special key for turning the crankshaft.
Consequences of incorrect installation and adjustment
The gas distribution mechanism greatly influences the operation of the engine , therefore, when replacing parts and setting marks, you must be careful and avoid mistakes. But if this does happen, the engine will immediately let you know about it.
If there is a serious error, the engine will not start . If the phase shift is small, the electronic engine management system compensates for this by adjusting the ignition. If the phases are shifted by half a tooth or a gear tooth, the system is not able to compensate for such a shift.
This leads to the following consequences:
- sudden loss of traction - the car responds poorly to pressing the accelerator pedal;
- deterioration in fuel efficiency;
- the engine runs intermittently, even at high speeds;
- the coolant temperature rises, causing engine overheating with all the ensuing consequences;
- premature wear of the camshaft, burnout of valves, broken chain followed by major engine overhaul.
We independently set the timing marks on the Chevrolet Niva
The gas distribution system of any engine must work correctly. If problems occur in its operation, this leads to premature wear of the motor and numerous breakdowns. To accurately adjust the timing, special marks are used, according to which the shafts in the engine are aligned. We will tell you about the correct placement of marks on a Chevrolet Niva car in this article.
Timing marks on a Chevrolet Niva car
In a Chevrolet Niva car, the gas distribution mechanism is driven by a chain. This allows you to get better performance when operating the car. In engine models with a timing belt installed, teeth may slip when it is stretched. But, despite the higher technical performance, the chain also has some disadvantages. It is subject to stretching and may burst if the engine is used frequently at high speeds. When replacing the chain, you should pay special attention to the location of the Niva Chevrolet timing marks.
Why are timing chain marks set?
The engine of any passenger car has 2 shafts: camshaft and crankshaft. In most cars they are connected by a belt drive. On a Chevrolet Niva car this is a chain transmission, and a single-row chain is used there. The advantages of such a system are obvious: the chain, unlike a belt, never slips on the pulleys and lasts much longer. However, the chain can stretch over time, and the teeth on the shaft sprockets can wear out or even break. This will lead to desynchronization of the camshaft and crankshaft. Their work will not be coordinated, so the engine may fail. Therefore, when adjusting or replacing the timing chain, it is very important to align the engine shafts in accordance with the marks on the pulleys and timing case. This is not easy to do, since, firstly, the marks are located in hard-to-reach places, and secondly, they need to be set very accurately, since the chain, unlike a traditional belt, cannot be slightly tensioned if necessary.
Labeling.
- To set the Niva Chevrolet timing belt, you need to rotate the crankshaft until the marks on the camshaft gear and bearing are aligned. When the chain is positioned correctly, the marks on the crankshaft should align with the mark on the chain cover. For greater convenience, the notch has an oblong shape. If the notches do not match, it is necessary to adjust the position of the phases.
- To do this, you need to loosen the fastening of the lock washer, and then remove the bolt from the camshaft sprocket using a 13mm wrench.
- After this, the gearbox must be set to speed 1 so that the bolt securing the crankshaft gear does not turn. Then, together with the lock washer, the fastening bolt is unscrewed.
- It is important to remember that after carrying out these steps, the bolt is not fixed in anything, so it may fall into the engine sump. When carrying out work, it is necessary to use a wrench with a deep head.
- The next step is to dismantle the tensioner. If there is no need to replace this element, you can remove the chain by squeezing the plunger using a screwdriver.
- Then you need to slightly pull the chain towards you to remove it from the crankshaft sprocket.
- To adjust the chain and align it with the marks, it is necessary to move the chain by 1 tooth.
- To make work easier, it is better to install the sprocket together with the chain. In order for the holes in it and the alignment pin to coincide, you must turn the crankshaft in the desired direction to match the notches.
- After this, the lock washer is installed. The bolt is inserted into the fastening point, but is not tightened.
- For the next operation, the key for turning the crankshaft will again be useful. You should use it to make two or three turns to check that the marks match.
- If all marks match, the installation is considered complete. Otherwise, you must repeat all steps.
In fact, this work is completed in a fairly short time. The main thing to remember is that an exact match of the Niva Chevrolet timing mark guarantees correct and stable operation of the engine. It is also important to remember that when installing the valve cover, it is necessary to replace the gasket with a new one, because when removing the old one, microcracks may appear on the old one, through which oil will leak out.
How to install an injector on a Chevrolet Niva (with photo)
- The car is installed on the inspection hole. Wheel chocks are placed under the rear wheels and the hand brake is applied.
- The car hood is opened, unscrewed and the fan is removed. The radiator is also unscrewed and carefully moved to the side (it is not necessary to drain the coolant from there).
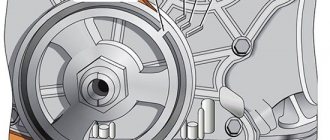
- Access to the engine valve cover is provided. Its fastenings are unscrewed with an open-end wrench, then it is carefully removed. There is access to the timing chain and the upper camshaft sprocket. The shaft pulley is rotated with a special wrench until the mark on the camshaft sprocket aligns with the protrusion on the timing case.
The mark on the timing case is aligned with the mark on the camshaft sprocket
The tension roller is removed, the chain can be removed
The mark on the crankshaft sprocket is precisely aligned with the DPKV core
How to set the ignition on a Chevrolet Niva
How to set timing marks Niva Chevrolet
The bolt is inserted into the fastening point, but is not tightened.
For the next operation, the key for turning the crankshaft will again be useful. You should use it to make two or three turns to check that the marks match. If all marks match, the installation is considered complete.
Otherwise, you must repeat all steps. In fact, this work is completed in a fairly short time.
The main thing to remember is that an exact match of the Niva Chevrolet timing mark guarantees correct and stable operation of the engine. Remove the chain tensioner as described. If you have the necessary skills, the hydraulic tensioner does not need to be removed.
It is enough to press out the hydraulic tensioner plunger with a large screwdriver or mounting spatula. Remove the sprocket and chain, remove the chain from the sprocket and then reinstall it on the sprocket, changing the position of the chain on the sprocket teeth in the desired direction.
How to set timing marks Niva Chevrolet
The part must be replaced if there are grooves on the leading part of the teeth. On a working mechanism, the chain moves on the teeth. The scrolling step is one tooth. The sprocket with chain is placed on the camshaft flange.
When the chain moves on the sprocket, its holes will not line up with the pin. The crankshaft should be rotated in the specified direction until the mark and pin match. It is important to secure the part with a bolt and washer without tightening it completely. After turning the crankshaft twice with a special wrench, check the placement of marks on the camshaft gear and bearings.
If the marks correspond, their adjustment has been successfully completed. The fastenings of the crankshaft and camshaft sprockets are tightened tightly.
There is access to the timing chain and the upper camshaft sprocket. The shaft pulley is rotated with a special wrench until the mark on the camshaft sprocket aligns with the protrusion on the timing case.
The mark on the timing case is aligned with the mark on the camshaft sprocket. If the chain adjustment has not been disturbed, then after the previous step the lower mark located on the crankshaft pulley also coincides with the oblong mark on the timing case.
If this does not happen, there is desynchronization of the tags, and regulation continues.
Timing marks on a Chevrolet Niva car
The lock washer holding the camshaft sprocket unbends. After this, the car is put in 1st gear; this will not allow the shafts to rotate when the fastening bolts on the sprockets are unscrewed.
The 13 bolt holding the camshaft sprocket is unscrewed and removed along with the lock washer. After removing the camshaft gear, the chain is loosened so that it becomes possible to remove the tension roller.
Checking and setting valve timing according to Chevrolet Niva marks
Remove the chain tensioner, see. If you have the necessary skills, the hydraulic tensioner does not need to be removed.
It is enough to press out the hydraulic tensioner plunger with a large screwdriver or the mark on the camshaft with a spatula. Remove the sprocket and chain, remove the chain from the sprocket and then reinstall it on the sprocket, changing the position of the chain on the sprocket teeth in the desired direction. It is recommended to move the chain one tooth at a time. Place the sprocket and chain onto the camshaft flange, tensioning the drive chain.
Consequences of incorrect installation and adjustment
- Characteristic extraneous clicks appear in the engine, which become louder as the vehicle speed increases.
- The engine is unstable even at idle speed.
- The car's acceleration time increases significantly because the engine does not respond well to pressing the gas pedal.
- Acceleration occurs in jerks, during which clouds of black smoke may fly out of the exhaust pipe.
- Valve wear accelerates many times over, and if the shafts are out of synchronization too much, the valves become deformed and their seats break.
- Incorrect adjustment can also lead to a broken timing chain. This, in turn, can puncture the radiator, break the fan and other engine parts.
- The engine constantly overheats, and the consumption of engine oil and antifreeze can increase significantly.
As can be seen from this article, correctly set timing marks are the key to long and uninterrupted engine operation. There is nothing complicated about this; even a novice car enthusiast can do it. It is important to take your time, follow the above sequence of actions, and also try not to drop the sprocket lock washers into the engine sump. Because it will be very difficult to get them from there.
Source
How to set the ignition of a VAZ 2106 with your own hands - step-by-step instructions
1. Unscrew the spark plug of the 1st cylinder, then use a finger or a rubber plug to close the spark plug hole.
2. Using a special key, rotate the crankshaft until the compression stroke begins in the first cylinder, that is, when the piston begins to move upward. You can tell by the way the rubber plug flies out; if you hold it with your finger, you will feel it being squeezed out.
3. Turn until the mark on the crankshaft pulley matches the mark on the timing cover. If you drive on “92” or “95” gasoline, combine with the middle mark, but if on “72” or lower, combine with the long mark, which corresponds to the “0” advance angle.
4. Unfasten the latches, then remove the ignition distributor cap.
5. After turning the crankshaft, the distributor rotor should rotate to a position in which its outer contact will be directed towards the 1st cylinder on the distributor cap.
6. When the marks are aligned, pay attention to the distributor, try to draw an imaginary line through the cover latches, it should be parallel to the axis of the engine, if this is not the case for you, then do the following:
7. Unscrew the distributor fastening nut, then turn the distributor up. Rotating the rotor axis, align it parallel to the engine axis.
8. Place the distributor, tighten the fastening nut without tightening it completely.
9. After this preparation, you can proceed directly to the ignition adjustment procedure.
10. Connect the “control” as follows: one end to the terminal of the ignition coil connected to the low-voltage wire of the distributor, the other end is connected to ground.
11. Turn on the ignition. Slowly turn the distributor clockwise until the control lamp goes out. If it doesn’t burn anyway, then you don’t need to do anything.
12. Next, you need to rotate the distributor counterclockwise, at the moment the control lamp lights up, fix the position of the distributor, then tighten its fastening nut.
13. Now you can turn off the ignition and put the distributor cap back in place.
After the ignition is set, it is necessary to check the correctness.
1. To do this, start the engine and start driving.
2. Accelerate the car to 45 km per hour, then turn on the fourth gear and sharply press the gas.
3. After this, after about 2-3 seconds, detonation will occur (popping, ringing of “fingers”), disappearing as the car accelerates.
4. If detonation occurs and does not disappear as the car accelerates, we can assume that the ignition is “early.” If you do not experience detonation at all, the ignition is “later”.
In case of early ignition, turn the distributor clockwise by approximately 0.5-1 division. If you have the opposite later, turn it 0.5-1 division counterclockwise.
When the ignition adjustment is completed, mark with paint on the distributor body the position of the middle mark of the scale relative to the block.
Now that the ignition timing of the VAZ 2106 has been set, you can collect everything and rejoice at the job successfully completed.
How to set the ignition on a Chevrolet Niva
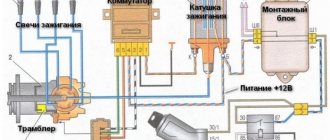
1.4. Chevrolet Niva engine ignition system (controller M7.9.7)
general description
The ignition system (Fig. 1.4-01) uses a 4-lead ignition coil, which is a block of two 2-lead ignition coils. The ignition system has no moving parts and therefore requires no maintenance or adjustment, with the exception of the spark plugs.
Fig, 1.4-01. Ignition system: 1 - battery; 2 - main relay; 3 — ignition switch; 4 — spark plugs; 5 - ignition coil; 0 - controller; 7 — crankshaft position sensor; 8 - master disk
The current in the primary windings of the ignition coils is controlled by a controller that uses information about the engine operating mode received from the sensors of the engine control system. To switch the primary windings of the ignition coils, the controller uses two powerful transistor valves (Fig. 1.4-01).
The ignition system uses a spark distribution method called the “idle spark” method. The engine cylinders are combined in pairs 1-4 and 2-3, and sparking occurs simultaneously in two cylinders: in the cylinder in which the compression stroke ends (working spark), and in the cylinder in which the exhaust stroke occurs (idle spark).
Due to the constant direction of current in the primary and secondary windings, the sparking current of one spark plug always flows from the central electrode to the side electrode, and the second - from the side to the central one.
Chevrolet Niva engine ignition coil (controller M7.9.7)
The four-terminal ignition coil (Fig. 1.4-02 and 1.4-03) has the following three circuits (see Fig. 1.4-01):
Primary winding power circuit
The vehicle's electrical system voltage is supplied from the ignition switch to contact “15” of the ignition coil.
Circuit of the primary winding of the ignition coil of cylinders 1 and 4, contact “lb”
The controller switches to ground the circuit of the primary winding of the ignition coil, which supplies high voltage to the spark plugs of cylinders 1.4.
Circuit of the primary winding of the ignition coil of cylinders 2 and 3, contact “1a”
The controller switches to ground the circuit of the primary winding of the ignition coil, which supplies high voltage to the spark plugs of cylinders 2 and 3.
If any element of the 4-terminal ignition coil malfunctions, the entire assembly must be replaced.
Removing the ignition coil 1. Turn off the ignition.
2. Disconnect the wiring harness block from the ignition coil.
3. Disconnect the high-voltage wiring harness.
4. Remove the ignition coil by unscrewing the mounting bolts.
ATTENTION. Dismantling of high-voltage wires should only be done using the protective cap.
Installing the ignition coil
1. Install the ignition coil on the bracket on the engine and secure with bolts, tightening to a torque of 9.6. 15.4 N • m.
2. Connect the spark plug wires.
3. Connect the high-voltage wire harness to the coil leads and spark plugs.
Dampening detonation of a Chevrolet Niva engine (controller M7.9.7)
To prevent damage to internal engine parts due to prolonged detonation, the ECM adjusts the ignition timing.
To detect detonation, the system is equipped with a knock sensor, see section 1.1.
The controller analyzes the signal from this sensor and, when detonation is detected, which is characterized by an increase in the amplitude of engine vibrations in a certain frequency range, it adjusts the ignition timing using a special algorithm*
Adjustment of the ignition timing to dampen detonation is carried out individually for the cylinders, i.e. it is determined in which cylinder detonation occurs, and the ignition timing is reduced only for this cylinder*
In the event of a malfunction of the knock sensor, the corresponding malfunction code is entered into the controller’s memory and the malfunction indicator turns on* In addition, the controller, depending on the engine operating mode, sets a reduced ignition timing, which eliminates the occurrence of detonation.
Ignition adjustments for vases according to any requirement
After assembling the engine and installing the distributor, you need to set the ignition. This operation can be performed using a strobe light following the attached instructions. Also, setting the ignition timing (for a contact ignition system) can be done with an ohmmeter (present in a multimeter) or using a test lamp (you can use a car carrier).
To check and adjust the ignition using an ohmmeter, do the following:
- Remove the negative terminal from the battery
- Set neutral gear
- Remove the distributor cover
- Turn the crankshaft clockwise until the distributor slider reaches about 30 degrees to the contact in the cover numbered “1”
- Next, one ohmmeter probe is connected to the distributor bolt (where the wire from the ignition coil is connected), and the second ohmmeter lead is connected to ground. In this case, the resistance on the ohmmeter scale should be zero.
- Then the crankshaft is slowly turned until the lower marks align. If, when the marks coincide, the resistance shows infinity, then the ignition is set correctly. If the resistance begins to increase until the marks coincide, or remains at zero, then you need to adjust the ignition timing by loosening the distributor and turning it in one direction or another
- The crankshaft is turned using an X38 mm wrench. As a last resort, in its absence, you can turn on speed 3 or 4 and slowly (with an assistant) move the car, which is really not very convenient when adjusting
A similar ignition adjustment can be performed using a control lamp, but care must be taken since this operation is performed with the ignition on. One wire from the lamp is connected to ground, and the second wire is connected to the distributor bolt, as is the case with an ohmmeter.
Further everything is the same as using an ohmmeter. The correct installation of the ignition is checked during a test drive. To do this, the engine is started, warmed up to operating temperature and a test drive is made to check and adjust the ignition. The following steps are performed:
The car accelerates to 50 km/h and the gas pedal sharply sinks into the floor. If everything is set correctly, you should hear 3-4 finger clicks. If the clicking of the fingers is longer, then this indicates that the ignition is set early; if there are no clicks at all, then the ignition is late.
With early ignition, the distributor must be turned clockwise, and with late ignition, counterclockwise and repeat the tests again.
Next, look at the video to see what electronic ignition looks like on a VAZ 2101, 2106, 2107 and contact:
All these installation and inspection work, ignition adjustments are carried out provided that the timing chain or belt is tensioned with the correct tension. And you also need to make sure that the engine valve clearances are adjusted, right.
How to tighten the alternator belt
Clutch slave cylinder kit
Instructions for setting the ignition
Installing the ignition on a Chevrolet Niva is done using a strobe light.
The order of work is as follows:
- First you need to disconnect the vacuum regulator.
- Ignition timing (ITT) is checked by connecting the positive clamp to the positive terminal of the battery, and the ground clamp to the negative terminal of the battery.
- Next, you need to remove the tip of the high-voltage wire from the spark plug of the 1st cylinder. It should then be connected to the strobe sensor.
- Then the rubber plug is removed from the clutch housing hatch.
- Next, you need to start the engine and direct the flow of light from the strobe into the hole in the clutch housing.
- MZ can now be displayed. If it is set correctly, the mark on the flywheel should be between the previous scale mark and the middle mark. If this is not the case, the MH needs to be adjusted.
- To increase the ignition timing, the sensor housing must be turned clockwise. To decrease the angle, the sensor must be turned counterclockwise.
- When the alignment is completed, you need to tighten the sensor mounting nuts. Next, you need to check the correctness of the set MH. If necessary, the procedure should be repeated.
The ability to make adjustments yourself makes it possible to save money on service stations and improve the quality of car operation.
Ignition system in the field: self-replacement and ignition adjustment
As you know, engine performance is largely determined by the state of operation of the ignition system. Problems in the functioning of the latter can lead to the motor starting to work intermittently. From this material you can learn how to remove the ignition switch on a Niva with your own hands and adjust it, as well as what needs to be taken into account during this process.
Ignition system module for Niva
Before removing the ignition module on a VAZ 21213 carburetor or injector, it is necessary to diagnose the ignition coil, distributor and spark plugs. As practice shows, spark plugs are often the cause of incorrect operation of the internal combustion engine. If you are sure that the problem lies in the fault, then the installed device will need to be changed.
How to replace the Niva ignition switch:
- First, the battery is disconnected and the steering column is removed.
- You need to mark the wires that are connected to the contact part of the VAZ ignition switch and disconnect them. Using a flat-head screwdriver, remove the bolt securing the system switch to the steering column bracket. You will also need to unscrew the screw that is located below, on the right side of the first one.
- Next, on Niva 21213 you need to turn the key to position 0, after which you need to use a screwdriver to slightly recess the device lock through the hole. The hole itself is located on the side of the steering column. Do not touch the exposed key.
- Before removing the ignition switch on the Niva, you need to pull it slightly towards you, after which the device is dismantled. In accordance with the connection diagram, the contact part of the device is replaced; to do this, you need to pry it off with a screwdriver and remove the retaining ring.
- Next, the contact part of the assembly is removed and changed if necessary. During installation, the rotating part must be turned counterclockwise using a screwdriver. Remove the key from the structure and install the contact part so that its wide protrusion can coincide with the wide cavity of the housing. Further assembly of the unit is carried out in reverse order.
1. Unscrew the 3Z mounting bolts. 2. Remove the assembly from its installation location. 3. Remove the contact part and replace it.