Drum pad wear
Finally, a little about the drum mechanisms that are used on the rear axle. There are cases when the pads of these mechanisms wear out faster than disc ones.
In addition to their main function, drum mechanisms are also an integral part of the parking brake. And it is the handbrake that usually causes accelerated wear.
Moreover, because of it, they can be intensively erased both on both mechanisms at once, and on just one.
If accelerated wear is observed on two mechanisms, you should check the condition of the handbrake drive.
An overtightened cable causes the lever installed inside the mechanism to constantly keep the pads in a relaxed state, and they come into contact with the drum, rubbing against it.
If there is wear on the elements on only one side, you need to check the adjustment of the release mechanism. If this mechanism is not adjusted correctly, it will press them against the drum.
Well, don’t forget that the cause of wear on one side can be problems with the drive - airing of the line, its blockage, damage to the cuffs of the working cylinder.
Master brake cylinder. Purpose, device
The main element of the hydraulic drive is the brake master cylinder (MBC). It is thanks to him that the mechanical action is converted into brake fluid pressure. It also separates the entire braking system along its contours, which is very important.
The main condition for the normal functioning of the hydraulic drive is the tightness of the system. If the pipelines break down due to a leak, the entire system will stop working. To avoid a complete failure of the system, it was divided into two circuits independent of each other. Each of them combines two brake mechanisms. As a result, if the pipeline of one of the circuits is damaged, the second remains sealed and the mechanisms to which it is connected continue to perform their function. And although the efficiency of the system decreases, the car still retains the ability to brake.
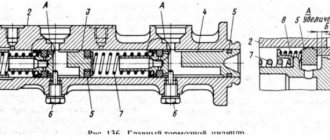
The design and operating principle of a dual-circuit gas turbine engine are quite interesting. And although they may differ in appearance, the internal structure of all main cylinders is almost the same.
There is a cavity made inside the body and channels for connection with pipelines (leading to the brake mechanisms) and a reservoir from where fluid is supplied. In this cavity there are two pistons installed one behind the other. They act on the liquid. To ensure that the pistons return to their original position after the pedal is released, they are both spring-loaded. Moreover, the spring stop of the first piston is the second one. The spring of the second piston rests against the end wall of the housing cavity.
Since each of the pistons is responsible for supplying liquid only to its own circuit, the entire cavity is divided into two chambers (one is located between the pistons, the second is between the piston and the housing wall). To ensure the tightness of each of them, rubber sealing elements are installed on the pistons.
Each of the working chambers is connected to the tank by two channels - compensation and bypass. Thanks to them, the amount of fluid in the system is replenished and the formation of vacuum and air in the system is prevented when the pedal is released. Also, two pipelines are connected to the chamber, each of which leads to its own brake mechanism.
The tank can be attached directly to the GTZ body or be remote (in this case it is connected to the cylinder by pipelines). The liquid from it is supplied to both circuits, but there is a partition inside the tank that separates the liquid between the circuits. This is necessary so that in the event of a depressurization of the system, all the liquid does not leak out.
How to file an application to initiate a criminal case
If we are talking about a criminal offense, then a statement about it can be submitted either orally or in writing. This requirement is expressly stated in Article 141 of the Criminal Procedure Code of the Russian Federation.
Based on the results of verification of the facts stated in the application, criminal proceedings can be expected. The applicant is notified in writing of the decision made. If a decision is made to refuse to initiate a criminal case, it can be appealed in court.
In order for a case to be initiated, a statement about the commission of a crime must be drawn up legally, otherwise one cannot count on a positive outcome.
Please note! Legal practice has developed some rules according to which it is recommended to draw up a statement of crime:
- At the top right you should indicate the details of the official in whose name the document is being submitted. Usually this is the head of a law enforcement agency, who, according to his official powers, is obliged to review the application and entrust its verification to a specific executor. In most cases, this is a local inspector;
- then the applicant’s personal data, place of residence, methods of communication in the form of telephone or email address are indicated;
- in the middle of the sheet the name of the document “Statement about the commission of a crime” is indicated, which is written without quotation marks and a period at the end;
- The content of the document briefly describes the circumstances of the crime. Namely, the date, month, year, time, place and commission of the criminal offense;
- what damage was caused, what it was;
- the applicant’s demands are to initiate a criminal case, bring the perpetrator to criminal liability, and take measures to compensate for the damage caused;
- a reference to the fact that the applicant is aware of criminal liability for knowingly false denunciation;
- Written evidence may be attached to the application. At the end of the document, the date, month and year of its preparation, surname, initials and signature of the applicant are indicated.
ATTENTION! View a completed sample claim for compensation for material damage:
The document may be drawn up by hand. It is recommended to write the text using a pen with blue ink. However, there is no prohibition on accepting an application written in a different color. You can also type the application on a typewriter or type the text on a computer and print it out. You need an A4 sheet.
What to do if you scratched your car mirror?
If the application is drawn up by a law enforcement agency, then the applicant may be provided with a formalized form of the document.
The official accepting the application is obliged to issue a note, which must contain information: who and when accepted the document from the applicant, position, surname and signature of the specified person.
It will take some time for your application to be verified. The result will be the initiation of a criminal case and the beginning of investigative actions. Otherwise, the initiation of a criminal case will be refused, but this does not exempt the guilty person from compensation for the damage caused. This issue will have to be resolved through civil proceedings.
Watch the video. How to properly file a claim:
Unpleasant moment: reasons why a car wheel does not spin
1. The front wheel is jammed
And now about how the car slows down. The brake pads are located in a caliper, which is mounted directly on the disc. In order for the pads to compress and unclench, you need a master cylinder.
The moment its piston begins to move, the brake register also begins to move. However, disc brakes have one drawback: dirt easily gets under the caliper and onto the cylindrical rods.
And most often this happens in winter. Indeed, due to low temperatures, dirt hardens on the cylinder rods, as well as on the springs that return the pads to their original position.
If you notice that the wheel does not spin, what should you do? First of all, check if the differential has worked. This is also often the cause of jamming. All this can lead to failure of this mechanism. And to restore the brake system on a car, you will have to spend a large sum on repairs.
2. The rear wheel is jammed
What to do if the rear wheel does not spin? First you need to find out why this happened. Most often the reason lies in the rear drum brakes. For the first 100 thousand kilometers they do not make themselves felt at all. However, if you have driven the car more, it is recommended to remove the rear drums and install new brake pads. Otherwise, you may encounter the fact that the car wheel will not spin. Moreover, this can happen at the most inopportune time, for example, when you are driving along the highway. The reasons why the wheel has stopped spinning may be in the following components:
— Brake pads
. The malfunction usually occurs when the pads are heavily worn. The braking layer (textolite or similar material) wears out, its thickness becomes insufficient and it breaks off. The torn brake layer gets into the gap between the brake pad and the drum, as a result the wheel does not spin.
- The reason why the wheel does not spin may be a faulty rear brake cylinder
. If the pads are worn out, the cylinder pistons will move out a long distance, but will not be able to return back. Jamming in this situation cannot be avoided. - If the wheel does not spin, the reason may be that the system is depressurized
. Or the rear brake cylinder is stuck. In this case, you will see that the brake fluid has leaked from the drum. In addition, if you press the brake, the pedal will be soft and the car will have trouble braking. - A jammed handbrake
is also one of the reasons why the wheel does not spin. What to do in this case? Loosen the rear brake cable.
Useful materials about cars
here!
Source
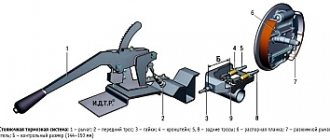
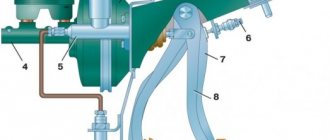
Working principle of the brake master cylinder
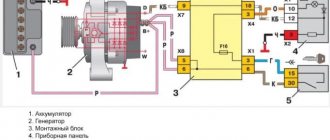
1 — brake tank; 2 - vacuum booster; 3 — brake pedal; 4 - main brake cylinder.
When the brake pedal is pressed, the vacuum booster rod begins to push the primary circuit piston. During the movement, it closes the compensation hole, due to which the pressure in this circuit begins to increase. Under the influence of pressure, the second circuit begins to move, the pressure in which also rises.
General description of the brake system
We highly recommend using a compressor with a rubber chamber that separates the air side from the liquid side. If this is not possible, perform the following procedure. Open the bleeder valve on the caliper or wheel cylinder until the fluid is released. If you have bleeding with the two-piece brake pedal, you need to open the front brake and rear brake drain screw at the same time. Wait 12 seconds and repeat.
- Press and hold the pedal.
- If you are bleeding with a cutting brake system, follow the instructions below.
- Close the exhaust valve and release the pedal.
Don't push the pedal.
Through the bypass hole, brake fluid enters the void created by the movement of the pistons. The pistons move as long as the return spring and stops in the housing allow them to do so. The brakes are applied due to the maximum pressure created in the pistons.
After stopping the car, the pistons return to their original position. In this case, the pressure in the circuits gradually begins to correspond to atmospheric pressure. Vacuum in the working circuits is prevented by brake fluid, which fills the voids behind the pistons. When the piston moves, the liquid returns through the bypass hole to the tank.
We recommend: DIY tips for replacing the Granta liftback fuel filter
Bleeding system with cutting brake
The pump will only aerate the fluid and prevent complete bleeding. Complete the bleeding procedure completely around the car. Remove each caliper until the air is clear of air. Repeat the procedure for the left brake. Repeat the process until all the air is out of the system.
- Hold.
- Close the drain screw on the right wheel cylinder or caliper.
- Release the brake pedal.
- Wait 12 seconds.
- Release the cutting brake handle.
Before every racing event or day off, it's a good idea to follow this checklist to make sure your brakes are at their best.
Problems arising with the braking system
Most common problems:
- burning smell from the front pads, jamming of the front pads
- The brake pedal has a lot of free play when pressed or slowly goes to the floor when pressed.
- uneven braking of the rear wheels (usually found out during a state inspection)
- a lot of free time
- together
The first and mandatory condition is the absence of brake fluid leaks in the entire system (i.e. integrity of hose tubes, etc.
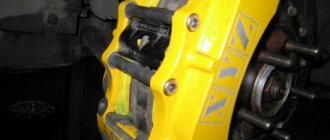
) The most common complaints from AUDI owners are about the front brakes - overheating, jamming, resulting in a burning smell, with prolonged driving, the pads lose their performance properties, and possible bending and uneven wear of the brake disc itself.
- On the right is an overheated block, below is a wrench for the brake pipes.
- In the worst case scenario, an overheated front caliper can negatively impact the health of the wheel bearing.
- Possible causes: jamming of the brake pads themselves in the brake caliper.
Reasons for complete jamming
There are not so many reasons for a complete jamming of the gearbox. One of these reasons is the destruction of the teeth of a gear. Broken tooth fragments can become meshed with the teeth of other gears, which in turn makes the gears unable to rotate.
It is also possible that one of the internal bolts of the box may rupture or spontaneously unscrew. In this case, the bolt gets between the gears and blocks them.
To check whether the cause of jamming is the destruction that occurred inside the box, simply drain the oil from the box crankcase and check it. The fact is that if any element of the box is destroyed, a large amount of metal shavings will get into the oil.
Diagnostics of the master cylinder after removal
Unfortunately, it is not always possible to identify problems with the master brake cylinder without dismantling it. The fact is that the rubber gaskets installed in it, which prevent the leakage of brake fluid, become unusable over time (crack, swell), which ultimately affects the efficiency of the brake system. Damage to the cylinder rod and its mirror is also visible only on the dismantled part.
Removing the master cylinder will also allow you to take a closer look at its body and rod for more serious damage. If they have deep scratches or cracks, the brake master cylinder assembly must be replaced. If only damaged gaskets are found, then you can get by with purchasing a suitable repair kit.
Initial diagnostics of the brake master cylinder can be performed without removing it from the vehicle. If a visual inspection reveals significant damage to the housing or leaks of brake fluid through the technological holes in it, replacement most likely cannot be avoided. The final decision can be made after removing the part, disassembling it and more thoroughly inspecting it.
Rear wheel stuck
Yesterday, my friend's rear wheel jammed in a Chevrolet Aveo (in the previous body). I couldn’t help him because I didn’t have the accompanying tools at hand. But he gave me a couple of tips. And today I want to write an article: — The rear wheel is stuck, what should I do? Read on...
So why might this happen? There are several reasons for this. It's all because of the rear drum brakes. They don't cause any problems until about 100,000 kilometers, but after that it's better to remove the rear drums and replace the brake pads. If this is not done, then the wheel can jam at any time, for several reasons, I will list them point by point.
1) It may “wedge” due to excessive wear on the rear brake pads. The effective braking layer, usually PCB or a material similar to PCB, becomes very thin and is simply torn off. This is what happened to my friend. The torn material gets between the brake shoe and the drum itself and jams the wheel.
2) The wheel may jam due to the rear brake cylinder. Also, due to the high wear of the pads, the cylinder pistons extend to their maximum distance and do not return back. This is also where the wheel stops
3) It may jam due to depressurization of the system. The rear brake cylinder is also seized. But here you can physically see the leakage of brake fluid from the drum. Also, the brake pedal will become soft, and the effectiveness of the brakes will decrease.
4) The handbrake mechanism of the car may jam. You need to loosen the rear brake tension cable.
Here are some of the main reasons why a car's rear wheel gets stuck. If your wheel is stuck and you cannot move, then you have two options.
The first is expensive, call a tow truck and take the car to a service station. There they will remove your rear wheel, then the rear brake drum, and then they will determine the breakdown. It will cost about 3,000 rubles, we have a tow truck in our city (1,500 rubles) + replacement work (500 rubles) + the pads themselves (about 1,000 rubles for a foreign car, for two wheels).
The second way is to change the pads or rear brake cylinder yourself. But the whole problem here is to remove the rear brake drum. It is quite problematic to do it yourself, the wheel is jammed, and even if it has never been removed, it has never been removed.
Removing the rear wheel
Unscrew the brake drum bolts
Although you tighten the two bolts, you evenly knock out the brake drum. It will take about three hours, that's for sure. You can hit the drum with a hammer, but not too hard (the drum is made of aluminum alloy), and preferably through a plank.
Then, as the drum moves away a little, you can pry it out with a pry bar or a large screwdriver and smoothly pull it out towards you. Here you will see and understand everything. We change the brake pads or brake cylinder and put the drum in place. If necessary, then you need to bleed the brakes.
That's basically it. I hope it helped someone, although I don’t have detailed instructions. Just a couple of pictures of the jammed wheel.
114,64
Lada Granta Red Luxury Mechanics › Logbook › The rear brake cylinder is jammed. Why?
Having learned from Lancer’s experience, I keep an eye on normal disinhibition.
You don’t need a lot of intelligence for this; just release the brake a moment before stopping. And then the absence of a rollback, even a small one (within the elasticity of the wheels), will indicate a jamming of the brake. Very clearly visible. I note that sophisticated testing methods, such as measuring run-out, are good for blondes whose brakes already glow gloomily in the darkness. While using the “rollback” method you can notice the slightest lack of inhibition. And if you suspect it, you should carry out a control operation - measure the temperature of the brakes. A hotter wheel will indicate the jamb itself. The temperature should be measured with your own finger. Thermal cameras are not required. So, one wonderful warm day I noticed that Granta stuttered somewhat when rolling back. Quite a bit. And the calibrated finger-thermometer showed that the rear left wheel was jamming. Quite a bit. The mileage was about 33,000 km. Quite insignificant. The situation does not require a boxing reaction and instant repair. But you shouldn’t delay it longer than 500-1000 km. Because if you do nothing at all, the disease will progress and the wedging will increase. And that's not so bad.
The main fun is that jamming almost always means leaking. To understand this non-obvious relationship, you need to look at the inside of the brake cylinder.
Well, if you do nothing, then along with the wedging it will progress and leak. As a result, the pads will flood and they will have to be replaced. This will approximately triple the cost of repairs. True, it still won’t become ruinous.
A critical reader may not believe the reasons - they say, rust is clearly growing for more than one day or even one month. And everything works. And then suddenly! - and begins to jam. How is that? And there is no contradiction. It works, works, and then crawls out onto the corroded surface - and we’ve arrived. Terminal station. The next station is the morgue (© A. Lomachinsky). Is it impossible to resurrect? Can. But not for long, not guaranteed and not necessary. With a price per cylinder of about 300 rubles - nafik. The work is already dirty, nasty, on all fours.
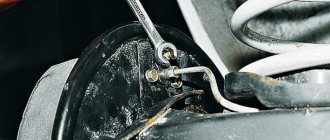
Are there any pitfalls in the cylinder replacement process? Fuck them. Here are just a few: 1. Remove and install the tension spring of the pads. There are many ways, but none of them are guaranteed or physically easy. Therefore, I can’t recommend a specific one. Choose to your liking. 2. Remove the brake pipe. On new cars it is not a problem, but on old cars it can lead to the pipe nut being licked off and the pipe itself breaking off. To avoid licking, you should use this key:
When everything is finished, for some reason it is customary to bleed the brakes. I’ve never done this before and I don’t understand why they do it. Just unscrew the fitting and smoke for three minutes. That's it, wrap it up, add brake moisture if necessary, test the pedal to check for leakage. And put on the wheel.
Do I need to replace the cylinders in pairs? Whatever you want. Practice shows that the condition of the cylinders rarely differs radically from each other. So if you want to suffer through one, then change both. If you need to save time, you can change one. And the second one later, as needed. You won't have to wait long.
In general, despite the fact that the work of replacing a cylinder is disgusting, dirty, and unpleasant, it is quite within the capabilities of a novice motorist. I wish all one-vehicle students to complete it without complications.)))
2 more reasons why rear brakes stick
Rear brakes jam like this: the pads stick to the brake discs or drums, as a result the wheels do not rotate and the vehicle does not move.
Why do the rear brakes stick? There may be two reasons:
- The car “rested” on the handbrake for more than a month.
- The brake pads got wet when the vehicle got into a puddle, and the driver drove the car into a garage or parking lot without drying them.
You will have to be quite nervous in such circumstances. The rear brakes are jammed, there is no way to even get to the service station. You'll have to do the repairs yourself. Below are tips on how to deal with this situation.
DIY caliper development procedure
Let's move on to a description of the repair itself. The algorithm will be something like this:
- First you need to lift the car using a jack and unscrew the wheel, locking the steering wheel in the extreme position.
- The mounting spring is removed, and the surface near the brake hose is thoroughly cleaned. To do this, you can blow it with compressed air.
- The brake hose must be clamped with a clamp to prevent leakage of working fluid.
- We continue to repair the caliper ourselves. After this, unscrew the bolt that secures it and remove the hose itself to the side. It is necessary to ensure that dirt particles do not penetrate inside it.
- After this, the caps on the guides are removed, and they themselves are unscrewed using a 7 mm hexagon.
- Using a screwdriver, we recess the piston, moving its body away from the disk to a sufficient distance. You can begin dismantling the old caliper.
- First, take it out of the case and check for moisture. We take the piston out of the housing. To do this, you can remove it from the disk without disconnecting the caliper from the hose. Just press the brake pedal and it should fall out on its own. How to clamp a brake hose? Any tight clamp will do, you can even use the one that is used to secure caps to wheel rims at a tire shop. You can use a vice in which to firmly clamp the body, and remove the piston itself with pliers. Or use compressed air, making sure that the part is not damaged during removal.
- We take out the old cuff, first removing the remaining working fluid. We thoroughly clean the surface in which the protective cover was located and the cuff seats. We rinse and blow with air, after which you can install a new cuff.
- When repairing the front caliper, lightly water the working surfaces of the piston with brake fluid. The piston itself is laid strictly vertically and slightly recessed. We put a protective cover on top. In this case, you need to make sure that the rubber band does not jam.
- Now the piston can be recessed completely, but you need to be careful to prevent the boot from twisting.
- We unscrew the brackets that are equipped with the caliper. We clean the surfaces on which the pads move. Care must be taken not to damage the threads in which the guides are attached. The bracket is screwed into its original place.
- We lay the block, making sure that it has taken its position and is not stuck anywhere. The guides must be cleaned of the slightest particles of dirt. The caliper is put on the bracket, and its guides are tightened with your fingers. We put on the caps and fix the springs. Don't forget to put grease under the brake pistons boot and remove any excess grease from around it.
- All that remains is to put the hydraulic fluid hose back in place and bleed the entire system with a few presses of the brake pedal. We lower the car to the ground using a jack and check the level of working fluid in the tank - refill if necessary. This completes the caliper rebuild.
In short, as soon as you encounter overheating or uneven wear of the brake pads, the appearance of odors and noise, you can be sure that the effectiveness of the braking system will no longer be the same.
Immediately pay attention to the condition of the caliper and, if necessary, use the caliper repair instructions described above
Much has been said about the importance of uninterrupted operation of all elements responsible for applying the brake. This article will talk about repairing the components of the caliper: the piston (cylinder), guides and replacing their boot - with your own hands, you can also learn about this clearly from the attached video.. To fully understand how to repair and replace these parts without any problems, it’s worth understanding in the design of the front and rear calipers and the reasons for their failure, what repair kit may be required for this
To fully understand how to easily repair and replace these parts, it is worth understanding the structure of the front and rear calipers and the reasons for their failure, and what repair kit may be required for this.
Preliminary check of the master cylinder
A characteristic sign of a malfunction of the master cylinder is the “sinking” of the brake pedal lower than usual (ideally, it should not sink more than a third of the full stroke), as well as the possibility of pushing it even deeper with significant force. In any case, such a symptom should make you look under the hood as soon as possible and first check the brake fluid level in the reservoir.
If it is normal, and there are no visible damages or leaks on the body of the master cylinder on which the reservoir is installed or the vacuum brake booster connected to it, everything may not be so dire. It is quite possible that the problem can be solved by bleeding the brake system and replacing the fluid. A slightly increased pedal stroke may be a result of wear on the brake pads, discs and drums, so it wouldn’t hurt to check their condition either.
How to fix a car
What actions should you take if the rear wheel of the Granta is stuck? Having found out the cause of the malfunction, you need to repair the failed vehicle component as soon as possible.
Cylinder replacement
If the cause of wheel jamming is soured pistons of the working brake cylinder, then the cylinder must be replaced. It is impractical to repair it, since often when cleaning the pistons, the seal of the cylinder is broken, and brake fluid begins to flow out through the pistons.
Reinstalling the pads
If the wear is severe, the brake pads can warp, move, or even break. To prevent the wheel from jamming due to worn pads, you need to promptly change them to new ones in accordance with the regulations.
Reinstallation of Lada Granta pads
The pads can only be replaced as a set on both rear wheels at the same time. It is unacceptable to change the pads on only one wheel or only one faulty pad out of two, as this can lead to uneven braking and skidding of the car.
Bearing replacement
If the rear wheel of the Granta is jammed due to a broken wheel bearing, then the problem can only be eliminated by replacing it. When replacing a wheel bearing yourself, difficulties may arise, since you need to dismantle the hub, press out the broken bearing and press a new one in its place. It is better to do such repairs at a car service center.
What to do if you can’t remove the brake drum
Having discovered that the rear wheel of the Granta was jamming, you decided to do the diagnostics and repairs yourself, removed the wheel, and suddenly a new obstacle arose in front of you: the brake drum was tightly stuck to the hub. There are several solutions to this problem:
- There are two threaded holes on the face of the brake drum. Bolts are screwed into these holes, which separate the drum from the hub. But often this method does not help due to thread stripping.
- The second way is to beat the drum using a hammer or sledgehammer and a wooden block. You cannot hit the drum directly with a hammer, as chips will appear on its edges, or it will crack altogether. The correct way is to tap the drum from the inside through a wooden block around its entire circumference.
- If it was not possible to remove the drum with a hammer, then you need to heat the area where the drum adjoins the hub with a torch, blowtorch or hair dryer. When heated, the metal expands and the two stuck together parts are easily separated.
- You can also remove a stuck drum using a three-legged puller. You can buy it at a car store or make it yourself.
Symptoms of problems
The fluid brake system consists of many parts that can become unusable: pipes, wheel cylinders, calipers, drums and pads. Typical signs of a faulty master cylinder:
- After pressing the pedal, the car stops slowly. The reason is that the cuffs of one or two pistons have lost their tightness - they have cracked or “floated”.
- To slow down, you need to press the brake pedal hard. The phenomenon occurs due to swelling of the rubber of the piston seals.
- The brake pedal travel is too short. The fluid inside the cylinder has nowhere to go because the compensation hole is clogged. Another option is that the passage is blocked by a swollen rubber seal.
- A common symptom is pedal failure, the brakes coming on at the end of the stroke. This indicates complete wear of the cuffs; as a result, liquid penetrates behind the piston and rushes into the expansion tank - the cylinder “bypasses.”
- The pads do not release the brake discs and drums and get very hot when driving. Options: one of the pistons is jammed or the bypass hole is clogged.
We recommend: What to do if the engine oil foams?
The listed symptoms of a GTZ malfunction are similar to malfunctions of other elements. Pedal failure also occurs when a large amount of air enters the tubes or loss of fluid in one of the working cylinders. Sluggish deceleration and increased force on the pedal are often caused by a breakdown of the vacuum booster - a cracked membrane or a lack of tightness at the joints of the hose that takes off engine vacuum.
There are signs that clearly indicate the performance of the main hydraulic cylinder and the malfunction of other elements:
- during braking, the car pulls to the side - the problem lies in a certain circuit or wheel;
- jamming of the brake mechanisms of one wheel;
- creaking and squeaking when braking;
- heating the discs and pads on one wheel.
If you eliminate these symptoms, it will become easier to check the brake master cylinder in a garage. This also includes obvious brake fluid leaks and the knocking sound of worn calipers.
How to solve a problem
To determine the exact cause, it is better to call a car mechanic. But if you have a garage with a pit and at least some experience, it’s worth trying to figure out the problem yourself, and at the same time save money.
Self-repair of manual mechanical brake
The very first thing to do in the event of a mechanical breakdown is to disassemble the rear wheels one by one. If you have a set of keys and other tools for the motorist, then you can get started.
Process:
- Remove protective caps, if any. Jack up the car on one side and put stoppers under the front wheels.
- Unscrew the wheel bolts one by one and remove the disk and tire.
- Take the drum from opposite sides with your hands and pull. If it cannot be removed, then place a board on the back side and tap the drum through it with a hammer. When it becomes mobile, remove it.
- Inspect the brake pads, spring, and the attachment point of the handbrake cable hook.
- Move the pads manually, pull the cable, that is, develop the parts manually.
- If dirt gets between the parts, clean it out. If the pads look worn out, the lining is worn out or has completely peeled off, then they need to be replaced with new ones.
- Inspect the handbrake cable itself and try to adjust it. If it looks rusty, and previous manipulations with the pads and spring did not help, you will probably have to replace the cable as well.
- After all the work, put the wheel back together.
If the car has been sitting outside for a long time, then the caliper, drum or brake disc, as well as the pads, are probably simply “stuck”
To avoid having to disassemble the wheel, you can try to carefully rock the car manually back and forth to separate the rusted parts.
How to fix a jammed handbrake in the cold
If the handbrake is jammed due to icy parts, then you need to warm them up. It is better to immediately avoid dousing with hot water, which is practiced by many drivers.
To defrost safely, there are the following methods:
- Heated with a construction hairdryer. This is an effective method for getting rid of ice, but you will need an outlet to connect the hair dryer. Therefore, if you can extend an extension cord to the car, then all you have to do is connect a hair dryer and point it at the brakes for a couple of minutes.
- Using defrosting liquid. Usually this is an alcohol solution, which you just need to spray on the frozen part and wait a couple of minutes, and then try to move it with the handbrake. As a last resort, instead of special defrosters from a car dealership, you can use pure alcohol or “anti-freeze”.
- Using the exhaust pipe of your own car. To do this, you will need a rubber hose with a diameter slightly larger than the exhaust pipe so that you can attach it to it. After connecting the hose, all that remains is to connect it to the rear brakes and start the car. As the engine warms up, the hot air will defrost the brake system and the handbrake will release.
But it is not recommended to jerk the handbrake sharply to try to break the ice in this way.
Operation of the system when one of the circuits fails
Dual-circuit brake drive device
If there is a brake fluid leak in one of the circuits, the second will continue to operate. The first piston will move along the cylinder until it contacts the second piston. The latter will begin to move, due to which the brakes of the second circuit will be activated.
- Check for leaks around calipers, pistons, fittings and lines.
- Burn once around the vehicle to replenish the system with fresh fluid.
- Gasket wear.
- Make sure all wheels rotate without resistance.
When replacing pads, you must clean the exposed portion of the caliper piston with brake booster or brake fluid before the piston is pulled into the piston housing. This procedure will prevent damage to the piston seals.
When the car is driven once a week, we recommend replacing the seals once mid-season and rebuilding between seasons. For less used cars, replacing seals between seasons is fine. Always flush the system with fresh brake fluid after replacing or rebuilding a seal.
If a leak occurs in the secondary circuit, the brake master cylinder will operate differently. The first valve, due to its movement, activates the second piston. The latter moves unhindered until the stop reaches the end of the cylinder body. Due to this, the pressure in the primary circuit begins to increase, and the car brakes.
Front disc brakes were optional and received pressure from the same master cylinder. We all probably take our brakes for granted. We don't think about brakes until we need them or they fail us. When you get over it, the physics of braking takes the kinetic energy of a moving vehicle and turns it into thermal energy. Okay, so what the hell does this have to do with stopping the Mustang? Friction material that contacts the rotating mass of iron or steel slows the rotor or drum to a stop, which heats the pad, shoe, rotor, or drum.
Even if the brake pedal travel increases due to a fluid leak, the car will maintain control. However, braking will not be as effective.
When serious malfunctions of the master brake cylinder arise, we put our heads together and begin to count how many thousands of rubles will be spent on repairs. Do not rush into pessimistic forecasts - first you need to determine the nature of the fault, its location, and take into account some other factors. You won’t always need the help of a top specialist—sometimes you can really solve the problem yourself.
We convert kinetic energy into thermal energy by applying resistance to that kinetic energy. This is the master cylinder for one brake system. One brake pressure reservoir and cylinder for four brakes. These master cylinders fail because the rubber cups and seals wear out or the fluid becomes contaminated.
When we overcome the theory of braking relativity, our goal is basically one thing: to stop safely and securely. Mustangs are equipped with two main types of brakes: drum and disc. Some have a force that eases the braking force. Hydraulics make fluid work for us. Hydraulic pressure could literally move the planet. Because we can't compress liquid, can we? it's through lines and hoses to the device we need to do the job. When you step on the brake pedal, the master cylinder moves fluid through lines and hoses to the wheel cylinders or disc brake calipers, which move the shoes or pads against the spinning drum or rotor.
Malfunctions of the master cylinder in most cases are due to the fact that the fluid begins to be distributed unevenly. Somewhere it is in abundance, somewhere it is completely lacking.
The structure and principle of operation of the brake cylinder
If you look at a regular cylinder in cross-section, it is a structure of two sections. Any of the sections is responsible for normal braking of the wheel in front and behind, but from the exact opposite side. Of course, if you are driving a rear-wheel drive car, the situation is completely different: each of the sections described above is responsible for the full operation of the system along the axes.
If there is air in the fluid, we compress the air and cannot move the brake fluid effectively. This is why brakes that require bleeding feel spongy. When all air and contaminated fluid are removed from the system, braking performance increases dramatically. Brake systems should be flushed and refilled every time you brake. This keeps the liquid fresh and effective. Contaminated brake fluid impairs braking performance and your safety.
Drum brakes have been around since the early 20th century, and there have been many variations along the way. Most classic Mustangs were equipped with drum brakes. That should tell you something about braking technology. Drum brakes are old technology.
How does a cylinder work? Just press the pedal and it immediately comes into action. If there is a vacuum booster, it consists of three chambers. One converts your pressure into pressure. After pressing, the piston takes on the load. The brake fluid begins to act on the caliper (apply pressure). The caliper compresses the brake discs using the pads.
A drum brake is more complex than a disc brake because there are more parts involved. When we apply the brakes, the wheel cylinder receives hydraulic pressure from the master cylinder. The friction material contacts the rotating drum, which is an integral part of the axle and wheel. This friction causes the drum, wheel and tire to stop moving. Three return springs pull the shoes out of the drum when the pedal is released.
How to disassemble the master brake cylinder of a VAZ
The star wheel adjuster between the two boots at the bottom adjusts the shoe in or out. Self-adjusting drum brakes use even more parts. The self-adjuster consists of a cable, a swivel hook and a return spring, and it only works when the brakes are backed up and applied. When the shoe touches the drum while backing up, the swivel hook moves away from the star wheel adjuster and then returns to move the star wheel adjuster, thereby moving the shoe closer to the drum.
How is the GTZ checked?
We recommend: DIY installation of xenon and bi-xenon lenses in headlights
Even seemingly insignificant faults can lead to not just repairs, but a full replacement. Whatever the outcome of the diagnosis, it is important to remember one thing - driving a car with a faulty brake cylinder is life-threatening! Therefore, at the first sign of a malfunction, we recommend that you seriously and thoroughly repair this part.
It is best to start checking the cylinder with a traditional inspection. Examine the part for defects and determine if there are any fluid leaks. If a visual inspection does not show obvious problems, we proceed to checking the brake pedal. It's as simple as a multiplication table - press the pedal with confidence. If it fails and you feel it sticking, it makes sense to think about a more thorough check. Most likely there is something wrong with the brake cylinder.
Another “headache” that will overtake any brake cylinder over time is corrosion. Yes, yes, like any other mechanism, the GTZ tends to rust, becoming stained inside. Why is this happening? Blame two factors: water and constant access to oxygen. These two components are always found in brake fluid.
Once again about the leak
The cylinder is designed in an interesting way. Even if there is a fluid leak in section No. 1, the second remains in working order. The first piston passes through its own section and drives the second. The latter creates the necessary pressure to ensure normal operation of the section.
But if a leak occurs in the second section, a completely different picture is observed. The piston works quietly in the good section, while another piston from the faulty section is involved in the work. He moves forward, not encountering any obstacles or obstacles on his way, and runs into a limiter. The outlet is immediately blocked. The pressure in section No. 1 increases, which will certainly lead to unexpected braking of the mechanisms.
Ultimately, after pressing, the brake pedal simply falls through. Braking does occur, but only at the end of the stroke. Now do you understand why driving with such a breakdown is dangerous?
Failure of the turbocharger, its comprehensive replacement
For what reason does the cylinder become unusable? You probably already guessed that this is depressurization. It can be seen with the naked eye. Even with an external inspection, you can see how the brake motor is leaking, leaving behind an unpleasant odor and a characteristic mark. Naturally, the brake fluid in the reservoir will make itself known. Its level will constantly decrease. These and some other signs indicate that you urgently need to repair your gas turbine engine to avoid fatal consequences.
A seemingly harmless depressurization of the cylinder is a serious reason to replace it with a qualitatively new mechanism.
Mandatory repairs and a full replacement of the gas turbine engine will be required if:
- The piston seals are quite worn or damaged.
- The input collar and return spring operate intermittently.
- The mechanism mirror is quite worn out.
In conclusion, we would like to remind you once again that your safety on the road directly depends on the quality of the brake system. Do not underestimate malfunctions of the master cylinder. Otherwise, the trip may end with unexpected brake failure.
What you need to know
As you understand, operating a car without a handbrake is a dubious pleasure, since its absence will not allow you to lock the car in a stable position even on a slope.
If you notice that the handbrake is not working well, adjusting the handbrake yourself can help. But in case of freezing, you need to act differently.
The situation when it is not possible to remove the handbrake is described as freezing. But this is not an entirely correct characterization. After all, it is the pads that freeze, and not the handbrake itself. That is, all your efforts to solve the problem will be directed directly at the block. Plus, do not confuse the concept of freezing, when it gets stuck in the cold, and jamming due to mechanical problems. They can jam even in summer. And then the only solution will be replacement. If they suddenly freeze in the summer, this situation requires serious intervention.
In our case, we are talking about the effects of low temperature and excess moisture.
It is the water that, after stopping in the cold, begins to crystallize and turns into a solid ice crust, which does not allow you to release the handbrake and calmly go on about your business.
Rust in this situation poses a much more serious threat, which can spread to the caliper and other elements of the brake system of your vehicle. We have already talked about caliper jamming.
Owners of different cars face the problem of freezing, including the following models:
- Lada Kalina;
- Ford Focus;
- Lada Priora;
- VAZ 2108;
- Lada Granta;
- Daewoo Matiz;
- Volkswagen Polo;
- Nissan Qashqai;
- Opel Mokka;
- Renault Duster;
- Daewoo Nexia, etc.
There are several ways to solve this problem.
Rotates slower than the front
This problem can be difficult to spot. If the rear wheel turns slower than the front wheel, driving will become more difficult. But the cyclist can attribute this to fatigue, poor road surface or other factors. It is only when the problem reaches a more serious stage that it becomes easier to recognize.
The rear wheel may spin slower than the front for three main reasons:
- bent wheel rim;
- brake pads rub against the disc;
- The braking mechanism is not configured correctly.
A bent disc can make movement difficult. This is caused by friction and contact with other parts. Therefore, the solution suggests itself - straighten the wheel rim. The main thing is not to overdo it, so that later you don’t have to bend the disk in the opposite direction.
If you hear friction sounds while driving, it means the brake pads are rubbing against the wheel disc. This usually happens with new bikes. This issue does not require any action. All defects are eliminated while driving. The pads will eventually wear in and stop causing trouble.
The handbrake won't go down, what should I do?
The parking brake, or as it is popularly called the “handbrake,” although it is intended to immobilize the car while parking, not all drivers and do not always use it.
If the car has an automatic transmission, then, by and large, a handbrake is not needed at all, but owners of cars with manual transmission, as a rule, prefer to leave the car in first gear when parking.
This is due to one of the most important reasons - harsh winter conditions and poor road quality may not allow the handbrake to operate when necessary. This may be caused by icing on the pads or clogged pads. But first things first.