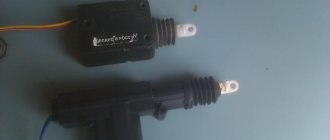
- socket head for a 24 mm wrench;
- ratchet or crank;
- thin flat-blade screwdriver;
- extension;
- 5mm hexagon socket.
Replacing tie rod ends on a Priora with your own hands
1. First of all, remove the wheel bolts and lift the front of the car with a jack.
2. Apply penetrating lubricant to all threaded connections:
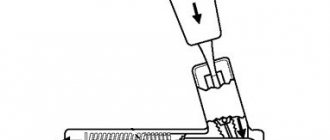
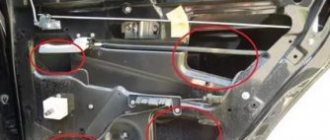
3. Now, using pliers, we align and pull out the cotter pin from the tip pin, as is clearly shown in the photo below.
4. Now loosen the coupling bolt that presses the tip to the rod:
5. Then, using a puller or a pry bar with a hammer, you need to press the tip out of the hole in the rack.
The result of this action is shown clearly below.
6. Next, you need to unscrew the steering tip, twisting it from the rod. To do this, you may need an additional lever, for example, a small piece of pipe or a deep socket
It is worth noting that the left tip unscrews clockwise, and the right one counterclockwise. The photo below shows everything using the left side as an example:
The result can be seen below.
7. If you want to maintain the alignment of the front wheels, at least at approximately the desired angle, you need to count the number of revolutions made when unscrewing the tip. The new one should be wound at the same number of revolutions.
8. After replacing the tip, screw on all the nuts and bolts, and also install the cotter pin in place.
9. We do the same with the second side. Of course, the ideal option is to definitely go to a service station after replacement and have the front wheels wheel aligned. There is no need to save money on this procedure; it may cost more if the wheel angles are disturbed after the repair.
If there are any unclear points, the video below will tell you everything more clearly! The price of new tips for Priora is from 700 rubles per pair, of course, from 350 rubles. a piece.
This is interesting: How to unlock the alarm with the valet button
Removal sequence
First you need to unscrew two screws on the back of the Priora steering wheel, which are located on both sides. To do this, you will need a 5 mm hexagon, while on both sides it is necessary to compress the spring clamps, preventing the pillow from falling out. It is important to remember that before starting work, you must remove the battery terminals to prevent the airbag from deploying.
After this, carefully remove the cushion from the front of the steering wheel. To do this, you need to carefully pry the clamp together with the wires and move it to the side, and also disconnect the power wires leading to the sound signal.
Please note that disassembling the airbag module is strictly prohibited.
Next, a pre-prepared 24-millimeter socket will come in handy, with the help of which the shaft nut is torn off; however, there is no need to unscrew it completely yet. At this stage, you need to somehow mark the position of the steering wheel, which will be needed for subsequent assembly to its original position. For this purpose, you can make appropriate marks on the casing or, in fact, on the steering wheel.
Once the nut has been loosened, you can begin to directly remove the steering wheel. To do this, you first need to gently tap it from the back with careful movements on both sides, but you should not use excessive force, because the steering wheel is still on the shaft. By progressively pushing the steering wheel, it is necessary to ensure that it is completely dislodged from the splines, and when this can be achieved, you can further unscrew the previously loosened nut.
After this, you can actually start removing the steering wheel. You need to act as before, carefully, threading the power wires for the horn and airbags through special holes. Upon completion of this procedure, you can finally remove the Lada Priora steering wheel.
After carrying out the planned actions, assembling the Lada Priora steering wheel with airbags is carried out in the reverse order. At the same time, do not forget about the marks made during disassembly, which will allow you to install the steering wheel in its original position. Remember that when carrying out the above manipulations, before removing the pillow, you should be outside the zone of its deployment.
Standard steering wheel - size, article number and price
First, it’s worth making a reservation that not everyone likes to install new-style components in the pre-restyling Priora. It would be fair to mention the pre-restyling steering wheel. Its article number is 11190-3402012-00.
It is not sold in all stores, “showdowns” or secondhand, but you will have to hunt for a new option. Its cost without an airbag is about 2,000 rubles. With it, the price can increase from one thousand rubles.
the restyled version looks like this
The steering wheel on the restyled Priora received article number 2170-3402018-00, its cost starts from 3,800 rubles. Please note that this is an option with a plug that is installed instead of an airbag, not from the “luxury” configuration - with a silver insert. A similar “luxury” steering wheel comes with article number 21700-3402018-20, it costs 400 - 1500 rubles more. The price for a steering wheel with an airbag starts from 7,500 rubles, from official dealers – 12,000 rubles.
Full size: The steering wheel diameter on the Lada Priora is 410 mm. Don't be surprised when you see that it fits Kalina too - the cars are equipped with the same steering wheels.
Photo report on removing the steering wheel yourself
First of all, read the material on removing the driver's airbag on a Priora. Then, when you have dealt with this, you can proceed further. Disconnect the power wires to the sound signal.
Then we put the head on 24 and rip off the nut, but don’t unscrew it completely yet. Before you start knocking it off the shaft, you need to mark the position of the steering wheel relative to the shaft - you can make marks on the steering wheel and casing.
When the nut is loosened, leave it on the shaft for now. Then we take and knock down the steering wheel from the reverse side, tapping it with medium force - on both sides.
When it comes off the splines, you can finally unscrew the nut and remove it from the shaft.
Carefully thread the horn power wires, as well as the airbag power wires, through a special hole.
And now the steering wheel is finally freed and you can remove it completely from the Priora.
If there is a need for replacement, then we perform it in the reverse order. Of course, the installation is carried out according to the marks that were originally set. The fastening nut must be tightened with a torque of 31 to 41 Nm. But you can take the average value and tighten it with a force of 40 Nm.
How to directly remove the Priora steering wheel
To remove this important part, you need to prepare some tools:
- Flat head screwdriver;
- Pliers;
- wrench head 24;
- hexagon number 5
- Wrench with extension for head.
Removal process
After installing the Priora in the desired position, it is better to fix the wheels, and you can begin to remove them. First of all, the airbag is removed. Removing it is a very delicate job and must be carried out with special precautions. To begin with, it is better to turn off the power to the car. That is, disconnect the battery terminal. And only after that, unscrew the 2 hex bolts from the back of the steering wheel. Then, very carefully move the device to the side.
The airbag wire connector is secured with a special clamp that wedges the center of the connector. You need to carefully pry it off with a thin screwdriver and then carefully remove it. Then remove the connector from the pillow. Without making sudden movements, put the device aside so that it does not come under impact or a sharp push. Do not under any circumstances try to disassemble the pillow!
Further work will be simpler. Using pliers, carefully disconnect the wires going to the sound signal and move them to the side.
Safety system
The Lada Priora has a built-in safety system that is activated in the event of a collision. This system is represented by an inflatable soft pillow that expands at the time of an accident. The Priora has 4 airbags: one for each passenger, including the driver. They operate only in the event of a sharp collision at a speed of over 20 km/h, so they never open accidentally.
The driver's airbag is located directly in the Priora's steering wheel, which can cause some difficulties when trying to remove or replace the steering wheel or its elements. If you are going to install a new steering wheel, then it is worth finding out a little about the features of the location of the cushion.
The design itself is quite simple and consists of the following elements:
- gas generator;
- pillows;
- control module.
In the event of a collision, a special sensor sends a signal to the module, which, in turn, turns on the gas generator. In about a second, the device fills an empty bag with nitrogen, which unfolds towards the driver.
If you bought a used Priora, check for the airbag: press just below the center of the steering wheel. A soft-touch center means the cushion is in place.
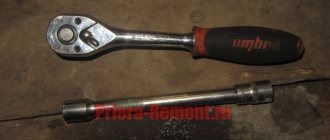
Tools for work
Let's try to figure this issue out together.
Experts say that you can remove it on your own, without involving professionals from a car service center and making do with a small list of tools. What you will need for this:
- 24 mm socket wrench;
- pipe 30-40 cm long (for support);
- 5 mm hex wrench;
- screwdriver (flat blade).
All these tools will help you easily cope with removing the steering wheel yourself. If you use them correctly, the whole process will seem easy.
{banner_content}
Replacing the steering wheel
The standard Priora steering wheel can be replaced with a new model from the Priora 2 SE luxury. The differences in feel are quite significant. The updated model is much more convenient to use, so it’s worth considering such a purchase if you have an old, battered steering wheel installed.
We will now figure out how to remove the steering wheel. To replace you will need the following set of tools:
- Phillips and flat screwdriver;
- hex key five;
- replaceable head for 24 and 8;
- ratchet.
Here's the procedure:
- Disconnect the device from the battery by removing the terminal. We are waiting for the capacitor of the protective system to discharge.
- We fix the steering wheel in the position for driving in a straight line.
- Using a Phillips screwdriver, unscrew the fastenings of the steering wheel casing (7 pcs.), then remove it.
- Next, you will need a hex wrench to unscrew the next 2 steering wheel airbag mounts.
- Now we pull the pillow towards us, use a flat screwdriver to pry the device from the bottom on the other side and disconnect it.
- Using a 24mm replaceable socket, loosen the fastening of the steering wheel to the shaft. The nut is strong, so you may have to work hard. Unscrew and remove the steering wheel.
- The 8 socket is useful for removing the steering column cable and switches.
This is interesting: In which city is Renault Duster assembled?
How to directly remove the Priora steering wheel
To remove this important part, you need to prepare some tools:
- Flat head screwdriver;
- Pliers;
- wrench head 24;
- hexagon number 5
- Wrench with extension for head.
Very important! Before you begin disassembling and removing the steering wheel, be sure to align the car’s wheels strictly in a “straight ahead” direction! And note how the steering wheel is located. This is necessary for proper reinstallation after removal.
Removal process
After installing the Priora in the desired position, it is better to fix the wheels, and you can begin to remove them. First of all, the airbag is removed. Removing it is a very delicate job and must be carried out with special precautions. To begin with, it is better to turn off the power to the car. That is, disconnect the battery terminal. And only after that, unscrew the 2 hex bolts from the back of the steering wheel. Then, very carefully move the device to the side.
Special attention! Under no circumstances should you make sudden movements or hit the device! Spontaneous operation may occur, resulting in serious injury!
The airbag wire connector is secured with a special clamp that wedges the center of the connector. You need to carefully pry it off with a thin screwdriver and then carefully remove it. Then remove the connector from the pillow. Without making sudden movements, put the device aside so that it does not come under impact or a sharp push. Do not under any circumstances try to disassemble the pillow!
Further work will be simpler. Using pliers, carefully disconnect the wires going to the sound signal and move them to the side.
Now the main nut is 24. It needs to be torn off, but not unscrewed or completely removed, but only unscrewed 2-3 turns. After this, gently tap your palms on the back of the Priora steering wheel to move it upward. That is, tear it along the slots. Then check the position of the wheels and steering wheel again. You can make marks with a marker on the steering wheel and column casing.
And only then completely unscrew the nut and finally remove the Priora steering wheel. When removing, be careful not to damage the wires of electronic devices. Pull them out through the special hole and move them to the side.
Installing devices in place
Carry out this operation strictly in the reverse order. Start by laying the wires and then follow the instructions. And again, be especially careful when handling the airbag!
Important! After fully assembling and connecting the battery, test turn on the ignition from the passenger seat! This will protect you from unexpected deployment of the airbag.
Useful video on removing the Priora steering wheel:
Source: https://auto-gl.ru/kak-snyat-rul-lady-priory/
Lada Priora Hatchback 2011, l. With. - with your own hands
Ulyanovsk
Lada Priora, 2011
225 000 ₽
October
Lada Priora, 2011
220 000 ₽
Barnaul
Lada Priora, 2017
395 000 ₽
Tolyatti
Lada Priora, 2011
230 000 ₽
See more cars on Drome
Participate in the discussion can only registered users.
Login Register
Removing and installing electric booster - tools
Even manually diagnosing something with an EUR will be difficult - one way or another, you will have to remove it. To do this, you should prepare and get:
- Hammer;
- Chisel;
- Extension;
- Driver (ratchet);
- Heads for 8 and 13.
Let's sort it out
- Disassemble and remove the steering column. Remove the negative terminal from the battery;
- Using the eighth head, remove the contact group;
- Disconnect all wiring from the gray metal block. Each wire is under a lock, so handle them carefully, try not to damage the contacts;
- Disconnect the steering rack and cardan mounts by removing the bolt. Using a chisel and hammer, loosen the universal joint;
- Unscrew the four nuts that secure the amplifier to the body;
- Pull out the EUR.
To install the EUR, all steps are performed in reverse order. It is highly recommended that during dismantling you remember (better - take a photo!) the connections of all wires so that the installation goes smoothly the first time.
Step-by-step instruction
1. On the inside of the steering wheel, unscrew the two airbag mounting screws.
The screws are located on the right and left of the inside of the steering wheel.
2. Pry up the airbag and disconnect the power connector from it.
In order to disconnect the power connector, you need to use a flat-head screwdriver to pry it up and remove the latch. After releasing the latch, remove the connector upwards.
3. Disconnect the power connector from the horn buttons. We squeeze the ears and disconnect the connector.
4. Place the steering wheel so that the wheels point straight and make a mark on the steering wheel relative to the steering column casing. This must be done in order to set the steering wheel to its previous position.
The mark can be made with a washable marker.
5. Unscrew the nut securing the steering wheel to the shaft using a twenty-four socket. Do not unscrew the nut completely.
After unscrewing the nut a little, we knock the steering wheel off the splines. This can be done by striking movements of the palms of the hands on both sides of the steering wheel.
After the steering wheel has come off the splines, unscrew the nut completely and remove the steering wheel.