VAZ 2107 clutch: device
The “Seven” has a dry single-disc clutch. The clutch hydraulic master cylinder is located directly under the pedal, when pressed, the pusher moves, acting on the master cylinder piston, creating pressure. The brake fluid that fills the hydraulic drive is squeezed out and flows into the working cylinder.
The piston of the working cylinder is connected to the clutch fork by a pusher. When you press the pedal, the latter moves the fork, it displaces the release bearing and separates the support and pressure discs. As a result, the torque from the crankshaft flywheel is no longer transmitted to the gearbox and it becomes possible to change gear.
If the clutch unit malfunctions, when you press the pedal, the gearbox shaft continues to rotate and changing gears becomes difficult or even impossible. If the clutch is adjusted incorrectly, the discs may slip, which is accompanied by accelerated wear.
You cannot continue to drive a car with a faulty clutch - both the clutch discs and the gearbox may be damaged. Therefore, at the first sign of a malfunction, you should start repairing and adjusting it.
How the clutch works
Now a few words about the structure of the mechanism. The seven, like all Tolyatti cars, has a dry single-plate clutch, the diagram of which is clearly shown below. The fork drive is hydraulic, in front-wheel drive VAZs it is cable drive. Under the hood there is a master cylinder, which is controlled by a rod from the pedal, and a slave cylinder is screwed to the gearbox housing, which sets the fork in motion.
The fork presses through the release bearing onto the heel of the clutch basket and separates the drive and driven clutch discs, interrupting the supply of torque to the input shaft of the gearbox.
To avoid problems with gear shifting, the discs must be completely disconnected from each other, and in order for the torque to be transmitted to the gearbox as much as possible and without losses due to slipping or slipping of the discs, they must be pressed as tightly as possible. To find a balance between these extreme positions, it is necessary to adjust the clutch on the VAZ 2107.
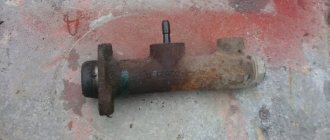
Replacing the clutch master cylinder VAZ 2107
The simplest way to repair a VAZ 2107 clutch is to change the worn cylinders (main and slave). Their price is low, and the labor intensity of the operation is much lower than when carrying out repairs. Therefore, car owners often prefer to replace rather than repair clutches.
Let's start by replacing the master cylinder. The order of operations is as follows:
- Drain the brake fluid from the clutch reservoir into another container. This can be conveniently done using a syringe.
- Loosen the clamp and remove the hose from the master cylinder fitting.
- Unscrew the fitting of the metal tube going from the master cylinder to the slave cylinder and disconnect the tube.
- Using a 13mm wrench or a socket with an extension, unscrew the two nuts securing the master cylinder to the body bulkhead and remove the master cylinder.
The new clutch master cylinder can now be installed. Before doing this, you should check the condition of the flexible hose of the clutch reservoir. If it cracks at the end, it needs to be trimmed slightly or replaced with a new one.
When installing a new cylinder, it is necessary to ensure that the clutch pedal drive rod fits inside the cylinder. For convenience, you can ask your partner to slightly press the clutch pedal and hold it. Then follows:
- Install the master cylinder onto the studs and tighten the nuts.
- Attach and tighten the metal tube fitting.
- Place the pipe from the clutch reservoir and tighten the clamp.
- Fill the reservoir with brake fluid, following the level marks.
The clutch master cylinder has been replaced.
Design and operation of the VAZ-2107 GCS
The clutch master cylinder is a rather complex assembly consisting of a large number of parts. However, in order to understand the principle of operation, it is enough to name the main ones. These include:
- main body with brake fluid reservoir;
- cylinder piston;
- union;
- return spring.
The principle of operation of the cylinder resembles the operation of a conventional piston pump and is as follows: pressing the clutch pedal causes the movement of its pusher, which acts on the piston. Moving forward, it creates pressure in front of itself, which is transmitted through tubes and hoses to the working cylinder. Its rod extends and displaces the clutch fork, the driven disk disengages the transmission. When the pedal is released, the reverse process occurs.
Replacing the clutch slave cylinder VAZ 2107
Removal of the working cylinder should be done from the inspection hole or using a lift. The order of operations is as follows:
- Remove the return spring from the slave cylinder bracket.
- Unscrew the fitting of the tube coming from the master cylinder. To prevent brake fluid from leaking from it, you can put a cap on it, removed from the cylinder bleeder fitting, or direct it into a container prepared in advance.
- Unscrew the two bolts connecting the slave cylinder to the gearbox and remove them together with the plate.
- Remove the clutch slave cylinder.
The new working cylinder is installed in the reverse order of removing the old one.
After replacing any of the cylinders, the hydraulic drive system must be pumped. The work must be carried out together with a partner. This is done like this:
- Place a hose on the fitting of the working cylinder and immerse its end in a prepared container for brake fluid.
- Depress the clutch.
- Unscrew the fitting on the working cylinder 1 turn.
- Wait until air bubbles stop coming out and tighten the fitting.
- Repeat the operation until air stops coming out of the fitting. At the same time, monitor the fluid level in the clutch reservoir.
- Tighten the fitting and put on the cap.
There are several ways to bleed the clutch on a VAZ 2107, here is a video about the most popular ones
Do-it-yourself VAZ 2101 clutch replacement
As we said, to replace any of the clutch elements (except for the fork), you need to remove the gearbox. You can do it alone, but it’s better to have an assistant. To dismantle the gearbox, you need to install the car on an inspection hole; there is no need to drain the oil from the gearbox. We carry out the work in the following order:
- Disconnect the negative terminal from the battery.
- Remove the gear shift lever from the interior.
- We remove the muffler hangers and unscrew the traverse mounting the gearbox to the body.
- Without turning it off, remove the starter and move it to the side.
- Unscrew the gearbox mount to the cylinder block.
- We move the box as far back as possible so that you can get to the clutch basket.
- We screw one of the bolts securing the gearbox to the block into place and, resting the mounting blade against it, block the flywheel.
- We unscrew the 6 bolts securing the basket and remove it without dropping the driven disk. If we install the same basket back, we mark with chalk or a punch the marks for installing the basket relative to the flywheel.
- Remove the release bearing by unlocking the lock with a screwdriver. If necessary, remove the plug.
- After checking the condition of the basket, release plate, and driven disk, we replace it.
- Install the basket and driven disk (The hub protrusion should point towards the gearbox), without tightening the mounting bolts.
- Using a mandrel, we center the driven disk with the flywheel support bearing. The mandrel is the outer part of the gearbox input shaft. You can use either part of the old shaft or a special mandrel, which is sold in stores.
- We clamp the basket mounting bolts with a force of 20-30 Nm.
- Apply grease to the splined part of the gearbox input shaft and put on the release bearing. We fix it on the fork.
Assembling and installing the gearbox is carried out in the reverse order.
VAZ 2107 clutch repair
Repairing clutch cylinders is somewhat more difficult than replacing them, but much cheaper.
Once the cylinders are removed, disassembly can begin. Let's start with the master cylinder:
- Use a thin screwdriver to remove the retaining ring.
- Remove the fitting and gasket.
- Remove the boot by prying it off with a screwdriver.
- Unscrew the cylinder plug using a 22mm wrench.
- Pull out the retaining ring and use a screwdriver to remove the inside of the cylinder.
To restore the master cylinder, the rubber seals must be replaced. It is also necessary to check the condition of the spring, the inner surface of the cylinder and the piston. If there are burrs or damage, parts must be replaced.
Clutch repair
Now let's consider another option - using a repair kit for the clutch cylinders - main and working.
Master cylinder
So, we have removed the main cylinder and now we begin to disassemble it.
VAZ 2107 clutch master cylinder repair
- We start by removing the fitting. Use a screwdriver to remove the retaining ring.
- After which you can easily remove the fitting with the gasket.
- Now remove the rubber boot (protective cap) by simply prying it with a screwdriver or other convenient object.
- Now, using a 22 key on the other side, you need to unscrew the plug of the VAZ 2107 clutch master cylinder.
- You also need to remove the retaining ring from the boot side. This can be done using two screwdrivers, or special pliers. It is more convenient to use expansion pliers.
- Now you can easily remove all the insides of the cylinder.
Now about damaged parts and their replacement:
Clutch master cylinder of VAZ 2107 disassembled
- All rubber seals should be replaced. 2 rubber rings - on the piston and pusher rod, one on the fitting, and we also replace the protective cap if necessary.
- If necessary, replace the spring. If it is deformed or damaged.
- Also pay attention to the internal mirror of the cylinder. It should not have burrs or chips.
- If the piston is damaged or the pusher is bent, then it is better to replace the cylinder with a new one.
- When assembling, all parts should be washed very thoroughly.
Note! Never wash parts in gasoline or oil and do not allow these liquids to get inside the cylinder. Lubrication is carried out only with brake fluid!
- Put all retaining rings back.
- Tighten the clutch master cylinder plug tightly!
Then install the cylinder back on the car. This is how the clutch master cylinder is repaired on a VAZ 2107 car.
Working cylinder
VAZ 2107 clutch slave cylinder repair
- Clamp the VAZ 2107 clutch slave cylinder in a vice and unscrew the rear plug.
- Remove the protective rubber cap.
- Remove the retaining ring from the plug side and remove all internal parts of the working cylinder.
- Using a 10mm wrench, unscrew the bleeder fitting.
- Check the condition of the spring.
- Replace all rubber seals of the VAZ 2107 working cylinder.
- Check the condition of the working cylinder mirror.
- Wipe the inside with a clean cloth if necessary.
- Clean the bleeder fitting. If the edges on it are “licked”, replace it.
- Wash all parts in brake fluid.
- Lubricate each part with brake fluid during assembly.
- Reassemble all parts in reverse order.
- Install the retaining ring, protective cap and plug.
Install the VAZ 2107 clutch slave cylinder on the car (see above).
Clutch adjustment on a VAZ-2107 - detailed instructions for a beginner
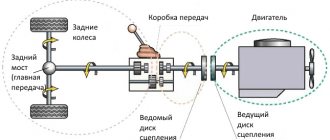
The main purpose of the clutch mechanism is to combine the crankshaft with the gearbox and transmit torque from the engine to the wheels of the car. This device is used on the car when switching to a lower or higher gear, as well as when turning on neutral. In order for gear shifting to be carried out easily and smoothly, you will need to properly adjust the VAZ 2107 clutch, which every owner of the 7 should be able to do.
The design of the clutch mechanism on the VAZ 2107
Although the clutch performs a simple task, it consists of many component parts. All parts have a corresponding lifespan, so sooner or later the clutch needs repair and adjustment. Before setting up the clutch on the VAZ 2107, you need to understand its structural elements.
Classic cars of the VAZ family are equipped with a dry closed-type clutch mechanism. The device consists of the following elements:
- The driving part is a driven disk that has splines for transmitting the moment of movement to the gearbox shaft. This rotation is transmitted by friction that occurs between friction linings with the flywheel and the pressure plate.
- Non-separable mechanism - this unit is called a basket, which is fixed to the flywheel.
The clutch mechanism on the VAZ 2107 is activated by the leftmost pedal in the car's interior. The device is driven by a hydraulic drive. The basis of the hydraulic drive consists of the following components:
- Master and slave cylinders.
- On and off forks.
- Release bearing.
All classic VAZ models, as well as carburetor and injection VAZ 2107, are equipped with a similar clutch design. The only difference is the presence of an auxiliary shield on injection models, the purpose of which is to protect against dirt. To give you an idea of what we're talking about, below is a diagram of the device in question.
How to adjust the clutch on a classic
The clutch adjustment on the seven should be done after the work on installing the mechanism is completed. If the setup procedure is correctly completed, you can continue to operate the machine without worrying about premature failure of the unit. Before the adjustment process, you will need to check the hydraulic drive for the presence of air in it. The air must be removed by bleeding the system, and if necessary, replace all the fluid.
This is interesting! If, after replacing the clutch parts, the adjustment of the mechanism was carried out incorrectly, then continuing to further operate the machine with an unadjusted device is not only inconvenient and dangerous, but may risk repeated repairs.
If there is a need to adjust the mechanism in question on the VAZ 2107, then detailed instructions are presented below.
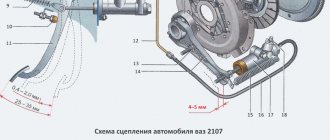
Adjusting the clutch pedal free play
To set the free play of the pedal, you will need to adjust two units - the main and working cylinders. This will allow you to perform the most precise adjustment of the clutch on the VAZ 2107. Procedures for adjusting the travel of the clutch pedal are performed:
- Using two keys at “13” in the car’s interior below, you need to adjust the full pedal stroke. A special rod acts as a full stroke limiter, which is secured with two nuts. Using one wrench you need to hold the travel stop fastening, and with the second you need to loosen the nut a few turns. The full pedal stroke should be about 140 mm, which can be measured using a ruler.
- In the next step, you should set the free play of the pedal. In standard mode, the free play should be approximately 30 millimeters. However, this value is not a reference value, and each car enthusiast can set the idle value based on his preferences. To set the free play of the pedal, you will need to rotate the nut of the limiter itself towards the bracket, which is indicated by the number “2”. As soon as the free play reaches the desired value, you need to hold the nut with a wrench and use a second tool to tighten the lock nut.
- At the final stage of self-adjustment of the clutch pedal, it is necessary to check. We take a ruler in our hands, and resting it on the body as the pedal moves, we take measurements. You immediately need to press the pedal with your hand and press until resistance occurs.
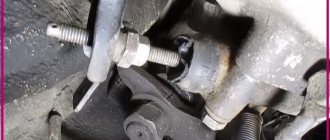
Adjusting the free play of the clutch fork pusher
Let's start adjusting the free play of the clutch fork push rod (working cylinder). First you need to clarify the amount of free play. This is done like this:
- The working cylinder is located at the bottom of the car, so to continue further actions you need to go down into the inspection hole and continue work there.
- Armed with pliers, you need to remove the spring from the resistance release fork. It is not necessary to remove the spring, but then when making adjustments you will need to apply force when checking.
- Using a ruler, you need to find out the amount of free play of the clutch fork.
- Applying force to the fork until it stops, you need to hold it in this position. We remember the position of the fork using a ruler, and then we need to release the mechanism and measure the free play. Its value should be between 3 and 5 mm. The service life of the release bearing depends on this free play. If there is no clearance, then the entire load will go to the release bearing, which will soon cause it to fail.
When the fork clearance is not correct, it should be adjusted. The adjustment process involves performing the following manipulations:
- Using two keys “13” and “17”, you need to loosen the lock nut. The photo shows this process - the letter “a” indicates the key with which you need to hold the nut, and the second under the letter “b” should unscrew the nut.
- Using pliers or an adjustable wrench, it is necessary to fix the end part of the pusher or the RCS rod with them in a stationary form, and loosen the nut “a” by 1-2 turns.
- We set the correct amount of free play of the pusher from 3 to 5 mm.
- We fix the lock nut “a” in the established position, while tightening the nut “b”.
After adjusting the idle speed of the clutch fork pusher, you need to double-check the pedal's idle speed. Don't forget to put the spring in place.
Complete disassembly with gearbox removal
The work must be done on a lift or in a pit. First of all, remove the battery
We continue disassembly by removing the rod from the gear shift lever. Then you will have to use a screwdriver to unscrew the screws securing the cover that covers the hole in the car body. This completes the manipulations inside the car dealership. What needs to be done next:
- Remove the exhaust pipe (exhaust system) and resonators;
- Then remove the starter from the flywheel housing and move it to the side;
- Disconnect the cardan from the rear axle and gearbox.
To be able to remove the box, remove the cross member of the rear engine mount and the speedometer drive cable. You also need to disconnect the hydraulic drive cylinder from the gearbox and move it to the side.
Next, you will need to remove the bolts that hold the clutch housing cover in place (key 10) and proceed to dismantling the box, and since it weighs a lot, it is worth putting a good support under it.
Read, it may come in handy: Replacing front brake pads: which ones are better
After this, use a socket wrench to unscrew the bolts from the flywheel housing. Now, in order to remove the box, you will have to carefully move it back, slowly removing the primary shaft from the hub of the clutch driven disc. This must be done carefully so as not to drop the box and injure yourself. That's it, the box is removed.
Video about disassembling the clutch using the example of a VAZ 2106, suitable for the “Seven”, a small difference only in the interior
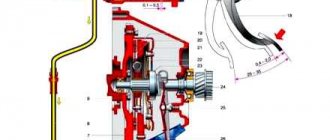
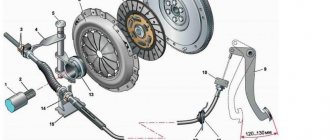
Clutch device VAZ-2107
Clutch assembly
1 – bleeder fitting; 2 – clutch pressure spring; 3 – stepped pressure spring rivet; 4 – pressure disk; 5 – driven disk; 6 – flywheel; 7 – clutch housing; 8 – bolt securing the clutch housing to the flywheel; 9 – gearbox input shaft; 10 – clutch release bearing clutch; 11 – clutch release fork; 12 – ball support for the clutch release fork; 13 – clutch release bearing; 14 – thrust flange of the pressure spring; 15 – clutch release fork cover; 16 – fork spring; 17 – support ring of the pressure spring; 18 – clutch casing; 19 – clutch release fork pusher; 20 – adjusting nut; 21 – lock nut; 22 – protective cap; 23 – clutch release cylinder (working cylinder); 24 – fork release spring; 25 – tension spring bracket
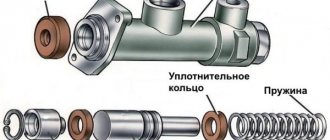
Slave cylinder and clutch release fork
1 – clutch release bearing; 2 – ball joint; 3 – clutch release fork; 4 – pusher; 5 – adjusting nut; 6 – lock nut; 7 – tension spring; 8 – housing plug; 9 – fitting for bleeding; 10 – cylinder body; 11 – sealing ring; 12 – protective cap; 13 – piston; 14 – seal; 15 – plate; 16 – spring; 17 – support washer; 18 – retaining ring The vehicle is equipped with a single-plate, dry, permanently closed clutch with a central pressure spring and a torsional vibration damper on the driven disk.
The leading part of the clutch is a non-separable unit, includes a clutch housing 18 (see Fig. Clutch assembly), pressure plate 4 and diaphragm pressure spring 2. The clutch housing is attached to the flywheel with 6 dowel pins and bolts 8. Pressure disk 4 is connected to the housing 18 by three pairs of steel plates, each of which is riveted at one end to the casing and the other to the pressure plate. Through the clamps, the pressure disk is connected to the outer edge of the diaphragm spring 2, which rests on two O-rings 17, fixedly fixed to the casing with stepped rivets 3.
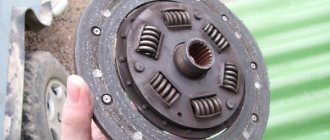
Driven disk 5 is made of steel, has slots that divide it into twelve sectors, bent in different directions. Friction linings are rivet-fastened to the disk sectors, independently of each other. To dampen torsional vibrations, the driven disk is connected to the hub using a torsional vibration damper (damper).
The clutch release drive is hydraulic. It consists of a master cylinder. Clutch pedal and master cylinder), clutch release cylinder 10 (see Fig. Slave cylinder and clutch release fork), fork 3 and clutch release bearing 1, reserve tank and clutch pedal with servo spring. The tank and drive cylinders are connected to each other by pipelines.
Clutch for VAZ 2107
The VAZ 2107 clutch is a part of the transmission mechanism that is involved in transmitting torque to the drive wheels of the car. The clutch is located between the gearbox and the car engine and transmits rotation from the engine to the gearbox. When the pedal is pressed, the clutch is released and the engine is separated from the gearbox. When the pedal is released, the connection is restored again. The clutch ensures smooth starting of the car and silent gear shifting.
Basic faults
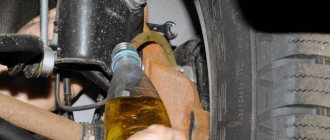
The slave cylinder has several rubber seals, which often become unusable or become oily, causing the car’s clutch to “slip.” Replacing old seals with new ones will require using a lift or inspection hole, since the main cylinder is located in an inconvenient place.
When replacing seals, do not forget that there is brake fluid in the system; it must first be drained.
It is advisable not to touch the flare nut, otherwise additional adjustment will be required later. In order to replace the gaskets without removing the master cylinder, certain skills and experience are required.
Another cause of clutch malfunction may be wear of the release bearing. To replace it, you will have to dismantle the gearbox. Brake disc linings wear out just as often, which is easy to notice by the characteristic noise when the pedal is released. And the most common problem with a clutch malfunction is air getting into the system. Air can be removed by bleeding.
Leveling up
To bleed, you will need brake fluid and a container for draining it, as well as a transparent hose with a diameter of 5mm. and an assistant who will have to press the clutch pedal until heaviness appears in it. After this, it must be clamped, and at this time a second person must unscrew the fitting and drain all the brake fluid. Air bubbles will be visible in the hose. The procedure should be repeated until these same bubbles disappear. Also, do not forget about the fluid level in the expansion tank.
VAZ 2107 clutch diagram
Checking the performance of the VAZ clutch
Actually, that's all the adjustment is. All that remains is to check the operation of the clutch, and this is done as follows:
- we warm up the engine to approximately operating temperature so that the thermal gaps in the clutch mechanism come into working condition, they are not too large, but nevertheless, this must be taken into account;
- at idle speed, press the clutch pedal all the way and engage first gear; if the gear engaged silently and clearly, everything worked perfectly;
- We also turn on the rear one, and it should also turn on clearly and clearly and turn off just as clearly;
- Let's go to the track and try to change gears from top to bottom and vice versa in turn, but there shouldn't be any crunches or grinding noises.
This completes the adjustment of the pedal and clutch drive. If we did everything correctly and did not forget to lock the locknuts on the rods, then the next time we will encounter them when replacing the clutch disc or friction linings. In the meantime, good roads and reliable grip everyone!
Adjustment
Clutch adjustment on a VAZ 2107 is carried out by adjusting the clutch drive, or rather, the adjusting bolt, which is located at the end of the cable in the engine compartment. Incorrect adjustment causes the clutch to slip.
- The car is installed on an overpass or inspection hole.
- In the cabin, the free play of the clutch pedal is checked and, if necessary, adjustments are made. To do this, use a 10mm wrench to loosen the locking nut of the pedal stop and set the required gap, approximately 0.4-2 mm.
- The pusher is cleaned of dirt and a penetrating lubricant is applied.
- The working cylinder is checked for free play of the pusher, on which the free play of the release bearing depends. To do this, push the clutch fork back by hand until it stops, while the free play of the pusher should be within 4-5 mm.
- Adjustment of the free play of the pusher is done with a 17 wrench, which will keep the adjusting nut from turning, and with a 13 wrench, loosen the tightening of the lock nut.
- The pusher is held with a key at 8, at the same time with a key at 17
- The adjusting nut is loosened and the required free play of the pusher is set, this is approximately 4-5 mm.
- The locknut is tightened by holding the pusher adjusting nut.
- Inside the car, the total free play of the clutch is checked, which should be approximately 25-30 mm. from the top position of the pedal to the start of switching on. If necessary, the entire operation is repeated several times until it is felt that the clutch is no longer slipping.
Features of adjusting the clutch release drive of VAZ 2105, 2107 cars
Correct and precise operation of the clutch on VAZ 2105, 2107 vehicles is ensured by certain adjustments to its drive.
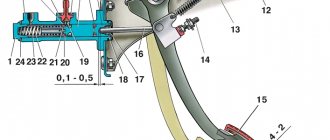
There are two of them: adjusting the gap between the pusher and the piston of the clutch master cylinder and adjusting the free play of the clutch pedal. The gap between the pusher and the clutch master cylinder piston is 0.1 - 0.5 mm. It is regulated by rotating the clutch pedal free travel limiter. In this case, a certain free play of 0.4 - 2.0 mm is formed at the clutch pedal, which the driver selects when starting to press the pedal.
the gap between the pusher and the piston, free play of the clutch pedal of VAZ 2105, 2107 cars
It is measured with a ruler or tape measure, which is installed from the floor to the middle of the lower part of the pedal platform. We move the platform with our hand relative to the ruler scale by pressing the pedal. If there is a gap, at first the pedal moves very easily, and then with difficulty. If there is no gap, turn the pedal travel limiter out a little. We ensure that the free movement along the ruler fits within the required two millimeters.
This gap is necessary for the clutch to disengage completely. If it is missing, then the piston will not be able to fully return to the rear position when the pedal is released and in the working cavity of the master cylinder, and excess pressure will remain in the entire drive. As a result, the clutch will not disengage completely, since the release bearing will press on the leafs of the pressure spring, and the discs will slip (not be fully pressed against the flywheel). Increasing this gap will lead to the fact that the clutch will not disengage completely and will “drive” (the discs do not fully move away from the flywheel).
Adjusting the clutch pedal free play (the gap between the release bearing and the plane of the pressure flange of the clutch “basket” pressure spring)
Replacing the master and slave cylinders
The master cylinder is replaced in the following sequence:
- Liquid is drained from the reservoir. This can be done using an ordinary syringe, or by removing the hose from the master cylinder fitting.
- The pipe fitting leading to the clutch slave cylinder is unscrewed.
- Using a 13mm wrench, unscrew the two nuts on which the main cylinder is attached.
Replacing the working cylinder:
- The spring is removed from the working cylinder.
- Using a 10mm wrench, unscrew the tube connecting the master and slave cylinders.
- Using a 13mm wrench, unscrew the two bolts of the working cylinder and remove them together with the plate.
After replacement, the working cylinder must be bled.
Replacing the VAZ 2107 clutch
Replacing the clutch yourself
When replacing the clutch, you should carefully inspect all the parts being removed; it is quite possible that you will not need to replace the entire assembly; it will be enough to change only some parts.
The clutch is replaced in the following sequence:
- The battery terminals are disconnected.
- The gear shift lever is disconnected from the transmission.
- The exhaust pipe is disconnected from the resonator, then the working cylinder is disconnected from the gearbox housing. The cardan is disconnected from the gearbox itself.
- The bolts securing the starter to the transmission housing are unscrewed, but before doing this, the two lower nuts that secure the transmission to the engine block must be loosened.
- The gearbox is removed, then the clutch basket is dismantled. After removing the basket, the clutch disc is released
- At this stage, if necessary, the master cylinder and other components are replaced, for example, the clutch fork or antennae on the basket are changed.
- Assembly and installation of the unit is carried out in the reverse order.
When assembling, all parts must be thoroughly washed, but under no circumstances should this be done in gasoline or oil. Lubrication is carried out only with brake fluid.
The clutch is one of the most important components in a car, without which it simply will not move. Therefore, this complex system requires proper attention and care. Malfunctions in the clutch operation can lead to spontaneous movement of the car, and this is a direct threat to the lives of others.
Clutch replacement procedure
Changing the clutch of a VAZ 2107, the price of a set of which is about 2000 rubles, does not take long. Most of the time is spent removing and installing the gearbox. When removing the gearbox, try not to damage the clutch basket. After all, it changes much less frequently than the disk and bearing. But in any case, you will need to install new bolts. The fact is that during operation, the threads on old ones are slightly deformed, and it is possible that they will not be able to provide a reliable connection.
Both when removing the basket and when installing it, it is necessary to screw in/unscrew the bolts diagonally. This will ensure even tightening. Don't forget to change the release bearing and carefully inspect the condition of the fork. If it is defective, replace it. Also, do not deprive your attention of the flywheel crown. If its teeth are worn out, you will need to either turn it over or install a new one. Installation of the basket and disk must be carried out only after alignment using a tube (or a piece of the gearbox input shaft).