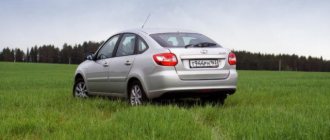
Replace your rear bumper on a Priora
First, unscrew the screws securing the rear fenders to the bumper on both sides. This can be clearly seen in the photo below.
Unscrew all the screws securing the fender flaps to the bumper. We then push the wings back as far as possible using a few screws at the bottom.
That is, the bumper is already attached directly to the body. Also, after this, unscrew the screws or fastening screws:
Next we go to the main rear bumper mounts. On top on both sides is one bolt with 10 heads and a winch:
Now look below, there are two main side mounts, one on top of the other and the other:
Removing and installing the rear bumper
on in
, change the style before restyling,
in
2
Bumper
there is no color
frame rear bumper Lada Priora
A specialist from the tuning center Drivebox.ru removes the factory rear bumpers
with priorities
install tuning.
And additional screws along the entire length, which you also need to unscrew.
Now the bumper is not fixed, but simply sits on the sides of your body. Gently pushing it away from the edge, we unscrew it into one piece.
And we do the same on the other side, after which the bumper can be completely removed from the car, since it is no longer attached.
This procedure was shown using a car as an example. Lada Prior sedan, although the hatchback and station wagon have a similar design and removal will be carried out in a similar way.
How to remove the rear bumper of a Priora repair
Removing the rear bumper on a Priora has to be done mainly for the following reasons:
- element replacement
- repair and/or painting
- replacing bumper amplifier
In order to independently remove the bumper on a Priora, we will need the following accessories and tools:
- 10 and 8 mm head
- Ratchet or crank
- Phillips screwdriver
Replacing the rear bumper on a Priora with your own hands
First you need to unscrew the screws securing the rear fender liners to the bumper on both sides. This is clearly shown in the photo below.
It is necessary to unscrew exactly all the screws that secure the fender liners to the bumper. Then we move the fender liner to the side as far as possible and there are still several screws under it.
That is, here the bumper is already attached directly to the body. Also, after this we unscrew the screws or screws securing the mudguards:
Next we move on to the main rear bumper mounts. From above on both sides under one bolt using a 10mm head and a wrench:
Now we look from below, there are two main fasteners on the sides, one on one side and the other:
And additional screws along the entire length, which also need to be unscrewed.
Now the bumper is not fixed by anything and sits only in its place in the sides of the body. Gently prying it from the edge with your hands, we remove it from the engagement under one part.
And we do the same with the second side, after which the bumper can be completely removed from the car, since it is no longer attached to anything.
This procedure was shown using the example of a Lada Priora sedan, although the hatchback and station wagon have a similar design and removal will be carried out in a similar way.
Replacing the rear bumper amplifier on a Priora
If the bumper is so damaged that even the amplifier (beam) has become unusable, then it will also have to be replaced with a new one. To do this, using an 8 mm socket and a ratchet handle, unscrew one amplifier mounting nut on each side.
And a few more mounting screws on the outside need to be unscrewed using a Phillips screwdriver.
After which you can easily remove it completely, as demonstrated below.
Replacement and installation of removed parts is carried out in the reverse order of removal.
Price of new parts: rear bumper and amplifier (beam) for Priora
- Rear bumper on Priora Sedan 2170 in primer - 2000 rubles, painted in color - from 3000 rubles.
- Rear bumper for Priora Universal 2171 in the ground - 2500 rub. Painted in color - from 3500 rub.
- Rear bumper amplifier 2170 - from 500 rubles.
These parts can also be bought or ordered at car dismantling yards, and at prices that are half the market or store prices.
Stages of work
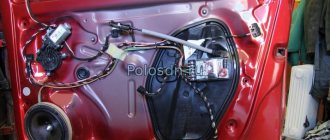
If fog lights are installed on your car, you must first remove them. It is also better to remove all the wires that went to them
After removing the PTF, it is important to disconnect the terminal from the battery. All bumpers on Priora are attached in a standard way; to remove them you will need to do the following
- First of all, you need to open access to the screws. To do this, remove the engine mudguard.
- Next, you need to unscrew 3 screws on each of the fender liners to remove the protective elements. Most likely, when performing the manipulation, your hands will get dirty from the rubber, so it is better to do this with gloves with a protective rubberized layer.
- Remove the plastic covers. Each of them has 4 screws that secure them.
- Next you will have access to 2 screws that secure the bumper to the body. You need to unscrew them.
- From the bottom you need to unscrew the 5 nuts that secure the part to the motor protection. It is most convenient to do this with a socket wrench. Before performing work, you must make sure that the car is on the handbrake, and if you use a jack, place stands under the body.
- You also need to unscrew the 3 side nuts that hold the part in place.
- After dismantling all hardware, you must carefully remove the bumper. For this purpose, it is better to involve an assistant, since a slight distortion can lead to damage to the part. The bumper is carefully and evenly dismantled from its place so that in the future it will be possible to repair or upgrade it for further use.
You may also be interested in the question of how to remove the headlight on Kalina. You can learn about this from our expert’s material.
If all the work is carried out without using a jack, then it is better to stock up on bedding first, since some hardware is located under the car, which will require you to crawl under the car. The entire dismantling procedure takes no more than 10 minutes, so you can replace a damaged bumper yourself.
https://youtube.com/watch?v=IWc4t9o_qVM
How to remove the front bumper on a Lada Priora step by step
A couple of decades ago, a car bumper was designed to perform protective functions. It was entrusted with the role of a kind of bump stop, which in the event of a collision could minimize damage to the body and mechanical impact on the car’s engine. That is why the part was made of metal and had very high strength characteristics.
Today the situation has changed. Nowadays, bumpers are made of polymer materials and serve only as an element of the design of the car. If this part is damaged, only the appearance of the machine will suffer, so it is still necessary to repair or replace it. You will learn how to do this on a Lada Priora hatchback from our article.
Work algorithm
To understand how to remove the bumper on a Priora, take the following tools:
- Phillips screwdriver;
- 10mm socket wrench.
The algorithm for how to remove the front bumper on a car is as follows:
- Provide access to screw fastenings. To do this, disconnect the negative terminal wiring from the battery. Remove the splash guard located on the engine.
How to remove the front bumper
- Since the front bumper on the Priora is located on a transverse mount at the front of the body, to dismantle it, unscrew two bolts on both sides.
- Remove the screws located on the right and left optics casing (4 pieces), two fasteners each - near the wheel arches and a pair of self-tapping screws that are used to secure the bumper on the Priora.
- Pull the accessory towards you. You will see 3 more bolts securing its beam to the body cross member. You need to unwind them.
To unscrew the screws at the bottom, you will need to crawl under the car (first lay cardboard or rags there). This is just as convenient and less labor-intensive than putting the vehicle on an overpass or lifting it on a jack. Installing the bumper yourself is done in the reverse order. In order not to confuse the places where the fasteners are located, you can first draw up their location diagram on a sheet of paper, and put the screws and self-tapping screws themselves in separate boxes.
A couple of decades ago, a car bumper was designed to perform protective functions. It was entrusted with the role of a kind of bump stop, which in the event of a collision could minimize damage to the body and mechanical impact on the car’s engine. That is why the part was made of metal and had very high strength characteristics.
Today the situation has changed. Nowadays, bumpers are made of polymer materials and serve only as an element of the design of the car. If this part is damaged, only the appearance of the machine will suffer, so it is still necessary to repair or replace it. You will learn how to do this on a Lada Priora hatchback from our article.
Replacement: step-by-step instructions
Auto mechanics know how to quickly remove the front bumper. To do this, you will need a socket wrench with a “10” head and a Phillips screwdriver. Removing the bumper begins by disconnecting the negative wire from the battery terminal. If necessary, you will need to remove the motor protection.
Then unscrew 3 screws securing the bumper to the protective covers and 4 screws attaching the part to the upper cross member of the front body. The next step is to remove the 2 screws securing the left and right headlight housings. To remove the front bumper, you need to push it forward. To dismantle the beam, you will need to unscrew 3 bolts securing it to the lower cross member of the body. Installation proceeds in reverse order.
Removing the rear protection
If you need to remove the rear bumper of the Lada Priora, then you will need to disconnect the negative wire from the battery terminal. Then unscrew:
- nuts for fixing the dismantled unit at the bottom;
- on 2 sides there is one bolt for fastening the bumper at the top and to the wings;
- mudguard fixing screws.
Step by step guide
1. Unscrew 3 screws on both sides in the wheel arch.
2. Unscrew the top plastic covers on both sides near the headlights and remove. They are secured with four screws each.
3. Unscrew 2 more screws securing the bumper in the area of the hood lock.
4. If you have built-in fog lights, then disconnect the power connectors from them.
5. Next, in the engine protection area, unscrew five nuts by ten.
6. At the corners of the bumper, unscrew three screws on each side.
7. Pull the bumper off the latches starting from the arch.
After all the latches have opened, remove the bumper.
When replacing a bumper, you need to replace the radiator grille, lower plastic grille and fog lights (if equipped) with a new one from the old one.
The radiator grille is secured with eleven metal latches. The latches are removed using a screwdriver.
The lower plastic grille is secured to twelve metal latches, the same as those on the grille mount.
The fog lights are secured with Phillips screws.
Video lesson
How to protect a plastic bumper from chips and scratches
There are several types of car bumper protection from scratches and chips that you can do yourself:
- Kenguryatnik is a metal grill that is installed on the front or rear bumper. Made from metal pipes. Depending on the design, it can protect not only the car bumper, but also part of the underbody of the car;
- Molding is a plastic strip that is glued to a car bumper and protects it from minor damage. Can be secured with self-tapping screws or glued;
- Masking tape and wrapping film - this method protects more from dirt and small insects than from actual damage;
- The liquid cover is a special silicone gel that can be used to treat your car bumper before long trips. The coating protects against minor damage, but it is ineffective during impacts and collisions with obstacles.
As you can see, even an inexperienced car owner can restore a scratched and damaged plastic bumper to a normal aesthetic appearance with his own hands.
I decided to combine two events, a chip received on the way back from the dacha and scratches on the rear bumper, which I caused while reversing in my own yard.
Since there is no official repair kit for my color yet, I ordered a kit for repairing chips according to paint code (J5N) from a specialized service center.
This is a chip on the anti-gravel in the area of the rear door threshold. It's not noticeable until you bend down to look. I got such a chip while driving through a hole, the rain washed away the road slightly and the rear of the car slightly slid into the hole and landed on the right rear threshold.
And this is what it looks like after I touched it up a little. The process is simple: degrease, carefully apply several layers of paint, letting each one dry, then a couple of layers of varnish.
And now the most unpleasant place is the rear bumper. The pavement turned out to be too high, I thought it would fit under the mudguard, but no ;(.
I was a little upset, of course, but quickly got ready and went to the store, bought some cheap chemicals (anti-scratch), a couple of rags, some sandpaper and got started.
For ease of work, a jumper mat from my velor carpets came in handy under the knees; I did not put it in the cabin, but put it in the trunk. How I knew it would come in handy.
Well, here is the very result of my manipulations with all this chemistry. I did this, first washed off the dirt with a rag dampened with water, then took sandpaper with 2000 grit and sanded the necessary areas. I washed and degreased again. And he began the jewelry work of painting over the scratches, which is very convenient to do, since the brush is like a woman’s nail polish. Again, I painted it in several layers, letting each one dry, and the same with the varnish. The final stage is anti-scratch. I took the rag mitten I bought and applied the product according to the instructions. I polished the whole thing and this is what came out in the end.
Thank you for your advice and help in finding a place to order Pavloc paint.
How to remove scratches on a bumper without painting
How to remove the front bumper of a Subaru Forester
The bumper is scratched, but you don’t have the time or money to paint it at a car service center? It doesn’t matter, you can remove scratches from the coating without painting, by doing it yourself.
Let's consider popular methods of restoring the aesthetic appearance of a bumper without the use of painting materials.
Polishing minor scratches and abrasions
Polishing with chemical products can be used to remove scratches and abrasions on a plastic bumper only if they are shallow and the bumper itself is not cracked. To polish and remove chips you will need WD-40 and an ordinary rag.
Any chemical is suitable for polishing. composition intended for such purposes. The product can be purchased at almost every auto store for little money.
The process of eliminating minor damage and abrasions using a VD-shki:
1) Using a sponge with water, clean the damaged area from dust and dirt. Let it dry a little.
2) Spray the spray on the damaged area.
3) Intensively rub and polish the scratched area with a rag until the surface is smooth and no scratches are visible.
- Simplicity and accessibility;
- Speed of execution.
You can learn more about the polishing method from the video.
If we talk about the classic method of polishing plastic parts with a special paste, then this method is much more effective, but also more complicated.
Removing deep scratches with a hair dryer
The method is easy to perform and does not require any special skills or knowledge.
The tools you will need are a hair dryer and a chemical. degreaser
Please note that the hairdryer can only be used on unpainted areas.
- The damaged surface must be treated with a degreasing compound to remove dust and dirt.
- Next, the damaged areas are intensively heated with a hairdryer; under the influence of high temperature, the plastic melts and straightens. Warming up should be uniform.
Benefits of treating scratches with a hairdryer:
- Speed and accessibility;
- It requires special skills;
- Cheap.
- There is a high probability of plastic deformation;
- The method is only suitable for unpainted bumpers.
You can find out how to remove scratches using a hair dryer in the video review.
What a wax pencil can do
Wax pencil is a universal synthetic product made from polymer compounds. Suitable for painting shallow and thin damage to bumper paintwork.
The pencil can be purchased at a car dealership or ordered online.
Using the pencil is simple: just make a few strokes at the damage site and the scratch will be removed.
Operating principle: the chemical composition of the corrector fills damaged areas and aligns them with the general surface, forming a protective layer.
- The damaged surface is cleaned of dirt and treated with a degreaser;
- The treatment area is thoroughly dried.
- Using neat strokes, the scratch is evenly painted over.
Benefits of wax pencil:
- Simplicity and accessibility;
- No need to paint the bumper;
- Convenience and low cost;
- Durability;
- Forms a protective anti-corrosion layer;
- Safe for paintwork.
The method is effective only for shallow and thin damage.
Watch how to use a wax pencil in this video.
Why do you have to change bumpers?
The obvious answer to this question is after the car gets into an accident, when the body kits literally fall apart. It is impossible to repair and paint broken parts, so in this situation you have to buy new ones. Fortunately, the price of the products is quite affordable and it is possible to select elements by color or buy them unpainted.
The nickel-plated grille on the front bumper looks better than the stock one.
There are other reasons why Prior owners resort to removing or replacing these parts:
- During operation, the bumper received multiple cracks or the paint peeled off, and the owner does not have the time or desire to repair and paint the elements.
- If a car enthusiast still wants to repair and paint the body kit, then it will still have to be removed.
- As a result of the impact, the plastic latches of the bumper broke off or the fastening screws were torn out in such a way that the material cracked.
- When you need to gain access to other parts and parts of the car body. For example, install new headlight units.
- Cars sold as standard were at one time equipped with black budget bumpers. They have to be removed to paint or exchange for painted ones.
- If the owner of a VAZ 2170 decides to start tuning his car and install beautiful body kits that differ from the standard ones in shape.
How to remove scratches on a plastic bumper by painting
Not all mechanical damage to the body can be eliminated without a trace, without resorting to painting. If deep cracks or wide scratches have formed on the bumper, they can only be eliminated with the help of special paint.
Painting any surface of a car, including a plastic bumper, consists of three stages:
- Sanding - the damaged area must be thoroughly cleaned and sanded;
- Primer - used to level damaged areas using a primer mixture;
- Painting - applying paint to the entire bumper or damaged areas.
Let's look at each stage in detail.
Grinding
To sand a scratched car bumper at home you will need the following materials and tools:
- Sandpaper “on water” R-800;
- Rubber squeegee;
- Emery wheel R-2000;
- Sander;
- A rag and a bucket of water.
Please note that repairing wide cracks and damage requires painting the entire bumper, as finding a suitable paint color is often problematic
The grinding process proceeds as follows:
- To make it convenient to work with the bumper and have access to all its areas, you need to remove it and secure it in a horizontal position on a stand.
- Rinse thoroughly with water, clean the damaged areas and the entire bumper from dirt and dust.
- First, we process the entire surface of the bumper with coarse sandpaper, using an emery wheel and a grinder.
- Next, using a rubber squeegee and fine-grained sandpaper, we process the surface manually, sand and level the layers.
Primer
Required tools and materials:
- Degreaser (white spirit, etc.);
- Moisture-absorbing cloth;
- Primer mixture;
- Spray.
Priming is done like this:
- After the bumper has been sanded, you need to wipe it with a dry cloth so that it completely absorbs the moisture.
- The entire surface is degreased with a solvent or similar reagent.
- Carefully, in several layers, the surface of the car bumper is covered with a primer mixture.
- The part is left to dry for a day in a ventilated area.
Link to video instructions for priming.
Coloring
Tools and materials:
- Spray bottle or can of paint;
- A can of paint and solvent (if a spray bottle is used);
- Polishing mixture;
- Dry soft cloth.
- First, the primer is stripped so that the surface to be painted is smooth and without roughness;
- Afterwards, the paint is diluted with a solvent (usually the proportions are indicated on the packaging) and poured into a spray bottle. If a spray can is used for painting, then no solvent is needed, just shake it before starting work.
- The surface of the car bumper is evenly coated in several layers of paint and left to dry.
- After the paint has dried, you need to polish the updated car bumper until it shines. For these purposes, use a polish or you can get by with a rag with wax.
You can learn how to paint a car bumper using a spray can from the video instructions.
How to remove the front bumper on a Priora
The buffer takes the hit first
A car bumper performs an important protective function. His task is to be the first to take the blow and soften it as much as possible. If the impact is small, the car body will remain intact. Most cars have bumpers made of plastic, so even minor collisions or impacts can cause them to crack. Replacing or repairing a damaged device is up to each car owner to decide for himself, but, of course, repairing an old bumper is cheaper. Then the question arises: how to remove the bumper?
Removing the bumper on a Priora is not difficult. You can cope with this task yourself, without the help of service center specialists. It will be enough to follow simple recommendations.
Replacing the front bumper
In order to remove the front bumper on a Priora you will need:
- Phillips screwdriver.
- 10 mm socket wrench.
First of all, it is necessary to ensure easy access to the screws. Disconnect the negative terminal wire from the battery. Then remove the engine splash guard. Access to the screws that connect the bumper to the protective cover of the wings is open. In total, you will need to unscrew 6 screws (3 screws on each side).
The front bumper on the Priora is attached to the cross member on top of the front part of the body. There you will need to unscrew 4 bolts. Next up are the screws for the right and left headlight housings. There are also 4 bolts on each side of the car near the wheel arches. Don't forget to unscrew the 2 screws that secure the front bumper to the fenders.
After all the bolts are unscrewed, you can slide the front bumper towards you. This will give you access to 3 more bolts, with which the front bumper beam is attached below to the body cross member. That's it, the removal of the front bumper is complete. Now you can assess its condition and decide what to do with it next.
To unscrew the bottom screws, you will need to crawl under the car (stock up with clean cardboard or a rag that you can throw on the ground). This option will be more convenient than lifting the car on a jack or driving it onto an overpass.
https://youtube.com/watch?v=IWc4t9o_qVM
Replacing the rear bumper
To remove the rear bumper on a Priora you will need:
- Phillips screwdriver.
- 10 mm socket wrench.
Replacing the rear bumper is easier and faster than replacing the front bumper. It is necessary to disconnect the negative terminal from the battery in the same way. Then unscrew the screws that secure the bumper from below. Then unscrew the screws on the upper mount. Don’t forget to unscrew the two screws with which the bumper is attached to the wings of the car, and another screw that is connected to the mudguard.
After unscrewing all the bolts, pull the device towards you. Removal of the rear bumper is complete.
We draw your attention to the fact that you should not neglect safety requirements; be sure to remove the negative terminal before starting work. This will break the electrical circuit and avoid a short circuit.
Why else do you need to know how to remove the bumper?
Diagram of how to remove a part from a car
The body under the plastic parts rusts faster, since moisture, dirt and salt, which is used to sprinkle roads from ice, gets and is retained between them and the body. To keep it in good condition, once a year you need to treat the surfaces with anticorrosive - a special material to protect the car from corrosion. To do this, you will need to remove all body kits, rinse the body well with warm water and wait until it dries.
Carefully inspect the metal; if rust has already appeared, it should be thoroughly cleaned off. After this, rinse the car again and let it dry. The places where the anticorrosive agent will be applied must be degreased using a solvent.
Experts advise making anticorrosive compounds from Cordon, Body 950, Movil-NN and cannon fat. Body 950 must be applied to the surface in several layers. Before applying the next layer, the previous one must dry well. Cordon, Movil and lard must be mixed and melted in a water bath. Apply the finished mixture to the metal surface using a regular paint brush.
Many car owners are fond of tuning. The main element of external tuning is replacing the front and rear bumpers. There are two ways to go here. You can remove the front bumper and replace it with a tuning one. You can install an additional spoiler or skirt. This trim is attached using ordinary self-tapping screws and is inexpensive, but significantly improves the appearance of the car. Also, while driving, the skirt adds weight to the front axle of the car, which improves stability and traction at high speeds.
Front bumper
This is an energy-absorbing device for a car that can withstand a collision with an obstacle at a speed of 4 km/h without major damage to the body. It is made of plastic and attached to amplifiers, which are installed on the car body and determine the nature of the deformation of the body. Today this detail plays more of a decorative function than a protective one. On Priora, the design is a continuation of the body parts.
The front bumper of the Lada Priora is additionally equipped with fog lights, a radiator grille and a boot. The lower part is made in the form of a spoiler, which reduces the air flow under the bottom of the car. There is a place in the center for attaching a license plate. When completely dismantling the structure, all attached parts are removed. The side wings are attached with self-tapping screws to the wheel arches.
Replacing the front bumper of a Lada Priora can be carried out not only after a collision, but also for tuning the car.
In addition, the device must be periodically dismantled to inspect the condition of the body parts located underneath it. Due to the ingress of moisture, snow and salt, the material begins to corrode. Such areas must be cleaned of rust and covered with special mastics. This will extend the life of the body.
Procedure for replacing the front body kit
To remove the old bumper from a Lada Priora car with your own hands and install a new one in its place, you need to have a simple set of tools:
- Phillips screwdriver;
- socket head size 10 mm;
- crank with ratchet and extension.
It’s good when you have an inspection ditch in your garage, it’s more convenient to unscrew the bottom screws from it. However, the presence of a hole or overpass is not necessary; you can do it on a regular flat area. When removing and replacing a part, be sure to involve an assistant to support it from the other edge. If you accidentally drop and hit a plastic element on the ground, you can knock off the paint around the edges.
These 3 screws on each side are unscrewed first.
The body kit is attached in different places with screws and self-tapping screws for a Phillips screwdriver and 10 mm wrench nuts. The disassembly procedure is as follows:
- Secure the car with the handbrake and remove the negative terminal from the battery, since you will need to turn off the fog lights.
- Unscrew the 3 screws located in the front part of the wheel arch and connecting the bumper to the fender liner. For ease of access, it is recommended to turn the wheel slightly. Repeat the operation on the side of the second wheel.
- Open the hood and unscrew the 4 screws holding the horizontal plastic trim (above the headlights on each side). Remove the covers from the car without losing the washers.
- Disconnect the fog lamp connectors. They are accessible from above, from the engine compartment.
- Unscrew 5 nuts and 3 self-tapping screws on each side to secure the lower part of the body kit.
How to remove a bumper on a Priora and how much it costs: a guide for doing it yourself
Every second motorist has at least once encountered questions about removing or replacing a bumper. Moreover, this may not necessarily be necessary after an accident to replace it with a new bumper. For example, you will have to remove the front bumper on a Lada Priora car when tuning the car. Every owner dreams of his car looking especially beautiful and standing out from the gray mass, and replacing the bumper will be a simple and effective solution.
Owners of the previous generation Priora can borrow some body parts from the updated car, including the bumper.
Currently, with the release of the new Priora, more and more owners of old cars want to embellish the appearance of the car with a new bumper of a restyled car. This is done quite simply, fortunately all the fastenings fit, but you will have to redo the towing eye.
Front bumper of Priora
The front bumper of the Priora is a plastic structure made in the shape of the front of the car.
It covers the energy-absorbing beam, which, in fact, protects the engine, and also partially protects the radiator grille, horn and headlights. In addition, it has seats in which fog lights can be installed.
The design of the Priora's front bumper is not particularly durable, which is why it often has to be repaired or replaced. The plastic of the bumper is quite thin and can be damaged even from minor mechanical impact. With a strong impact, it is easily deformed and cracks along the bend line.
If you damage the bumper, but the damage is not critical, it can be restored by soldering and painting. If it has completely fallen apart and cannot be repaired, you can buy a new bumper, and not necessarily a stock one.
Replacing the rear bumper
To remove the rear bumper on a Priora you will need:
- Phillips screwdriver.
- 10 mm socket wrench.
Replacing the rear bumper is easier and faster than replacing the front bumper. It is necessary to disconnect the negative terminal from the battery in the same way. Then unscrew the screws that secure the bumper from below. Then unscrew the screws on the upper mount. Don’t forget to unscrew the two screws with which the bumper is attached to the wings of the car, and another screw that is connected to the mudguard.
After unscrewing all the bolts, pull the device towards you. Removal of the rear bumper is complete.
Removing the rear bumper
To independently remove the rear bumper on a Priora, you will need the following tools, which every car enthusiast has:
- 10 and 8 mm heads;
- Ratchet or crank;
- Phillips screwdriver.
The removal procedure is no more complicated than the front bumper.
The procedure for removing the rear bumper is as follows:
- Using a Phillips screwdriver, unscrew the screws securing the fender liner to the bumper;
- We move the fender liner as far as possible and unscrew a few more screws on each side, which already secure the bumper itself to the body;
- Unscrew the self-tapping screws and screws securing the mudguards;
- Next, we proceed to the main fastenings of the rear bumper, namely, we unscrew the two bolts in the upper part of the bumper with a 10-mm head;
- We go down and unscrew two 8mm nuts, as well as several self-tapping screws along the entire line of the bumper;
- Next, carefully remove the bumper from its seats and push it out.
The only difficulty that you may encounter during the dismantling process is the stuck fastening screws. Then you will have to cut them off and screw new ones in their place. But such problems usually arise among owners of old cars.
The procedure for removing the bumper on sedan, hatchback and station wagon cars is absolutely the same and, with the right approach, does not take more than an hour.
How to install the rear bumper
Installation is done in reverse order and usually does not cause any difficulties. It is also important to treat the body to extend the life of your car's paintwork.
Even more information about replacing the bumper on a Priora is in this video:
Tool
Dismantling a buffer in a garage does not require special knowledge or outside assistance. One person can successfully handle this job. In order to remove the front bumper on the Lada Priora, you need to prepare the following tools:
- a Phillips-head screwdriver;
- 10 mm ratchet wrench.
They will be needed to dismantle the fasteners holding the part to the car body. A screwdriver will be used to unscrew the screws, and a wrench will be used to unscrew the engine protection bolts. For ease of work, you will need to install the car on an inspection hole or overpass. If there are no such structures nearby, then you can raise the front of the car using a jack and securely secure it in this position.
Adviсe
Before installing the bumper in its place, it is recommended to treat the metal parts of the body with special compounds, since water most often flows under the bumper during rain and from puddles while driving.
To keep the body in good condition, it is recommended to treat all problem areas with anti-corrosion agents, as well as additionally coat them with protective compounds.
If corrosion has already appeared, then it must be cleaned and the body treated with anti-corrosion agent.
If you don’t pay attention to the part with rust and fasten the bumper on top, then most likely there will be nothing left of it the next time you remove it
Rear bumper
To carry out body work or replace damaged elements (reflectors, parking sensors), you need to remove the bumper on the Priora. This work is simple and differs from dismantling the front structure only in the number of fastening screws.
In some cases, difficulties arise when removing the side wings from the grooves, especially at low air temperatures. Doing these steps may cause the plastic to crack. The same problems arise on Kalina 2. Due to the unique shape of the buffer, it can be difficult to push it out. However, if you follow all the requirements of the vehicle’s operating instructions, dismantling can be carried out without difficulty.
How to remove the rear bumper from a Priora
For cars of different versions, the dismantling of the buffer differs only in the locations of the fasteners. For example, on a sedan the screws are screwed into the trunk frame vertically from top to bottom, while on a Priora station wagon - horizontally. Due to the shortened end part of the hatchback body, it is difficult to reach the structure fasteners in the arches.
To remove the rear bumper on a Priora you must:
- Unscrew the 2 fastening bolts on the trunk frame, and then the 2 nuts connecting it to the body at the bottom of the car.
- The wings of the structure are held in place by 3 screws located in the wheel arches.
- After dismantling the fasteners, the buffer is removed.
- Inside it there is a structural reinforcement, which is fastened with self-tapping screws.
- The reflectors are screwed on with one nut.
Installation
If the structure being installed does not have an amplifier and reflectors, then use the corresponding elements from the removed part. Installation of the bumper on the Priora body is carried out in the reverse order of removal. The work is easy to do with your own hands. After the structure is installed in place, it is secured with bolts and screws.
When installing the SE bumper, problems arise with the installation of the amplifier. To secure it to the structure, it is necessary to cut off the upper horizontal shelf of the attachment to the body. The amplifier located inside the buffer is attached using self-tapping screws. Some car enthusiasts do not install this part. Lastly, screw the wings to the arch and install the wheels.
For several years now, a new Lada Priora has appeared on the market, with an improved appearance. So what has changed in the new model? Looking at the car, the front bumper on the new Priora immediately catches your eye; it is this that has undergone significant changes. Thanks to this, the front of the car got a fairly solid look.
Let's take a closer look at the front bumper of the Priora in the photo:
As you can see, the radiator grille also received changes; its appearance has become more aggressive.
The bumper consists of the following separate parts: guides, the bumper itself, two eyelashes, upper and lower radiator grilles, frames for fog lights, chrome radiator grille molding, amplifier and plug for the towing eye.
The appearance of a plug, which can be easily removed if necessary, cannot but please, because now a protruding eye only spoils the appearance of the car.
As for the fog lights, the old version had a choice. It was possible to install 2 or 4. In the new version, their number remains equal to two.
In terms of strength, the new sample is in no way inferior to the old one, and it is quite difficult to break it, for example, on snow in the winter.
If necessary, you can easily find a front bumper for a Priora in any auto parts store for domestic cars. It can be purchased in both painted and black versions.
The price for a painted front bumper of the new Priora model in color is relatively not high. At the moment, the price for the main part ranges from 1800 to 2400, and for the entire set you will have to pay about 4500 rubles.
There should be no problems during installation, as well as dismantling, the main thing is to follow the instructions and have approximately 50 bolts with you.
Moreover, such a bumper can also be installed on Priors of earlier years of production. At the same time, if you buy an original Priora front bumper, then only one problem will arise, which can be easily solved.
On Priors of the first family, the towing eye is welded to the side member; you will have to get rid of it. The next step is to drill a hole and weld our nut into it, further strengthening the welding site.
Next, we treat with mastic the places where rust may form, as well as the welding seam. If all measurements were carried out correctly, then no further problems will arise.
https://youtube.com/watch?v=IWc4t9o_qVM
We finish installing the bumper, after which we admire the more solid and aggressive appearance of our car.
Types of restyled bumpers and their prices
Today, buying a new bumper for a Priora is not a problem at all. The fact is that the VAZ-2170 and its modifications are the most popular model for tuning. Taking advantage of this popularity, a large number of enterprises produce many varieties of bumpers and other body kit elements for Priora.
At the same time, you can buy them either as blanks (unpainted, without seats for additional headlights), or ready-made (painted in the desired color, with spaces for headlights, or with built-in headlights). Here are just a few popular models:
- "I am a robot";
- "Tokyo";
- "Fan" -2;
- "Boxing ring";
- "Ring"-2;
- "Sniper";
- "Strike".
Tuning bumpers can be made of ordinary polyethylene, ABS plastic, fiberglass or fiberglass. Prices for such products vary between 3000-5000 rubles. A stock bumper (catalog number 2170-2803015) produced by AvtoVAZ will cost from 2,400 to 4,000 rubles.
How to replace a bumper
How to remove the front bumper on a Lada Priora? To perform this operation you will need a jack, a Phillips screwdriver, and a socket wrench or 10mm socket. If you have the necessary tools, just follow these steps:
disconnect the negative terminal from the battery to stop supplying voltage to the on-board network; on the side of the front wheels, unscrew the screws connecting the bumper to the fender liners; remove the covers located above the front headlights of the car
They are held in place with screws and are made of brittle plastic, so be extremely careful not to damage the parts; Using a Phillips screwdriver, unscrew the screws holding the bumper on the central part of the body in its upper part; unscrew the 5 nuts with which the part is attached to the energy-absorbing beam; unscrew three more nuts on each side of the body, and begin to remove the bumper. To do this, you need to carefully pull it towards you, avoiding distortions to one side.
After this, all you have to do is install the new part, doing all the above work in reverse order. We strongly recommend that you carefully prepare the seat for installation - remove dust and dirt from all body components that are hidden under the bumper, and also put the radiator grille in perfect order.
It is absolutely not necessary to install a “native” bumper on the Priora. Many owners of this car model often select restyled parts produced by both large enterprises and private companies. You can choose a model that fully meets your appearance requirements and completely change the design of the machine. Basically, manufacturers offer to buy either unpainted bumpers with prepared seats for optics, or completely finished products that are made to order.
How to replace the front bumper on a VAZ 2170-VAZ 2172
Removal: 1) At the very beginning of the operation, you will need to disconnect the battery, because you will still be working with wires when you disconnect the bumper from the car body (Working with wires involves disconnecting the wires from the fog lights, so if you have these There are no headlights then you don’t have to disconnect the battery).
Note! Many people say: “Why de-energize the battery, what will happen if I don’t de-energize it?” The thing is that when moisture gets on the exposed wires, it can easily cause a short circuit, after which you will start having problems with the wiring, and when the battery is de-energized, this will not happen since the wires will not be energized! (For information on how to de-energize the battery, see the article: “Replacing the battery”, point 1)
2) Then crawl under the front of the car and there you will look for the bolts that will attach the engine mudguard to the bumper, some people also call this mudguard the crankcase protection, so those bolts that secure the mudguard to the bumper will need to be unscrewed and after unscrewing, carefully lower the mudguard so that it you just had it hanging down a little, as shown in the small photo below:
3) Next, without getting out from under the car, find the six screws that secure the bumper itself to the car fender and then unscrew them completely, thereby all the lower bumper mounts will be removed and you will be able to get up and move along a short distance to the wheel arches.
4) After you approach the wheel arches, there will be three more screws that will secure the bumper to the front fender, so unscrew three screws on both sides and then get into the car and pull the handle that opens the hood.
5) After this, find the last six screws that will secure the upper part of the bumper to the car body and then, carefully pulling the bumper itself, disconnect from its back part (If you have) two wire blocks, one of which is connected to one fog lamp, and one to another and then completely remove the bumper from the car.
Note! Be sure to take into account that you will need to pull the bumper carefully, because there are latches on the body that hold it and if you pull it too hard, these latches may break, so be careful when removing the front bumper from the car!
Installation: The new bumper is installed on the car in the reverse order of removal.
Additional video clip: If you want to clearly see how the front bumper is replaced on a Priora, where the screws and bolts that secure it are located, then watch the video clip below, everything is described and shown in detail.