We will show you how to replace the gearbox gearbox seal of a shaft with grenades on VAZ 2115 VAZ 2114 VAZ 2113 with your own hands. During this repair, you will find the instructions on how to remove the shaft with grenades in the material “replacing the internal grenade of a VAZ 2115 2114 2113” useful. When the shaft is removed, use a screwdriver to pry up the oil seal and pull it out of its seat. Oil seals:
Different for the right and left sides. Black right, brown left. The arrows indicate the direction of shaft rotation:
Before installation, degrease the seals with a solvent, then coat them with sealant. Using the old oil seal, carefully hammer the new one into the hole.
Video of replacing the gearbox oil seal, shaft with grenades in a VAZ 2115 2114 2113
:
Backup video on how to replace the gearbox seal in a VAZ 2115 2114 2113:
You can replace the internal grenade seal of a VAZ yourself at home. To do this, you don’t need to be a specialist, you just need to have a head and hands.
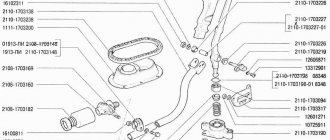
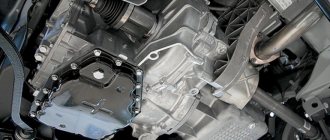
Gearbox device
General view of the gearbox
Before proceeding directly to the process of replacing the oil seal, it is necessary to consider the structure of one of the main elements of the car - the gearbox. So, what parts does the unit consist of:
Transmission device diagram
Gearbox: 1 – clutch release bearing; 2 – guide sleeve; 3 – input shaft; 4 – roller bearing of the secondary shaft; 5 – secondary shaft; 6 – retaining ring; 7 – satellite axis; 8 – speedometer drive drive gear; 9 – transport plug; 10 – wheel drive oil seal; 11 – tapered roller bearing of the differential; 12 – axle gear; 13 – satellite; 14 – differential box; 15 – clutch housing; 16 – driven gear of the main gear; 17 – drain plug; 18 – adjusting ring; 19 – driven gear of the 1st gear of the secondary shaft; 20 – synchronizer for 1st and 2nd gears; 21 – driven gear of the second gear of the secondary shaft; 22 – retaining ring; 23 – persistent half ring; 24 – driven gear of the third gear of the secondary shaft; 25 – synchronizer for 3rd and 4th gears; 26 – driven gear of the fourth gear of the secondary shaft; 27 – needle bearing of the secondary shaft gears; 28 – ball bearing of the secondary shaft; 29 – thrust plate; 30 – driven gear V of the secondary shaft transmission; 31 – 5th gear synchronizer assembly; 32 – nut; 33 – thrust washer; 34 – drive gear V of the input shaft; 35 – rear cover of the gearbox housing; 36 – ball bearing of the input shaft; 37 – gearbox housing; 38 – roller bearing of the input shaft; 39 – breather; 40 – input shaft oil seal
Oil seal replacement process
When the design, as well as the principle of operation of the gearbox, has become clear, you can move on to the process of replacing the gearbox drive oil seal. So. Let's look at the step-by-step process:
- We place the car in the pit.
View of the car from the viewing hole
Pull back the stem boot
Remove the rod shaft
We remove the oil seal from its seat
Installing a new oil seal
Part selection
2108-1703042 – original catalog number of the gear selection oil seal manufactured by AvtoVAZ. The average cost of a spare part is up to 50 rubles.
Backstage oil seal of different prices
Alternative oil seals must be selected according to markings, or rather according to size in automotive stores.
The cost of such a product will not differ significantly from the original. So the quality of such products is approximately the same.
Reasons for failure
Now that the issues of replacement and product selection have been considered, we can study the issue of the causes of failure.
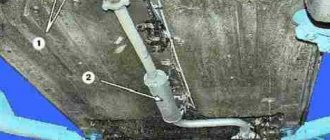
Box drive oil seal and the drive itself
So, let's look at what affects the condition of the oil seal:
- Wear or natural wear and tear . Since the spare part is subject to friction during operation, wear appears on the inner walls, which renders the part unusable.
Leakage due to a burst drive seal
What to do if replacing the oil seal does not stop the oil leak?
In this case, the shaft in the satellites is faulty. Because of this, there will be a backlash in the grenade.
Replacing the gear selector oil seal on a VAZ-2114 is not as difficult as it seems at first glance. Probably, every motorist, even a novice, can handle it on his own, but if not, then it is recommended to contact a car service center. Particular attention should be paid to the choice of parts, or more precisely to the quality of the product. The better the quality of the spare part, the longer it will last.
Spare parts
It’s a no-brainer that replacing the drive oil seal of a VAZ 2108, 2109 involves purchasing a new one, but here lies a little secret - the oil seals on the left and right sides differ from each other by oil-removal notches, which are marked on the inside of the oil seal. You ask - what is the use of them? The thing is that the oil seal holds oil inside the mechanism body not only due to the tight fit of its inner part to the rotating shaft, but also due to the effect of oil reflection from the oil seal created by these very notches. Therefore, the direction of these notches must coincide with the direction of rotation of the shaft. In order for the replacement of the drive seals of the VAZ 2108, 2109 to occur without any unpleasant surprises, the manufacturer marks the drive seals in three ways (indicated by arrows in the photo):
Right oil seal VAZ 2109
Left oil seal VAZ 2108
- Drawing arrows on the inside (on the right oil seal the arrow is directed to the left, on the left to the right);
- Numbers in the catalog number (the number of the right cuff ends with an even number, on the left with an odd number);
- In addition, the Balakovo manufacturer paints the drive cuffs in different colors: the right one is black, the left one is brown.
So, it’s time to move on to the most interesting part of this article, in which we will change the drive seals with our own hands. Although the price of the cuff is cheap, the services for replacing it are quite expensive.
We drive our car into a pit (overpass), place wheel chocks under the rear wheels and drain the oil from the gearbox;
Unscrew the ball from the steering knuckle
Using a pry bar, we press out the lateral stability lever (by inserting it between the body and the lever), and pull out the drive from the wheel hub;
Removing the drive from the wheel hub
Then, also using a pry bar, we pull out the inner CV joint from the gearbox, resting the mounting plane on the ebb in its body (at the same time, we kindly remember my advice about draining the oil);
Removing the drive oil seal
...we install a new one in its place, having previously lubricated its seating surface with oil.
Pressing in the oil seal
This concludes this instruction. I hope that the process of replacing oil seals for VAZ 2109, 2108 drives is described and illustrated in clear language and does not require any additional video materials. You can also find out on our website how to change the oil in a gearbox.
Manual transmission oil seals BRT VAZ 2108-21099, 2110-2112, 2113-2115, Kalina, Priora, Granta (4 pieces)
- We guarantee fast processing of your order during business hours (we work from 11-00 to 20-00, Saturday and Sunday are days off).
- We guarantee reliable packaging of your order (when sending it by Russian Post or transport company).
- We guarantee the fastest possible dispatch of your paid order (within 2-4 business days after receipt of payment).
- We guarantee a refund or exchange for another product (with recalculation) within 14 days from the date of receipt of the order (the product must be in good condition, without traces of installation, delivery costs are not reimbursed).
- We guarantee a free exchange of goods (transportation costs at our expense) if the purchased goods turn out to be defective.
Payment Methods
Delivery in Russia and abroad
Pickup in Moscow
- Description
- Reviews
APPLICABILITY: VAZ 2108, 2109, 21099, VAZ 2110, 2111, 2112, VAZ 2113, 2114, 2115, VAZ 1117, 1118, 1119 (Lada-Kalina), VAZ 2170, 2171, 2172 (Lada-Priora ), VAZ 2190, 2191 (Lada-Granta), VAZ 2192, 2194 (Lada-Kalina 2), DATSUN on-DO, mi-DO with manual gearbox.
The set includes 4 oil seals:
1. input shaft oil seal 2110-1701043
2. right wheel drive oil seal 2110-2301034
3. left wheel drive oil seal 2110-2301035
4. gear selector rod oil seal 2108-1703042-01
OJSC "BalakovoRezinoTekhnika"
is a leading manufacturer of rubber products, producing more than 6,000 items and ensuring the uninterrupted operation of VAZ, KamAZ, GAZ automobile conveyors.
Oil seals VAZ 2109
Oil seals are used on a VAZ 2108 2109 21099 car in the following places: 1) Crankshaft oil seals. 2) Camshaft oil seal. 3) Distributor oil seal. 4) Gearbox seals.
Oil seals VAZ 2109
The purpose of the oil seal is to prevent oil leakage at the installation sites. The oil seal is a regular rubber O-ring in a metal cage. The rubber ring has special notches, thanks to which the oil does not leak out. The owner of the car is interested in the oil seal when an oil leak is detected under the car. By visual inspection, you can determine where the oil is leaking from: from the gearbox or from the engine. Let's take a closer look at each group of seals separately. 1) There are two crankshaft oil seals. One is installed on the crankshaft on the gear side, the second on the flywheel side. It is very simple to determine a leak from the oil seal on the timing belt side: the timing belt will be covered in oil, and oil will also drip from the gear side under the engine. To replace, you will need to remove the timing belt, crankshaft gear and change the oil seal. Everything is much worse if the crankshaft oil seal leaks from the flywheel side. Firstly, it is not so easy to determine what is leaking: the crankshaft oil seal or the gearbox input shaft oil seal. It’s not easy because both of them are closed by the gearbox housing, and it’s impossible to determine where the leak is coming from. Some craftsmen determine whether the transmission oil is leaking or engine oil based on taste and reserve. However, the nine may have motor oil in the box (allowed according to the instructions) and then it is generally impossible to determine what has leaked. Replacing the crankshaft oil seal on the flywheel side is more labor-intensive: you need to remove the gearbox. 2) The camshaft oil seal is installed on the gear side. Replacing it is also not very labor-intensive: the timing belt and gear are removed, and the oil seal is replaced with a new one. 3) The distributor oil seal is installed on the camshaft on the distributor side. It needs to be changed if the fuel pump is full of oil and oil drips from the distributor itself. To be fair, it should be noted that if the engine’s breather becomes clogged, then the oil begins to press through the distributor oil seal, even though it may be in good working order. 4) Gearbox seals. The gearbox has four oil seals: a) Two oil seals on the CV joint side. b) Gear shift seal. c) Gearbox input shaft oil seal. If the seal on the CV joint side is leaking, this can be determined by drops of oil under the places where the CV joint is inserted into the gearbox. If there is a problem with the rocker seal, the oil leak will again be visible on the gearshift rod boot. We wrote about the input shaft oil seal above. It is impossible to say unequivocally that it was he who leaked. In such cases, it is better to buy two oil seals at once. Remove the gearbox, and there will already be a trace of oil leakage visible. It will immediately become clear whether it is leaking from the box or from the engine side. And an oil seal that is not useful can be returned or kept as a reserve, fortunately its price is small, about $1. Some people call engine valve stem seals oil seals. According to their intended purpose, yes, they perform the same function, but still these are not oil seals, but valve stem seals.
To home.
Gearbox seal VAZ 2114
18 customers chose this product
The gearbox repair kit includes four oil seals:
- Gear selector rod oil seal VAZ-1111, 2108-2115, 2123 (NBR 505) — 1 pc.
- VAZ-2110 gearbox oil seal (primary shaft) fluorine rubber (FPM) - 1 pc.
- Drive seal VAZ-2110-2112, axle shaft 2123 universal - 2 pcs.
Set: 4 oil seals
Product delivery options
Note! Below are the shipping methods available specifically for this product. Payment options may vary depending on the shipping method. Detailed information can be found on the “Delivery and Payment” page.
Parcel by Russian Post
Available payment methods:
- Cash on delivery (payment upon receipt)
- Using cards Sberbank, VTB, Post Bank, Tinkoff
- Yandex money
- QIWI
- ROBOKASSA
Shipping throughout Russia. Delivery time is from 5 to 12 days.
Parcel by Russian Post 1st class
Available payment methods:
- Cash on delivery (payment upon receipt)
- Using cards Sberbank, VTB, Post Bank, Tinkoff
- Yandex money
- QIWI
- ROBOKASSA
Replacing the gear selector rod oil seal for VAZ 2114 - 2109.
Hello. In this article I will tell you how to replace the gear selector rod oil seal on VAZ 2114 and later models such as the VAZ 2109. At the end of the article there is a video for a better understanding of the replacement process. When you find fresh drops of oil under the car, this is a reason to drive it into a pit or overpass for inspection. If a worn gear selector rod seal is to blame, you will see a fresh oil stain around the rod. If there are leaks, check the oil level.
Along with the oil seal, it is best to change the cardan housing, since oil from the box most likely got on it. Rubber quickly begins to crack after oil gets on it. Another argument in favor of replacing the yoke cardan boot together with the box rod seal is the possible damage to the boot during removal. Well, let's begin! First of all, bend the cardan boot and put a mark between the gearshift lever and the cardan. This is done so as not to adjust the position of the gear shift lever during assembly.
Now you can start turning the nuts! We take the key 13 and unscrew the bolt of the gearshift lever clamp and remove the lever from the cardan.
Pulling the boot towards the box, unscrew the bolt with a 10mm wrench and remove the cardan from the gear selector rod along with the boot.
Here we can see the culprit of this event - the gear selector rod oil seal.
You can get it in three ways:
- Using a thin hook.
- Using self-tapping screws.
- Along with the bushing.
The first method is quite simple. We insert the hook between the oil seal and the gear selector rod, turn the hook so that it catches on the oil seal and take it out. During this action, it is important not to scratch the gear selector rod! The second method is also not complicated. We take two self-tapping screws and screw them into the oil seal from different sides. We pull out the oil seal using the screws.
The third way to remove the gear selector rod seal from the gearbox is to knock it out along with the bushing. Take a screwdriver and hammer and knock out the bushing. Next, use the same screwdriver to remove the oil seal from the bushing.
We press in the oil seal.
If you removed the oil seal using the first two methods, i.e. without knocking out the bushing, then to press in a new one, you need to select a tube corresponding to the diameter of the oil seal (approximately 24mm outer diameter). In the case when the oil seal is removed with the bushing, simply press the oil seal by placing the 22 socket on it.
Next, coat the bushing with sealant and hammer it into place.
We assemble everything in reverse order. I hope this article was useful to you. Leave your questions and suggestions in the comments.
Replacing the front wheel drive oil seal on a VAZ 2109, 2110
Replacing the front wheel drive oil seal on VAZ 2109, 2110.
Is your front wheel drive seal leaking? Thoughts are swirling in my head: “How much will a replacement cost me?” “Will it be possible to replace it with your own hands and how difficult is this operation?” Then this article is for you. It's safe to say that this operation is not that difficult. You can easily do it yourself. Naturally, only if you have the right tool and, of course, desire. So, let's move on to the description of the necessary tool.
We will need a 30mm socket wrench (necessarily with a sufficiently long wrench), a 17mm wrench, a screwdriver, a container (where we will pour the oil), a hammer, a pry bar, a mandrel (useful for carefully pressing the oil seal in. In principle, you can use an old part for this , but this is not very convenient). Any car owner will probably have such a simple set of tools. The mandrel can be made to fit the gland from any suitable piece of pipe.
Now about spare parts. When buying a drive oil seal, you must be sure for which side you need it. The left and right parts have different directions of notches to drain oil. There are three key differences between them:
- There are arrows on the inside of the seals. On the right, the arrow points to the left, and on the left oil seal, to the right.
- Please note the last digit in the catalog number. The number on the right ends with an even number, the number on the left ends with an odd number.
- This difference is typical for parts produced in Balakovo. They differ in color: the right oil seal is painted black, the left one is brown.
In order not to get confused and to be confident in choosing a part, we advise you to contact the official supplier of VAZ spare parts.
Let's move on to the description of the actual process of replacing the oil seal on VAZ-2108, 2109, 2110, 2115 cars :
- The car must be driven onto an overpass or into a pit and the oil must be drained from the gearbox. You don’t have to drain completely; from experience, it’s enough to drain about one liter of oil.
- Now let's loosen the bolts on the wheels and unscrew the hub bearing nut.
- Using a jack, raise the car and loosen it, and then unscrew the two bolts that secure the lower ball joint to the steering knuckle. Having placed the pry bar between the stabilizer and the body, press the lower arm down and carefully pull the end of the drive out of the hub.
- Once again, make sure that the oil is drained from the box. Now let's crawl under the car and use a pry bar to push the drive out of the gearbox. To do this, you can rely on the tide of metal on the gearbox housing.
- Now let's remove the oil seal from the gearbox.
- Finally, we press the new oil seal into place.
We assemble everything in exactly the reverse order and add oil. All is ready!
LADATUNING.NET
I would be very grateful if you share the article on social networks.
How to change the oil seal on a VAZ 2114 gearbox
Oil seals and other sealing elements are characterized by a high degree of wear. Therefore, their service life, especially with intensive use, quickly ends. As a result, the tightness of the connections is broken, which can cause oil leakage. Therefore, such a problem must be solved as early as possible, otherwise it is fraught with negative consequences for the mechanisms. Let's look at how to change the oil seal in a VAZ-2114 gearbox. But first, let’s figure out when this needs to be done and what could be the reasons for the failure of this element.
Replacing the gearbox seal of a VAZ 2114
The gearbox makes it possible to change the acceleration rate of the car, increase the speed at different speeds, rotate the wheels at different speeds, etc. During operation, the gearbox may fail, which will require repair of the gearbox on the VAZ 2114.
Checkpoint disassembled
The best way to prevent breakdowns is to take preventive measures. Unfortunately, even the most careful care is not able to protect the box from the occurrence of certain malfunctions.
Manual transmission
Today, all cars are equipped with one of three types of gearboxes.
- Mechanical. Speed shifting is done manually using a special lever.
- Automatic. No external influence is required to change gears. Switching is carried out depending on the degree of pressure on the brake and gas pedals. In this case, reverse gear is engaged manually.
- CVTs. This is a mixed type of gearbox, where the bulk of the work is performed automatically, but if necessary, the gearbox is switched to manual mode.
Why might the oil seal fail?
Let's highlight a few of the simplest reasons:
- wear – as a result of friction, the working edges wear out over time;
- insufficient amount of lubricant - damage to the boot can cause lubricant leakage;
- low-quality element - the use of untested seals.
Therefore, to achieve maximum product life, you need to buy them from reliable sellers.
Oil Seal Replacement Procedure
So, here are the instructions on how to change the oil seal in a VAZ-2114 gearbox:
- We use a pit for repairs;
- the boot is located on the gear selector rod;
- it must be bent to gain access to the cardan, which must be dismantled;
- the boot should be removed completely;
- the oil seal is located in a small recess at the exit of the rod;
- it must be removed and the seating surface must be cleaned;
- a new oil seal should be prepared and installed, which requires pressing;
- Assembly of the remaining parts is carried out in the reverse order.
Attention! Remember that the car must first be set to the parking brake, and wheel chocks must be provided. Even with a pit repair, precautions must be taken to prevent injury and financial damage.
So, if the oil seal is installed correctly, the oil leak will stop. However, be prepared that you will not succeed. This often happens due to a lack of knowledge or experience. In this case, experts recommend immediately contacting the workshop. Professionals will be able to do everything quickly and without negative consequences.
Replacing the camshaft oil seal of the VAZ 2108, 2109, 21099 engine
A leaking camshaft (camshaft) oil seal in engines 2108, 21081, 21083 of VAZ 2108, 2109, 21099 vehicles must be replaced immediately.
Engine oil gets through it onto the timing belt, thereby very quickly destroying it. It is recommended to check the condition of the camshaft seal every oil change (10,000 km), fortunately, to do this you just need to remove the front timing cover.
Necessary tools and equipment
— Wrenches (open-end, socket or socket) for 10, 17, plus a special key for tensioning the timing belt.
— Thick slotted screwdriver.
- Hammer.
— A hook made of steel wire (for removing the oil seal - you can make it yourself).
— Mandrel or head 30 (for pressing in a new oil seal).
— Sealant for gaskets.
— New camshaft oil seal (aka front crankshaft oil seal, gearbox oil seal).
Preparatory work
— Remove the front engine timing cover
Using a 10mm wrench, unscrew the three bolts securing it and remove it by sliding it upwards.
— Remove the washer fluid reservoir
— We combine the timing marks of the engine timing drive
We turn the crankshaft clockwise by the teeth on the flywheel with a thick slotted screwdriver through the hatch in the clutch housing until the marks align.
Timing timing marks for VAZ 2108, 2109, 21099 engines
— Remove the timing belt from the camshaft pulley
To do this, use a 17mm wrench to loosen the tension roller mounting nut (counterclockwise) and remove the belt by sliding it off the pulley. The belt does not need to be completely removed from the engine.
Loosening the timing belt tension roller
— Remove the camshaft pulley
We fix it through the anti-rotation hole with a socket wrench by one of the nuts securing the rear timing drive cover and, using a 17mm wrench, unscrew the bolt securing the pulley. Carefully slide the pulley off the shaft.
Unscrew the camshaft pulley mounting bolt
— We remove the key from the groove on the shaft shank.
We remove the key from the groove on the camshaft shank
Procedure for replacing the camshaft oil seal on engines 2108, 21081, 21083
— We remove the old oil seal from the seat
We hook it and pull it towards ourselves. When prying, we try not to scratch the surface of the camshaft. You can also remove the camshaft oil seal using a screwdriver, bent-nose pliers, etc., whichever is more convenient for you.
Remove the old camshaft oil seal using a hook
— Install a new camshaft oil seal
We clean the seat under the oil seal from any remaining sealant (if there was any), engine oil and dirt. Lubricate the surface of the camshaft under the oil seal with engine oil. If you are not sure that the oil seal will fit tightly in the socket, apply a thin layer of sealant to its outer part in contact with the socket.
By hand, push the oil seal all the way along the shaft into the seat, trying not to damage its working edge. Using a mandrel (or a 30mm head), with light and gentle blows of a hammer, we press it into the seat.
We press in a new camshaft oil seal using a mandrel (head of a suitable diameter)
— Assembling the timing drive
Reinstall the key and camshaft pulley. Apply sealant to the pulley bolt and tighten it to a torque of 98-109 N.m. Align the installation mark on the pulley with the mark on the protrusion of the rear timing cover.
Install the timing belt. If it is in oil, replace it with a new one. We check the alignment of the installation marks on the camshaft pulley and on the flywheel (in the hatch on the clutch housing). We tighten the belt with a tension roller using a special wrench (for more details, see “Replacing the timing belt 2108, 2109, 21099”).
We wait until the sealant hardens and start the engine. Check to see if the engine oil is leaking again. If it leaks again, see below for reasons for leakage.
Notes and additions
— The camshaft oil seal replacement described above is applicable to both carburetor engines 2108, 21081, 21083, and injection 2111.
— There may be several reasons for an engine oil leak under the camshaft oil seal: wear of the working surface of the oil seal itself (their service life is 40-50 thousand km, provided that the product is of high quality), wear of the working surface under the oil seal on the camshaft (age-related or in the presence of risks and scratches from a careless previous replacement), increased pressure in the engine crankcase due to wear of the piston or clogging of the ventilation system, etc. For more details, see “Oil is driven under the engine seals, causes, troubleshooting.”
Twokarburators VK - More information on the topic in our VKontakte group, on Facebook Twokarburators FS , in Odnoklassniki - Twokarburators OK and in Yandex Zen - Twokarburators DZ
More articles on the engine of VAZ 2108, 2109, 21099 cars
— Engine oil in the engine air filter housing, causes, elimination
— How does dirty engine air filter affect its performance?
— Replacement of the valve cover gasket of the engine 2108, 21081, 21083
— Antifreeze (antifreeze) in engine oil, why?
— How to dry out engine valves?
Box nuances
The VAZ 2114 uses a five-speed manual gearbox. It is quite simple in design, which allows you to independently carry out preventive and repair work.
Device diagram
Experts recommend identifying a malfunction at the initial stage of its occurrence, since delaying means wasting even more time, effort and money.
Replacing the front-wheel drive oil seal on VAZ-2108, VAZ-2109, VAZ-2110, VAZ-2115 cars
Is the front wheel drive seal leaking?
Thoughts like: How expensive is it to replace an oil seal? Is it possible to replace the oil seal with your own hands? And how difficult is it to replace it? Yes!? Then you have come to the right place... I can say for sure that it is not difficult, and you can easily carry out the work yourself. Of course, only if you have the desire, the necessary tools and precise instructions for correctly replacing the front wheel drive oil seal on VAZ-2108, VAZ-2109, VAZ-2110, VAZ-2115 from the Auto Repair School website! ))) Well, as they say, from words to deeds! Let's move on to the description of the main thing - a list of tools, purchasing spare parts and the process of replacing the drive oil seal with photographs. Tools: a 17 wrench, a 30 socket wrench with a long knob, a pry bar, a screwdriver, a container for draining the oil, a hammer and a mandrel for carefully pressing the oil seal. You can also use an old oil seal to mount the drive seal. But this is not very convenient. It’s easier, after all, to buy an oil seal and select a piece of pipe of a suitable diameter for it. Spare parts: when purchasing a drive oil seal, you must know exactly which side you need it for. Since the oil seals of the left and right drives differ in the direction of the oil drainage notches. There are three main differences from each other. First, the direction of the arrows on the inside of the seals. On the right oil seal, the arrow indicates movement to the left, and on the left, to the right. The second difference is the numbers at the end of the catalog number. The number on the right oil seal ends in an even number (4), on the left oil seal - in an odd number (5). And the third, exactly applies to Balakovo-made oil seals, is the color of the oil seal itself. Right black, left brown (photos 1 and 2).
Let's move on to the description of the process of replacing the front wheel drive oil seal on VAZ-2108, VAZ-2109, VAZ-2110, VAZ-2115:
We drive the car into a pit or overpass and drain the oil from the gearbox. You don't have to drain everything. It will be enough to drain about one liter. Loosen the wheel bolts and unscrew the front hub bearing nut (photo 3).
We jack up the car and unscrew the two bolts securing the lower ball joint to the steering knuckle (photo 4). Having installed the pry bar between the body and the anti-roll bar, push the lower arm down. And pull out the end of the drive from the hub.
We unscrew the bolts securing the lower ball joint from the steering knuckle of the VAZ-2109. After that, we climb under the car and, using a pry bar or mounting blade, leaning on the boss on the gearbox housing, push the drive out of the gearbox (photo 5). At this moment, if you forgot to drain the oil from the box, the fun will begin))).
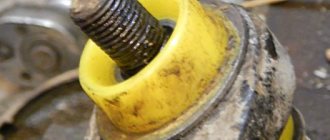
Using the same pry bar or screwdriver, we pull out the oil seal from the gearbox (photo 6).
AND …. We can press in a new oil seal (photo 7). We do not press the oil seal all the way, namely as shown in photo 8.
How to correctly install the front wheel drive oil seal on a VAZ-2110 car. We carry out the assembly in the reverse order. Don't forget to fill the gearbox with oil!
If you find an error, please select a piece of text and press Ctrl+Enter.
Typical breakdowns
General form
Based on some signs, it can be determined that certain gearbox components on a VAZ 2114 need to be repaired.
- When a certain gear is engaged, it does not lock properly and crashes. This indicates that the fastenings of the gear teeth and clutch are worn out. When reverse gear is difficult to engage on a VAZ 2114, you will have to take certain measures. Repair consists of replacing the damaged element. If the gear engages spontaneously, the reason may also lie in wear, delamination and cracking on the rubber element of the rear support. Just replace it.
- To engage the gear you have to apply more force than usual. If the reverse gear on a VAZ 2114 car does not engage, the problem is most likely hidden in loose or worn teeth attaching to the hinge. This may also occur due to deformation of the torque rod or the appearance of cracks in the plastic part of the gearbox drive.
- There is noise in neutral gear. The oil level may be too low or its original viscosity may have been lost. Plus, a similar symptom is characteristic of wear on the upper bearing of the input shaft. Check this element, inspect the oil level and quality.
- It is not uncommon for reverse gear to engage with a crunch on a VAZ 2114. The problem here is the wear of the synchronizer. If the problem is not corrected at the first sign of its occurrence, this may result in the need to replace the entire gear assembly and synchronizer.
- Noise is generated while the car is moving in certain gears. A similar malfunction occurs due to a damaged lower or upper bearing. Along with the noise, the lever may jam. The only option is to carry out a full diagnosis of the gearbox.
- A knocking noise occurs in a certain gear with or without load. The problem lies in the drive gear, which will have to be replaced.
- When the transmission is engaged, a cracking sound is heard. This indicates wear of the synchronizer blocking ring or the need to replace the satellite axle. The box will have to be sorted out to fix the damage.
- Oil leaks from the box. The reasons can be very diverse, so you will have to carefully diagnose the checkpoint.
Causes of oil leaks
As you know, a damaged oil seal leads to oil leakage, which is unacceptable. But before blaming this element for everything, you need to know about other reasons that lead to similar symptoms.
| Cause | Your actions |
| Dirty crankcase ventilation system | When the system is contaminated, the fluid flow is disrupted, pressure increases, and traces of oil leakage from the crankcase appear. You need to clean the crankcase ventilation system |
| Pinched crankcase ventilation system hoses | If the hoses are pinched, this will also soon lead to a leak. The problem can be solved in two ways - restore the structure of the hoses or replace them with new ones in case of wear |
| Deformation, wear of the oil seal | This is a case that we will talk about in more detail in our article. Replacing the oil seal is not difficult, so it is not necessary to contact a service station. |
Damage to the oil seal leads to leaks. As a result, oil gets onto the timing belt, which negatively affects its condition, performance and efficiency of the entire engine. Therefore, replacement is a necessary measure.
Repair and replacement
It is quite difficult for novice motorists to even simply determine why their gearbox is not working. What can we say about replacing the gearbox seal on a VAZ 2114, which requires a certain skill and knowledge in the field of car repair.
Unfortunately, if you ignore the initial signs of a gearbox malfunction, this may result in a full-fledged need to replace the entire unit. Many are even afraid to ask the current cost of a new gearbox for the “fourteenth” model. But we will say. Today such a unit will cost you at least 15 thousand rubles. Moreover, this price does not include installation services. Changing an entire gearbox yourself is not an easy task.
Another big disadvantage of replacing it yourself is the lack of a warranty. The factory will only provide it to you if the replacement is performed by a certified service station. So we strongly recommend that you contact an official dealer if it comes down to replacing the box.
Let's be frank. Situations in which a car is rendered unsuitable for transmission repair are very rare. Most often, something like replacing the gear selector rod seal on a VAZ 2114, gears, levers and other components is required.
It is difficult to carry out diagnostics on your own in a garage environment. To correctly identify a breakdown, you will need at least a lift and a driver’s extensive experience in car repair. But it is best to carry out diagnostics at a car service center with the appropriate equipment. Whether you entrust them with the repairs or handle this stage yourself is up to you.
The cost of repairing a gearbox on a VAZ 2114 is influenced by several factors:
- Location;
- Skill level of the craftsmen;
- Clauses of the concluded contract for the replacement or repair of the gearbox;
- Level of car service (regular garage-type service station or full-fledged car service with a large staff and new equipment).
New or refurbished old?
If replacing the gearbox cannot be avoided, it is worth considering one very attractive option - installing a rebuilt gearbox. To do this, companies purchase old, damaged boxes, restore them to the highest possible quality and offer installation with a guarantee.
Disassembled gearbox
As practice shows, such gearboxes are approximately 30-70% cheaper than purchasing a new gearbox.
There is only one important condition for successful savings on such significant repairs. It must be a reliable, proven company. Such companies value their own reputation, so they do not deal with fakes or low-quality repairs. In order to receive positive customer feedback and attract new customers, they simply must do everything well, conscientiously. That’s why today there are fly-by-night companies and companies where, over the years of work, they have established themselves as a reliable and responsible specialist in repairing and replacing gearboxes. You yourself understand perfectly well who you need to contact if you have problems with your box.
Extending the service life of gearboxes
You will be able to use your car for many years without going to car repair shops if you can follow basic recommendations. They will extend the service life of the gearbox, minimize possible problems, breakdowns and the need for repair work.
Transmission shaft assemblies
There are only two recommendations.
- Always try to monitor the oil level in the gearbox. If it drops, be sure to top it up immediately, do not delay the procedure until later. When the oil becomes unusable, change it completely, rather than fill in the missing amount.
- Avoid aggressive use, do not jerk the gears sharply, accelerate smoothly, and brake similarly. A simple caring attitude towards the gearbox will allow you to avoid wear and tear and numerous breakdowns.
Basic procedure
First of all, you should put the car on the parking brake and secure the rear wheels with blocks. After this, while the car is on the ground, the hub nut is loosened. You will first need to remove the protective cap. It should also be taken into account that this nut is tightened quite tightly, so you will have to make a significant effort. At this point you can loosen the wheel bolts.
Next, you need to raise the front of the car by placing the body on supports. After this, you can unscrew the wheel bolts completely, removing the wheels, and remove the hub nut stop washer. The next step is to disassemble the steering rod, or rather its tip. The fastening bolts of the lower part of the steering knuckle support are screwed together, after which it is necessary to turn the steering wheel in the direction from which the replacement is being made until the extreme position is reached.
Next, the spitz end of the outer CV joint of the VAZ 2109 is pulled out from the hub, after the steering knuckle and strut have been pulled out. The next step is to press out the inner CV joint secured in the gearbox, for which it is better to use a pry bar.
It is important to pay attention to the fact that if it is necessary to carry out work on all CV joints, it is recommended that after removing one drive, install a retainer in the box, which can be an old similar part of the inner CV joint. Otherwise, the gears will shift, making it impossible to install the CV joints in place.
If traces of oil were observed in the area of the gearbox during operation of the vehicle, then the seals on the CV joints will also need to be changed. Next, you need to clamp the drive shaft with a vice, remove the clamps from the hinges and unscrew the boots if they are intact. It is enough to cut off torn anthers with a knife.
The CV joints are knocked off the shaft with a hammer and drift, with the main forces being applied to the hinge cage. The same is done for the outer CV joint.
If you only need to replace the boots, the joint should be washed with gasoline to get rid of old grease and traces of dirt. The new boot is placed on the shaft, but it is important to keep in mind that the right shaft is longer than the left. In addition, it is better to immediately replace the lubricant in the CV joint, making sure there is enough of it.