During the operation of a car, various malfunctions can occur; there are breakdowns that are most typical for each car model. On the Lada Kalina, car owners quite often encounter a problem - the reverse gear of the manual transmission does not engage, and when such a defect appears, many car owners are prepared for serious repairs. But breakdowns occur for various reasons; the fault can be caused by either a mechanical or an electrical part. In order not to do unnecessary work, you need to start looking for the defect that has arisen from the most basic one, maybe the wire is simply frayed, or there is a bad contact in the plug.
Reasons for the loss of reverse gear on the VAZ 1118
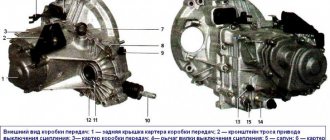
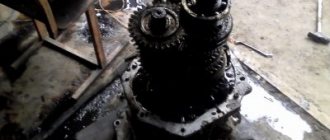
To find out why there may be no reverse gear on a VAZ car, you need to understand what kind of design it is, what parts and assemblies it consists of. The reverse gears themselves are located inside the gearbox, in the housing, just like the speed selection mechanism, located outside the crankcase:
- two scenes (jet thrust);
- shift lever (RP);
- solenoid blocking the gearbox, screwed into the gearbox housing from the outside;
- locking ring located on the lever rod;
- switch located in the gearshift knob.
The reverse gear lock (RP) protects the gearbox from accidental engagement, and to engage the RG, you need to lift the locking ring up, first move the lever all the way to the left, and then move it forward. But sometimes it happens that even with the switch raised, the ZP refuses to work; the RP stubbornly refuses to take the desired position.
So, why doesn't reverse gear engage:
- there are defects on the gears of the gearbox;
- there is no normal clutch release;
- the spring on the axis in the speed selection mechanism broke;
- solenoid does not work;
- The sensor contacts do not close;
- there was a break in the wire supplying power to the blocker;
- fuse F21, responsible for the operation of the blocking device, has burned out.
Removal and installation of the Gearbox (Gearbox) Kalina
We carry out the work on a car lift.
Disconnect the wire from the negative terminal of the battery.
For ease of operation, remove the air filter.
(For ease of operation, the front wheels can be removed.)
Remove the left side of the engine splash guard.
If the transmission is removed for repair, drain the oil.
Remove the four bolts securing the front clutch housing cover...
Disconnect the front suspension arms from the steering knuckles by unscrewing two bolts securing the ball joints to the knuckles on both sides of the car.
With the mounting spade resting on the gearbox housing, press the left inner joints out of it...
... and right-hand drive of the front wheels. Move the drives away from the transmission by moving the corresponding front suspension shock absorbers outward.
Disconnect the wiring harness connectors from the reverse light switch, from the reverse lockout solenoid...
... and from the speed sensor.
... and move the rod down along with the bracket.
Loosen the nut of the coupling bolt of the transmission control rod clamp...
... and disconnect the rod from the gear shift rod joint.
Disconnect the lower end of the clutch cable from the gearbox.
Remove the rear bolt securing the ignition coil bracket.
Remove the two upper bolts securing the transmission to the engine, simultaneously securing the second support bracket. Move the throttle cable together with the bracket to the side.
Place a reliable support under the engine or hang it using a lifting mechanism.
Unscrew the nut of the lower right mounting of the gearbox to the engine and remove the lower end of the intake pipe spacer from the stud. If necessary, loosen the upper mounting nut of this spacer.
Place a secure support under the gearbox.
Remove the bolt from the lower left mounting the gearbox to the engine.
Troubleshooting in the electrical part of the Lada Kalina
A break in the wire of the switch on the Lada Kalina car occurs quite often, this is due to the fact that the switch often changes its position, and accordingly, the wiring is not at rest. Checking whether the solenoid itself is working is quite simple; here you need to:
If a fault appears, it means that everything is in order with the switch itself and the manual transmission, it’s all a matter of electrical wiring or poor contact of the plug. After such a diagnosis, the paperclip will need to be removed; driving constantly with the contacts closed on the connector is highly not recommended.
In some cases, a break is detected immediately after lifting the gearbox cover, but often the wires fall off in the area of the locking device solenoid. To carry out diagnostics, you should install the VAZ Kalina on a pit or a car lift and conduct a visual inspection. Most often, a break occurs in the immediate vicinity of the sensor, since this place is not protected by anything - dirt and moisture, crushed stone and pebbles fly from the road.
When the wiring is still in the factory braid, it is sometimes difficult to detect any damage. The contact may periodically disappear and then appear again, the defect turns out to be floating, in which case it is necessary to open the insulating protection.
It is also worth noting that such a defect is common on Kalina and is typical for this car; such a breakdown can occur even on a car with a relatively low mileage (40-50 thousand kilometers). The problem occurs because:
- the wires are too short, they should be made a few centimeters longer;
- The insulation is of poor quality and often cracks in the cold.
So, before looking for faults in the mechanical part, you need to check the electrical part.
Reverse gear of Lada Kalina is not blocked
Another malfunction is exactly the opposite of the one described above, in this case the locking does not work, and reverse gear is engaged in any case, regardless of whether the ring is raised or not. Driving a car without a gearbox lock is not very comfortable; there is a risk of ruining the gearbox (especially for beginners) by engaging reverse gear while driving instead of the lowering first gear. There are also several reasons for the problem:
- the button contacts inside the manual transmission handle are stuck;
- there is a short circuit in the wires going from the box to the lever;
- The solenoid is stuck.
Checking the condition of the push-button contacts of the blocker is quite simple: lift the cover of the gearshift lever and disconnect the plug. If the guess turned out to be correct, it will be impossible to turn on the ZH.
How to replace the solenoid switch
The solenoid may become sour in the open position; in some cases, lightly tapping its body helps. It is typical that sticking occurs when the car is standing on a steep incline. Breakdowns also happen on the road, and if the sensor fails and it is impossible to engage reverse gear, you can temporarily unscrew it a little from the box (about 7 turns), then the fault will appear. But you need to understand that this is a temporary measure; when the solenoid fails, it needs to be replaced.
Before making a replacement, it would be a good idea to check the sensor; this is quite simple to do. It is necessary to disconnect the wires from the chip, apply 12 volts to the contacts, at the moment of supply, a noticeable click should be heard in a working solenoid.
Before starting work, prepare:
- container for transmission oil;
- key to 36;
- sealant.
A similar operation must be performed on a pit or a car lift; the oil from the gearbox may not be drained, but it is better to do it anyway in order to do the job more accurately. We replace the part in the following order:
Removal and installation of gearbox Lada Kalina 1117 2004 - 2013
Tools:
- Open-end wrench 8 mm
- Open-end wrench 10 mm
- Open-end wrench 17 mm
- Open-end wrench 19 mm
- Straight box spanner 13 mm
- Straight box spanner 19 mm
- Driver for socket attachment
- Knob attachment 10 mm
- Knob attachment 13 mm
- Knob attachment 15 mm
- Knob attachment 17 mm
- Knob attachment 19 mm
- Knob attachment E-14
- Extension for socket bits
- Adjustable stops 2 pcs.
- Medium Phillips screwdriver
- Medium flat screwdriver
Parts and consumables:
- Wooden blocks 2 pcs.
- CV joint grease-4
- Studs M12x1.25 mm 2 pcs.
- Transmission oil
- Rags
- 3.5 liter capacity
- Funnel with hose attached
Note:
We carry out the work with an assistant on an inspection ditch or overpass.
1. Drain the oil from the gearbox as described here. Disconnect the wire terminal from the negative terminal of the battery. Remove the air filter as described here. Remove the starter as described here. We remove the clutch cable lead from the groove of the clutch release fork lever, following the instructions described here. Remove the left mudguard of the power unit, as described here. Disconnect the wire block from the reverse gear lock solenoid.
2. Disconnect the wiring harness from the reverse light switch.
3. Disconnect the wire block from the speed sensor.
4. Using a 10mm wrench, unscrew the three bolts securing the lower clutch housing cover.
5. Remove the clutch housing cover.
6. Remove the right and left front wheel drives as described here. Using a 13mm spanner, loosen the tightening of the nut of the coupling bolt of the clamp securing the control rod to the shank of the gear selector rod hinge. Then disconnect the transmission control rod.
7. Using a 19mm wrench, unscrew the nuts of the two bolts securing the clutch housing to the gearbox housing (which also secure the torque arm), holding the bolts from turning with a head of the same size.
8. We remove the reaction rod with the bracket from the gearbox.
9. Disconnect the plastic throttle cable holder from the gearbox bracket.
10. Using a 13mm socket, unscrew the bolt securing the ignition coil bracket to the clutch housing.
11. Using a 19mm socket, unscrew the two upper bolts securing the gearbox to the cylinder block, which simultaneously secure the bracket with the holders for the throttle cable and wiring harness. The front bolt (in the direction of vehicle travel) is shorter than the rear bolt. We remove the bracket with the cable and wiring harness from the gearbox.
12. Remove the left front suspension brace as described here. We install adjustable stops through wooden blocks under the engine oil pan and gearbox housing.
13. Using a 19mm spanner, unscrew the nut of the lower rear mounting of the gearbox to the cylinder block.
14. Using a 19mm socket, unscrew the bolt of the lower front fastening of the gearbox to the cylinder block.
15. Using the “E-14” head, unscrew the two screws securing the front left support of the power unit to the support.
Replacing the reverse switch (reed switch) in the gearshift knob
To replace the reed switch located in the “knob” of the manual transmission handle, you will need a 13th key and a flat-head screwdriver with a sharp end. To get to the switch, you need to remove the top cover from the handle; this can be done using a screwdriver.
Then:
- unscrew the nut securing the handle (thirteen wrench), it is even more convenient to dismantle the parts using a 13 mm socket and a wrench;
- after the nut is removed, dismantle the handle itself by turning it counterclockwise;
- remove the dermantine casing, disconnect the plug from the wires that supply power to the solenoid, remove the reed switch;
- We install a new switch, install all the parts in their places.
Gearbox lever jammed
In any case, it is necessary to remove the last fastener after the bolt nut securing the left suspension arm has been unscrewed to the body bracket.
Repairing a box cushion is not complete without many of the steps described above.
After this, all that remains is to remove the lever. Another rather important element is the gearbox fork; its condition must also be monitored.
You will need to drain all the remaining oil into the container. A complete gearbox repair also involves removing such parts as the wheel drive from the gears of the differential axle shafts. The plugs are placed in the place where the gears used to be. After the gearbox adjustment is completed, they usually proceed to installing the left suspension support and brackets for the rear of the car.
Replacing the gear selection mechanism
Another reason why reverse gear may not engage is a malfunction of the gear selection mechanism. As a rule, the defect occurs due to a broken spring in this unit. To fix the problem in this case, you have to remove and disassemble the gearbox; the work turns out to be labor-intensive and takes a lot of time. To get to the mechanism, we perform the following operations (we will list only the most basic):
Of course, only the spring in the mechanism can be replaced, but this is provided that the parts in it are not worn out. Practice shows that it is easier and more reasonable to install a new part in the assembly - there is no guarantee that the repaired mechanism will not present any “surprises”, and it is relatively inexpensive. It should be noted that if the “selection” spring is broken, in some cases it is still possible to turn on the reverse speed, but always with great difficulty.
Lada Kalina gearbox repair: nuances, features
Kalina's popularity is due to several reasons. Among the main ones, car owners name the relative simplicity and affordable cost of repairs. It should also be noted that the quality of the components and mechanisms is quite decent. The Lada Kalina gearbox is distinguished by its reliability of the unit is usually required infrequently.
The causes of malfunctions in the transmission unit should be considered in more detail. It would also be useful to describe the specifics of the repair.
How does the box break?
Repair of the VAZ Lada Kalina gearbox may be required in various cases. Traditional options:
- natural wear and tear of the transmission unit elements;
- the occurrence of malfunctions due to the influence of user factors (driver errors);
- the need to eliminate the consequences of handicraft repairs;
- restoration of the unit after an accident.
How much does it cost to rebuild a gearbox on a Kalina ? It all depends on the specifics, quantity, and complexity of breakdowns. What do service station technicians have to deal with most often? Our practice shows that the TOP 3 complaints from car owners about the operation of the Kalina checkpoint include:
- clearly audible extraneous noise in different operating modes of the transmission unit;
- mechanical problems (gears do not shift, shift with difficulty, skip, gear knob does not lock in a given position, etc.);
- vibration of the unit when the engine is on;
- lubricant leaks;
- gears falling out.
Where to look for breakdowns?
Determining the location of faults is a task for experienced specialists. To eliminate the possible omission of important technical points, we use advanced methods, tools, and diagnostic technologies.
Each problem with a gearbox has its own technical expression. For example, a leak of lubricating fluid indicates depressurization of oil seals, seals, and plugs. There may also be excess oil in the unit. The so-called overfilling is not a prevention of a possible lack of lubrication, but a source of additional problems. Take this fact into account when changing the gearbox oil.
If we talk about extraneous noise during gearbox operation, this problem has many technical manifestations. Faults can be localized in the area of unit mounts, shaft or gear bearings, synchronizer clutches, and locking devices. Various types of deformations of the elements of the transmission unit also lead to the appearance of extraneous sounds. Often noises appear after an accident. At the same time, visually the gearbox may be normal, and there are no difficulties in shifting gears. But there is a high risk of worsening problems. If the box makes suspicious noise in any of the operating modes, you should immediately contact a workshop.
Who to trust for repairs?
offers on the topic “ Kalina gearbox repair, repair, price ” on the market today. Services are offered by private technicians and specialized service stations. Who is more profitable, convenient and reliable to cooperate with?
Are you looking for the best offer for the request “ Lada Kalina gearbox, disassembly, Moscow ”? Come to our workshop! We offer services at competitive prices and guarantee the quality of spare parts and service.
Cooperation with a specialized car service is a rational option if you want to save money and time. Services here may cost slightly more than private ones (although this is not always the case). But at the same time, the quality of the repair is guaranteed. Private handicraft restoration of gearboxes and other transmission elements often leads to additional problems. Ultimately, repairs are quite expensive. Don't want to pay twice? We are waiting for you in our workshop!
Other reasons for the lack of reverse gear on the VAZ-1118
The gearbox may not yet turn on if the link (thrust) is not adjusted, but in this case problems will also arise when trying to turn on some other speed (for example, first or fifth). That is why, whenever removing a manual transmission, it is recommended to put marks on the slide so that during reassembly it can be installed in exactly the same position.
Another reason for the malfunction of the gearbox is an unadjusted or poor clutch, but here, too, other gears either do not engage or shift with a crunch. The travel of the clutch pedal on Kalina is adjusted by decreasing or increasing the length of the cable; when the disc is worn out, the car begins to drive with slipping and does not pick up speed well. One of the main signs of bad ferrodo is the smell of burnt linings, which is especially noticeable when the car picks up speed and operates under increased load. At the same time, the free play of the clutch pedal increases, and it is not always possible to adjust it.
The performance of the Lada Kalina gearbox is directly determined by the type of transmission substance used. The gearbox design requires regular monitoring of the oil level. The lubricant in the unit must also be replaced in a timely manner. Lada Kalina is equipped with manual and automatic transmissions. The option of equipping one or another gearbox determines the design and operational features of the vehicle.
Technical features of the gearbox
When repairing a Lada gearbox, special schemes are used. The radial clearance of roller bearings is no more than 0.07 mm. For ball analogs, this figure should not exceed 0.04 mm. Oil is supplied through an oil sump, which is located in the area of the front bearing, fixed behind the secondary shaft. You can adjust the tension by selecting the desired thickness of the rings. The last parts are installed in the crankcase. The driven gear of the Kalina gearbox is attached to the differential flange. The box communicates with the atmosphere through the saloon located at the top of the structure in question.
Repair of the Lada Kalina gearbox is carried out when the seals of the internal joints fail. Before replacing them, drain the oil, disconnect the front wheel drive, and remove the parts with a screwdriver. To press the new oil seal, you will need a suitable mandrel.
The structure of a mechanical box on Kalina
The Lada Kalina manual transmission is a two-shaft design with 5 forward gears and 1 reverse gear. Synchronizers are installed on all forward gears. Structurally, the gearbox, differential and main gear are combined into one unit.
The manual transmission housing consists of several elements:
- clutch housing;
- gearbox housing;
- rear cover of the gearbox housing.
They are cast from aluminum alloys. When assembling, a sealant gasket with gasoline and oil resistant properties is used between the structural parts. There is a special magnet located in the clutch housing oil drain plug socket. It traps metal debris and prevents it from entering the Lada Kalina checkpoint.
The input shaft is represented by the drive gears in the block. There is constant engagement between them and the driven gears of the forward speeds. The secondary shaft of the Lada Kalina gearbox has a hollow structure, due to which oil is delivered to the driven gear area. The secondary shaft contains a removable main gear drive gear, driven gears, and front gear synchronizers.
Front (roller) and rear (ball) bearings are fixed on the shafts. The radial clearance in the front bearings is no more than 0.07 mm, in the rear bearings – 0.04 mm. The oil flow is directed into the shaft through the oil sump.
The driven gear of the Lada Kalina gearbox is attached to the flange of the two-satellite differential box. The box is connected to the atmosphere by a breather located at the top.
The gearbox control drive consists of:
To block spontaneous gear shifting, jet thrust has been introduced into the Lada Kalina box
. At one end it is connected to the motor, and at the other to the base of the lever for changing gears.
We carry out the work on a car lift.
Disconnect the wire from the negative terminal of the battery.
For ease of operation, remove the air filter.
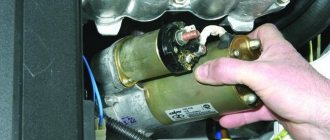
We remove the starter.
(For ease of operation, the front wheels can be removed.)
Remove the left side of the engine splash guard.
If the transmission is removed for repair, drain the oil.
Remove the four bolts securing the front clutch housing cover...
... and remove the cover.
Disconnect the front suspension arms from the steering knuckles by unscrewing two bolts securing the ball joints to the knuckles on both sides of the car.
With the mounting spade resting on the gearbox housing, press the left inner joints out of it...
... and right-hand drive of the front wheels. Move the drives away from the transmission by moving the corresponding front suspension shock absorbers outward.
Disconnect the wiring harness connectors from the reverse light switch, from the reverse lockout solenoid...
... and from the speed sensor.
Unscrew the nuts of the two bolts securing the torque arm to the gearbox, remove the bolts...
... and move the rod down along with the bracket.
Mark in any way the relative position of the transmission control rod and the shank of the gearshift rod hinge so that when reinstalling, maintain the drive adjustment.
Loosen the nut of the coupling bolt of the transmission control rod clamp...
... and disconnect the rod from the gear shift rod joint.
Disconnect the lower end of the clutch cable from the gearbox.
Disconnect the throttle cable holder from the bracket located on the gearbox next to the hole for the oil level indicator.
Remove the rear bolt securing the ignition coil bracket.
Remove the two upper bolts securing the transmission to the engine, simultaneously securing the second support bracket. Move the throttle cable together with the bracket to the side.
Place a reliable support under the engine or hang it using a lifting mechanism.
Disconnect the left brace mounting bracket from the body without disconnecting the brace from it. Move the stretcher along with the bracket to the side and secure it in any available way. (for example, tied with a wire).
Unscrew the nut of the lower right mounting of the gearbox to the engine and remove the lower end of the intake pipe spacer from the stud. If necessary, loosen the upper mounting nut of this spacer.
Place a secure support under the gearbox.
Remove the bolt from the lower left mounting the gearbox to the engine.
Remove the two bolts securing the left power unit support cushion to the support bracket...
...unscrew the three nuts securing the bracket to the gearbox, remove the spring washers installed under the nuts...
... and remove the bracket.
Remove the three bolts securing the rear power unit support bracket to the gearbox.
Move the gearbox as far back as possible (the input shaft should come out of the clutch). Holding the gearbox, remove the support and remove the gearbox from under the car.
Install the gearbox and all removed parts and assemblies in the reverse order of removal.
All material on the site and instructions for removing and installing the gearbox are protected by copyright! Copying and distribution is permitted only with the written permission of the administration of the Korobka.pro site and or by indicating the authorship and a link to the Korobka.pro site!
Reverse lock solenoid
The Kalina gearbox device is distinguished by the presence of a solenoid to block accidental or random engagement of reverse gear. The solenoid core has a protruding part that prevents the locking brackets from moving along the axes until reverse gear is engaged. The solenoid is controlled by a switch mounted on the lever.
The solenoid is located in the box housing, its lower left part. When the ring under the handle is raised, then the contacts are closed to supply voltage to the solenoid. Its core retracts and reverse gear can be engaged. This mechanism eliminates the possibility of mistakenly switching to reverse gear instead of first.
If the solenoid fails or the electrical circuit is damaged, engaging reverse gear becomes impossible. The solenoid will need to be replaced. It can be done at a service station or in a garage. When the solenoid is replaced, you will have to add oil to the gearbox. When the solenoid is turned out, a certain part of the liquid flows out.
If a malfunction is detected far from the place where the car is parked or where the car can be repaired, you will have to get there in emergency mode. For this:
- you need to unscrew the solenoid;
- Place the rod lock plug (from the gear shift fork) into the vacated hole.
When driving the vehicle, you must be careful not to engage reverse gear instead of first. The device diagram will help you install the solenoid on the gearbox yourself. The replacement itself is not a particularly complicated process.
Design features
The optimal level of acceleration is ensured by the transmission system. In particular, on the version of the car that develops 87 horsepower, the car accelerates to 100 km/h in approximately 12.5 seconds (manual transmission). This indicator is higher only on a car where an automatic transmission is installed. As for fuel consumption, the basic configuration consumes approximately 8 liters per 100 km. This indicator is optimal for cars of this class.
Cross-section of Kalina gearbox
The Kalina 2 gearbox includes a block of drive gears, driven bearings and synchronizers are installed. There is an oil sump near the front bearing. This element is responsible for supplying oil. The mechanical housing on the Lada includes, in addition to the clutch housing, the rear crankcase cover. They are cast from aluminum alloy.
Gearbox device
A distinctive feature of the Kalina gearbox is that there is a magnet in the existing drain plug. The need for this is explained by the fact that it directly attracts metal debris that can get into the system.
The solenoid is effective. It is necessary to block accidental reverse gear. The solenoid is located in the gearbox housing. If the solenoid breaks down, reverse gear will no longer engage. However, the occurrence of this malfunction may be due to an electrical circuit break.
Thus, Lada Kalina can be equipped with a manual or automatic transmission. The service life of the machine depends on how often the device can be serviced. It is recommended to periodically check the oil level in the Lada Kalina box.
Design features of Kalina with automatic transmission
Lada Kalina cars, which have a 16-valve petrol engine with a volume of 1.6 liters, are equipped with an automatic transmission. The remaining models still have a manual transmission.
The structural replacement of a manual transmission with an automatic transmission led to the fact that the car began to differ in a number of features:
All this is a kind of payment for comfortable driving. Some companies propose to change the design of the automatic transmission and bring it to a sports class. This changes the operation of the entire transmission, and the car becomes very noisy.
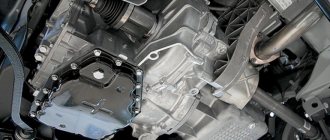
How to remove the gearbox
To remove the gearbox from a Lada Kalina car, you need to be able to hang the car. A lift is best, but an overpass or a pit in a garage will do. You will need a set of tools in the form of keys, sockets, flathead screwdrivers, and pliers. Since the oil will have to be drained, you need a container for used oil with a volume of 4-5 liters, new oil and gloves. The box itself is quite heavy, ask someone to help you.
Transmission removal technique close up
If you are an experienced motorist, removing the box on a Kalina will not be difficult for you. The main thing is to follow safety precautions and instructions.
Hanging the car
First, drive the car onto a pit, lift or overpass, then secure it with the handbrake and put the car in gear. It doesn't hurt to put something under the wheels to prevent the car from rolling. Check if it is securely fastened. If it rolls away, it can cause serious injury and expense if it becomes damaged.
Gearbox Maintenance
To maintain normal operation of the gearbox, it is necessary to systematically monitor the oil level. The procedures should be performed on a cold box. The desired oil level indicator is located between two control marks marked on the indicator.
Using the dipstick you can determine how much fluid needs to be added. It is better to pour the substance in small doses through the hole closed with the dipstick.
The Kalina operating manual defines the filling volume of the box as 3.1 liters. But practical advice on how much to fill with transmission fluid differs slightly from the normative ones. It is more often said that a complete fluid change requires 3.3 liters.
For the Kalina gearbox, clear parameters have been defined according to which the planned replacement of the transmission substance is carried out. High-quality oil lasts 75,000 km or 5 years of vehicle operation. Depending on what comes first, the transmission substance is replaced.
Identifying and eliminating gearbox problems
Servicing the gearbox involves removing this device from its original location. Especially for this, the car needs to be placed in an inspection hole or use a lift. To remove the box, you need to remove the air filter, starter, mudguard, crankcase protection, wheel drive, suspension mounts, disconnect the jet rod, front wheel drives, mounting bolts and nuts. Transmission repair may also involve replacing the rocker.
During diagnostic work, all components of the gearbox control drive are checked, from the shift lever to the control rod. Attention must be paid to the gearbox fork. This component of the gear shift mechanism is made of durable material. The fork has two branched tines and an axle. If it becomes deformed, the part should be replaced.
Lada Kalina can be repaired with your own hands. In particular, one of the ways to restore the performance of the gearbox is to change the gearbox oil. It is possible to independently determine the oil level using the control marks that are placed on a special indicator. As for the use of transmission fluid, you should choose a fuel that does not lose its properties over a wide temperature range. In particular, it can be 75W-90, 80W-85 oil.
When repairing the Kalina gearbox, special schemes are used. This allows you to get an accurate and complete picture of the vehicle system. Increasing noise and howling may also be a consequence of worn-out gear teeth. In rare cases, this is due to the fact that there is not enough oil in the box.
Manual transmission diagram
It is possible to eliminate noise from the gearbox if you replace the bearings. Repairing the Kalina gearbox can involve replacing the internal joint seals. If the seals are worn out, then because of this the owner of the Lada will be faced with such a manifestation as an oil leak.
Recommendations for the use of transmission oils for Kalina
Adding oil or replacing it in the Kalina gearbox will require an answer to the question of which substance to choose. It is better to build on the manufacturer's recommendations. The machine's operating manual provides a list of different oils. They are classified by:
It is important which substance ensures stable operation of the gearbox in the widest temperature ranges. This is an oil with a viscosity marking of 75W-90. It guarantees lubrication of components at temperatures from -40° to +45°.
Which gear oil has more universal properties? This can be considered a substance whose viscosity is designated 80W-85. If Kalina’s gearbox is filled with this oil, then normal operation of the units is maintained in climatic conditions from -26° to +35°.
Regardless of what oil is planned for use in the Kalina box, it is strongly recommended not to use various additives or other means. The use of high-performance gear oils does not require additional additives. Moreover, in some cases, the use of additional additives can lead to damage to the gearbox or other transmission units.
The Kalina gearbox has its own characteristics that every car owner should know. The manufacturer installs 5-speed gearboxes on the cars, which have 1 rear gear and 5 forward gears. Some car owners complain that the gearbox makes a squeaking noise when the lever is shifted. The thing is that the manufacturer installed special synchronizers on all forward gears. They are the ones who create the creak. When adjusting or replacing synchronizers, the squeak disappears. To carry out repairs, you will need a diagram of the device.
Most often, buyers choose cars with manual transmissions at car dealerships. It must be said that their power directly depends on how many valves there are in the car’s engine. More recently, the car plant has carried out work to improve them; changes affected engines with 8 and 16 valves. The installation of reinforced parts made the engines more powerful and reliable.
Removal and installation of the gearbox
Servicing the gearbox assumes that the mechanism will have to be removed and its position changed. Before doing this, you need to install the vehicle itself on the lift. The ignition must be turned off completely and the parking brake must be used.
How to repair a gearbox? To do this, disconnect the minus terminal from the battery. The hood must be opened completely. Any manual on gearbox repairs writes about this.
The oil filler cap is also removed. It is necessary to install the previous item after the screen is removed. The gearbox requires loosening the clamp responsible for fixing it. The inlet pipe hose must be disconnected from the corresponding sensor. Gearbox lever play requires the same actions in practice. Then you need to unscrew the air intake nut.
The repair progress further depends on the specific malfunction.
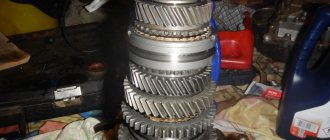
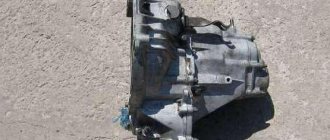
Gearbox Lada Kalina after dismantling and disassembly.
The gearbox can be installed in its original place after the 1st speed repair is completed. SHRUS-4 lubricant is applied to the outer surface of the corresponding bushing in the clutch in a very thin layer. This will also help if the gearbox is loose. The pin fixing bolts are removed from the steering knuckles.
Gearbox structure
A manual transmission includes several elements. These include the gearbox housing, clutch housing, and the rear gearbox cover. A magnet is installed in the oil drain plug of the box; it is used to prevent metal debris from entering the box. The system also has two types of bearings. The front bearings are roller bearings and the rear bearings are ball bearings. The car's designers placed a special oil sump below the front bearing, from which the oil gets inside the gearbox.
Transmission oil is poured into the Kalina gearbox at the factory; it needs to be replaced from time to time. It is best to do this every 75 thousand kilometers. But you should constantly check the fluid level, adding oil if necessary.
The car has a special dipstick, with its help you can easily check the fluid level in the box. Carefully lower the dipstick into the funnel, then remove it. There is a marking on the dipstick; you can use it to determine the oil level. Add oil in small portions, do it slowly.
If you have decided completely, then it is best to sign up for a service station. When replacing the fluid yourself, be careful. The old oil is drained through a hole located at the bottom of the box; it is closed with a special valve.
Removing an automatic transmission Lada Kalina
Place the car on a lift or inspection hole, apply the parking brake and turn off the ignition.
Disconnect the negative terminal from the battery.
Remove the engine soundproofing screen.
Loosen the clamp 3, fasteners and disconnect the upper hose 4 of the crankcase ventilation from the pipe of the cylinder head cover.
Disconnect the connector of the canister valve tube 5 from the electronic intake module 1.
Loosen the fastening clamp 2 and disconnect the intake pipe hose 6 from the electronic intake module.
Disconnect block 7 of the ignition system wiring harness from sensor 8 of the mass air flow.
Disconnect connector 1, ignition system wiring harness, from the canister valve.
Disconnect the connector of the steam pipe 2 from the canister valve.
Disconnect fastening bracket 4 together with front wire harness 3 from air filter housing 5.
Disconnect the air filter 1 from the air filter mounting supports 3 and the air intake pipe 4, turn over the air filter with the intake pipe hose assembly, disconnect the mounting bracket with the steam exhaust pipe 2 of the radiator from the air filter housing and remove the air filter with the intake pipe hose and the adsorber valve in collection
Disconnect the wiring harness connector from sensor 1, output shaft speed.
Disconnect the wiring harness connector from the drive mode selection mechanism 2 connector.
Disconnect the wiring harness connector from the 22-pin connector 3 of the automatic transmission.
To disconnect the block, you must turn the locking ring of the connector counterclockwise until it stops.
Unscrew nut 8 securing the control drive cable to lever 7 of the transmission mode selection mechanism.
Unscrew two bolts 1 securing bracket 2 of the control drive cable to the torque converter housing.
Unscrew bolts 3 and 4 of bracket 5 securing the wiring harness to the gearbox housing.
Remove the front wheel hub caps and loosen the wheel drive nuts.
Remove the front wheels. Remove the left front fender shield
Unscrew eleven screws 3 and remove the middle and right engine mudguards.
Unscrew nut 2, fasteners and disconnect the terminal of the front wiring harness from the starter.
Disconnect wire block 1 of the starter traction relay from the front wiring harness.
Unscrew the three fastening bolts 5 and remove the starter 4.
Unscrew the plug and overflow pipe and drain the oil from the automatic transmission.
Unclench clamps 2, disconnect pipes 3 of the oil cooling system from the automatic transmission fittings and drain the oil from the cooling system.
Install technological plugs on the fittings and tubes.
Remove the heat shield of the right wheel drive joint, disconnect the ball pins from the steering knuckles and remove the front wheel drives
Unscrew one bolt 1 and two bolts 2 securing the bracket 3 of the brace, remove the spring washers and disconnect the left brace 4 of the lower arm with the bracket assembly from the body.
Unscrew nut 8 of bolt 10 securing the anti-roll bar strut 7 to the lower arm 6 of the front suspension, remove the spring washer and remove the bolt.
Unscrew nut 9 of bolt 10 securing the left lower suspension arm 6 to the body bracket, remove the spring washer, remove the bolt and remove the lever assembly with the extension.
Unscrew the bolts 2 securing the torque converter housing cover plug and remove the plug 1.
Unscrew the four nuts 3 securing the torque converter to the flywheel, alternately turning the crankshaft clockwise by the head of the crankshaft damper mounting bolt.
Unscrew the two upper bolts 3 and 4, securing the automatic transmission to the cylinder block.
Install supports under the engine and gearbox
Unscrew two nuts 1 securing the rear engine mount 2 to the car body.
Unscrew two bolts 2 and one bolt 3 securing bracket 1 of the rear support to the automatic transmission and remove the bracket as an assembly with the support.
Unscrew two nuts 4 and bolt 3 securing the left engine mount 1 to the car body
Unscrew three nuts 3 securing bracket 2 of the left engine mount to the automatic transmission and remove the bracket as an assembly with the support
Unscrew the two bolts 2 securing the automatic transmission 3 to the engine crankcase 1
Unscrew nut 4, studs securing the automatic transmission to the cylinder block
Unscrew the last bolt 6 securing the automatic transmission to the cylinder block
Carefully remove the automatic transmission from the engine with a slight tilt downwards. Perform the operation with an assistant.
Remove the torque converter housing cover from the engine.
Install the automatic transmission on the workbench.
Unscrew the three studs securing the left engine mount bracket from the automatic transmission housing.
Unscrew the stud securing the automatic transmission to the engine from the torque converter housing.
Unscrew the two oil cooling system fittings from the automatic transmission crankcase and install technological plugs in their place.
Secure the torque converter from axial movement by installing the technological bracket on the torque converter axis and securing it to the crankcase with a bolt and nut.
Gearbox Features
If we talk about the features of the Lada Kalina 2 gearbox, then it is worth mentioning the locking solenoid. It was installed specifically to prevent the driver from accidentally engaging reverse gear while moving forward.
You will not be able to engage reverse gear if the electrical network of the solenoid is interrupted or if it fails. If you find such a malfunction, then repair is needed. But it is important to get to the parking lot.
Unscrew the solenoid from the box and install the rod lock plug in its place. You will take it in a special repair kit; every driver should carry it with him. This will help you get to the garage or get to the repair shop. You need to drive carefully. Be careful not to shift into reverse instead of first gear.
You can do the repairs yourself, but you will need a diagram of the gearbox. If you do not have a catalog of the car's design, you can buy circuit diagrams at a specialty store.
Lada Kalina cars are equipped with five-speed gearboxes combined with a two-satellite differential final drive. They have four forward gears, only one reverse. All forward gears with installed synchronizers. They are the ones that give the box a characteristic creaking sound when switching, for which the car is often criticized. But it is quite simple to eliminate this defect of the device; you need to adjust the synchronizers if you need to replace them. Kalinas are equipped with mechanical boxes, the power of which depends on the number of valves in the engine. Recently, the VAZ plant improved them for these cars; this affected copies with eight- and sixteen-valve engines; they were replaced. For these Lada “Kalina” models, reinforced secondary shafts are now installed on the devices, which make them more reliable and powerful.
Device composition
The mechanical gearbox itself consists of three metal housings:
- Clutch housing;
- Gearbox housing;
- Rear gearbox housing cover.
A special feature of this device model is the fact that there is a special magnet in its core. It is designed to hold small metal debris so that it does not end up in the box, replacing parts allows it to be removed. The bearings installed in the system are divided into rear type - ball and front type - roller. In the space below the front bearing of the secondary shaft, a special oil collector is installed, which will torsionally direct the mass of oil inside the secondary shaft.
Change of oil
The manufacturer has supplied the box with special gear oil; it requires regular replacement. On Kalina, the oil is changed after about 75 thousand kilometers, but the level must be constantly monitored. To do this, the car is equipped with a special oil dipstick, which must be carefully lowered into a funnel on one of the crankcases. There are special marks on the dipstick; you should follow them; they will show the oil level. If the oil level is insufficient, then it must be added, this must be done slowly in small portions. The used oil must be drained through a special hole located at the bottom and closed with a valve.
Locks
Another feature of the Lada Kalina gearbox is a specially installed locking solenoid, which prevents accidentally engaging reverse gear. If such a solenoid fails or its electrical network is interrupted, it becomes impossible to engage reverse gear. If such a malfunction is detected, in order to get to a repair shop, you should unscrew the solenoid from the box. Its place should be taken by the plug of the rod lock of the shift fork. It should be in the repair kit, you need to take it with you. You need to drive to the workshop slowly and carefully, making sure that you do not accidentally change from first gear to reverse.
Removing and installing the gearbox
The gearbox weighs more than 30 kg, so you should work with an assistant or using an adjustable stand or lifting device.
Do not remove both drives at the same time or, if necessary, install a special mandrel in place of one of them to prevent the side gears from falling out of the differential box.
Removal
1. Remove the engine splash guard or crankcase protection (if installed).
2. Drain the oil from the gearbox.
3. Remove the battery shelf.
4. Remove the air filter.
5. We remove the starter.
6. Disconnect the clutch release cable from the gearbox.
7. Disconnect the wiring harness connectors from the reverse light switch, vehicle speed sensor, and reverse lock solenoid.
8. Disconnect the gearshift drive rod from the hinge.
9. Disconnect the torque rod from the gearbox housing.
10. Loosen the nut securing the longitudinal brace to the transverse arm and disconnect the brace bracket from the body. So that the stretch does not interfere, we move it to the side and secure it with a tourniquet or wire.
11. Removing the front wheel drives
12. Using a 10 mm wrench, unscrew the three bolts securing the lower clutch housing cover.
13. Remove the lower crankcase cover.
14. We install an adjustable stand under the engine and remove the left and rear mounts of the power unit
We carry out further work with an assistant or install an adjustable stand under the gearbox.
15. Using a 19 mm socket wrench, unscrew three bolts, as well as one nut securing the gearbox to the engine.
The upper gearbox mounting bolt on the right side of the engine (when looking at it from the gearbox) is shorter than the others.
When removing the transmission, do not rest the input shaft on the clutch diaphragm spring, as this may damage the latter.
16, Rocking the gearbox from side to side, remove it from the guide bushings and carefully remove the input shaft from the hole in the driven disk and clutch basket.
17. We move the gearbox as far away from the engine as possible, tilt it down with the clutch housing and, passing it between the engine and the front suspension brace, carefully lower the gearbox to the floor.
Installation
We install the gearbox in the reverse order, having first applied grease to the splines of the gearbox input shaft.
Automatic transmission
Recently, Lada Kalina cars began to be equipped with automatic transmissions, which belong to the new generation. The peculiarity of their installation is the fact that they are mounted on one type of equipment of this car; other models are not in danger of such a replacement. The automatic transmission on the Kalina can only be seen in combination with a 16-valve gasoline engine with a volume of 1.6 liters.
Peculiarities
All cars equipped with an automatic transmission have a number of features:
- Their ground clearance decreased by a couple of centimeters;
- The engine is covered with an aluminum pan, so it is better to immediately install corrosion protection on it;
- The design features of the automatic transmission for Kalina are such that thanks to it the car is controlled more rigidly;
- Acceleration of a car with automatic transmission is slower;
- Fuel consumption with automatic transmission is higher.
These features indicate what had to be sacrificed for the sake of comfortable driving of a car like the Lada Kalina. It should be noted that the automatic transmission itself has impressive dimensions and significantly added weight to the car.
Sports gearbox
There is also a special gearbox for the Lada Kalina, which belongs to the sports class. The Kalina sports gearbox is distinguished by carefully adjusted synchronizers and gears. The production of such devices has been discontinued by the manufacturer, but they remain in operation, and passionate owners dream of acquiring them. Therefore, many companies today offer conversion of the Lada “Kalina” box and bring it to a sporty state, changing the device beyond recognition. To do this, companies use refurbished spare parts, which are tested and are often not inferior in quality to new ones.
Nuances
- A car with such a system reaches high speeds faster;
- The fifth stage in the box works better;
- Pickup in all gears becomes smoother and more reliable;
- Moving from a place becomes easier.
But there are also unpleasant nuances: after converting the box to a sports version, it will become very noisy, since the entire operation of the transmission as a whole has been changed.
- Original German autobuffers Power Guard Autobuffers - save money on suspension repairs, increase ground clearance +3 cm, quick and easy installation...
Official website >>>
Drivers can diagnose many problems with reverse gear on Lada Kalina and then fix them with minimal time losses with their own hands. To do this, it is not at all necessary to contact a car service center and pay money for the services of specialists.