The brake system in any car is the most important safety element. Despite the fact that it is one of the most reliable in the entire car design, it must be constantly maintained and repaired. In the VAZ 2114 model, the braking system is quite simple, so it can be repaired by the car owners themselves. Almost any procedure for replacing braking elements involves further pumping the brakes. Many people do not understand how to bleed the brakes on a VAZ 2114, so we will consider the procedure step by step.
Useful video:
Signs of air in the brake system
Airing the car's braking system is fraught with serious consequences, because... the next time you try to stop the car, the brake pedal may fail and not work. Diagnostics at every maintenance is a sure way to preserve the entire design. Most civilian vehicles are equipped with a hydraulic braking system from the factory. When the driver presses the pedal, force is transferred to the vacuum booster, which drives the calipers with pads. Due to this, braking occurs.
The situation when air enters this circuit manifests itself as follows:
- Increasing pedal free play;
- Too high “softness” and “cottonness” when pressed;
- Complete pedal failure.
Air ingress is caused by untimely maintenance of the machine. Infrequent replacement of pads leads to the fact that the calipers have to work for a complete fit, because The pads themselves are worn out. A lack of fluid in the circuit leads to early wear of the cylinders in the caliper and gradual leakage of air.
The lack of air in the circuit depends on how to properly bleed the brakes on a VAZ 2114. The procedure is not complicated, but it requires attention and double-checking, because The performance of all components must be normal.
When is pumping required and how to prepare for it
Bleeding the brakes is not always necessary - if the brake system is functioning properly, then bleeding is not necessary.
It is required only in the following three situations:
- When the pedal begins to “fail” (as was mentioned at the very beginning of the article).
- After replacing any component of the brake system.
- After replacing the fluid.
All these situations are caused by one single reason - air entering the system. So, if the pedal began to “fall” by itself, then, most likely, the brake tract was depressurized in some area, and air leaked inside.
When replacing parts, air also enters the brake system in large quantities and remains inside, causing its failure (the same applies to a complete replacement of the brake fluid).
Necessary tool
The pumping process should be carried out with a partner, because... It will be difficult to do the work yourself. To get results when working independently, you will need the following tools:
- A hose suitable for the fitting on the wheels of the car;
- Set of keys and sockets;
- Brake fluid;
- A rag for cleaning dirt from the caps;
- Container for liquid accumulation;
- Spare fittings in case the old ones break off.
It is also worth knowing the procedure for bleeding the brakes on a VAZ 2114, because... When performing the procedure, you should start with the rear wheels.
Preparation for work
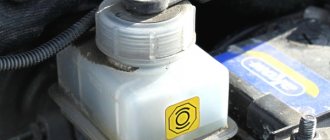
First of all, disconnect the sensor connector and secure this connector next to the tank. Then open the lid and add liquid to the MAX mark. This requires DOT-4 fluid .
Level sensor connector
On any car, including the VAZ-2114, the brakes are pumped with the lid closed. This means we tighten the lid harder, and then roll the car onto an overpass or pit.
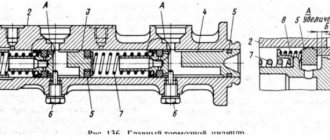
If a lift is used, it means that when bleeding the rear cylinders, a spline is placed in the regulator (sorcerer).
Pressure regulator (sorcerer)
The screwdriver here is between the bracket and the rod. When bleeding the front brakes, remove the screwdriver.
Safety precautions: the handbrake must be engaged and the ignition key must be removed.
Procedure for bleeding the brakes
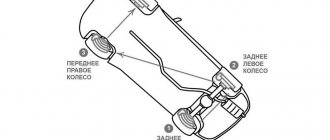
Before starting the procedure, you should check all connections and hoses for leaks. If there are leaks and signs of friction, replace the hoses with new ones. Also keep in mind that the brake fluid you will fill must match what is already in the circuits. Starting from the rear wheel, the procedure is carried out diagonally. Only by following the procedure for bleeding the VAZ 2114 brakes will you get a good result.
For convenience, we present the sequence of pumping the brakes of a VAZ 2114:
- Rear left wheel.
- Front right wheel.
- Rear right.
- Front left.
If you have to bleed the brakes alone, study the video instructions for using a nipple from a tubeless wheel and an extended hose.
Replacement
To replace the TJ yourself, you will need a certain set of tools and materials. This set includes:
- Brake fluid - 500 millimeters;
- A set of keys;
- Screwdriver Set;
- Transparent flexible hose;
- Container for draining old fluid;
- Dry rags for cleaning surfaces.
To work, you will definitely need the help of one more person, so when pumping, one should be inside the car, and the other outside.
Let's start the procedure.
- Unscrew the cap on the master cylinder reservoir and place it on a prepared surface. The cover is combined with the float of the fuel oil level sensor, so be careful, because a toxic and dangerous substance will remain on it.
- Unlock the rear brakes using a screwdriver. It is simply inserted between the plate and the piston. Ready.
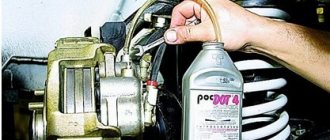
- Clean the right rear brake release valve of any accumulated dirt and dust, then remove the rubber cap that covers the valve.
- Place a flexible transparent hose onto the valve fitting and place its other end in a container to drain the liquid.
- Approximately once every two seconds, press the gas pedal all the way four times in succession. When you press the fifth time, lock the pedal in the clamped position.
- Unscrew the valve at least half a turn. As the brake fluid drains, the pedal will gradually begin to sink.
- As soon as the fluid flow stops, close the valve.
- Simultaneously with the procedure, do not forget to monitor the level of fuel fluid in the tank.
- As you pump out the old substance, add a little new one. This will avoid the formation of air locks inside the system.
- Add fresh fuel fluid into the tank until all the old fluid comes out and new clean substance begins to flow through the hose into the container.
- Having completed the work on the rear right wheel, go to the front left and perform a similar procedure. Due to this movement pattern, you will be able to completely get rid of the old fuel oil in one circuit.
- By analogy, remove the fuel fluid from the second circuit in the same sequence. Having completed draining, close the valves with caps and add new fuel fluid to the required level.
After completing the replacement procedure, be sure to bleed the brakes. It is strictly not recommended to go out on the road without it, since the brakes may simply not work.
Why bleed the brakes?
Bleeding a vehicle is a preventive measure aimed at ensuring stable operation of the brakes. The point is to remove foreign liquid and excess air.
Air and excess liquid can appear in the system for various reasons. Namely:
- The hoses are damaged and their integrity is compromised;
- Low-quality brake substance is used;
- System elements were replaced or brake fluid was updated;
- The seal of the vehicle is broken.
Any braking system, due to its design, can spontaneously accumulate moisture inside itself. Therefore, pumping cannot be ignored under any circumstances.
Bleeding brakes on a VAZ 2114
Having decided in what order the brakes are pumped, you can begin. Note that it is convenient to pump in a pit. Step by step bleeding the brakes of a VAZ 2114 looks like this:
- Get to the rear wheel and find the bleeder fitting with a cap on the drum.
- Remove the protective cap and clean the surface from dirt.
- Next, put a hose of a suitable size on it, the other end of which leads into a container to collect the liquid.
- An assistant presses the brake pedal several times and leaves it pressed.
- Using a size 8 wrench, unscrew the fitting half a turn.
- The liquid from the fitting is drained until bubbles stop appearing. During the process, you need to add liquid to the tank and keep it at least at the minimum level.
- Next, go to the front wheel and carry out the same actions as described in paragraphs 3-6.
It is not recommended to carry out the work independently, without the help of a partner, because... To do this, the front wheels of the car will have to be hung. You will also have to find a way to supply pressure to the system.
Never add plain water to the tank. When frost sets in, the hoses will freeze and burst, making it impossible to stop the car. Carry a spare bottle of DOT4 fluid with you. If the reservoir level is low, add DOT4 to the correct level and locate the source of the leak.
Do not forget that at the moment when the air leaves the brake system, you must not allow the level in the reservoir to drop below the minimum. If this happens, the system will air again. To visually study the process, we recommend watching the video with step-by-step instructions.
Sequencing
First you need to open the hood of the car and open the cap of the brake fluid reservoir. Make sure it is filled to the maximum. If not, add to about. After this, follow the steps in the following sequence:
- On the rear right wheel, find the cap that covers the fitting. Remove the cap and clean it of dirt.
- Fill a clear glass or plastic container with brake fluid.
- Place one end of the hose onto the fitting and place the other end into a glass or transparent plastic bottle. The hose must be lowered into the liquid.
- Ask your partner to sit behind the wheel and gently press the brake pedal 7 times with breaks of 2 seconds. After this, he must press the pedal again and leave it in this position (pressed all the way).
- While an assistant holds the pedal, use a wrench to unscrew the fitting 2-3 turns.
After all these steps, you will see that brake fluid will flow into a transparent container through the hose. Watch how it drains.
There will be visible air bubbles in it that need to be removed. Drain the liquid until the bubbles disappear. Then screw the fitting back on. Only after this can your assistant release the pedal. When the liquid flows into the container, monitor its level in the tank. If necessary, add brake fluid. If during pumping it completely leaks out, you will have to start the whole procedure from the beginning.
Repeat similar steps for each wheel in the above sequence. This mechanism of action is suitable not only for the VAZ-2114, but also for models 2113, 2115.
We recommend: A proven method for repairing an engine without disassembly
Many car owners are wondering: is it possible to carry out pumping alone? Yes it is possible. Only in this case, the pressure should be produced not by pressing the pedal, but by using a powerful compressor for these purposes. It should create a pressure of 2 atmospheres.
Car owners have to carry out pumping in different situations. Air can enter when replacing copper pipes at the rear or other components of the brake system, when hoses are damaged, when replacing brake fluid, or if the seal in the unit is broken. Regardless of the reason, after air enters the GTZ (brake master cylinder), bleeding must be carried out. Otherwise, the brake simply will not work.
The failure of the brake pedal in VAZ cars can be overcome by carrying out the process of bleeding the system.
Before you start bleeding the brake system, you need to study the car's instructions, which contain a clear bleeding scheme. If there is no such scheme, then the wheels are pumped from right to left (rear right and left, then the front ones in the same way).
You also need to prepare the following necessary elements: a hose and any plastic or glass container.
The work progresses like this:
- Brake fluid is poured into the master cylinder;
- The brake pipe fittings are cleaned;
- Brake fluid is added to the container, into which one end of the hose is inserted. The other end is inserted into the fitting;
- An assistant is brought in to press the brake pedal several times and hold it down. At this time, you need to unscrew the fitting and check the liquid that leaks out. When the system is aired, air bubbles may be noticeable;
- Next, the fitting is tightened and bleeding continues with three wheels, which should be pumped according to this scheme.
If bleeding the wheels yourself is not successful, then you need to contact a service station, where highly qualified specialists will inspect and bleed the car’s brake system.
Where does the air in the brakes come from?
Untimely maintenance and inattention to the technical condition of the machine are not all the reasons why air problems occur. Let's consider several main reasons for the violation of the tightness of all circuits:
- Replacing technical fluid throughout the entire circuit involves draining the old DOT4. At the moment of refilling, air also enters the circuit;
- There are hoses going to the brake cylinder, damage to which is a very common situation on VAZ. Over time, they begin to “sweat” and become airy;
- Cylinder leaks (both rear and front);
- Leak from the GTZ.
Timely maintenance involves replacing all fluids in the car, incl. and brake. Ignoring this fact plays a cruel joke on drivers. With long runs, moisture somehow gets into the system, which reduces the resistance of DOT4 to low temperatures. In cold weather, the pipes can crack and render the machine stopping unit unusable. Also, do not allow DOT4 to come into contact with paint surfaces. It contains quite aggressive elements that can damage the paint. If you carry out manipulations yourself, using a compressor to pump up pressure, follow the safety rules. Excessive pressure will cause the pipes to rupture and spill their contents onto you. After completing the work, do not rush to accelerate and check the effectiveness of the brakes at high speed. It is enough to press the pedal several times and feel how much it sinks. In a situation where following the instructions does not produce results, contact the service specialists. It is better to pay for brake system repairs with money than with your safety.
How to bleed the brakes alone?
I decided not to spend money on this procedure and stir up something like that so as not to return to this issue. And so, in order...
We take the plug of the expansion tank of the brake system, drill a 16 mm hole, this is exactly the inner diameter of the upper skirt where the fuel fluid level sensor was located, while it (the plug) retains the greatest strength. It looks something like this:
Next, we find a fitting of a suitable diameter (let me remind you, it is 16 mm) and try to push it in. It should fit very tightly and have an outlet of such a diameter that you can put a hose on it with the diameter of a regular pump (or compressor). I found this one in the garage:
I sharpened it in the place intended for turning with a key, to the recommended 16 mm. It turned out like this:
Then he inserted it into the intended place in the traffic jam, it stood very tightly, which is what was required to be achieved.
Because tight fixation is not enough, I decided to pour epoxy glue inside the cork, which was done. The glue was poured into the place indicated between the two red circles in the figure below:
There are grooves in the plug to prevent vacuum and excess pressure in the expansion tank, so they also need to be carefully filled with epoxy glue, an ordinary toothpick will help with this, and of course glue.
The rubber seal, which is normally placed in the plug, must be left, carefully cutting off the “skirt” to prevent the passage of air during pumping. To be honest, I missed this, so I used regular foam, which I wrapped around the neck of the expansion tank. In principle, the nano-cork is ready.
Next, everything is even simpler, we take a hose for the pump 1.5-2 m long (as convenient for you) and a tip, which we usually put on the nipple when inflating the wheel. I recommend taking the one that is at 90 degrees, because... a straight line will allow air to pass through when the hose is bent. We secure everything with clamps and the device is ready. We also need a thin hose to put it on the bleeder fitting, a transparent bottle, and a 10 or 8 wrench.
The whole thing looks like this:
To replace the fuel tank and flush the brake system, I needed 1.5 liters. DOT4 brakes and 15 minutes of time. The result is obvious, in the can of brake fluid that was there, and in the bottle that is now (drained at the time of pumping the last circuit).
I hope this idea will be useful and useful to someone...
I would be grateful for comments on improving this device.