Procedure for pumping brakes Niva 2121
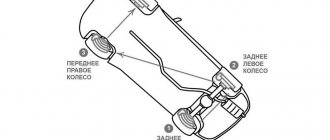
- We remove air first from the first circuit of the system, and later from the other. We start bleeding from the right rear wheel cylinder.
- Bleeding the brakes is necessary when replacing brake water, also to remove air that has entered the hydraulic drive during repairs or replacement of individual components of the VAZ 2121 brake system.
Remove the cap from the bleeder fitting of the rear brake cylinder of the VAZ 2131.
We put a transparent VAZ 2131 hose onto the fitting, lowering its free end into the vessel. The assistant presses the brake pedal three to four times at intervals of one to two seconds and keeps the pedal pressed. Using an eight key, unscrew the bleeder fitting 1/23/4 turn.
In this case, part of the brake water and air are forced into the vessel, and the pedal is lowered to the floor.
How to bleed the brakes on a Niva yourself?
In this article we will tell you how to upgrade
DIY brakes on Niva.
Let's first look at the design of the brakes and decide when bleeding is required. The brakes need bleeding in this case if there is interference in the design of the system, specifically:
- The master cylinder is being changed.
- New calipers are installed on the front wheels.
- New cylinders are installed on the rear axle.
- Tubes and hoses are replaced.
- The brake fluid is changed.
In other words, pumping is needed in this case if there has been a violation of the system density.
Bleeding the brakes: why is it necessary?
Properly pumping the brakes on a VAZ-2110 is important in order to ensure the stability of the brake system, creating a preventive measure. The essence of such manipulation lies in carefully removing bubbles and excess liquid from the system. One of the factors in the occurrence of air jams is the peculiarity of the brake compound. The latter is prone to hygroscopicity, or the ability to accumulate moisture. For this reason, this manipulation should be carried out regardless of the condition of the system components. The fluid must be pumped every time the brake system is engaged.
Bleeding the hydraulic brake system of Chevrolet Niva
- Rubber bulb
- Split spanner 10 mm
- Brake water container 1-2 l.
- Eight mm split spanner
Parts and consumables:
- Aerosol lubricant type WD-40
- Bleeding hose
- Brake fitting
- Brake fluid
- Rags
Notes: Bleeding the brakes is necessary when changing brake water, also to remove air that has entered the hydraulic drive during repairs or replacement of individual components of the brake system.
Air trapped in the hydraulic drive causes an increase in the free play of the brake pedal (the pedal becomes soft) and significantly reduces the effectiveness of the brakes.
Vesko-trans.ru
How to bleed the brakes with your own hands Good luck, dear car enthusiasts! We sincerely hope that none of you need to explain what the car’s braking system is and what it is designed for.
No matter what is said in different definitions about the importance of car brakes, you and I know one thing: serviceable car brakes are the basis of safety.
The safety of you personally, your family and people around you and, ultimately, the integrity of your car. But considering its price, this is not so and not enough. A car's braking system likes to be constantly monitored, maintained and maintained in good condition.
One of the main types of brake system maintenance, in addition to replacing brake discs and brake pads, is timely bleeding of the brake system. It all starts with the manual. In other words, at first you look at the management of your own car and see the manufacturer’s recommendation there.
Automotive portal. Answers on questions
Difficulty Pit/Overpass one 3 hours Tools:
- Brake water container 1-2 l.
- Eight mm split spanner
- Rubber bulb
- Split spanner 10 mm
Parts and consumables:
- Brake fluid
- Bleeding hose
- Aerosol lubricant type WD-40
- Brake fitting
- Rags
Notes: Bleeding the brakes is necessary when changing brake water, also to remove air that has entered the hydraulic drive during repairs or replacement of individual components of the brake system. Air trapped in the hydraulic drive causes an increase in the free play of the brake pedal (the pedal becomes soft) and significantly reduces the effectiveness of the brakes.
Signs of air getting into the hydraulic drive are: when you press the pedal once, the pedal travel increases and becomes soft; with repeated pressing of the pedal, a gradual decrease in the pedal stroke with a simultaneous increase in its rigidity.
Signs to watch out for
In what cases should this operation be performed? The main reason that leads to pumping is air accumulated in the system. It can get inside for various reasons. As a rule, this is a malfunction of the brake cylinders or leaking hoses. Very rarely, air gets in due to a weak connection of the fittings, but this possibility should not be ruled out.
How to determine that air has formed in the system? The driver will notice changes in the behavior of the car. So, when you press the pedal, the car will not reduce speed as effectively. And the pedal itself will be more sluggish and have an increased stroke. The situation is critical when it completely falls into the floor, and the car barely slows down. In this case, it is urgent to bleed the front and rear brakes of the VAZ-2115.
READ Repair kit for rear brakes Nissan Almera Classic
How to bleed the brakes on a Niva alone. Device for bleeding brakes for one person.
This operation is also required when replacing brake fluid. If it has not been updated for more than three years or has become black, it definitely needs to be replaced. In addition, some fluids are changed when buying a car on the secondary market, when there is no confidence in the reliability of the system. Bleeding may also be required when doing any work on the brake system. This may include replacing the reservoir, working or master cylinder, hoses and other elements. It is not pumped only when replacing the pads, since the working cylinders are only recessed here (both in the case of front disc mechanisms and rear drum mechanisms).
Vesko-trans.ru
How to bleed brakes on VAZ cars All cars of the VAZ family use a hydraulically driven brake system. This means that the force that the driver makes when pressing the brake pedal is transmitted to the brake mechanisms installed on the wheel hubs of the car using water. But in order for the impact to have sufficient force, an amplifier is included in the design.
To transmit force, one of the characteristics of water is its incompressibility. In other words, for the force on the liquid, its volume does not change, and it acts for the transmitter. A hydraulic brake drive is more practical than a mechanical or pneumatic one, but the computer has one drawback: if air gets into the fluid, the transmission of force will be significantly reduced.
Our client remains because air, just like any gas, is compressible. Due to, the presence of air leads to a change in the volume of water for the force (due to gas compression).
Design features and purpose of Chevrolet Niva disks
Is your brake making an unbearable squeak?
Is your steering wheel vibrating so loudly that it feels like it's going to fail? This indicates problems with the brakes and the need to replace the brake discs. There's no need to worry, as there's no need to spend a fortune at the workshop or spend days without a car. The article will tell you how to independently replace brake discs on a Niva Chevrolet car. Brake discs and brake pads are subject to natural wear. This means they are designed to withstand wear and tear and must be replaced. This is a very easy task requiring only a few tools and gloves.
Depending on the size, weight and power of the vehicle, the drive needs a more or less efficient cooling system. Thus, there are two types of mechanisms: solid and ventilated. The ventilated mechanism ensures better heat dissipation. In this regard, it is necessary to comply with the type of disk installed in the original version of the Chevy Niva car.
The Niva has discs made of cast iron and is on each wheel (front and rear). Their goal is the same, but their features are different. The rear mechanisms are called drums because of their shape.
The braking system of a car is an extremely important element that ensures that the car stops, allowing it to be fully controlled and prevent emergency situations from occurring. According to traffic regulations, a car with faulty brakes cannot be operated on public roads.
In our short article we will look at how to replace brake discs on a Chevrolet Niva. The brake system is the most important part of any car, because it allows you to stop traffic as quickly and safely as possible. Naturally, this affects road safety - the system allows you to avoid emergency situations.
Every car owner knows that the braking process involves friction. It helps reduce the speed of the car and stops its movement. The primary role in the braking process involving friction is played by the brake disc, which stops the movement of the wheels. This part can be cast iron, carbon fiber or ceramic. Chevrolet Niva is equipped with cast iron discs.
The car we are considering has brake discs on each wheel, which is why they are divided into front and rear. Their purpose is the same, but their design features are different. The rear discs are called drums with a shape corresponding to the name.
The Niva's front discs resemble a flat support, which is affected by working system elements. During the braking process, these elements heat up and eventually wear out.
The stronger the heating, the more worn out the disc is, so sooner or later the brake disc on the Niva will need to be replaced, which you can do yourself after reading this manual.
Now let’s look at the specifics of the operation on other cars of the VAZ family. Starting with model 2108, the circuit diagram has changed, and therefore the sequence is somewhat different. And you need to know it before bleeding the brakes on the VAZ-2108, 2109, 21099.
These cars already use a diagonal arrangement of contours. That is, one of them combines the rear left and front right wheels, and the second - the other two.
Bleeding begins, as usual, from the farthest wheel, that is, from the rear right one. An operation to remove air from its brake mechanism is carried out according to the described sequence.
But there is one caveat. The design includes a pressure regulator for the rear wheel drive mechanisms. If the rear of the car is hung out before bleeding, this regulator must be unlocked. To do this, just install a screwdriver between the regulator rod and the thrust plate.
After all work it should be removed.
Then it is pumped to the second rear wheel, and the front left one, since it is the one that is combined with the circuit with the already pumped rear mechanism.
After pumping each mechanism, it is necessary to check the level in the tank. If you omit this point, then during operation the liquid will go into the system and air will enter it again.
As for the VAZ-21213 Niva, this car has its own characteristics. And although the system on this car is dual-circuit, it is different from other VAZ cars.
On this SUV, one circuit combines all 4 brake mechanisms, and the second - only the front wheels. To ensure that the circuits are independent, the Niva uses a block caliper in front, to which two brake hoses fit; accordingly, there are two fittings for bleeding.
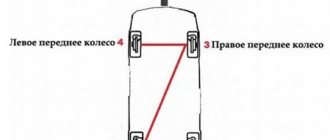
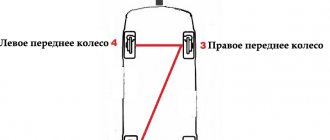
Bleeding the brakes on a Niva is done in the following sequence: first, air is expelled from the rear right mechanism, then from the rear left one. Next, the general circuit on the front brakes is pumped - first the right, then the left (the principle of the distance of the wheel from the master cylinder). In this case, it is important not to confuse the fittings - the upper one is responsible for the general contour, and it is this that should be used.
Only then is the front brake circuit pumped, for which the lower fitting is used. Here the pumping sequence does not matter; you can start with both the left and the right mechanism.
But the Chevrolet-Niva does not use such a brake design. A conventional diagonal dual-circuit system is installed there, so the pumping sequence is identical to the process on VAZ-2108 and higher cars.
About the device and operation of the car
31 30 two 33 30 four 35 30 6 37 30 eight 39.Lada 4x4 (VAZ-21214): Bleeding the hydraulic brake system, changing water We bleed the brakes to remove air from the hydraulic drive after it has depressurized when replacing the head cylinder, wheel brake wheel cylinders, hoses, tubes, also in case of changing the working water or when the brake pedal becomes soft. We remove air from the system when the engine is not running, first from the 1st circuit, and then from the other in the following sequence: Brake mechanism of the right rear wheel; Brake mechanism of the left front wheel ;Brake mechanism of the left rear wheel;Brake mechanism of the right front wheel. If air gets into one of the circuits, it is enough to bleed only this circuit, and not the entire hydraulic drive. Before pumping, check the level of working water in the brake system hydraulic reservoir and add fluid as necessary (see 33)
Bleeding the brake system Niva 2121-2131
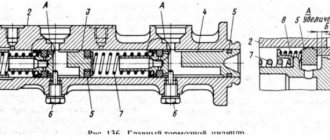
Repair of brake devices, features of disassembling and assembling VAZ 2131 units, procedure for replacing VAZ 2121 pads, stages of removing and installing brake cylinders. Repair notes. Operation and service of the Niva
2121.
Checking and adjusting Niva 2131 devices.
- We remove air first from the first circuit of the system, and later from the other. We start bleeding from the right rear wheel cylinder.
- Bleeding the brakes is necessary when replacing brake water, also to remove air that has entered the hydraulic drive during repairs or replacement of individual components of the VAZ 2121 brake system.
Remove the cap from the bleeder fitting of the rear brake cylinder of the VAZ 2131.
We put a transparent VAZ 2131 hose onto the fitting, lowering its free end into the vessel.
In what sequence should you bleed the brakes in the field? Bleeding the hydraulic brake system of Chevrolet Niva
Difficulty Pit/Overpass one 3 hours Tools:
- Rubber bulb
- Split spanner 10 mm
- Brake water container 1-2 l.
- Eight mm split spanner
Parts and consumables:
- Brake fitting
- Rags
- Brake fluid
- Bleeding hose
- Aerosol lubricant type WD-40
Notes: Bleeding the brakes is necessary when changing brake water, also to remove air that has entered the hydraulic drive during repairs or replacement of individual components of the brake system.
How to properly bleed the brakes on a Chevrolet Niva
Bleeding the hydraulic brake system, changing water Niva Chevrolet
We pump the brakes to remove air from the hydraulic drive after it has depressurized when replacing the head cylinder, wheel brake wheel cylinders, hoses, tubes, also in case of changing the working water or when the brake pedal becomes soft.
We remove air from the system when the engine is not running, first from the 1st circuit, and then from the other in the following sequence:
right rear wheel brake;
left front wheel brake mechanism;
left rear wheel brake;
brake mechanism of the right front wheel.
If air gets into one of the circuits, it is enough to bleed
only this circuit, and not the entire hydraulic drive. Before pumping, check the level of working water in the hydraulic brake system reservoir and add fluid as needed (see Checking the water level in the brake hydraulic reservoir, p. 33). We bleed the brakes with an assistant. If the rear wheels are hanging out.
.insert a screwdriver between the pressure regulator piston in the hydraulic drive of the rear wheel brakes and the piston lever, fixing the regulator piston in the recessed position.
We clean the bleeder fitting of the brake mechanism of the right rear wheel from dirt.
and remove the protective cap from it.
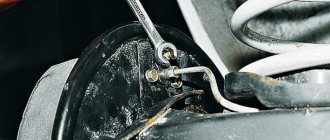
Using an eight ring spanner, loosen the tightening of the bleeder fitting. We put a hose on the fitting, and immerse its free end in a container partially filled with working fluid.
The assistant must vigorously press the brake pedal all the way 4-5 times and keep it pressed.
Using an eight key, unscrew the bleeder fitting 1/23/4 turn.
In this case, liquid with air bubbles will flow out of the hose, and the brake pedal should be pressed all the way.
To ensure that the liquid does not flow out of the hose, we tighten the fitting and only then can the assistant release the pedal. We repeat pumping until air bubbles begin to appear in the water coming out of the hose. We remove the hose, wipe the bleeder fitting dry and put a protective cap on it. We bleed the brake mechanism of the left front wheel.
. remove the protective cap from the lower bleeder fitting of the working cylinder block of the left front wheel.
We put a hose on the fitting and lower its free end into the vessel,
partially filled with brake fluid.
We remove air through the lower fitting of the working cylinder block.
In the same way, we remove air through the upper fitting of the working cylinder block of the left front wheel (shown in the photo with an arrow). Similarly, we bleed the brake mechanisms of the other circuit.
When pumping, it is necessary to monitor the water level in the tank and add liquid as necessary.
If you feel softness and increased travel when you press the brake pedal, it means there is air left in the system. In this case, we repeat pumping until the pedal becomes hard, i.e., when pressed, it travels less than half the distance to the floor. If air cannot be removed, check the tightness of connections, pipelines, hoses, head and working cylinders. We tighten leaking connections, replace faulty main and working cylinders (see Brake system, p. 268). We replace the working water in the hydraulic drive of the brake system in accordance with the maintenance regulations after three years.
When replacing, pump out the old liquid from the tank with a syringe or rubber bulb.
Fill the reservoir with new fluid. We pump the hydraulic drive of the brake system until new fluid (lighter than the old one) begins to come out of the bleeding fittings of all working cylinders. After bleeding the brakes, bring the water level in the hydraulic brake system reservoir to normal (see Checking the water level in the brake hydraulic reservoir, p. 33).
Hello, as I figured out, you need to bleed the brakes in a certain sequence. Rear is right, in front is left, rear is left, in front is right. Everything is clear with the rear, there is one fitting each, but with the front it’s somehow not clear. There are two fittings on the calipers. Liquid flows from the top ones when opened, but not from the bottom ones. Tell me how to fight with the front?)
Chevrolet Niva
Attention! If brake fluid gets on your car's paintwork, plastic parts, or wiring, it can cause damage. Remove it immediately with a clean cloth.
Next, you will have to bleed the brake system hydraulic drive until new fluid (lighter than the old one) begins to come out of the bleeder fittings of all working cylinders.
We carry out pumping for a water change with the engine not running, first on one circuit, and then on the other in the following sequence:
- right rear wheel brake;
- left front wheel brake mechanism;
- left rear wheel brake;
- brake mechanism of the right front wheel.
Front brake mechanisms from two thousand one hundred twelve on Niva 2121, VAZ 2131
But first, let's figure out why they are better. After all, traditional brakes have two cylinders, so their efficiency should be higher. But we should not forget that traditional brakes were invented 40 years ago and have never undergone industrial modifications. The naturally floating caliper in the front-wheel drive VAZ family is also not the height of perfection and, for sure, it would be more correct to install 6-piston calipers from such eminent manufacturers as Brembo, JBT, Wilwood, etc., but the budget for such alterations can be up to 50% of prices of the newest 2107. And the brakes from two thousand one hundred twelve are ventilated and have a two hundred and sixty mm brake disc. Therefore, their advantages are that in extreme driving conditions it will be more difficult to heat the brake fluid to a boil, and also due to the enlarged brake disc, the braking force arm will be greater, in other words, you need to put less effort on the brake pads to stop the wheel, but how It is known that a wheel slows down a car.
In general, the feasibility of replacing brakes is confirmed both theoretically and practically.
Now let's look at exactly what parts we need for such work:
Wheels are 14" because 13" simply won't fit on the new brakes!
Caliper two thousand one hundred twelve 2 pcs.
Brake disc 2112.2 pcs.
Front pads from two thousand one hundred twelve set.
Brake hoses from two thousand one hundred one front two pcs.
Caliper mounting bolts two thousand one hundred one 4 pcs.
Brake fluid. A kilogram bottle should be enough.
And, of course, tools in the form of keys, sockets, hammers and screwdrivers. Since we will be removing the hub, we will also need Litol.
VAZ two thousand one hundred twenty-one Bleeding the brakes
We carry out the work together with an assistant on an inspection ditch or lift.
Bleeding the brakes is necessary when replacing brake fluid, as well as to remove air that has entered the hydraulic drive during the repair or replacement of individual components of the brake system. We remove air first from one circuit of the system, then from the other. We start bleeding from the right rear wheel cylinder.
Remove the cap from the rear brake cylinder bleeder fitting.
We put a transparent hose on the fitting, lowering its free end into the vessel.
An assistant presses the brake pedal three to four times at intervals of one to two seconds and holds the pedal down. Using an eight key, unscrew the bleeder fitting 1/23/4 turn. In this case, part of the brake fluid and air are forced into the vessel, and the pedal is lowered to the floor. Air bubbles are clearly visible in the transparent hose. We tighten the bleeder fitting and repeat this operation until the release of air bubbles completely stops. When removing air from the system, monitor the fluid level in the master cylinder reservoir and add it if necessary. We pump the left rear wheel cylinder in the same way. Then we remove air from the upper fittings of the left and right cylinder blocks of the front wheels.
Remove the cap of the upper fitting of the front wheel brake cylinder block (for clarity, the wheel has been removed).
We pump the front brake cylinders of one circuit.
To pump another circuit, remove air from the lower fittings of the front wheel cylinder blocks in random order.
Remove the cap from the lower fitting of the front wheel brake cylinder block.
Let's pump another circuit.
If there is no air in the system, the brake pedal should be hard, i.e. when pressing, go no more than half the distance to the floor.
Sequence and correct procedure for pumping brakes on a VAZ-2114
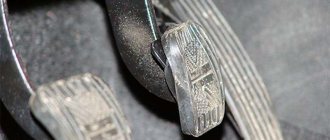
- Ask an assistant to press and release the brake pedal several times.
- Now the pedal remains pressed. Using the “8” key, turn the fitting half a turn to the left. The liquid is drained into an empty container, the pedal “falls”.
- As soon as the liquid stops draining, tighten the fitting. The pedal is released.
- If there were bubbles in the drained liquid, repeat steps 2-4. In this case, you must ensure that the tank is filled at least to the MIN mark. If necessary, top up.
- Move to the front brake mechanism, perform steps 2-5.
- Screw on the protective caps.
Possible sequence for pumping brakes for a VAZ-2114: rear right wheel, front left, rear left, etc. Each circuit is pumped starting from the rear wheel.
What you need to know about bleeding the system in a Chevrolet
- Hydraulic fluid contains poison. If it comes into contact with exposed skin, wash it off immediately with a large stream of water. If suddenly the substance gets into your eyes, or, worse, you swallow it, you should seek medical help.
- Some types of hydraulic fluid are flammable and can therefore catch fire if they come into contact with hot elements or an open flame. During your work, you should always remember this in order to take appropriate precautions in time.
- The liquid is aggressive to plastic parts and paint. If the substance gets on the surface of a painted body or plastic, immediately wash it off with a large stream of water.
- The liquid is hygroscopic, that is, it can absorb moisture from the air. Excess moisture lowers the boiling point to unacceptable levels, leading to an unsafe reduction in braking performance.
- Used hydraulic fluid cannot be reused. It is most likely already contaminated. If you need to add or replace fluid in the system, use only the recommended type.
- Ten mm split spanner
- Eight mm split spanner
- Rubber bulb
- Capacity for brake fluid 1-2 l.
Parts and consumables:
- Brake fluid
- Rags
- Aerosol lubricant type WD-40
- Brake fitting
- Bleeding hose
Bleeding the brakes is necessary when replacing brake fluid, as well as to remove air that has entered the hydraulic drive during the repair or replacement of individual components of the brake system. Air trapped in the hydraulic drive causes an increase in the free play of the brake pedal (the pedal becomes soft) and significantly reduces the effectiveness of the brakes.
pressing the pedal once increases the pedal travel and makes it softer;
with repeated pressing of the pedal, a gradual decrease in the pedal stroke with a simultaneous increase in its rigidity. Before bleeding the hydraulic drive, it is necessary to identify and eliminate the cause of depressurization.
When bleeding the brakes on a car with the rear part suspended (for example, on a lift), it is necessary to load the rear brake pressure regulator, insert a screwdriver between the pressure regulator piston and the piston lever.
1. Remove the protective cap from the bleeder fitting of the wheel cylinder of the right rear wheel.
2. We put a hose on the head of the fitting, lowering its free end into a vessel partially filled with brake fluid.
3. An assistant presses the brake pedal three to four times at intervals of 1-2 seconds and holds the pedal down. Using an eight key, unscrew the bleeder fitting 1/2 3/4 turn. In this case, air and part of the brake fluid are forced into the vessel, and the pedal is lowered to the floor (air bubbles are clearly visible in the vessel with the liquid).
4. Then remove air from the cylinder block of the left front wheel.
5. Remove the protective cap from the lower bleeder fitting of the cylinder block of the left front wheel.
6. Putting a hose on the head of the fitting, lower its free end into a vessel partially filled with brake fluid. We remove air through the lower fitting of the cylinder block.
7. In the same way, remove air through the upper fitting of the cylinder block of the front left wheel.
8. To remove air from another circuit, we bleed in the following sequence: left rear right front wheel.
When removing air from the system, you need to monitor the fluid level in the master cylinder reservoir and add it if necessary.
If there is no air in the system, the brake pedal should be hard, i.e. when pressing, go no more than half the distance to the floor.
When removing or replacing elements of one of the circuits, only this circuit must be pumped. When removing or replacing the master brake cylinder, pressure regulator, or a drop in the level of brake fluid in the reservoir, resulting in air entering the hydraulic drive, it is necessary to completely bleed the brake system, i.e.
The article is missing:
- Photo of the instrument
- Photos of parts and consumables
- High-quality photos of repairs
Preparatory stage
If you decide to bleed the brakes yourself, it is important to know that when bleeding you must use the same brake fluid as the one in the system. No other liquid can be used. You must first check the tightness of the system. To level up you need one more person. You will also need a hose of a suitable diameter for the bleeder fitting, a glass or plastic container (transparent), a wrench and a rag for cleaning the caps.
It is very important to know in what order to remove air from the brake system. This procedure must be carried out diagonally, alternating the rear and front brakes:
Articles
- 2101-1602591 – rear cylinder fitting;
- 2101-1602591-01 – disc brake fitting;
- 2101-1602592 – fitting cap.
How to bleed the brakes alone?
It seems that one person can bleed the brakes. But then you need to increase the pressure in the tank. The source of air will be the tires. By the way, the limiting value should be considered 2 atmospheres.
READ Toyota RAV4 Drive Belt Replacement
Cover from VAZ-2106 and nipple for tubeless
The cap with the nipple is screwed onto the neck of the tank. Next, the “extension cord” is assembled. The donor wheel is hung out when bleeding the brakes.
Or a compressor. Do not apply strong pressure; the hose may burst. In this case, you will stain the entire engine compartment.
You can open the fittings one by one and drain the liquid. But you also need to monitor the fluid level in the tank.
Topping up is done as follows: disconnect the “extension cord” from the tire, unscrew the cap, etc.
How to properly bleed the brakes on a Chevrolet Niva
Bleeding the hydraulic brake system, replacing Niva Chevrolet fluid
We pump the brakes to remove air from the hydraulic drive after it is depressurized when replacing the master cylinder, wheel brake wheel cylinders, hoses, tubes, as well as in case of replacing the working fluid or when the brake pedal becomes soft.
right rear wheel brake;
left front wheel brake mechanism;
left rear wheel brake;
brake mechanism of the right front wheel.
If air gets into one of the circuits, it is enough to bleed only this circuit, and not the entire hydraulic drive. Before pumping, check the level of working fluid in the brake system hydraulic reservoir and, if necessary, add fluid (see Checking the fluid level in the brake hydraulic reservoir, p. 33). We bleed the brakes with an assistant. If the rear wheels are hanging out.
.insert a screwdriver between the pressure regulator piston in the hydraulic drive of the rear wheel brake mechanisms and the piston lever, fixing the regulator piston in the recessed position.
We clean the bleeder fitting of the brake mechanism of the right rear wheel from dirt.
and remove the protective cap from it.
An assistant must vigorously press the brake pedal all the way 4-5 times and keep it pressed.
Using an eight key, unscrew the bleeder fitting 1/23/4 turn.
In this case, liquid with air bubbles will flow out of the hose, and the brake pedal should be pressed all the way.
As soon as the liquid stops flowing out of the hose, tighten the fitting and only after that can the assistant release the pedal. We repeat pumping until air bubbles no longer appear in the liquid coming out of the hose. We remove the hose, wipe the bleeder fitting dry and put a protective cap on it. We bleed the brake mechanism of the left front wheel.
. remove the protective cap from the lower bleeder fitting of the working cylinder block of the left front wheel.
partially filled with brake fluid.
We remove air through the lower fitting of the working cylinder block.
In the same way, we remove air through the upper fitting of the working cylinder block of the left front wheel (shown in the photo with an arrow). Similarly, we bleed the brake mechanisms of the other circuit.
If you feel softness and increased travel when you press the brake pedal, it means there is air left in the system. In this case, we repeat pumping until the pedal becomes hard, i.e., when pressed, go no more than half the distance to the floor. If air cannot be removed, check the tightness of connections, pipelines, hoses, master and working cylinders.
When replacing, pump out the old fluid from the tank with a syringe or rubber bulb.
Fill the reservoir with new fluid. We pump the hydraulic drive of the brake system until new fluid (lighter than the old) begins to come out of the bleeding fittings of all working cylinders. After bleeding the brakes, bring the fluid level in the hydraulic brake system reservoir to normal (see Checking the fluid level in the brake hydraulic reservoir, p. 33).
Hello, as I understand it, you need to bleed the brakes in a certain sequence. Rear is right, in front is left, rear is left, in front is right. Everything is clear with the rear, there is one fitting each, but with the front it’s somehow not clear. There are two fittings on the calipers. Liquid flows from the top ones when opened, but not from the bottom ones. Tell me how to deal with the front?)
- clean glass container;
- a suitable piece of rubber/plastic tube;
- a wrench with a head corresponding to the valve size;
- brake bleeding kit.
Meanwhile, the choice of the sequence of bleeding the brake lines is not significantly important, since each caliper has its own connection to the main cylinder.
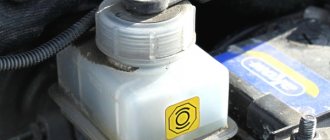
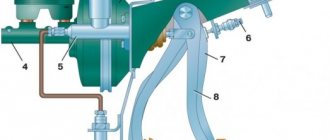
The car must be placed on a level surface, in first or reverse gear. Then it is advisable to place wheel chocks or a device made of boards under the wheels. Next, you need to check the brake fluid level in the cylinder reservoir, which is located under the hood (between the windshield and the air filter housing).
- Remove the dust boot cap from the bleeder valve of the 1st caliper.
- Place a wrench on the valve. Then you need to pull the drain tube onto the valve nipple. The opposite end of the tube should be lowered into the vessel and a little brake fluid should be added to close the lower end of the hose.
- During the process, it is worth monitoring the liquid level in the container, preventing it from falling below the minimum level. If necessary, fluid is added to the Niva Chevrolet car.
- Next, you need to instruct an assistant to press the brake pedal to increase the pressure in the brake system. When pressing the last time, the assistant needs to hold the pedal in the pressed position.
- Having raised the pressure in the system, it is necessary to loosen the valve approximately one turn, allowing the liquid to flow into the container. During the process, the pedal must be used to maintain pressure in the system. If necessary, you should fully depress the brake pedal all the way, but without releasing it. Next, when the liquid stops flowing, you need to tighten the valve. At this time, the assistant can smoothly release the brake .
- Check the brake fluid level in the reservoir. If necessary, it is worth topping up.
- If there was air in the system, it is easy to notice it as bubbles in the fluid coming out of the brake system. The process should be repeated until the liquid stops producing bubbles. In the event that the brake fluid was drained from the main cylinder and a new one was poured in, and the air was pumped out of the 1st brake line, you need to make an interval between cycles of five seconds. This is necessary to refill the master cylinder passages.
- After air bubbles have stopped appearing, tighten the valve tightly, then remove the tube, as well as the key, and replace the dust cap.
- You need to repeat the process with the remaining lines until the air is completely out of the system and the feel of the brake pedal becomes firm again.
Carrying out work on rear mechanisms on VAZ classic models
Tools: keys, hammer, screwdriver, etc. Same as replacing front discs.
- The car is placed on a jack and the rear wheel is removed.
- The brake drum mounting bolts are removed.
- The drum is removed.
- Using a screwdriver, remove the tension spring and spacer bar.
- The shank of the front pad strut rotates.
- The front block is retracted and the lower tension spring is removed.
- The support strut of the rear block is removed.
Assembling and installing the pads is performed in the reverse order.
For details of the entire process, watch the video at the end of the article.
First, let's look at how to properly bleed the brakes on a Classic. To perform the operation correctly, it is necessary to take into account that on the VAZ-2106 or any other model, the brakes are dual-circuit. That is, the entire system is divided into two independent parts. This was done so that if one of the circuits depressurizes, the second remains operational and the car can stop.
For all classic models, including the VAZ-2107 brakes, the circuits separate the front and rear wheel drives. This must be taken into account when it is necessary to bleed the brakes of a 2101 or another model.
By the way, if only one circuit is aired, then it is not necessary to bleed the second one, although it would not be superfluous to treat all mechanisms, both front and rear.
So, everything is prepared, and you can get started.
The sequence of actions is as follows:
- It is better to drive the car into a pit to make it easier to get to the fittings. At the same time, he is immobilized using a handbrake or wheel chocks;
- Remove the cap from the brake fluid reservoir, check the level, and if necessary, bring it to the maximum level;
- First, we bleed the rear brakes of the VAZ, since the entire operation is done from the brake mechanism, which is as far as possible from the master cylinder, that is, from the right rear wheel;
- We put the assistant in the driver's seat. We climb under the car ourselves, put the key on the fitting, and then put the prepared tube on it, the second end of which should be lowered into a container with a small amount of liquid poured into it. It is advisable to immediately tear the fitting out of place and immediately screw it back, even before pumping. This is done so that there is no hitch in the process due to a non-unscrewing fitting;
- We ask the assistant to press the brake pedal 5-6 times. At the same time, with each press the failure will be less and less - the drive is pumped with liquid, while air moves to the mechanisms. After downloading the system, the assistant should hold down the pedal - press and hold it;
- Unscrew the fitting half a turn, working fluid will begin to flow out of it. If a transparent tube is used, air bubbles will be clearly visible in it, and the pedal being held will begin to move down until it hits the floor. In this position, the assistant must hold it, at this time the fitting must be screwed back;
- This sequence of actions should be carried out for one mechanism 4-5 times to completely remove air;
- On the “classic”, the left rear wheel is pumped next (since they are combined into one circuit). But before that, you need to check the level of the tank and bring it to the maximum level. The sequence of actions is the same: pump the brakes and hold the pedal - release the fitting to drain the fluid with air (the pedal goes down) - tighten the fitting - pump again. And so 4-5 times;
Note that this sequence of actions is identical for all cars. The difference lies only in some design features of the system itself.
Many car enthusiasts have resorted to a similar method of upgrading their cars. In this case, as a rule, the brake discs were taken from the Sobol, and the calipers were removed from the Oka. It is worth noting that the finished result was often an order of magnitude worse than the expected effect. There were no hydraulics, problems with the handbrake often arose, and other unpleasant situations occurred, so driving such a tuned car did not bring anything good. Yes, and you won’t be able to pass a technical inspection after such an upgrade.
Also interesting: How to bleed the brakes on a Chevrolet Niva correctly
Alternative way
The essence of this method is that the work is performed by two people at once. One sits in the driver’s seat and, on command, presses the brake pedal, while the other performs the necessary manipulations.
Here's how to properly bleed the brakes on a Niva:
- Start working with the rear right cylinder. Fill the expansion tank with liquid. Place a tube onto the fitting and lower the other end into a jar with a small amount of brake fluid.
- Give the command to your partner to press the brake pedal 5-7 times (of course, you also need to release it).
- When pressing the last time, it is necessary to fix the pedal in its extreme position near the floor.
- Unscrew the fitting a little and bleed air from the system. It will come out along with a small amount of liquid.
- Repeat the procedures described above until air stops flowing.
This method is suitable when it is not possible to use the help of a partner. To do this, you will need to create excess pressure in the system using a simple bladder or spare tire. You'll have to be Kulibin a little to make an adapter between the chamber fittings and on the expansion tank cap (you need to use a spare cap).
The essence of the procedure is the same as in the first option. You should unscrew the bleeder fittings one by one to get rid of excess air. Experts recommend carefully monitoring the fluid level in the tank and, if necessary, adding it to the required volume.
Sources:
https://womaninred.ru/kak-pravilno-prokachat-tormoza-na-nive-shevrole/ https://o-ladagranta.ru/kak-prokachat-tormoza-na-vaz-2121-niva/ https:// newniva.ru/niva-pravilno-prokachat-tormoza.html
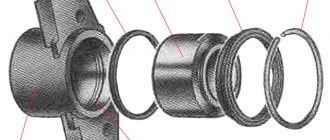
Rear wheel brake
Rear wheel brake on VAZ 2114
- Hub nut
- Hub flange. The brake drum is attached to it
- Lower tension spring
- Left pad
- Thrust spring
- Cylinder
- Upper tension spring
- Guide bar
- Eccentric
- Right pad
- Pad cover
In general, the braking system of the VAZ-2114 is simple and reliable. For a person who has experience driving cars of other brands, servicing it on a “fourteen” will not be a problem. But even those drivers who got behind the wheel of a car for the first time can easily understand the operating principle and operating features of the VAZ-2114 brake system. But remember: it is better to service the brake system at warranty service stations from experienced technicians.
READ How to Bleed the Clutch on Focus 1
Rear left
- After a short period of time, fully release the pedal and wait until the pump automatically turns off.
- After excess air has escaped, tighten the fitting and press the pedal halfway;
- Do not depress the brake pedal, the fluid will begin to come out under the action of the pump;
- We repeat the first point, as for the rear wheel; Securely clamp the connectors and check all connections
- Turn off the ignition and connect the connectors back to the brake fluid reservoir. We check the reliability of the connections and look at the ABS system operation indicator. It should go out if everything was done correctly.