VAZ engines "tens" of the latest releases were equipped with rubber valve seals, which included an expander spring and a steel bushing. The manufacturer recommends changing the oil removal part every 150 thousand km. A certain part of Lada 110 owners do this at a car service center, not suspecting that in fact the operation is not so difficult to perform independently.
Purpose and design of valve seals
A worn oil seal allows oil to enter the cylinder along the valve stem, causing it to burn along with the mixture, forming carbon deposits on the valve plates, as well as on the rings and cylinder walls. In advanced cases, coking leads to a drop in compression due to stuck rings and loose valve closure. It is generally accepted that the cost of timely replacement of oil scraper bushings is incommensurate with the repair of the piston group.
The design of the oil seal is quite elementary, it consists of only three basic elements:
- The base is a steel bushing, which represents the frame of the oil seal and gives it strength.
- Spring – ensures the tightest possible fit of the edge of the rubber seal to the valve stem.
- Oil seal - made of rubber or secondary rubber and serves to remove excess lubricant from the valve stem.
It is important to take into account that to replace valve stem seals on a VAZ 2110 8-valve car, it is better to buy appropriate high-quality consumables. First of all, this will affect the service life of the parts; they will not have to be changed ahead of time.
Adjustment process
You should not buy adjusting washers in advance, as the cost of these parts is quite high. First of all, you should decide on the size of the gaps, and only then go to the store in order to select the right size of washers and buy them in the right quantity. All work should be carried out in a garage with good lighting, since a closed room will protect the car from the extremely undesirable effects of rain and wind, which inevitably carry dirt into the uncovered camshaft.
At the same time, do not forget to cool the engine before adjusting the valves of the VAZ-2110 eight-valve engine
Disassembling VAZ 2110 valves
Adjusting the VAZ-2110 valves (8 valves) always begins with dismantling the necessary components, which is performed as follows:
- The battery terminal is disconnected.
- The air filter housing is dismantled (if the car uses a carburetor engine).
- The gas cable bracket, as well as the crankcase gas hoses, are disconnected from the valve cover.
- All the bolts that secure the timing case are completely removed. Once the cover is removed, you can freely work with the pulley.
- Get the spark plugs. Due to this, the rotation of the crankshaft will be simplified, which will help to find BDC and TDC.
- The valve cover is removed.
Before proceeding with the actual adjustment, you should understand the features of the timing mechanism.
Read the instructions for your car and read the operating order of the valves. In particular, there will be a table indicating the order in which the valves are adjusted. It is worth noting that the adjustment of the VAZ-2112 valves (16 valves) provides for a completely different scheme.
How to adjust gaps yourself
After dismantling the valve cover, any remaining engine oil near the tappets should be completely eliminated. To do this, you should use an ordinary rubber bulb or a special medical syringe. If you have a retaining rod, you will need to place it on the two outer studs, with which the cylinder head cover is secured.
After this, you can proceed directly to the repair:
- The top dead center is set. To do this, you will need to align the marks located on the inner timing case and the camshaft pulley. To do this, you can hang and spin one front wheel, then use a spanner to turn the camshaft, securing it to the bolt securing the pulley. However, you should immediately warn that this operation may result in the bolt breaking, so it should be performed extremely carefully, and it is even better to first stock up on an additional bolt.
- Once top dead center is located, the camshaft should be rotated to move the pulley approximately 40-50 degrees from TDC. Now you will need to put your mark, from which several more rotations of the camshaft will be carried out with additional marks.
- The thermal clearance of the exhaust valve is measured. To do this, one of the screws should be placed between the pusher and the camshaft cam. The standard gap is 0.35 mm.
- If the probe passes without any obstacles, you should take a larger one and repeat the procedure in increments of 0.05 mm.
- If a probe with a diameter of 0.4 or 0.45 mm can no longer pass, this indicates the need to replace the adjusting washer.
- The pusher turns so that the groove is facing you, after which you will need to push the locking rack lever on it and remove the used washer from there using simple tweezers. There will be numbers on it indicating the original size.
- To obtain the required size, you need to subtract the difference between the measured and nominal gap from the thickness of the used washer, and then write it down in a notebook so that you can later buy the required washer in the store.
- The nominal clearance in the intake valve is 0.2 mm. The gap is measured in the same increments as in the previous case.
- The washer is replaced in the same way as in the previous case.
- In accordance with the table, the crankshaft is rotated to the desired angle, after which the procedure is performed with each valve separately.
- All the necessary washers are purchased at the store.
- The washers are mounted in the pushers.
- All gaps must correspond to the standard ones, that is, 0.2 or 0.35.
- New thermal clearances are being checked.
- When the new washers are installed, all dismantled components are returned to the workplace.
- The engine is started and its operation is monitored.
Causes and signs of wear of rubber seals
During engine operation, oil removal seals are subjected to serious loads, because the valve performs more than 1000 operating strokes per minute. If we add to this the factor of the chemical effects of hot oil and exhaust gases, then it is not at all surprising that the rubber does not withstand and wears out. And the point here is not the quality of the product, although this is important, it’s just that the seal is a consumable material that should be changed after a run of about 100,000 km.
If you detect the wear of valve seals in time and replace them at an early stage of the malfunction, you will be able to avoid problems with the internal combustion engine. The primary signs of failure of rubber seals include the following symptoms:
- The candle thread is coated with oil.
- Smoke from the oil filler neck.
- Smoke coming from the exhaust pipe.
- The electrodes of the spark plug are covered with carbon deposits.
- Increased fuel consumption.
- Rapid oil contamination.
The presence of oil on the threaded part of the spark plugs does not always indicate the need to urgently change the seals. It happens that the thread is still dry, because a small amount of lubricant still gets into the chamber, and it has time to burn.
Work order
Now the sequence of actions:
- We install the VAZ 2114 on a flat surface, the engine must cool completely so that there is no error in the measurements due to metal expansion;
- Remove the valve cover, as well as the side cover under which the timing belt is located. The surface under the lid must be wiped of oil. You should also carefully inspect the timing shaft for burrs, holes, and signs of significant wear. If there are any, the shaft will have to be replaced;
- We unscrew the spark plugs to make it much easier to turn the crankshaft in the future.
- We combine the mark on the camshaft drive gear with the protrusion on the cylinder head, that is, we set the TDC on the first cylinder. This can be done using a wrench, which we use to rotate the crankshaft by the pulley bolt. But some car enthusiasts do things a little differently - jack up the front wheel on the left and engage 4th gear. Then they simply rotate the wheel, and since the gear is engaged, this rotation will be transmitted through the transmission to the engine;
- After aligning the marks on the camshaft gear, strictly opposite the existing mark, we make another one with chalk. This will make future work somewhat easier.
- We use a feeler gauge to measure the gaps on valves 1 and 3 (you need to count from the camshaft gear. The 1st is exhaust, and the 3rd is intake);
- The gap on 1 valve should be 0.35 mm, but an error is allowed. That is, we take a feeler gauge 0.35 mm thick and insert it between the shaft cam and the adjusting washer. If the probe moves with little effort, then the gap is normal, but if the probe does not enter or is very loose, then adjustment is required. We do the same check on valve 3, but the gap on it should be 0.2 mm.
- The adjustment of the valves is carried out as follows: we attach the device for pressing the valves to the studs securing the cover. This device has a curved lever that we place between the cam and the washer. Using the handle of the device, we press on this lever, as a result of which it will press on the pusher. This device comes with a special clamp, which we place between the camshaft and the pusher. After releasing the handle, the latch will hold the valve in a squeezed state, while the washer will not be pinched and can be removed with tweezers.
- Let's look at an example of what kind of washer will need to be installed in order for the gap to be correct. For example, when checking the exhaust valve, it was found that it was not 0.35 mm, but 0.42 mm, that is, it was increased by 0.07 mm. Next, remove the washer that was installed. There should be a mark on it indicating its thickness (for example, 3.65 mm); if there is no such mark, then you will have to measure the thickness with a micrometer. Now we add to the thickness of the washer the value by which the gap is increased, in our case - 0.07 mm, as a result we get the value of the thickness of the washer for installation - 3.65 + 0.07 = 3.72 mm. But since a washer with such a thickness is not included in the kit, we install a new washer with a thickness as close as possible to the obtained value, that is, 3.7 mm. This is why an error of 0.05 mm is allowed.
- We install the washer of the required thickness in place with the size mark down (towards the pusher). Next, use the lever of the device to press the valve again and pull out the latch. This completes the adjustment.
- Next, the remaining valves are adjusted, but for this you need to know the order. After checking valves 1 and 3, turn the camshaft half a turn (for ease of installation, we made a mark on the gear in advance) and check valves 2 (intake) and 5 (exhaust). Then we turn it another half turn and adjust 6 (intake) and 8 (exhaust). To check the 4th (intake) and 7th (exhaust) valves, you still need to turn the camshaft half a turn once.
Are the valves knocking on your VAZ 2114? Then it's time to regulate them. And if this is not done, the engine power will decrease, the valve may burn out, and the camshaft may become unbalanced. And many other things can break in the engine. What? Don’t know how to adjust the valves of a VAZ 2114? Then we will help you.
How to organize the replacement of valve stem seals for a VAZ 2110 8-valve car in a garage?
Even an ordinary motorist can easily install new valve seals. If we consider that dismantling the cylinder head is not included in the technological list, then the repair does not present any difficulties at all.
When purchasing spare parts, it is important to pay attention to the internal profile of the seals. Quite often, parts that are not equipped with a reinforcing sleeve have an annular protrusion on the landing plane in their design. During installation it may be damaged, but otherwise the process is no more complicated than changing the damper support on a “ten”.
Preparatory stage
First of all, it is worth noting that replacing valve stem seals on a VAZ 2110 with an 8-valve engine uses the same technology for both carburetor and injection engines. Therefore, the tool set is similar in both cases:
- Set of wrenches and socket wrenches.
- Device for pressing valve springs.
- Mandrel and puller for valve seals.
- Tin rod with a cross section of 7-9 mm.
- Tweezers, hammer, screwdrivers and pliers.
Before starting work, it is advisable to clean the cylinder head with kerosene, after which the air filter, fuel pump and ignition distribution device should be removed. Next, use a No. 5 hexagon to unscrew the screw that secures the auxiliary device drive housing. Be sure to remove the negative terminal from the battery, as well as the toothed pulley from the camshaft.
Preparatory dismantling stage
- Unscrew the nuts securing the cylinder head cover and remove it.
- Unscrew the two nuts securing the ground wires and remove them from the studs.
- Unscrew the two nuts and bolt of the rear cylinder head cover and remove it from the head.
- Alternately loosen the four nuts securing the front camshaft bearing housing and the six rear ones. Remove both housings.
- The key should be removed from the camshaft groove immediately so as not to be lost.
- Dismantle the camshaft and remove the seals from it.
Removing the old seal
This stage of replacing deformed valve stem seals for VAZ 2110 8 valves includes installing the piston where the work is being done to the TDC position. Further actions are performed according to the following scheme:
- Remove the appropriate spark plug and insert a tin rod into the hole to prevent the valve from falling through.
- Using a special tool, compress the valve spring.
- Use tweezers to remove two crackers and remove the device.
- Install a collet to remove the caps and hit the fixture bushing with a hammer. This will allow the seal to be pressed off the bushing.
- Remove the oil seal from the collet. If you don't have a collet, you can use pliers. Do not rotate the seal; this will damage the valve guide.
Installation of a new seal
- Place the cap in the oil and install it in the mandrel.
- Carefully press the oil seal into the lower plate until it stops.
- Install the spring onto the seal. Carry out similar actions with the remaining parts.
- Install the crackers and hit the ends of the valve with a hammer through a metal rod. So the crackers will return to their normal place.
- Lubricate the camshaft cams and journals with oil, and treat the bearing surfaces under the journals in the same way.
- Place the shaft in the supports so that the cams of the first cylinder are directed away from the pushers.
- Treat the area of the outer shaft supports with sealant.
- Install the camshaft bearing housings, then put the washers on the studs and screw the nuts. They need to be tightened in two stages - first until they touch the bearing housings. Then check whether the guide bushings fit into the corresponding holes in the bearing housings. Only then finally tighten the nuts in order.
Final stage
The replacement of oil seals on a VAZ 2110 8-valve car is completed by installing camshaft seals. Be sure to check the clearances in the valve drive assembly. At the end of the process, all hoses and wires are installed in the reverse order.
If there is a suspicion that the car has been driven on faulty seals for quite a long time, then the experts recommend making repairs by dismantling the cylinder head. This will allow you to perform a full repair with thorough cleaning of engine components from carbon deposits.
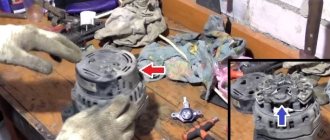
The pump on the VAZ 2110 is a pump that distils coolant. This is an important element of the engine cooling system. The device is necessary for pumping coolant, which ensures coolant circulation through the circuits.
The structural elements of the pump are:
- Bearing;
- Impeller;
- Frame;
- Drive gears.
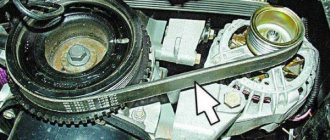
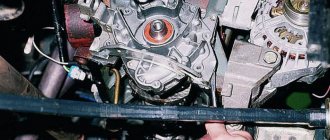
On a VAZ 2110, the pump is located to the right of the cylinder block in the direction of travel under the timing belt cover. The pump operates by rotating the timing belt, which drives the drive gear.
Dismantling the cylinder head
First of all, to get to the cylinder head, you need to remove the cylinder head cover. For different 16-valve engines, this operation is different, and the cover part numbers also look different: 2112-1003260 (-10) and 21124-1003260.
Engine cover VAZ-21124 (1.6 l)
You will also need to remove the timing belt - there are no differences between different engines.
Let's look at how the exhaust manifold can be detached from the cylinder head. On engine 21120:
- Remove the exhaust pipe of the muffler: unscrew two nuts 1 (key “13”), remove the clamping bar, unscrew six nuts 2 (key “14”) and dismantle, not forgetting to turn off the oxygen sensor.
The photo shows three of the six nuts. Elements of the exhaust pipe - Using a “13” wrench, unscrew three nuts 1 to remove screen 4. The bracket holding the hose with antifreeze is moved to the side (two nuts are unscrewed one turn). The screen hides from us 8 nuts that press the manifold to the engine.
They are unscrewed and manifold 2 is dismantled. Everything important is under the screen
Now we will talk about engine 21124:
- Disable both oxygen sensors. We unscrew the three nuts securing the protective screen (with a 10mm wrench) and disassemble the bracket by unscrewing the four nuts with a 13mm wrench.
How to disassemble the mounting bracket - We disconnect the additional muffler and the exhaust pipe.
We also get rid of the bracket holding the hose with antifreeze (see above). Operation with additional muffler - At the last step, unscrew the 8 “13” nuts holding the manifold to the engine.
Here we believed that the VUT hose was disconnected from the intake module. Finally, the spark plugs are unscrewed on any of the engines (a “16” tubular wrench).
The tightening torques for the mounting screws are given in another text. In general, on VAZ-2112 hatchbacks, cylinder head repairs begin by replacing the “extended” screws with new ones. The length should be 95mm or less.
The order of unscrewing (left) and tightening the mounting screws
Breakdown and signs
There are several characteristic signs based on which you can recognize the failure of the coolant pump:
- A hum or a rustling sound appears near the timing drive;
- There are traces of coolant leakage from the pump seat;
- Mechanical damage occurred to the belt - cracked, delaminated, teeth broke;
- The engine began to overheat excessively;
- The coolant level drops below normal, even when topping up;
- Liquid does not circulate well through the system.
Most often the pump fails due to bearing failure. It, in turn, breaks due to wear or incorrect installation of the timing belt tension. If such problems are found, the pump must be completely replaced.
Consequences of ignoring
If you ignore a pump breakdown and do not take any action to repair or replace it, this can lead to dire consequences. Namely:
- The timing belt is damaged or broken. It will then have to be repaired, the cylinder head, gas distribution mechanism, and piston group must be replaced;
- The motor is overheating. Because of this, all rubber connection elements of the engine cooling system, cylinder head gasket, valve cover, and rubber components of the piston group can be destroyed.
The current cost of a new pump is up to 1000 rubles. And the price for replacement services at a service station is another 1,000 rubles. If you don’t want to spend that kind of money on a car service, then you can easily do the replacement yourself.
Purchase rules
If you are going to change the pump, then first you have to purchase a new part. To choose it, follow a few simple rules.
Necessary parts and tools for repair
Troubleshooting the cylinder head begins with the purchase of original parts and various consumables, the list of which is as follows:
- Fuel intake system valve 8 pcs. (art. 21120-1007010).
- Exhaust gas valve 8 pcs. (art. 21120-1007012).
- Set of hydraulic compensators 16 pcs. (art. 21120-1007300).
- Gaskets for valve cover, cylinder head, intake manifold, exhaust manifold (all come as a set art. 21120-1002064-86).
- Bolts securing the cylinder head to the engine crankcase (art. 21120-1003271-018).
- Timing belt (art. 2112-1006040-02RU), timing tension roller (art. KT100507/100513), drive belt for mounted units (art. BP638).
- Engine oil and oil filter.
- Cooling system fluid.
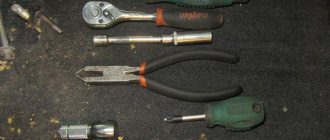
Installation of valves on a VAZ 2112 is carried out using a standard set of tools, as well as several specialized types of keys:
- standard set of spanners from 8 to 24 mm;
- socket sockets in a set from 8 to 27 mm;
- end internal hexagons;
- mechanical valve retaining ring remover (depressurizer);
- torque wrench for tightening the cylinder head and camshaft bolts;
- paste for grinding valves (set for rough and fine grinding);
- metalworking cloth gloves to protect hands while working.
The work of replacing 16 valves on a VAZ 2112, the price of which as of this fall is about 50 thousand rubles at AvtoVAZ dealerships (or approximately 35-40 thousand rubles at ordinary car repair shops), is not a very complicated process. You can carry out the work yourself, for which it is enough to purchase the above-described spare parts and the necessary tools.
Replacement
Having purchased a new coolant pump, you can begin the replacement procedure.
The VAZ 2110 works in conjunction with 8 valve and 16 valve power units. Despite there being a certain difference between them, the pump replacement procedure is identical.
Dismantling works
The instructions below are relevant for dozens with two types of motors.
- Place the car on a level area above a hole or on an overpass.
- Lift the hood, remove the negative terminal from the battery, which will turn off the power to the car.
- Unscrew the cap of the coolant expansion tank. This will relieve excess pressure in the system.
- Now get down under the car.
- Place a clean container with a volume of at least 5 liters under the cylinder block.
- Unscrew the coolant drain plug using a 13mm wrench, which will allow you to drain the coolant. Be careful, unlike oil, you need to drain the coolant when the engine is cool.
- When all the coolant is out, screw the plug back into place.
- Using a 10mm wrench, unscrew the three mounting bolts that hold the timing case in place.
- Remove the casing.
- Place the crankshaft at TDC of the first cylinder - top dead center. To do this, you need to turn off the gear and turn the special bolt that holds the generator pulley to 19 with a key. Turn until the marks on the camshaft gear align with the mark on the rear timing case.
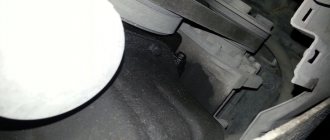
- Make sure that the marks on the flywheel and clutch housing match. To do this, you will have to remove the plug on the crankcase. It is made of rubber and is located to the right of the cylinder block.
- Lock the crankshaft in this position. You can use a simple slotted screwdriver that fits into the teeth of the flywheel.
- Slightly loosen the tension roller locking nut using a 17mm wrench.
- Turn the roller using a special wrench in a counterclockwise direction. This way you can loosen the tension level of the timing belt.
- Now you can quite easily dismantle the tension roller and belt.
- The next step is to remove the five mounting bolts that hold the lower timing case in place. These include 3 bolts that hold the pump. You will need a socket wrench or a 10mm socket.
- The casing can then be removed.
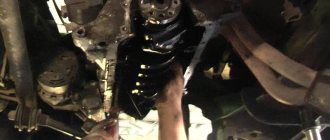
- The VAZ 2110 provides for installation of a pump using three hexagon bolts. Once you unscrew them, you can simply carefully remove the pump by tapping on the body.
- If that doesn't work, then use a flathead screwdriver to pry up the coolant pump housing, which will allow you to remove the pump.
- Remove traces of the old gasket that should remain on the surfaces of the seats.
Changing the gasket
- The gasket is lubricated on both sides using a special automotive sealant. The prepared and processed new gasket is placed on the body of the new pump.
- The new pump is installed in its rightful place, taking the baton from the old coolant supercharger.
Before installing a new coolant pump, make sure that it rotates normally and does not jam anywhere.
Reassembly nuances
- Reinstall the new coolant pump;
- Replace the casing;
- Fix the camshaft pulleys;
- Return the timing belt to its rightful place;
- The belt must be put on, focusing on the marks on the camshaft and crankshaft;
- Pull the belt using the tension roller and eccentric to the desired level;
- Turn the engine over several times to check that the marks match;
- Adjust the position and tension of the belt in accordance with the standards;
- Install the outer casing of the device;
- Replace the terminal from the adsorber;
- Add coolant to the required level.
Replacing the pump is an excellent reason to change the coolant at the same time. If you plan to do this in advance, you don’t have to pay special attention to the cleanliness of the container for draining the coolant.
If the pump fails some time after the coolant was changed, it is better to fill it back after the repair is completed. Still, buying a new coolant is not the cheapest thing. Learn to save wisely on repairs.
By properly organizing the replacement of the pump on your VAZ 2110, you can save a decent amount of money, plus improve your skills. On average, the work takes about 3 hours. If you follow the instructions, no pitfalls should arise during the repair process.
Next we look at how to replace the intake or exhaust valve on the 21120 engine. The engine was installed on cars of the “tenth” family, including the VAZ-2112. Our method involves removing the cylinder head. In general, on VAZ-2112 engines, replacing valves does not have the features characteristic of some foreign cars. The only thing is that it is recommended to grind the valves. The advice applies to all VAZ engines, but decide for yourself whether to use it or not.
The method of using lapping paste is shown in the video. Let's see.
How to change it yourself?
Replacing the cylinder head gasket in a VAZ 2112 16 valves with your own hands is a rather complicated procedure. You need to change the head seal yourself if you have certain knowledge and experience.
If you read the instructions below, then taking into account all the nuances, you can independently replace the seal on a 16-valve VAZ 2112.
Tools and materials
So, if we change the gasket with our own hands, before performing the task we prepare the following:
- set of spanners;
- fresh engine oil and coolant if consumables are mixed;
- a torque wrench, it will be used to tighten the cylinder head bolts;
- container for collecting waste liquid;
- two screwdrivers - with a Phillips and a flat tip;
- clean rags.
The Basile Fomin channel published a video demonstrating the procedure for replacing the head gasket in a VAZ 2112 engine.
Algorithm of actions
Below we will look at how to remove and install the cylinder head in a VAZ 2112 car to repair the gasket:
- The car is driven into a garage with a pit or onto an overpass. You will need easy access to the bottom of the car.
- Open the hood of the car and turn off the power to the on-board network; to do this, use a wrench to loosen the bolt on the negative terminal of the battery and remove it.
- The coolant is poured into a pre-prepared container; to do this, the drain plug is unscrewed.
- If the replacement procedure is performed immediately after a trip, then you should relieve the pressure in the vehicle's fuel line. To do this, press down on the latch and disconnect the cables connected to the fuel pump.
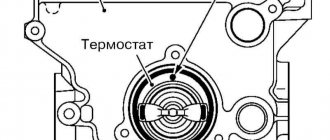
- Then the intake manifold of the exhaust system is disconnected from the exhaust manifold. The thermostat is being dismantled. To do this, loosen the fastening clamps on the pipes and disconnect them.
- When the nuts securing the bracket are unscrewed, it must be moved to the side. The cylinder head with camshafts is dismantled. To do this, use a torque wrench to unscrew all the bolts securing the cylinder head. With the head, the housing of the bearing devices and the fuel rail are removed.
- After this, the engine fluid pressure controller in the power unit, as well as the DPKV, are removed. First, you must disconnect the connectors with wires from these devices.
- Loosen the tension roller screw and remove the timing belt. The toothed pulley on which the strap is mounted must be secured to prevent it from turning. Unscrew the fixing screw and remove it with the washer.
- Then, using the prepared screwdrivers, remove the disc from the camshaft.
- Disconnect all cooling system lines from the car engine, remove the antifreeze temperature controller in the engine. Remove all screws securing the head and washers. The device with the old gasket is removed. The surfaces at the point of contact of the head with the block are cleaned from residual sealing gum and dirt to prevent them from entering the power unit. Clean the threaded holes to remove any remaining coolant and lubricant.
- A new gasket is being installed along the guide elements. Please note that the hole for the intake of engine fluid must be installed as in the image below.
- Before installing the BC head, you must make sure that all marks on the shafts match.
- After installing the cylinder head, the bolts securing it are tightened. The screws are tightened in a certain sequence, as shown in the diagram - first the central parts, then the side ones. The stretching procedure is carried out in several stages. First, all bolts are tightened with a force of 20 Nm. Then the screws must be tightened with a torque wrench to 70-85 Nm. It is important that the moment of force is the same for all bolts. Next, each screw is tightened 90 degrees, and after all the parts are tightened, they must be turned again 90 degrees. To tighten, be sure to use a torque wrench, since it will not be possible to install the bolts correctly and tighten them without this tool.
- The procedure for assembling all components and connecting the lines is performed in reverse order. When the installation is completed, the valves are adjusted and the timing belt is tightened.
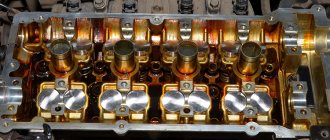
Sectional view of the valve mechanism
Replacing valves on a VAZ-2112 includes all the actions carried out when replacing hydraulic compensators. Having removed the compensator, you can see the valve stem and the upper plane of the disc. Plate 3 is held by two crackers 2 (see diagram).
Dismantling includes the following steps:
- A “soft stop” (braided rope, etc.) is placed under the valve from below;
- Press down on the plate from above;
- The crackers are removed with tweezers or a magnetized screwdriver;
- Carefully move the plate upward, preventing the spring from rebounding.
Sometimes in “step 2” you have to hit the plate with a hammer, and here you need to be extremely careful. In general, there is special equipment, such as shown in the photo.
The puller works on the principle of a vice. But the force when screwing should be small, otherwise they conclude that the crackers “stick” to the plate. And in this case, take a hammer.
Articles
- 21120-1007010 – inlet valve;
- 21120-1007012 – exhaust valve;
- 21120-1007028 – cracker;
- 21120-1007025 – upper plate;
- 21120-1007300 – hydraulic compensator (about checking them here).
Advantages of a 16-valve engine
The VAZ 2112 with 16 engine valves has a number of advantages over cars of the same brand, but with fewer valves. Its main advantage is the ability to achieve maximum engine power, regardless of the type of the latter. (see picture).
For comparison:
- VAZ 2112 with a volume of 1500 cubic cm, has 77 horsepower.
- A VAZ 2112 of the same volume can have a power of up to 90 horsepower.
This difference is possible due to the fact that in the second case the filling of the cylinders with the warm-air mixture is much higher.
In addition, the advantages of the 16-valve engine:
- Better performance of the cooling system and, as a result, greater strength of the unit.
- Possibility of increasing engine knock resistance. This is especially important if low quality fuel is used.
- With 16 valves, the intake and exhaust tracts are located on opposite sides of the cylinder head, which facilitates their installation, repair, etc.
Preparing to remove valves
However, on a VAZ-2112 engine it is easier to replace valves by dismantling the cylinder head: to press in new guides, the cylinder head plate would have to be heated. It's best to leave the valve guides in place. But then you will have to remove different equipment:
- There is a connector under the fuel pump hatch (photos 1 and 2). Turn it off so that the fuel pump stops pumping;
- Start the engine and let it stall;
- Remove the air filter: loosen clamps 1 and 2 and disconnect connector 3 (photo 3). Then use a 10mm wrench to unscrew the screw (photo 4).
All actions are illustrated by one photo.
Remove the plastic filter housing along with the supply hose.
Disassembling the timing mechanism
Our goal is to remove both camshafts. On the VAZ-2112 engine, valve replacement can be performed even without removing the cylinder head. But the shafts will interfere in any case. Procedure:
- The negative terminal is disconnected from the battery;
- Remove the wires from the spark plugs, then disconnect them from the coils;
- The ignition module must also be removed (photo 2), and the crankcase ventilation hose must also be removed (photo 3);
- The bracket securing the injector wiring is screwed to the cylinder head cover (photo 3). Remove it! The same is done with the bracket of the second harness (DPZ and IAC);
- You will need to remove the receiver (photo 4). And the intake manifold holes are covered with fabric.
Study what the list says.
The cover itself is held in place by 14 bolts. A socket wrench is needed here. But first, let’s remove the plastic protection by unscrewing the six bolts with a 10mm wrench (photo 1).
Disconnect and remove the phase sensor under the right timing pulley. It is also necessary to disconnect the pressure sensor - it is located near the bracket that was removed. Using a 17mm wrench, without turning the pulleys, loosen the two mounting screws. A screwdriver is installed in the round holes - it is used as a stop. It remains to loosen the belt tension by partially unscrewing one nut (photo 3).
At the final step, after removing the belt, unscrew the screws on the pulleys. Each pulley is removed from the shaft. Then tighten three screws located flush with the pulleys (screws on plastic).
To remove the shaft, follow these steps:
- Remove the cylinder head cover;
- Unscrew 20 bolts (photo 1);
- Using two 15mm wrenches, unscrew the nut on the upper rod (photo 2). Do the same with the three nuts on the rod bracket (key “13”). The bracket is removed from the studs;
- Dismantle the bearing housing (photo 4);
- Now both camshafts can be removed (photo 5).
The meaning of what has been said is clear from the photo.
Hydraulics, that is, compensators, can be easily pulled out with a magnet.
Removing the cylinder head on a VAZ-21120 engine
We need to get rid of the fuel rail: use the “17” keys to unscrew pipes 2 and 3 (photo 1), and also remove clamp 1.
The screws on the bar with the fuel line are unscrewed with a screwdriver. Then the rubber rings are removed from the pipes. You will also need to remove the tube with the oil dipstick - here you unscrew one “10” screw (photo 2). Finally, the two ramp mounting bolts are removed.
The main thing is to partially drain the coolant. Then top it up! Now unscrew the two nuts on the thermostat (photo 1) to move it to the side.
The thermostat gasket is also removed. Using a “13” wrench, unscrew the nut with the “zero” wire. You can also disconnect the connector of the DTOZH sensor.
The VAZ-2112 engine is ready to replace the valves: use a “10” wrench to unscrew the bolts on the cylinder head and remove the plate along with the valves. Follow the turning sequence. Similarly, observe the sequence and tightening torque when assembling the cylinder head.
Next, the actions specified in “Chapter 1” are carried out. We wish you success!
The process of replacing hydraulic compensators on a 16-valve valve
Hydraulic compensators produced by AvtoVAZ
So, if the diagnostics showed that the hydraulic compensators are out of order, then we replace them. Of course, first of all, you need to buy new ones. Now, consider the sequential replacement process:
- We dismantle the upper protective cover.
- We remove the receiver.
- Now, it is necessary to dismantle the ignition module.
- Disconnect the crankcase ventilation hose.
- Using a 10mm wrench, we dismantle the injector wiring harness bracket.
- We dismantle the valve cover.
- Now, you need to carry out diagnostics and press on the drifts.
- Next, we dismantle the camshaft pulleys.
- Disconnect the oil pressure sensor wires.
- Remove the bolts that secure the camshaft bearing housing.
- We dismantle the rear support of the power unit.
- Now, you need to remove the camshaft bearing housing.
- The spark plug wells need to be removed from the housing. Inspect them for the presence of oil.
- We dismantle the camshafts assembled with oil seals.
- Remove the plugs that are located on the head and camshaft housing.
- We remove the hydraulic compensator from the cylinder head.
- Lubricate the bearing journals and cams.
- We install new hydraulic compensators.
- We carry out the assembly in the reverse order, observing the order and tightening torque of the cylinder head.
If the replacement is correct, then after assembly and the first start of the engine, nothing should knock. If the knock remains, you need to disassemble everything again and carry out diagnostics, and then fix the problem.
Selection of hydraulic compensators
The choice of any spare part must be taken quite seriously. Hydraulic compensators are no exception. Let's consider possible options for installing them on the VAZ-2112 series:
- 2112-1007300 is the original catalog number of hydraulic compensators for the VAZ-2112. The cost is 3300 rubles. Manufactured by AvtoVAZ.
- Herzog HL0 7300 is an analog replacement for the original part that can be used for installation on a car. The price is 2700 rubles.
- Master-sport 2112-1007300-SET/16/-MS is one of the options for replacing the original hydraulic compensator made in the Russian Federation. Certified and recommended for installation.
Installation Tips
Before installing the shafts, the piston of the first cylinder must be at the “top dead center”. To achieve this, rotate the crankshaft, grabbing it by the screw securing the generator pulley. Here you need a key “17”.
The camshafts have spikes and the pulleys have grooves. Each pulley is equipped with a mark that should face up. The diagram shown in the photo corresponds to the upper position of piston 1. This is how the shafts are installed during installation.
You can set the crankshaft according to the mark located on the gearbox assembly (photo 1). This is done before installing the belt.
To set the tension correctly, use basic tips. Or you can do it simpler: when dismantling, note at what angle the tension roller was fixed. The key plate (photo 2) is set at the desired angle and the fixing nut is tightened (force 40 N*m).
How to screw the cylinder head
The threaded part of the screws is lubricated with engine oil. Then, maintaining a force of 20 N*m, the screws are tightened in the required order (see photo).
Second pass - each screw is turned at an angle of 90 degrees. On the third pass, the screws are turned another 90 degrees.
Chemistry
The bearing housing will be connected to the cylinder head cover. The connection itself must be airtight. A sealant is applied to the edge of the body around the perimeter: KLT-75M, Loctite-574, etc. During installation, the cylinder head gasket is not lubricated in principle - graphite or grease will only cause harm. Someone smears valve stems with graphite lubricant, which is also not correct. You need to use motor oil.
Before installation, the new valve is cleaned of factory grease. It is necessary!
Device
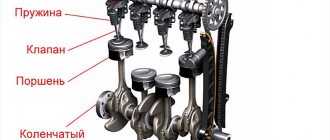
In order to understand why there is a need to adjust the valves, you need to understand a little about the operation of the VAZ 2110. So, when the engine is cold, there is a gap between the cam and the pusher.
It is needed for the so-called compensation of thermal expansion. Simply put, we all know that when heated, all objects tend to expand.
So that there is room for expansion, and the component parts do not break or bend, there are gaps. However, they must be of a strictly defined size, otherwise instead of benefit we will get harm.
Engine device