The uninterrupted operation of the power unit depends on the serviceability of each individual element. If a characteristic metallic knock is noticed during its operation, this is usually caused by wear or rotation of the upper/lower sliding element. In this case, replacing the engine liner is carried out quickly in order to protect the engine from major repairs.
How to replace bearings without removing the engine?
To replace the liners successfully, it is not at all necessary to dismantle the motor. If you are assured that it is impossible to get to them without removing and pulling the engine out of the hood, urgently change the car service center. But be sure to take into account one condition - the crankshaft (CV) should not be worn out. Otherwise, you won’t be able to do without removing the engine and completely disassembling it!
Without dismantling the power unit, it is easier to change the connecting rod bearings; it is more difficult to change the main bearings. For the latter case, you need to loosen the fastenings and release the crankshaft by 10-15 cm. Although there is another method, adopted by our grandfathers from ship motorists. The main bearings are pushed out using a soft rivet or bolt, which is inserted into the desired lubrication passage and rotated clockwise. The main thing is that the size of the aluminum insert should be slightly smaller than the hole and not scratch the crankshaft.
After removing the half rings, it is imperative to evaluate their condition. If there are no visible scuffs or damage, you can get by with a simple replacement. However, if it is very worn, polishing the HF is mandatory. Therefore, you will have to remove it from the mounts, and to do this, pull out the motor.
More information about condition assessment:
- pits or pockets - fatigue wear;
- scratches and ingrained dirt - low-quality motor oil;
- worn surface - insufficient amount of lubricant;
- chamfers on the edge - taper of the necks.
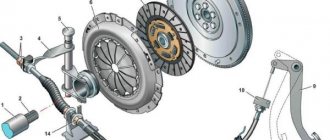
Disassembly and assembly of the VAZ 2109 engine
1- carburetor 2 - valve cover 3 - cylinder head 4 - front cover 5 - water pump 6 - generator 7 - crankshaft pulley 8 - oil pump 9 - drain plug 10 - oil sump 11 - oil filter element 12 - cylinder block 13 — flywheel 14 — fuel pump Caution
Be sure to hold the flywheel. Procedure 1. Place the power unit on strong supports. 2. Unscrew the three starter mounting nuts. 3. Remove the starter.
4. Unscrew the three bolts and nut securing the gearbox to the cylinder block. 5. Carefully remove the gearbox. Make sure that the splined end of the input shaft does not rest on the diaphragm spring petals. 6. Insert the mandrel into the pressure plate opening
You can dismantle the clutch without a mandrel, but you must hold the slave disc - it may fall out of the clutch housing. The mandrel can be made to fit the dimensions of the input shaft or a decrepit input shaft can be used instead.
7. Unscrew the six bolts securing the clutch housing to the flywheel, securing the flywheel with a screwdriver. To limit the screwdriver, install a bolt of suitable diameter. 8. Carefully remove the clutch cover at the same time as the driven disc. 9. Remove the upper cover of the clutch housing from the mounting pins, rotate it and remove it from behind the flywheel 10. Unscrew the six bolts securing the flywheel, securing it from turning. Remove the locking plate while holding the flywheel. 11. Remove the flywheel from the crankshaft. 12. Place the piston of the first cylinder at i.d.t. compression stroke. To do this, turn the crankshaft with a wrench by the bolt until the mark on the crankshaft pulley matches the long mark on the front cover.
13. Remove the wire ends from the spark plugs. 14. Separate the pipeline from the vacuum corrector. 15. Unscrew the three nuts securing the ignition distributor. Remove the bracket for fastening the high-voltage wires.
16. Remove the ignition distributor. 17. Reduce the tightening of the clamp and separate the pipeline from the fuel pump. 18. Unscrew the two nuts securing the fuel pump.
19. Carefully remove the fuel pump so as not to damage the gasket. 20. Carefully remove the heat-insulating spacer with the rod without damaging the adjusting shims. 21. Unscrew the hexagon socket bolt securing the ignition distributor drive housing (auxiliary units).
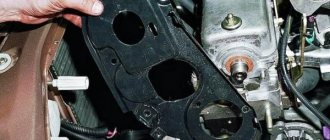
22. Remove the base of the ignition distributor drive (auxiliary units). 23. Unscrew the three bolts securing the front cover. 24. Remove the front cover.
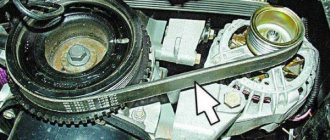
25. Reduce the tightening of the generator mounting nuts. 26. Turn the generator towards the block. 27. Remove the generator drive belt.
28. Unscrew the bolt securing the tension bar to the cylinder block. 29. Completely unscrew the generator mounting nut. 30. Remove the bolt while holding the generator and remove it from the engine.
31. Unscrew the two cap nuts securing the valve covers. 32. Carefully remove the valve cover at the same time as the sealing gasket. 33. Loosen the camshaft pulley mounting bolt, holding it from turning, to do this, press the screwdriver against the rear cover mounting stud.
Replacement procedure and marking of liners
Below are instructions for independent work. Replacing the engine liner will be faster and easier if you do it consistently.
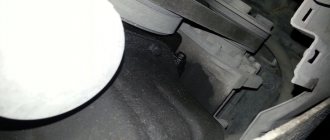
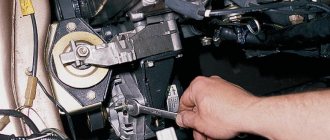
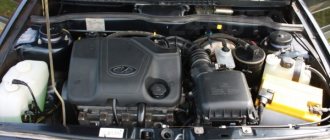
- Place the car in a repair pit. Remove the power unit protective cover, if present. Place a jack under one of the drive wheels. Be sure to drain the engine oil.
- Remove exhaust pants and other components that interfere with work from below. Also unscrew the suspensions connecting the engine to the gearbox. Loosen the camshaft chain, remove the starter, and on some cars, the beam.
- Remove the oil pan bolts, nuts and studs.
- Rotate the wheel to move the connecting rods to the most convenient position for unscrewing the bolts. They are tightened with a force of approximately 3 kg, so you need to select the appropriate tool (usually a socket of the appropriate size with an extension). After tearing off the pins, you can continue to unscrew them by hand.
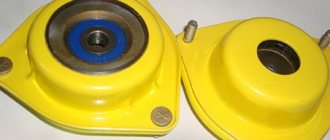
- Remove the half rings along with the connecting rod caps by pulling down. Be sure to check the condition of the internal surfaces of the half rings.
- Pull out the main bearings using a pusher - a bolt of a suitable size or rivet.
- Install a new set of half rings, tighten and reassemble everything in reverse order.
For quick installation of half rings, the connecting rod is completely raised up, moved to the side and lowered. Now nothing will interfere with the work, the sliding element can be inserted faster. Then the connecting rod is put in place.
It is important to tighten the fastener bolts tightly so that they do not loosen after the car has been driven for a long time and cause a malfunction, such as spinning. To do this, tightening is carried out at a specific moment:
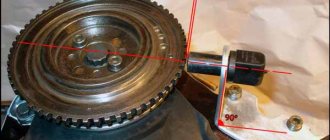
Dimensions
You need to know the dimensional parameters in order to ensure proper interference and correctly install the main bearings. The dimensions of these elements are selected based on the diameter of the bed. According to this parameter, the liners are divided into size groups, the designation of which is contained in the marking.
Based on size, the main ones are divided into nominal and repair ones. There are four repair sizes with a difference of 0.25 mm. They are used if replacement is carried out for a ground crankshaft in accordance with its dimensions.
When is it necessary to replace crankshaft bearings?
The HF engine experiences heavy loads. Just look at the vibration on the axis, which invariably occurs during the operation of the crankshaft. It is clear that the sliding bearings also suffer, because they take the blow first.
- Physical wear is the main reason when an engine liner needs to be replaced. The surfaces of parts wear out, backlash and vibration increase. Naturally, in such conditions the engine is in danger of knocking.
- Rotation is the second reason. More details about this are written below.
Thus, replacement of liners is required in several cases. Problems can be judged by various signs. For example, by the absence or presence of abrasive inside the lubricant. Also, a symptom of half-ring wear is low interference when installing the connecting rod cap.
Regarding factors that lead to wear or turning:
- dirty or too viscous lubricant - impurities and abrasive particles reduce the properties of the lubricant, and in general its cleanliness is one of the key rules of prevention;
- constant overload of the internal combustion engine - you cannot drive for a long time at high speeds, from time to time you need to pause, slowing down to 80-90 km/h;
- incorrect installation of half rings during a previous repair - as a rule, this occurs due to weak tension (insufficient clamping torque), so tightening must be carried out using a torque wrench.
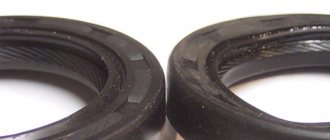
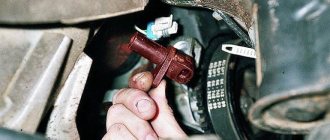
Causes of leakage. Determining the location of the leak
The reason for the leak is that the oil seal is skewed
An oil seal can leak for several reasons:
- Natural wear and tear. In previous articles I explained how you can remove the engine from a VAZ 2109 without removing the gearbox and disassemble it yourself at home. No matter how carefully the elements of the crank mechanism (CCM) are adjusted to each other, the crankshaft still vibrates during rotation, which leads to wear on the inner surface of the oil seal. how to change the front pads on a Kia Rio 2014? Everything is very simple, you don’t need to contact. Because of this, it no longer fits tightly to the shaft and lubricant leaks out through the gap;
- Loss of elasticity. This happens due to the rubber drying out, it becomes “tanned” and the tightness of the seal decreases;
- Installation is skewed. Incorrect installation leads to the appearance of leaks through which lubricant under pressure leaks;
- Low quality rubber element installed when replacing a leaking oil seal. There are many fake spare parts on the market and the likelihood of purchasing a defective product is high.
Since the oil seal is located in a place where inspection is not very convenient, the problem is judged by traces of oil under the car and severe contamination of the lower part of the engine. But it is worth noting that lubricant can also leak in other places - from under the pan gasket, oil filter. Therefore, before eliminating a leak, it is necessary to carefully inspect the lower part of the power unit in order to accurately determine the location of the leak.
This can be done on an overpass or inspection hole, after first dismantling the crankcase protection (if there is one). In the case where it is impossible to determine the location of the leak due to severe contamination, the bottom of the engine is cleaned, and then, after a short trip, everything is inspected again. Dust will stick to the leak site, which is used to determine the location of the leak.
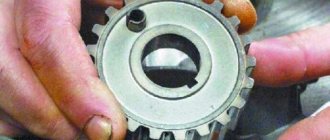
Rotated liners: what does this mean and why do they rotate?
Rotating the engine bearings is a change in their position relative to the crankshaft journal or block. As mentioned above, this is caused by the colossal loads to which the parts are subjected. Shifting the bearings from their place immediately negatively affects the flow of oil. His pressure worsens, starvation begins and the power unit is destroyed. And all because the half rings are equipped with holes that must clearly coincide with the channels for the passage of lubricant.
The main reasons for cranking
There are several known reasons that cause elements to rotate:
- banal wear - the end parts of the sliding bearings wear out (support collars, stops, antennae), which are no longer able to hold the parts in one place;
- weak, incorrect fixation of the covers - the half-rings must be tightened with a certain torque specified in the passport data.
And of course, this arises due to a violation of the design operating conditions of the plain bearings themselves. In other words, due to a large and uneven load. This happens especially often with half rings with weak tension.
Rotating sliding parts can cause big troubles and therefore requires urgent intervention. The most dangerous is the shift of the main bearings. In this case, the power unit will definitely need an expensive overhaul.
It is noteworthy that when the connecting rod half ring rotates, it is simply updated. However, it is wrong to do so - because the resource of the mating connecting rod-pin pair in this case is reduced by almost 70%. Therefore, it is necessary to replace the connecting rod itself, in which a broken lock can often be found. And the most optimal method of repair is considered to be boring the crankshaft and replacing the complete liners, along with the connecting rods.
Crankshaft faults
Let's look at typical crankshaft faults:
- crankshaft seal leaks;
- “oil starvation” of working surfaces;
- mechanical damage to crankshafts;
- natural physical wear and tear;
- abnormal increased physical wear and tear.
As a rule, the first thing motorists encounter is oil leakage from rubber seals (crankshaft seals). This is a widespread problem on used engines. A leaking oil seal requires replacement. In some cases, replacing the oil with a more viscous one will help stop the leak for a while.
For crankshafts, as for other engine parts, “oil starvation” is the most dangerous. The cause may be a broken oil pump, a clogged oil supply channel, or low engine oil level. This leads to increased bearing friction and heating of the elements. Continued operation of the engine in this mode will lead to its overheating, complete seizure and major repairs. A “wedge” while running can lead to critical damage to the shaft or other engine components.
Water and fuel getting into the oil change its chemical composition. composition and degree of viscosity. The reason may be significant wear of the cylinder-piston group, damaged gasket structure, microcracks in the engine block or cylinder head.
Over time, the journals and bearings wear out, the permissible clearance increases, crankshaft play appears, this leads to an increase in vibrations, and the engine begins to “knock.” The characteristic engine knock is a critical signal. When it appears, you must stop driving and immediately contact a car service center. If the crankshaft is unbalanced or improperly mounted, increased, abnormal wear on the contact surfaces may occur.
Selection of crankshaft liners
In most cases, the selection is entrusted to a specialist. But after studying the information in detail, you will be able to do this on your own. In addition to the fact that it is necessary to combine spare parts with the car model, the general condition of the vehicle is also taken into account.
Selection of main liners
Some useful recommendations for selecting a new HF when replacing the crankshaft liners:
- it is better to buy basic elements of the same color as the standard ones (used, old);
- Be sure to check the markings directly on the shaft.
A special identification color selection card is issued for main bearings. For example, for a 4-cylinder engine, the markings applied to the BC and the CV assembly are used. If marked C3, then you can install yellow and green elements. More details about the colors in the picture below.
And this is an identification card for 6-cylinder engines.
Selection of connecting rod bearings
And here, if the HF is new, the plain bearings are selected according to the diagram. If the color code is lost, you need to look at the markings on the connecting rod caps.
Below is an identification card for selecting connecting rod half rings for four-cylinder power units.
And this is the color map for 6-cylinder units.
The choice of bearings also depends on the antifriction coating. As a rule, it consists of several layers:
- biometallic with a steel base (1-4 mm) - lead, copper, zinc, tin, silicon and aluminum;
- trimetallic - lead, tin, copper.
Use the correct engine oil that meets all the requirements and approvals of the engine manufacturer. It is also necessary to update the filter promptly to prevent abrasive particles from entering the lubricant. It is also not recommended to overload the engine. All this will extend the service life of the liners by almost 2-3 times.
Sometimes a car requires very minor repairs, just replacing the liners, but is it really necessary to remove the engine, look for a hoist or several assistants for such a simple procedure? When it comes to such a need, replacing the liners without removing the engine will help. This simple type of repair does not require a large number of tools, but it does require some skill, so you should immediately evaluate your skills.
Why does this happen and how to avoid it?
- The lubricant was too viscous or there was too little of it. Abrasive got into the lubricant and disrupted the smooth running. Lubricant cleanliness is one of the key parameters for preventing any breakdown; it is better to change it regularly every 60-80 thousand km. mileage
- The motor was constantly operating in overload mode. You should not constantly “strain” the engine at high speeds and drive the car for a long time without slowing down.
- When installing previous bearings, the interference was too low. Check everything yourself, tighten the bolts well, it is better to use special equipment.
How to replace bearings without removing the engine?
Many car owners think and write on forums that it is impossible to get to the liners without removing or removing them from the engine hood. However, such operations are carried out by repairmen on ships, where the size of the parts is enormous and too much force is required to remove the engine. And if the technique exists, it can be used for simple cars.
- Park the vehicle on a ramp to gain easy access to the engine. If there is protection installed on it, it should be removed and the lubricant drained.
- Remove the box, front cover and loosen the camshaft chain in advance. If you're not too lazy, it's better to remove it entirely so it doesn't interfere.
- Remove the starter and pan (if the beam does not interfere). If it interferes with operation, you will have to lift the motor and pull out the pan from under it.
- You now have access to the crankshaft. The easiest way is to replace the connecting rod bearings. The old bearings are pulled out after unscrewing the head screws; it’s easy to put new ones in place, just don’t forget to lubricate them well with the same engine oil that is in your engine.
- It is more difficult to replace the main bearings without removing the engine. You will need to lower the crankshaft by loosening its fastening. You don’t need to lower it much, ten, maximum fifteen centimeters.
- Now it will be easier to pull out the earbuds. But you will need an aluminum rivet, which must be inserted into the lubrication hole, so it will push the bearing out. The main thing is that the size of the rivet is suitable and does not scratch the crankshaft.