Functions, structure and location of the VAZ 2110–12 oil pump
The engine lubrication system is designed to timely supply engine oil to the moving and hottest elements of the power unit. Oil is supplied from the sump and circulates through special channels inside the block and cylinder head. The oil pump ensures forced circulation of the lubricant.
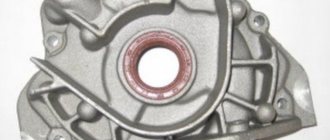
Location of the oil pump on the VAZ 2110–12
On the VAZ 2110–12, the oil pump is located in the lower right corner of the cylinder block under the crankshaft gear, which drives the gas distribution mechanism.
The oil pump is located in the lower right corner of the engine under the crankshaft gear
This applies to both eight and sixteen valve engines. The pump housing is also the side cover of the power unit.
Oil pump device
The design of the oil pump is very simple and includes the following elements:
- housing with lid;
- driving and driven gears;
- pressure reducing valve with spring;
- oil receiver
The oil pump has a simple design based on two gears
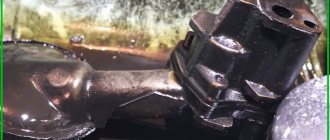
Operating principle of the oil pump
The pump is driven by the crankshaft through the drive gear. The latter rotates the driven gear, creating a reduced pressure at the input of the device and increased pressure at the output. Thus, oil from the crankcase flows through the oil receiver tube into the pump, and from it into the engine oil line. When the pressure inside the pump begins to exceed the permissible value, a spring-loaded pressure relief valve drains excess oil back into the sump.
Oil pump disassembly instructions
Replacing the oil pump VAZ 2107
To determine the nature of the malfunction, the removed pump must be disassembled:
- We remove the gasket.
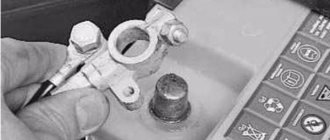
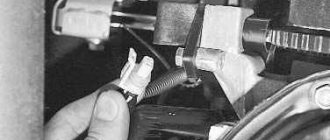
- First, unscrew the bolt (1) and remove the sensor that registers the crankshaft position (2) (Photo No. 2), which is present on engines with a fuel injection mechanism.
Photo No. 2, Remove the sensor, unscrew the cover fasteners and remove the cover
- Unscrew the six bolts and remove the pump cover.
- Using two screwdrivers, lift the pump body so that the pins on its body can freely come out of the holes in the pump cover.
- Now we remove the body itself and disconnect it from the cover.
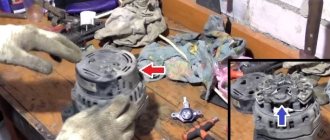
- We remove the pump gears from the cover - first the drive gear, followed by the driven gear.
We take out the drive and driven gears
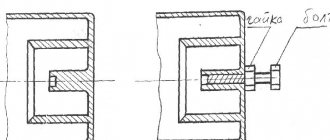
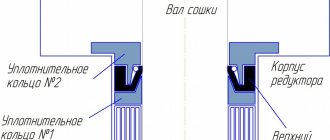
Now unscrew the plug (cover) of the pressure reducing valve. There is an O-ring underneath.
Unscrew the pressure reducing valve plug
- We inspect the ring - if it is too squeezed out or if it is damaged, we must replace it.
- We take out the pressure reducing valve spring.
- Now we take out the valve itself, tapping (gently) the body on a wooden stand (the stand must be clean).
- If the valve is stuck, remove it using a thin and pointed object, preferably also wooden, otherwise the surface may be damaged.
- Now let's carefully inspect the aluminum cover. If signs of wear, mechanical damage or deep scratches are detected where the gears are adjacent, we must replace the cover with a new one.
- We carry out further repairs of the pump by inspecting its housing. Signs of wear, such as scuffing and mechanical damage, are not allowed on the body (working) surfaces. Having discovered them, we replace the case without hesitation.
- The dimensions of the maximum acceptable diameter of the socket for the driven gear are 75.1 millimeters, so we measure the diameter; if it is larger than acceptable, we will have to change the housing.
- Now we measure the width of the body fragment in its middle part. If the measured value is less than 3.4 millimeters, the pump housing must also be replaced.
- We measure the thickness of the gears. According to technical requirements, the thickness of the leader must be at least 7.42 millimeters. If suddenly it’s less, we change the gear.
- The same operation with the driven gear. If its thickness is less than 7.35 millimeters, it must also be replaced.
- Now we move on to checking the axial clearances of the gears.
We check the axial clearances of the gears with a ruler and feeler gauge
- We install the drive gear back into the housing, then apply a steel ruler to the housing and, using a feeler gauge, measure the gap between the ruler and the gear.
- In the same way, we measure the gap between the ruler and the second (driven) gear. For gears - driving and driven, the maximum permissible axial clearances are 0.12 mm and 0.15 mm, respectively.
- If the gaps exceed these values, the gears must be replaced.
- Using calculations, you can obtain more accurate values for the size of the gaps.
- To do this, use a micrometer to measure the thickness of the pump housing along all external surfaces.
- We measure the thickness of the metal in the area of the sockets for both gears using milled surfaces, always at several points.
- We calculate the axial clearance by finding the difference between the arithmetic mean values: the resulting thickness of the gears and the depth of the socket.
- The next step is to inspect the seat of the pressure reducing valve itself. If we find rough scratches and other deep mechanical damage on the inner surface of the socket, replace the cover.
- Having discovered scuffs or deep scratches on the pressure reducing valve, we also replace it with a new one.
- We replace a bent, cracked or broken spring.
- The free height of the spring should be 44.72 millimeters. The height of the spring under a load of 4±0.24 kgf should be 31.7 millimeters. If there is a discrepancy, replace the spring.
Assembling the pump:
- We install the driven gear to the housing with chamfers on the teeth.
- We also apply the chamfers on the teeth to the housing of the drive gear.
- Before installation, lubricate the gears with engine oil.
- Then we install the pump cover on the housing and tighten the fastening bolts.
- Lubricate the pressure relief valve before installation.
- We install it in the nest, always bottom down.
- Then install the spring and screw in the plug with the O-ring, also pre-lubricated.
- Pour engine oil into the unit through the oil receiver tube.
- At the end of complete assembly, turn the pump gears a couple of full turns so that all working surfaces of the gears are thoroughly lubricated.
Now we have completed the repair of the pump, install it in place according to the instructions.
Tuning
The manufacturer AvtoVAZ provides a minimum of 50 hp for all its engines. s, so the 21124 engine can be modified in several ways:
- tuning of the cylinder block - boring of cylinders to 84 - 88 mm using ShPG of the appropriate sizes;
- tuning of the intake/exhaust tract – 4 throttles and “spider”, respectively;
- modification of the cylinder head - lightweight camshafts and split gear with appropriate tuning by a specialist;
- modernization of valves - replacement of standard equipment with lightweight T-shaped parts.
Separate throttle for each cylinder
Thus, engine 21124 is an improved version of the basic internal combustion engine 2112 with the volume, piston stroke and height of the cylinder block increased to 1.6 liters. The developers have ensured the interchangeability of parts from other engines from the AvtoVAZ manufacturer.
If you have any questions, leave them in the comments below the article. We or our visitors will be happy to answer them
Troubleshooting
Direct connection of the pump to the crankshaft avoids damage associated with its drive. This, however, does not exclude the possibility of other malfunctions.
Pump malfunctions and their symptoms
The main malfunctions of the VAZ 2110–12 oil pump include:
- clogging of the oil receiver mesh;
- damage to the device body;
- wear of gear seats in the housing and cover;
- wear of the drive or driven gear;
- damage to the pressure reducing valve;
- deformation or damage to the valve spring.
A constantly burning warning light in the form of an oil can indicates a drop in pressure in the lubrication system to a critical level
Signs of oil pump failure may include:
- critical oil pressure warning light on the dashboard;
- engine overheating;
- high-frequency knocking (clattering) at the pump location.
The design of the VAZ 2110–12 engine does not provide for the installation of an oil pressure sensor. Like most modern cars, representatives of the tenth family are equipped only with an emergency (critically low) pressure sensor. When the pressure in the system drops, a warning light in the form of a red oil can lights up on the instrument panel. However, this lamp can also light up in the event of other malfunctions (failure of the sensor, break in its electrical circuit, oil leak, etc.).
Engine overheating also cannot be attributed only to symptoms of a faulty oil pump. It usually occurs due to problems in the cooling system.
As for the knocking coming from the oil pump, not everything is clear here either. Sometimes, when gears or housing elements wear out, the device may produce a high-frequency knocking sound. As a rule, it is associated with the formation of play between the gears and the housing (cover) and is most clearly audible at idle. However, similar sounds can also be produced by worn bearings (tension or guide rollers, pumps, crankshafts).
How to determine that the oil pump is faulty
The process of replacing the oil pump on a VAZ 2110-12 is quite simple and does not involve the use of any special tools. However, to do this you need to buy a new pump and spend some time. Therefore, before replacing the device, you should make sure that it is the one that is faulty. This can be done using the following algorithm.
Oil level measurement
First you need to measure the oil level in the engine and check its consistency. This is done with a special probe. It is advisable to remember when the oil and filter were changed. If the car has traveled more than 10 thousand km since the last replacement, it is better to replace them immediately. Then you should apply a drop of oil to your thumb and rub it with your index finger. If the oil turns out to be too dark, liquid and quickly absorbed, it needs to be replaced.
If the lubricant level on the dipstick is below o, add oil and start the engine. Next, you need to see if the warning light on the dashboard comes on. You should also check whether the power unit is overheating. At the same time, the engine is inspected for oil leaks. If you previously heard a knocking sound from the pump, you should listen to see if it disappeared after adding oil.
One of the reasons for the drop in oil pressure in the system may be its low level
Checking the sensor electrical circuit
If the listed symptoms do not disappear, you should do the following:
- Stop the engine and let it cool.
- Disconnect the wire from the emergency oil pressure sensor. On sixteen-valve engines it is located on the left side at the end of the camshaft bearing housing, on eight-valve engines it is located on the right on the rear side of the cylinder head.
- Turn on the ignition without starting the engine.
- In the engine compartment, short the wire going to the sensor to vehicle ground. If the warning light goes out, everything is fine with the sensor circuit.
To check the sensor circuit, it is enough to short-circuit the wire going to it to ground with the ignition on
Sensor diagnostics
To diagnose the sensor, you need to unscrew it with a 21 key and inspect its working part, which goes into the cylinder head. There should be traces of engine oil on it, indicating normal lubricant circulation in the system. If the working part is dry, the oil pump is most likely faulty.
The sensor itself is usually checked by replacing it with a known good one. After this, it is checked whether the warning light is on and how the engine behaves.
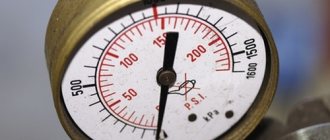
Checking oil pressure
If after checking and replacing the sensor the symptoms do not disappear, you need to measure the oil pressure using a special pressure gauge. This pressure gauge has a metal tip with a thread that is screwed into the sensor socket. Then the engine starts and warms up. If the pressure gauge shows a pressure greater than 0.6 bar (60 kPa) at idle, the oil pump is working. If the pressure is lower, the pump should be replaced.
The oil pressure at idle speed must be at least 0.6 bar (60 kPa)
Checking the oil pump on the stand
In a car service center, the oil pump is checked on a special stand. This implies:
- determination of pump performance;
- measuring oil pressure at the pump outlet;
- measuring the pressure at which the pressure reducing valve opens.
In this case, special oil is used, the temperature of which should be exactly 200C. The performance of the VAZ 2110–12 pump at a crankshaft speed of 6000 rpm must be at least 35 l/min, and the pressure relief valve must open when the pressure inside the pump increases to 0.55–0.75 MPa.
Dismantling
Depending on the situation, the oil pump can be completely replaced, or repair work can be performed - change gears, return the pump pressure reducing valve to functionality.
But let's talk about everything in order. In any case, work begins with dismantling the oil pump:
- Before you remove the pan to gain access to the pump, you will definitely need to drain the oil.
- To do this, warm up the engine to operating temperature, open the drain hole and wait until all the liquid drains out.
- Draining can also be done when it is cold, but due to its high viscosity, the oil can flow for a very long time and most of it will still remain inside the crankcase.
- After draining the oil, remove the three mounting bolts from the crankcase protection using an 8 mm wrench. The protection blocks access to the flywheel near the crankcase.
- Remove the flywheel guard and then remove the bolts from the crankcase. That's it, now the crankcase can be removed.
- In front of you is the crankshaft and the oil sump where the desired pump is located.
- By unscrewing the three mounting bolts, you can remove the intake from the pump.
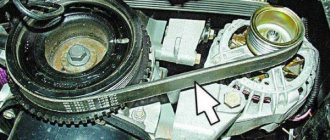
- Let's move on to the engine compartment. Lift the hood and remove the plastic cover. This is a guard that covers the timing belt.
- Next, you need to remove the front right wheel to remove the pulley fixing washer, and then remove the pulley itself.
- Remove the timing belt and remove the six mounting bolts that hold the oil pump in place. Here you will need an 8 mm wrench.
- Remove the oil pump from the crankshaft.
Disassembly
If you do not want or cannot yet purchase a new pump, you can try to repair it. Perhaps the problem is a malfunctioning valve or worn gears.
- Remove the gasket from the pump;
- Remove the bolt holding the crankshaft position sensor;
- By unscrewing the six mounting bolts, you can remove the cover from the pump;
- Using a pair of screwdrivers, lift the housing so that the pins on it come out of their holes freely;
- Remove the body, disconnect it from the cover;
- Now you need to remove two gears from the cover. The drive gear is removed first, and then the driven gear is removed;
- Next in line is the pressure reducing valve. You need to unscrew the plug under which the o-ring is located;
- Check the condition of this seal. If the ring shows signs of damage or is too squeezed out, be sure to replace it with a new one;
- Remove the valve spring;
- Now you can remove the valve itself. To do this, gently tap the case on a stand made of pure wood;
- The valve may be stuck. Do not worry. Take any thin, sharp object, pry it up and remove the element. It is better not to use metal objects so as not to damage the surface;
- Check the current condition of the aluminum cover. If there are deep scratches or signs of wear, replace it;
- If the pump body shows signs of wear, do not even try to repair anything. The only correct solution would be to completely replace it;
- You also need to make sure that the gears and the diameter of their sockets comply with the standards;
- The maximum diameter of the driven gear socket is 75.1 millimeters. If it is larger, the case must be replaced;
- Measure the width of the body in the middle. If the indicator is less than 3.4 mm, it is worn out and needs to be replaced;
- As for the thickness of the gears, according to the requirements, the thickness of the drive is at least 7.42 mm, and the driven one - 7.35 mm. In case of deviations from the norm, the gears are changed.
Assembly and installation
If you managed to repair the oil pump, then all that remains is to assemble it and install the unit in place. If you decide to completely replace the device, skip the first part of the further instructions.
- Install the driven gear onto the housing with the chamfers on the teeth.
- Also, the new pump drive gear is returned into place using chamfers on the teeth.
- Be sure to remember to lubricate the gears with oil so that they work more reliably and longer.
- Replace the pump cover and screw back all the fasteners.
- Lubricate a new or repaired old relief valve before installing it in its proper place.
- The valve fits into its seat. Make sure installation is done bottom down.
- Now it’s the turn of the spring and the plug, which is wrapped with an o-ring. Again, these elements are pre-lubricated with engine oil.
- Using the oil pickup tube, oil is poured back into the unit.
- Once assembly is complete, rotate the pump gears several full turns. This will ensure effective lubrication of all surfaces inside the pump.
The unit is assembled and can be returned to its place. For this:
- Return the timing belt to its place by pulling it onto the rollers. Don't forget to set according to the labels;
- Return the plastic belt protection to its rightful place, install the wheel;
- Now you need to crawl under the car to install the oil pick-up on the pump;
- Be sure to treat the crankcase with compounds, removing all fat. Treat with sealant;
- We recommend installing a new gasket on the crankcase, after which another layer of sealant is applied;
- The block is degreased, the crankcase is returned to its rightful place;
- To make it easier to attach it, tighten several bolts at different points, and then screw in all the rest;
- Protection is installed on the flywheel, the crankcase protection is returned to its place;
- Pour oil back into the system, start the engine, and allow the oil to distribute throughout the components.
If you carry out all the manipulations correctly and first determine that it is the pump that has failed, the warning light on the dashboard will go out.
The oil pump plays a huge role in the functioning of the engine’s lubrication system, so at the first sign of its breakdown, immediately go to the garage, or entrust the replacement to specialists from trusted service stations.
Didn't find the information you are looking for? on our forum.
We recommend reading:
Turning relay for VAZ 2107 diagram
VAZ 2114 signs of internal CV joint failure, diagnostic methods
VAZ 2107 with a Priora engine
How to remove the gearbox on a VAZ 2107
How to clean the breather on a VAZ 2106
The speedometer on the VAZ 21099 injector does not work
Lada Kalina, what kind of gasoline to fill in a car, 92 or 95
Similar articles
What kind of oil to pour into the VAZ 2115 engine
Choosing oil for VAZ 2110
VAZ color chart, codes, names, description
VAZ error codes - table with a list of all errors
Replacing the oil pump on a VAZ 2110, where it is located, removal and installation, repair Link to main publication
Oil pump VAZ 2112 16 valves
Post by Grigoryich » May 29, 2012, 1:41 pm
radiont625, Some service stations have a special adjustable wrench.
To deceive clients!
Nothing is adjustable in the oil pump.
We will never get what we want until we are grateful for what we have!
Osim haim!
Post by MaximV » May 29, 2012, 01:57 pm
Post by Grigoryich » May 29, 2012, 2:13 pm
We will never get what we want until we are grateful for what we have!
Osim haim!
Post by radiont625 » May 29, 2012, 2:15 pm
Is it possible to adjust it with a pressure reducing valve?
Added after 4 minutes 7 seconds:
The thing is that the oil pump is new, I also changed the oil receiver, the sensor is working, I can’t understand the reason. When it’s cold it doesn’t light up, when it warms up it starts blinking, the oil is in the middle of the mark
Post by Grigoryich » May 29, 2012, 2:29 pm
We will never get what we want until we are grateful for what we have!
Osim haim!
Post by radiont625 » May 29, 2012, 2:41 pm
Post by Grigoryich » May 29, 2012, 2:53 pm
There are so many of them, starting with general engine wear. N: in your case, it is most likely: low viscosity oil (I probably replaced it when changing the pump), or air leakage at the junction of the oil receiver and the pump (the ring was torn during installation, it did not fit correctly, or an old one was installed).
Lada 2112 ᵀᴴᴱ ᴼᴿᴵᴳᴵᴺᴬᴸ › Logbook › Oil pump.
This is a device that is necessary in order to create optimal pressure in the internal combustion engine lubrication system for constant oil circulation. The oil pump is driven by the crankshaft or camshaft through the drive shaft.