How to check the thermostat of a VAZ 2106 without removing it from the car
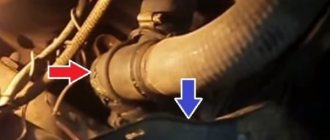
We start the engine. After a few minutes, we feel with our hand the hose that goes from the cylinder block to the upper part of the thermostat housing. If it is cold and the lower radiator hose is warm, it means that the valve of the large circle is stuck in the open position and the small one is closed.
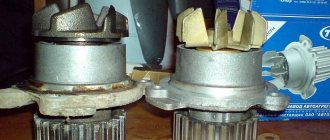
The opposite situation. The engine has warmed up to operating temperature. We try to touch the upper and lower radiator hoses. If they and the radiator cells are cold, then the valve of the large circle is closed, and the small circle is open and jammed. A secondary sign of a malfunction in such a situation is that the radiator forced cooling fan does not turn on, if one is installed.
And the last option is to determine if the thermostat is malfunctioning - the engine has been running for several minutes, according to the sensor, its temperature has begun to rise, but has not yet reached the green zone. We put our hand on the radiator hoses and at the outlet of the cylinder block. If their temperature is the same, then the valves are in the middle position and antifreeze “flows” through both cooling circuits.
Having decided on possible breakdowns, you need to change the thermostat; we’ll talk about how to do this in the following articles. Good luck to everyone on the roads!
Video on the topic:
A visual demonstration of the operating principle of the thermostat:
Operating principle of the cooling regulator
The function of the thermostat is to control the movement of the working fluid to maintain the engine temperature within the operating range. When turned off, the coolant moves along a small circuit, giving off heat only to the interior heating system.
When 87ºС is reached in the adjustment mechanism, the locking properties of the special heat-sensitive element holding the spring-loaded piston are reduced. With increasing heating, the strength of the protection decreases, and the rod opens the bypass valve to allow coolant to pass into a large circle with a mandatory visit to the large radiator for enhanced heat transfer.
When the operating temperature drops, the reverse process occurs in the control mechanism; as a result, the main valve spring returns the thermostat to the closed position. The stable operation of the protective element is the main factor for the optimal operation of the entire cooling system and the safe operation of the machine with an injector.
Purpose of the device
Thermostat for a VAZ-2114 car
Essentially, a thermostat is a large valve whose task is to allow (or, conversely, not to allow) coolant into the car radiator . When the car's engine has just started, it remains cold for some time, as does the coolant. During this period of time, the thermostat valve is closed, so that the coolant is directed in the so-called small circle. And when the engine temperature reaches 90°C, the valve in the device automatically opens and coolant begins to flow into the radiator. Thanks to this operating scheme, the engine temperature is kept at a constant level, and overheating is eliminated.
Thermostat replacement algorithm
To carry out repair work, the following operations are required:
- drain the coolant - to do this, you must open the cap of the expansion tank to prevent a vacuum zone and only then unscrew the drain plug (do not forget to substitute a 10-liter container);
- disconnect the temperature sensor and remove the ground wire so as not to damage the electrical wiring, injector, generator and other important devices;
- loosen the fastening clamps and unscrew the fixing nuts, then, using oscillatory movements, release the thermostat from the pipes;
- installation of a new device is carried out in the reverse order; first check the condition of the hoses and, if necessary, replace them;
- Clean the mounting location and install a new gasket, after which you can install a new VAZ 2114 thermostat (injector);
- After filling the coolant, you need to make sure that it passes normally through all working circuits and that there are no air pockets in the system.
Recently, it has become fashionable to install a Granta thermostat on the VAZ 2114, which is a low-temperature device and operates at 65ºC. As a result of such a replacement, the transfer of coolant to movement along a large circuit occurs earlier, as a result of which the thermal wear of engine parts and components is reduced. Also, when installing a control device from Granta, the operation of the interior heating stove improves.
When purchasing this spare part, please make sure by all available means that the device is unique and new, so as not to end up with a restored faulty thermostat. Purchase important mechanisms only from trusted sellers with a long and well-deserved reputation.
Changing the thermostat of a VAZ 2114 injector with your own hands
To independently replace the thermostat on the injection 2114, we will need a standard set of tools, a container for draining antifreeze and, of course, a new thermostat. We carry out the work in the following order:
- Remove the air filter. To do this, unscrew its body with a 13mm wrench and loosen the air duct clamp.
- Open the expansion tank cap to relieve pressure.
- Pour the antifreeze into a prepared container. We carry out work only on a cooled engine! Next, you will have to unscrew the front screws of the engine protection, if installed. It is best to drain the antifreeze through the drain valve in the bottom bank of the radiator.
- Loosen the clamps on the thermostat pipes.
- Carefully remove them; some more antifreeze may spill out.
- We remove the old thermostat and check the rubber pipes for integrity.
- We install the new VAZ 2114 thermostat in the reverse order. In this case, it often becomes necessary to install new clamps.
Sometimes the clamps need to be replaced.
When filling in antifreeze, it is advisable to remove the throttle body heating hose to displace the air. Otherwise, an air lock may form, which will have to be dealt with separately. After adding antifreeze and checking the tightness of the cooling system, warm up the engine and make sure that the thermostat is working as expected.
What is better than a thermostat with “ten”?
Of course, we are not talking about the models that were included in the first “ten” releases. The VAZ-2109 thermostat (carburetor) is very similar to the one that was installed in the first “ten” models. But now we are talking about more modern models. Their main advantage is that the number of clamps is reduced to a minimum. But the thermostat is not attached to the engine block using a short pipe. The housing is screwed to the engine block using two studs. The temperature sensor is screwed into the thermostat, therefore, the second hole must be plugged.
In addition, when installing the thermostat from “ten” to “nine”, it becomes possible to save a little, because you can only change the sensitive element. Passive benefits include freeing up space under the hood. The thermostat housing becomes five centimeters shorter, which makes it possible to easily reach, for example, the adjusting nuts of the clutch cable.
Which thermostat is better to install on the VAZ-2114
Thermostat WEEN 182-0114
The difficulty in choosing a thermostat specifically for the VAZ-2114, and for any VAZ, is not even that we will not know its model. There are no problems in this regard; both the model and the valve response temperature are stamped on the bottom of the device. The problem is different - each of the manufacturers, and there are more than two dozen of them, supplies devices of completely different quality. They differ both in response temperature and resource.
Practice shows that the average thermostat must travel at least 120-150 thousand km before it goes on its final journey to scrap.
We replace the thermostat on a VAZ-2115 ourselves
According to experts, the procedure for replacing a thermostat takes about an hour if tools and consumables are available. Therefore, you should take care of this before carrying out this operation. You will need the following:
- Tools:
- standard car mechanic kit (screwdrivers of various sizes and configurations);
- capacity of more than 7 liters for draining liquid waste.
- Materials:
- new thermostat;
- heat-resistant sealant;
- set of gaskets for repair;
- antifreeze or antifreeze (as a coolant).
Now you can begin the procedure for replacing the failed thermostat element, which consists of the following steps.
- Preliminary – stage of preparing the vehicle for the repair procedure:
- the car is installed on an inspection hole or on a flat surface;
- the engine is turned off;
- put on the handbrake;
- the engine is cold.
- Removing the old thermostat element:
- unscrew the expansion tank cap;
- open the radiator tap to drain the coolant from it;
- drain the coolant into a prepared container;
- remove the air filter (at the same time carry out a visual inspection for any malfunctions of this part);
- loosen the clamps of the radiator pipes;
- disconnect the hoses from the radiator and from the thermostat element;
- unscrew the fastening bolts (4 pieces);
- remove the thermostat (it is removed together with the seal ring).
- Installation of a new thermostat:
- lubricate the perimeter of the circuit with heat-resistant sealant;
- install a new sealing ring;
- put a new gasket;
- install a new thermostat;
- connect all hoses;
- tighten the clamps tightly;
- screw the plug on the drain valve at the bottom of the radiator;
- fill with coolant.
- Verification stage:
- start the vehicle;
- check for possible leaks;
- warm up the car to the optimal temperature - more than 90 degrees (this operation is necessary for the large circle of the cooling system to start);
- We check all hoses and pipes in operating mode - they should be hot.
A nuance of a working thermostat on a VAZ-2115: when starting a still cold engine, the lower pipe on the radiator will begin to heat up already at 85 degrees of coolant. This can be determined by touch.
To fully ensure that the newly installed thermostat element is functioning at the proper level, you should also turn on the heating element - the stove. If there are no failures or leaks in this mode, then the thermostat is installed correctly and without errors.
If you are not confident in your abilities, then to replace this part you should seek help from qualified specialists, that is, to the nearest car service center.
We independently modify the VAZ 2110 thermostat or install a replacement
Many VAZ 2110 owners are dissatisfied with the performance of their car's heater. It would seem that the interior has already been insulated, no cold air is coming in from outside, the stove seems to be working, but it is still cold in the cabin.
Therefore, auto craftsmen come to the conclusion that the original stove may be nothing, but modifying the thermostat on the VAZ 2110 will not be superfluous at all. Therefore, someone, having bought a new thermostat, even before installing it on the car, makes modifications: the circuit on the 5-hole one is redone, making it 6-hole.
Factory thermostat Others believe that it is enough to narrow the bypass channel. Third, it is much better to install a Granta thermostat, since it completely shuts off a large circle of coolant and, accordingly, the heater begins to supply hot air to the cabin much faster.
https://www.youtube.com/watch?v=J6GQJpMqCQA Let's consider all the options, but first you need to check whether the thermostat is to blame for the fact that there is clearly not enough heat in the cabin.
Signs of breakdown
What could be the first sign that the VAZ-2109 thermostat is faulty? Of course, the engine overheats even when driving at a high constant speed. The reason is that the liquid continues to circulate in a small circle, not a drop gets into the radiator. And even turning on the electric fan won’t help, because doing so is simply useless. The only thing that can slightly correct the situation is opening the heater tap and turning on the interior airflow at maximum speed.
But such an action will not bring comfort in hot weather. The most common thermostat breakdown is the sensing element jamming in its original position (the liquid moves in a small circle). If this suddenly happens, then you need to try all methods of elimination. Even a few light blows to the body can open the valve. If such an emergency occurs on the road, you will have to drain the liquid and break all the insides of the thermostat so that the liquid circulates only in a large circle. But it won’t boil, and you can get to the repair site.
Which thermostat to choose
To answer this question, it is important to understand one thing: saving on this device is strictly not recommended. A faulty thermostat leads to engine overheating. And overheating entails a lot of problems, the elimination of which can be very expensive. There are 2 brands of thermostats for the VAZ-2114, proven over the years, the quality of which car owners always speak well of:
- LUZAR (Lugansk Automobile Radiator Plant).
Thermostat for VAZ 2114 from LUZAR - WEEN (Poland).
Polish thermostat from WEEN
It is strongly not recommended to buy Chinese-made thermostats for the VAZ-2114 (in particular, BAUTLER); you should also refrain from purchasing devices from PRAMO (Russia, Vladimir), despite the fact that Polish thermoelements are installed there. Both of these brands, although they work, are not durable.
Thermostat data
Orlovsky LLC
Weight 524 g, length 150 mm.
Distances between pipes: between the front ones 115 mm, between the extreme rear ones 110 mm, offset “right-front - right-rear” 20 mm.
Hole diameters, internal/external: - 3 large 27/33 mm; — 2 small 14.5/20.5 mm; — internal (bypass) 12 mm.
article about the differences between VAZ cooling systems
Types of thermostats and rules for their selection
Having decided to replace the thermostatic device, many drivers are wondering whether to install an imported or domestic thermostat on a VAZ 2114, which one is better and which company to give preference to.
In this case, it is unlikely that it will be possible to give an absolutely accurate answer, because everyone chooses the appropriate spare parts themselves, based on the issue of availability, price and other factors.
Thermostat PEKAR
Let's say that we can distinguish the following 3 groups of thermostats that are suitable for the 14th and which can be found in regular car stores:
- Domestic. Original thermostats for 2114 are very easy to find on sale, but it is worth remembering that their quality leaves much to be desired - they either fail ahead of schedule (25,000 km) or often jam, which can lead to overheating of the engine on the road. That is why it is not recommended to purchase them as a replacement.
- Chinese. They may have an attractive appearance and a shiny body, but their overall quality is noticeably worse than domestic options. That is why you can purchase Chinese thermostats only if there is nothing else left.
- Foreign. Despite the slightly higher cost, they have much better quality of workmanship, which is why preference should be given to them.
Thermostat LUZAR
But what to do if you couldn’t find branded parts, but the choice of thermostats themselves is quite wide and the prices are about the same? In such a situation, you should pay attention to the material of the case. You should only purchase products made from stainless steel or high-quality brass, which can be distinguished by weight by holding them in your hands.
WEEN thermostat (Poland)
You should absolutely not purchase products made from zinc alloys, which can imitate brass or steel, but are also very light. The housings of such thermostats are extremely unreliable and can leak not only from impact, but also from frequent temperature changes (especially in winter).
Types of VAZ thermostats and which one is better
Visually, even an experienced salesman cannot distinguish a kopek thermostat from a Niv one. Because the difference is inside them and in the location of the pipes. All Togliatti thermostats are made according to the ancient Fiat design - they are removed from the cylinder head into a separate unit and fixed to the pipes and hoses of the cooling system. Here are the main types of VAZ thermostats:
- All classic Zhigulis had a 2101 thermostat under the hood . which can be identified by the location of the pipes, they are turned opposite each other almost at a right angle. However, the most important difference is that the thermal operating conditions of rear-wheel drive Zhiguli engines required blocking the valve at 80 degrees and fully opening it at an antifreeze temperature of 95 degrees.
Exactly the same device was installed and is being installed on Niva . The only difference is that the angle between the pipes tends to 180 degrees.
Thermostat VAZ 21213, 21214 (Niva)
The eight thermostat is installed on all carburetor Samaras in their countless modifications. The difference with classic motors in terms of thermoregulation is that in thermostat 2108 the valve should operate seven degrees later. This happened due to the more advanced design of the combustion chamber, so until the antifreeze temperature reaches 87 degrees, the valve should be closed, and only at 102 degrees should it open.
Modern thermostats on the spare parts market are not distinguished by high accuracy and high quality workmanship, so after a series of tests the plant gave two degrees to the manufacturers. As a result, on boxes with thermostats for the entire Samara family, you can often see the number 85. Visually, the 2108 thermostat is distinguished by the presence of a thin pipe to remove possible air bubbles. The tenth VAZ family received exactly the same thermostat housing as on the classic, but in a mirror image. It does not have a small pipe for air outlet, since the design for the carburetor tens provided a separate tee, which greatly complicated the decoupling of the hoses under the hood. By the way, the figure-eight device is also perfect for carburetor tens; the only thing you need to do is tightly plug the small air hole.
Such thermostats have become the most popular, so when purchasing them, you should definitely look inside; there should be a curtain made of plastic or metal, which better redistributes the flow of liquid to the thermoelement. If it is not there, the valve response temperature can differ greatly (up to 10-15 degrees) from the nominal value, which leads to engine overheating. The thermostat of the 2112 family is designed specifically for injection VAZ engines . Actually, the thermostat doesn’t care what type of power system it is, it does its job and if the manufacturer is conscientious, the valve will always be closed up to a temperature of 85 degrees.
"Injection" thermostats
The trick of injection thermostats is that they significantly improve the performance of the heating system. To do this, it was necessary to increase the intensity of the passage of liquid through the cold circle precisely due to the thermostat - a special throttle was installed in the inlet pipe, and in the latest versions there will be as many as four holes.
That is why in everyday life such thermostats are called “6-hole.” For this reason, such thermostats are optimal for all injection VAZ cars, including the VAZ-2114. This is exactly what they replace from Granta.
Replacement procedure
Before changing the thermostat on a VAZ 2114, watch video tutorials that will make it easy to master a rather complex procedure with your own hands. You certainly can’t call a DIY replacement impossible. However, it won't hurt to gain additional knowledge.
Also prepare the necessary tools and materials:
- New thermostat;
- Screwdriver Set;
- Keys for 13 and 12 millimeters;
- Sealing gasket;
- Silicone based sealant;
- New antifreeze or antifreeze;
- Container for old coolant;
- Engine cooling system pipes.
Now let's get down to the repair itself.
- Place the car on the inspection pit. Before starting work, the engine must cool down, otherwise burns will be difficult to avoid.
- Open the hood and remove the air filter. Check its condition. It might be a good idea to replace it.
- Remove the expansion tank cap, unscrew the drain plug and remove all the antifreeze. Make sure it fits exactly into the container underneath.
- There are clamps on the cooling hoses that need to be loosened a little.
- Using wrenches, remove the nuts and studs responsible for fastening. Be sure to remove the ground wire.
- After you disconnect the hoses, wiggle the thermostat a little to allow it to be removed.
- Clean the thermostat mounting points and check the hoses for serviceability. Often during the life of the car they become covered with cracks, through which air and coolant escape. Even if they are intact, but have been on the car for a long time, we recommend replacing them with new ones.
- Treat the pipes on the body of the new thermostat with sealant and let them dry a little.
- Replace the old gasket, put the thermostat in place, fix the studs, nuts, and connect the pipes. The clamps must be tightened well, but carefully so as not to break the tightness of the connections.
- Close the drain plug, and then you can start adding new coolant.
- Start the engine and check the efficiency of your new thermostat valve.
- Make sure that the heating radiator is in good working order and check for any air pockets.
At this point the repair can be considered complete. If you have questions or certain stages cause difficulties, watch the video about replacing the VAZ 2114 thermostat, which will allow you to study in detail the procedure for removing the old element and installing a new one in its place. In fact, there is nothing complicated here. It just requires accuracy, patience and consistency in completing each step.
Loading …
Why do you need a thermostat?
We will not organize courses on eliminating automotive illiteracy, because every self-respecting driver knows that the thermostat directs the coolant either in a large circle (including the engine cooling radiator) or in a small circle (bypassing the radiator).
Thermostat for VAZ-2114 injector
The operating algorithm of the device depends on the thermodynamic valve, which closes one pipe in the thermostat and opens the other. Before changing the thermostat, it must be checked.
To refresh your memory of its structure, we have provided a diagram of the VAZ-2114 thermostat and attached it below.
Scheme of operation of the cooling system (thermostat)
Thermostat operation diagram
As can be seen from the diagram, this is a simple device with a thermal valve, which, when a certain temperature is reached, is activated, thus directing the antifreeze in a small or large circle.
In most cases, it has three pipes - one inlet and two outlet . through which the coolant flows either directly from the pump into the heater and further through the cooling system, or into the radiator if its temperature has reached the required value. It is the temperature value at which the device operates that determines the use of the thermostat on a particular VAZ model, although there are still some nuances that specifically concern the VAZ-2114 injector.
Video about the operating principle
How to make a replacement
In order to install a thermostat from ten to 14, you will need to prepare a nominal set of tools - keys, screwdrivers, pliers, and also turn off the car engine (if it is running) and wait for it to cool completely.
After the coolant in the system is no longer hot, you can begin the replacement itself, which is performed as follows:
- Unscrew the plug and drain the coolant from the radiator.
- Open the expansion tank cap.
- Unscrew the drain plug located behind the ignition module, and then drain the remaining antifreeze from the system (if access to the plug turns out to be difficult and inconvenient, remove the engine protection).
- Remove the air filter housing.
- After loosening the fasteners, remove the clamps from the pipes suitable for the thermostat.
- Remove the pipes themselves.
- Unscrew the nuts securing the thermostat housing and remove the device.
Before installing a new thermostat, its contact surface should be cleaned, covered with a layer of sealant and equipped with a new gasket (which should be purchased along with the new 6-hole thermostat).
Installing a VAZ 2110 thermostat on a VAZ 2114
Installing a new thermostat is performed in exactly the same order as dismantling the old one, but in reverse order. In this case, you will first need to select a plug and plug the outlet hole provided for connecting the throttle heating pipe (you can learn more about the principle of connecting a thermostat from 2110 using the diagram below).
After the device is installed, you should wait for the sealant to harden on the connections (about 1 hour), then pour new coolant into the system and start the engine, allowing it to warm up completely.
Simultaneously with its warming up, you will be able to verify the effectiveness of the tuning performed.
Thermostat 2110 to 2114
At the end of the conversation, it should be added that when replacing a thermostat, you should fill in new coolant (necessarily of high quality), and not use the old one - this will extend the life of the device. In addition, it is necessary to inspect the surface of all pipes for cracks or damage and, if any are found, replace them immediately.
This will protect you from possible leaks, frequent replenishment of the coolant level and engine overheating during long trips.
Modification of the thermostat
On a VAZ 2110, it is quite possible to modify the thermostat by adding another hole to the 5-hole device. Why is this needed and what does it give? So:
- In cars, in particular on the VAZ 2110, the injector becomes warmer with the advent of the sixth fitting due to the fact that the bypass channel decreases. For reference: a bypass is a pump for circulating liquid in a parallel pipeline;
- For the stove to operate, it is necessary for the coolant to circulate in a small circle. This happens through the bypass channel. The smaller its diameter, the more liquid will flow through the stove;
- An additional fitting, as a rule, prevents the heater return tee from leaking, since such malfunctions are not uncommon on “tens”.
An additional 8 mm hole is drilled in the body of the vehicle (thermostat). Install an additional pipe parallel to the same one going to the stove. It is needed so that the “waste” liquid from the heater enters the thermostat cavity, and there is no overcooling of the engine.
Modifying a 5-hole thermostat into a 6-hole Modifying a 5-hole thermostat into a 6-hole Modifying a 5-hole thermostat into a 6-hole You also need a throttle washer - to increase the flow of liquid through the stove if the small circle is open, and an adjusting bolt that rests on the leg of the element in order to regulate the opening temperature of the vehicle from the outside.
By the way, having modified it in this way, you can turn the carburetor TS 82, by drilling and tapping, into an injector suitable for the VAZ 2110.
Installation
In addition to the thermostat, you need to purchase a new pipe through which the coolant can return to the pump. Among motorists it is called a “saxophone”. You can find it by number: 2110-1303055-10. The following tools and materials should also be on hand:
- Clamps 15-28 mm (it is better to take about 7 pieces).
- New gasket.
- Replacement hoses.
- Screwdriver Set.
- Special hose puller (needed for old-style cars).
- Rags.
- Antifreeze.
There are two installation options: standard and alternative. In the first case, the 6-hole thermostat opens for additional cooling. In other words, it monitors the temperature coming out of the engine, not the temperature of the already cooled antifreeze. An alternative option is to check the temperature lower than the motor reading. The installation proceeds according to the following scheme:
- Part of the coolant must be drained; to do this, you need to unscrew the plug from the drain hole;
Along with the drop in temperature due to the gradual arrival of winter, it began to get colder in the car. It began to take more time to warm up the engine, then wait for the coolant temperature to rise to 60 degrees to turn on the heater and warm up. In this regard, I remembered the modification of the cooling system of the VAZ 2109, when instead of the standard thermostat, a 6-hole thermostat from the VAZ 2110 is installed. It is improved in comparison with the standard one and has the following advantages:
— the thermostat has been modified to ensure a more stable coolant temperature; — fewer connections on clamps. The standard thermostat is attached to the outlet pipe through a rubber connecting tube; — the thermostat is made collapsible for the possibility of replacing the thermoelement separately from the body; — the new thermostat is 5 cm shorter than the standard one — there is more space.
To remove the thermostat and not spill antifreeze, you must first release the pipe on the throttle assembly and drain what spills out through it. All you have to do is be careful and not spill antifreeze when disconnecting the return pipe from the heater radiator.
We connect a new thermostat with 6 holes according to the following diagram:
Connecting a 6-hole thermostat according to the standard diagram
It will be necessary to install a new pipe through which the antifreeze is sent back to the pump, the so-called “saxophone” (2110-1303055-10), it is shorter than the standard one from the VAZ-2109. However, newer cars already have this pipe installed from the factory. You may also need hoses, clamps, and a gasket for a new thermostat. It is advisable to try on the thermostat and determine locally whether the hoses will need to be replaced.
Above is a standard connection diagram for a 6-hole thermostat. However, it is recommended to connect such a thermostat using a different, modernized circuit.
Modified thermostat connection diagram for VAZ 2109, VAZ 2108 “injector”
Modified thermostat connection diagram for VAZ 2109, VAZ 2108 “carburetor”
Connecting a 6-hole thermostat
The meaning of this connection is that the coolant, which has given off heat in the heater radiator, is directed back to the temperature-sensitive element of the thermostat (rather than drained into the receiving pipe to the pump), and cools it a little, preventing the large circle from opening until the temperature of the antifreeze coming from the heater won't rise. It turns out that now the thermostat also takes into account the temperature of the coolant from the heater radiator, which makes the engine temperature more stable, and the car will be warmer in winter. To connect you will need a special tee.
With such a system for connecting a 6-hole thermostat, there is no need to install cardboard boxes so familiar to all owners of domestic cars in front of the radiator. In summer, there are no differences in the operation of all types of thermostats.
For comparison and understanding of the nuances of operation, below are the standard cooling systems of the VAZ 2109, VAZ-2108.
If the thermostat fails, the engine will take a very long time to heat up to the required operating temperature, and while driving, the engine temperature will drop sharply. This is especially felt in winter due to a poorly heating stove.
Appearance of the device
Lada 2115 › Logbook › The thermostat burst. Which one is better?
The antifreeze began to go away slowly (50 or 100 ml per week). I found the wet spot quickly. It's under the thermostat. I thought it was a hose. Tightened the hose clamp ring. I also placed a second ring nearby. Just to be sure. Antifreeze is leaving anyway!
I started to look more closely. I see that the ring at the connection of the two parts of the thermostat has burst. The thermostat needs to be changed.
There are no problems with the heater. In winter it warms with a bang. There are three options.
Option 1. Cover this place with glue, for example cold welding. And he doesn’t give a damn. But doubts gnaw at me. Somewhere on a long trip this whole structure will fall apart. There are no wolves in our forests. But the bears appeared. They say they swam across the Volga from the north from the Kostroma region.
Option 2. Replace the thermostat with a standard 6-hole one. Price approximately 600 rub.
Option 3. Replace the thermostat with a non-standard 5-hole one. From VAZ 2110. Price about 1000 rubles. According to reviews, this thermostat seems to be better. And it takes up 5 centimeters less space. Here are some links www.luzar.ru/catalogue/termostaty/ 929 RUR Thermostat 21082-10 assembled OEM number 21082-1306010-10 applicability for vehicles VAZ 2110 2111 2112 2108 2109 21099 2113 2114 2115
www.drive2.ru/l/2384682/ www.drive2.ru/l/6575925/ vaz-2114-lada.ru/2012/06/termostat-vaz/ vazgarage.ru/vaz2115/dvig…rmostata-na-vaz- 2115.html www.drive2.ru/l/442155/ www.drive2.ru/l/2436848/ Installation of a six-hole thermostat www.drive2.ru/l/38523 remontauto-vaz.ru/page/6-…tat-na- vaz-v-chem-raznica You will have to change the design a little Namely - a longer hose will be required - longer studs Mounting to the engine - install a tee on the hose - a plug on one hose And you may also have to replace the antifreeze Although they change “without draining the antifreeze” they change (With a minimum loss of antifreeze) Probably install a tap instead of the OX drain plug on the engine to drain into a canister. But there is also a plug on the radiator. And put a tap there?
Please advise what to choose? ========================== I decided to listen to the advice of sanj-putnic1991 and install the thermostat the same as the 6-hole one. Bought
1) 400 rubles Thermostat BAULTLER 2108-1306010 BLT-0008T 15.12 85C 2) 510 rubles Antifreeze Get-3 Dzerzhinsk, Novgorod region. -40 +108 www.tex-oil.ru 3)18 RUR * 8 pieces Rings 4) lower hose between thermostat and expansion basque diameter 25 mm total approximately 1200 RUR
5)50 rubles tap for draining the coolant of the BLOCK Diameter of the hose pipe is 6 mm 6)30 rubles tap for draining the coolant of the RADIATOR
Replacing the thermostat
Remove the old one, install a new one in its place - this is the entire replacement procedure. But you need to carefully inspect all the pipes of the system. The VAZ-2109 thermostat is connected. The injector or carburetor in the injection system does not matter.
When carrying out work, pay special attention to the clamps. It is highly undesirable to use old ones, it is better to install new ones
Moreover, reliability is an important criterion. Worm-type clamps are very delicate: as soon as you apply a little more force, it breaks. And the possibility of damaging the pipe is very high. If you tighten the clamp too much, you can puncture the rubber. But, of course, you can’t tighten it loosely, as liquid leaks will appear. In other words, this is a double-edged sword. And a little advice: before installation, it is advisable to apply a thin layer of sealant to the surface of the thermostat that will be in contact with the pipe.
What is a thermostat?
As the name of the device suggests, it does something with temperature. More specifically, it helps switch fluid flows in the cooling system. Moreover, the thermostat, carburetor or injector are at the heart of the gasoline injection system and have the same composition and housing design. When operating any engine, it is necessary to ensure heating of the throttle assembly. And it is present in any injection system: both in the carburetor and in the injector.
The basis of any thermostat is a special plate, which is made of a material called bimetal. It reacts to temperature changes and is capable of deformation because of this. The switching of air flows is based on this effect: the plate moves the valve, which is fixed by springs. Having overcome their force, the plate moves the valve, opening the path for liquid flow to the main radiator to ensure effective cooling.
Operating principle
By design, a thermostat is a fairly simple device that serves to redistribute the circulation of liquid over small or large cooling circles depending on its temperature.
The standard 2114 thermostat, installed from the factory, includes the following parts:
- frame;
- bypass valve spring;
- bypass valve;
- main valve spring;
- main valve;
- pipes;
- piston with holder;
- temperature sensitive element.
The latter, in fact, is the key to the entire operation of the thermostat. So, after starting the engine, the coolant in the system heats up and, with the main valve closed, begins to circulate in a small circle, passing through the thermostat and heating the sensitive element (which, in turn, begins to expand and put pressure on the valve).
At the moment when the coolant reaches a temperature of 87 C, the valve opens slightly and coolant begins to flow into a large circle. And when the liquid reaches a temperature of 102 C, the valve opens completely and all circulation begins to flow in a large circle (through the radiator).
Thermostat circuit
In turn, after the engine of the machine is turned off and the liquid in the system begins to cool, the thermoelement will begin to compress and the valve will return to its original position under the action of the return spring.
But, sometimes it happens that for one reason or another (wear, damage, manufacturing defects) the VAZ 2114 thermostat becomes stuck in one position or another. In this situation, either the engine warms up for an extremely long time or, conversely, it can overheat very quickly.
The latter is especially dangerous because it can cause serious damage and even destruction to the engine, resulting in the need for major repairs.
Video
This video contains useful information on how to check thermostats for quality.
How to check the thermostat yourself.
Thermostats for VAZ 2101-2107.
The thermostat is one of the most important components of the engine cooling system, allowing it to warm up a cold engine in a short amount of time until it reaches an operating temperature of 90°C and significantly reduces wear on the latter.
What is a thermostat in a car
As a rule, the thermostat is placed near the radiator. The design is equipped with a return spring, a heat-sensitive valve, and a solid filler. The pipes are connected so that 2 circles are used for cooling: the large one covers the radiator, and the small one covers the engine. After the engine starts, the coolant begins to flow and heats up, which ensures the fastest warm-up. When the coolant temperature reaches 90°C, the temperature-sensitive element opens the valve. The liquid enters the radiator, which ensures effective cooling, and the warmed-up engine keeps the temperature at normal levels.
Thermostats installed by the factory on the VAZ 2114 are not always of the proper quality, which is why most drivers, when given the opportunity, try to replace them with foreign analogues.
A huge mistake is made by those who, in the hope of saving on cost, decide to purchase and install Chinese-made thermostats. The latter soon fail and require replacement even faster.
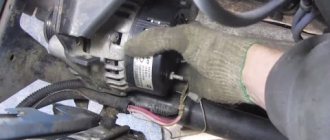
Where is the thermostat located
On injection-type engines, the thermostat is located under the air filter, and on carburetor engines it is in the same place, except that the filter housing itself is slightly shifted on older models of the VAZ 2114-2115 family, which makes the removal procedure much easier.
There is no need to remove the housing; the high-voltage wires are simply disconnected and the required component of the cooling system can be dismantled. On injection models, after removing the filter housing, the thermostat will be visible. The battery on the right side can be considered a reference point.
When does a VAZ 2114 thermostat need to be replaced?
An indicator of wear may be improper valve operation. In some cases, the coolant begins to circulate in a large circle, as a result of which the car begins to quickly heat up, which is very little noticeable in the summer - this is the main problem. In winter, on the contrary, the car warms up very poorly. In these cases, the thermostat valve is completely open and does not close. The opposite case is when the valve is completely closed and the liquid begins to circulate in a small circle, the car begins to quickly heat up, and when driving in dense city traffic with traffic jams or during long stops, the engine temperature even reaches critical levels.
It is a little less common for the valve to open to the middle, while the car warms up in cold weather a little slower than normal, and in warm weather the temperature indicator needle can gradually reach a critical point. All these signs indicate a malfunction of the thermoelement.
There are cases when both the thermostat and the cooling fan are faulty. The liquid will flow only in a small circle, which can lead to rapid overheating of the engine and even damage the cylinder head. Then it will no longer be possible to do without major repairs.
If the temperature of the engine suddenly raises suspicions, or rather the engine takes a long time to heat up or too quickly, you can check the operation of the thermostat without dismantling it by doing the following:
- you should start the engine and let it warm up to a temperature of 87-92 ° C;
- at the moment of warming up, when the engine is still cold, touch the lower pipe next to the thermostat - it should be cold all the time until the engine warms up to operating temperature;
- When the engine finally warms up, the lower hose will begin to heat up. If the hose heats up ahead of time, or if the hose does not heat up even when the engine reaches operating temperature, this means that immediate replacement of the thermoelement is necessary.
Replacing the thermostat on a VAZ 2109
To remove and install the thermostat on a VAZ 2109 with a carburetor engine, it is necessary to drain the coolant from the cooling system; the figure below shows how to drain the coolant:
1 — radiator drain plug, 2 — thermostat, 3 — hose to the pump inlet pipe, 4 — hose to the expansion tank, 5 — lower radiator hose (outlet)
Before removing the thermostat from the VAZ 2109, it should be checked - this is done if the engine overheats during operation or slowly warms up to operating temperature. To check the thermostat on a VAZ 2109 car, start the engine and touch the lower radiator hose with your hand. It should be cold. After the coolant temperature reaches 87–92 °C, the hose should begin to heat up. If this does not happen, you need to remove the thermostat and check its functionality.
Thermostat design VAZ 2109: 1 – inlet pipe from the radiator, 2 – rubber insert, 3 – solid heat-sensitive filler, 4 – bypass valve spring, 5 – inlet pipe from the engine, 6 – bypass valve, 7 – outlet pipe to the pump, 8 – main valve spring, 9 – main valve, 10 – pipe from the expansion tank, 11 – piston.
Replacing the thermostat VAZ 2109 with carburetor
Unscrew the bolts securing the crankcase protection and remove it
Unscrew the expansion tank cap
Unscrew the cylinder block drain plug and drain the coolant from the cylinder block
Unscrew the radiator drain plug and drain the coolant from the radiator
Loosen the clamps
Disconnect the three hoses from the thermostat housing
Loosen the clamp and remove the VAZ 2109 thermostat with the hose. Then disconnect the short hose from the thermostat
Lower the thermostat into water heated to 78–80 °C. Heat the water, stirring it constantly, to (87±2) °C
At a temperature of (87±2) °C, the main thermostat valve should begin to open. If this does not happen, replace the thermostat. Install the thermostat on a VAZ 2109 in the reverse order of removal. After installation, fill in coolant. This completes checking and replacing the thermostat.
Installation of a modified vehicle
On a VAZ 2110 you can easily install a more advanced thermostat from Granta 2190. But you should still know a little about the design of the heating/cooling system in Granta. Its scheme can be easily implemented on the “ten”. Will need:
- Original TS Grants 2190 from BEHR;
- The lower radiator hose is from Granta, but the upper one 21214 will also work, or simply matched to size;
- Tee from VAZ 2110 for the cooling system;
- The studs are 8 mm in length - like from the camshaft bed;
- Straight long stove pipe from the “ten”;
- Gasket for thermostat.
We act according to this plan:
- We change the lower radiator pipe to the one from Granta (or similar). You can leave the original one, but connect it to a suitable diameter at a right angle using a piece of pipe. However, remember - the more connections, the more opportunities for leaks;
- We connect the expansion tank pipe through a VAZ 2110 tee: one end goes to the drain from the heater radiator, the other end goes to the supply pipe;
- Drain the coolant;
- We change the studs to longer ones and install the Granta thermostat;
- We twist the temperature sensor.
Next comes a check to see if the modified heating system is working properly. Typically, the Grant vehicle is more stable, provides faster heating of the air in the cabin, and is not subject to temperature fluctuations.
Source: https://vazweb.ru/desyatka/ohlazhdenie/dorabotka-termostata.html
Replacing the VAZ 2107 thermostat - step-by-step instructions
Hello dear readers of the Autoepoch.ru blog! Today I want to talk about replacing the VAZ 2107 thermostat.
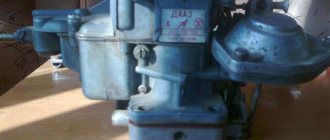
Description, device and principle of operation.
The thermostat, also known as the “seven” thermostat, is a part that is a cylindrical container with three outlets for pipes. At the upper end of the part there is an inlet pipe from the engine, at the bottom there is an inlet pipe coming from the radiator, and the third outlet pipe is located on the top side. The thermostat device can be seen in more detail in the photo below.
If the engine is started “cold”, antifreeze passes through the cylinder block and the pump, the so-called small circle. This ensures quick warm-up of the engine. When the temperature reaches 80.6 to 81.5 degrees Celsius, the main thermostat valve begins to open, and the antifreeze begins to move in a large circle through the radiator. At the same time, the bypass valve gradually shuts off the antifreeze coming from the engine. When the temperature reaches 94 degrees, the valve opens to its maximum value, the coolant moves only in a large circle.
Main malfunctions of the VAZ 2107 thermostat.
- Engine overheating - the thermostat opens partially or does not open completely.
- When first started, the engine heats up slowly and does not reach operating temperature - the thermostat does not close.
How to check the thermostat without dismantling it?
If the unit is working properly, then after starting a “cold engine”, the lower pipe leading to the radiator should not heat up immediately, but only when the engine temperature reaches 80-88 degrees. Also, if this pipe does not heat up at all, and the engine does not overheat, this indicates a malfunction of the unit. Accordingly, if at minimum temperatures the lower pipe begins to heat up, this also indicates a malfunction.
How to replace a VAZ 2107 thermostat with your own hands - step-by-step instructions.
To replace you will need:
- new thermostat
- crosshead screwdriver
- clamps (if necessary)
- pipes (if necessary)
- coolant
- sealant (if necessary)
- The first step is to drain the coolant (only on a cold engine).
- we drive the car into the pit (the car must be strictly horizontal!),
- move the warm air supply lever to the right,
- unscrew and remove the expansion tank cap,
- unscrew the radiator filler cap,
- unscrew the drain plug on the cylinder block (place a container under the drain in advance!),
- unscrew the radiator drain plug (place a container under the drain in advance!),
- The remaining coolant can be drained by unfastening the belt securing the expansion tank and lifting it up.
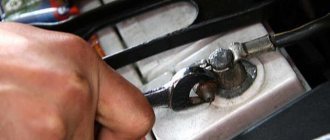
- For convenience, you can remove the battery.
- Unscrew the old clamps and remove the thermostat.
- Next, install a new thermostat (if necessary, you can replace the pipes and clamps).
- Fill with coolant, test the new part (described above).
Adviсe.
- When you drain the coolant, it is better not to open the expansion tank cap right away. In this case, the liquid will flow slowly due to the vacuum created.
- When you unscrew the plug on the block, slowly unscrew the tank cap.
- In order not to get rid of air in the pipe after filling the liquid, you can remove the thin hose supplying coolant to the carburetor, located in the rear part. Fill in the coolant, watch when it flows out of the hose. This will indicate that the air has escaped; this is the highest point of the coolant in the car.
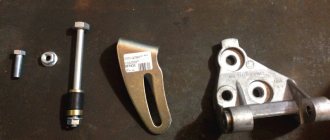
Sequencing
- Using a 13 key, unscrew the air filter.
- Unscrew 2 bolts and 1 nut on the radiator. Under one of the bolts there is a hole through which the coolant is drained into a container placed in advance under the radiator.
Drain bolt on the radiator for draining antifreeze - The connector located on the recirculation valve filter housing is removed. Then the valve itself is removed and carefully moved to the side along with all the tubes located next to it. The connector from the air flow sensor is also removed, the clamp on it is loosened, and then the air supply hose is removed.
All hoses have been removed from the recirculation filter housing and it is ready for removal. - After these operations, the filter is easily removed and access to the thermostat is opened.
- Use a 12 wrench to unscrew the nut on the top of the thermostat (there is only one there). After this, the ground wire is removed and the stud and the lower nut on the device are unscrewed with a 13mm wrench.
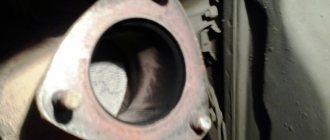
- After this, the thermostat is removed from the socket (this is done by slightly shaking the device, and if this does not help, the thermostat is pryed off with a screwdriver).
The thermostat is carefully removed from the socket - Before installing a new thermostat, the socket is thoroughly wiped off from drops of coolant and other contaminants, after which a thin layer of sealant is applied (the sealant must be allowed to dry for at least 5 minutes before installing the device).
- The new thermostat is installed in its original place, after which all components of the vehicle’s cooling system are reassembled.