Signs and causes of lambda probe malfunction
According to statistics, oxygen sensors fail gradually, so you can identify its malfunction if you pay attention to the following “symptoms” in time:
- The idle speed began to drop or “float”.
- The car jerks, and after starting the engine, popping noises uncharacteristic of the engine are heard.
- The engine power has decreased and when you press the gas pedal there is a slow response.
- The engine overheats greatly and fuel consumption has increased.
- The smell in the exhaust pipe has changed (exhaust gases have become more toxic).
As a result of a failed sensor, the quality of the fuel mixture entering the combustion chamber deteriorates, which disrupts the smooth operation of the engine. There can be many reasons for this:
- Incorrect operation of the filament circuit or reduced sensitivity of the sensor tip.
- Low-quality fuel with a high content of iron, lead, oil decay particles and other harmful inclusions. All these substances stick to the platinum electrodes, causing the sensor to malfunction.
- Problems with the lambda probe heating system. If the heating stops functioning as it should, the oxygen sensor will produce inaccurate data.
- Overheating of the regulator housing. This happens if the ignition timing is incorrectly set.
- Worn oil scraper rings. In this case, engine fluid enters the exhaust pipe, which affects the lambda probe.
- If the engine is started repeatedly.
- Using sealants (especially silicone) to install lambda probes.
- The compression level in the engine cylinders is impaired. In this case, the combustible mixture burns unevenly.
- Clogged engine petrol injectors.
If you notice that the lambda probe is not working, you should not ignore the symptoms, as otherwise you will cause yourself a lot of problems with your car. The fact is that most modern cars are equipped with an emergency locking unit, which can work at the most unfortunate moment. However, the impossibility of further movement is not the worst thing. If the sensor becomes depressurized, the injection system will fail and you will have to pay for expensive repairs to a more serious unit.
Therefore, it is recommended to periodically check the condition of the lambda probe. You can do this yourself.
Device and symptoms of malfunction
To completely burn 1 kilogram of fuel mixture, about 14.7 kilograms of air are needed. Therefore, the lambda probe data is very important in the fuel supply system, since its performance directly affects the smooth and stable operation of your car’s engine. Periodic checking of its performance is very important, however, before checking the lambda probe, we need to study the device, as well as the principle of operation. The oxygen concentration meter sensor, otherwise called a lambda probe, (in our case, VAZ 2112 lambda probe) contains the following elements:
- Metal body with threads for mounting
- Sealing ring
- Ceramic insulator
- Electrical signal current collector
- Wires
- Cuff that seals wires
- Live contact for heating circuit
- Protective shell (outer) with ventilation hole
- Ceramic tip
- A special tank with an incandescent coil in it
- Protective screen, with a hole for the passage of exhaust gases
All parts of the lambda probe are made of materials resistant to high temperatures, since the sensor itself has a fairly high operating temperature, so it is not afraid of overheating, while overheating, for example, a motor will have dire consequences (and this is possible if the probe faulty). Probe sensors can have from one to four wires in the device, respectively, the name comes from them: one and so on up to four wire sensors. By the way, some “craftsmen” claim that the VAZ 2112 works well without a lambda probe, but they are mistaken, it’s just that until the engine is warmed up, the readings of the sensor are not taken into account during injection, since it has not reached its operating temperature, therefore, you can trust such advice drive without it, only on a cold engine. Failure of the oxygen sensor is often caused by violations in the maintenance and care of internal engine parts and some other factors, such as:
- Cleaning the body (washing) with products that are not intended for this purpose
- Accidental contact with coolant or brake fluid on its body
- Increased content of lead (metal additives) in fuel
- Severe overheating (red hot) of the sensor housing, which is caused by an unrefined combustible mixture
- In addition, the ingress of highly contaminated gasoline may occur due to a malfunction of the gasoline pressure regulator, or the DTOZh (coolant) temperature sensor, or a clogged fuel filter.
As a rule, if the lambda probe of the VAZ 21124 is faulty, this causes the following very noticeable problems in the operation of the engine:
- Its need for fuel increases, its consumption increases
- The car jerks when driving
- Unstable motor operation occurs
- The operation of the catalyst is disrupted
- Exhausts exceed permissible toxicity standards
Therefore, it is necessary to carefully monitor the operation of the probe and the condition of the exhaust gases; it is recommended to check its condition every 5,000-10,000 kilometers, especially this is necessary before the vehicle is certified for exhaust toxicity. In order not to bother with checking and replacing, no one bothers you to go to the service station, they will replace the sensor, they may not even look for what the problem is, or even find a couple of additional (not always existing) faults, which will raise the cost of repairs, and the quality of work may require the best.
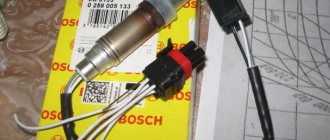
Lambda probe replacement kit
In the photo above we see what a replacement probe looks like, which is worth purchasing to replace it yourself.
Checking the probe status
So that you can check the performance of your oxygen sensor with your own hands, you will need the following items:
- Operating instructions for your car, which will tell you where the lambda probe is located in the car
- Digital voltmeter
- Oscilloscope
We have listed only the basic necessary auxiliary tools. The engine will need to be warmed up during the test. Now we’ll tell you how to check the lambda probe on a VAZ 21124 yourself, it’s simple:
- We first study the manufacturer's instructions; we are interested in the main parameters of our sensor. We check those indicators that will be affected by its unstable operation: voltage in the vehicle’s on-board circuit, ignition timing, condition and functioning of the gasoline supply system. In addition, we pay attention to the external condition of the mechanisms, for example, the presence or absence of mechanical damage to the housing and wiring
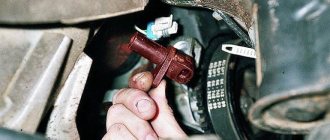
- Then we look into the engine compartment, find the lambda probe there. We inspect its condition for contamination. When the tip of the probe is covered with a layer of soot or lead, as well as a white-gray coating, it will most likely need to be replaced. The coating of the device with various deposits is usually caused by poor-quality gasoline composition. When the sensor tip is clean, then we continue checking further
- We disconnect the oxygen sensor from the car circuit and connect it to a digital voltmeter. We start the car, press the gas pedal, and increase the engine speed to 2500 rpm. We use a device to enrich your fuel mixture, reduce the speed down to 200
- If your car is equipped with an electronically controlled fuel system, remove the vacuum tube located in the gasoline pressure regulator. Now look at the voltmeter readings. And if the instrument needle approaches the 0.9V mark, this means that your lambda probe is in working condition. If the sensor malfunctions, the voltmeter needle will indicate a lack of response, as well as readings below the 0.8 Volt mark
- Do a lean test. To do this, you need to take a vacuum tube and provoke an air leak. When your oxygen sensor is working properly, then the voltmeter readings are about 0.2 Volts or lower
- We check the operation of the probe in dynamics. We connect the sensor to the connector of our fuel supply system, install a voltmeter parallel to it. We increase the engine speed to 1500 rpm. If the sensor is working properly, the voltmeter should show 0.5 Volts. Any other value will indicate that the lambda probe for the VAZ 2112 is broken
Checking the oxygen sensor
Typically, diagnostics of a lambda probe is carried out using a voltmeter and an ohmmeter or a multimeter, which replaces both of these testers at once. To check the filament coil of the regulator, you need to disconnect pins 3 and 4 of the connector from the block (usually these are brown and white wires) and connect the ends of the tester to their clamps. If the resistance of the spiral is at least 5 ohms, then this is a good sign.
Also, checking the lambda probe with a multimeter allows you to find out the sensitivity of the tip of the oxygen sensor. To find out the thermoelectric parameters of the element, you need to turn on and warm up the engine to 70-80 degrees. After that:
- Raise the engine speed to 3000 and hold this value for 3 minutes to allow the sensor to warm up.
- Connect the negative probe of the tester (signal wire) to the ground of the car, and the second one to the output of the lambda probe.
- Check the tester readings, the data should vary from 0.2 to 1 V and update up to 10 times per second.
- Press the accelerator pedal sharply and release it; if the multimeter shows a value of 1 V, and then sharply drops to zero, then the lambda probe is ok. If the data on the tester does not jump when you press and release the pedal, and the readings are about 0.4 - 0.5 V, this indicates the need to replace the sensor.
If there is no voltage at all, then most likely the cause of the malfunction lies in the wiring, so use a multimeter to test all the wires that go from the ignition switch to the relay. Healthy! To more accurately clarify the sensitivity characteristics of the lambda probe, you will need professional equipment - an oscilloscope.
If your car is equipped with a “smart” on-board system, then pay attention to the “Check Engine” signal, which may display the following errors:
- 0130 - indicates that the sensor is producing an incorrect signal.
- 0131 – very weak sensor signal.
- 0133 – lambda responds slowly.
- 0134 – no response at all.
- 0135 – malfunction of the lambda heater.
- 0136 – the grounding of the second sensor is short-circuited.
- 0137 – the second sensor produces a very low signal.
- 0138 – the signal of the second lambda is too high.
- 0140 – probe breakage.
- 1102 - it is impossible to read the indicators, since the resistance of the element is too low or completely absent.
However, before you check the lambda probe oxygen sensor (a video of this process is presented below) using a special tester, pay attention to its appearance. If substances have stuck to it that prevent it from working properly, then it may be possible to limit yourself to repairing this element.
VAZ-2112 sixteen valve sensors and their location: diagram, photo,
The efficient operation of the injection motor is ensured by a set of sensors. They all connect to the ECU. Lada hatchbacks of the two thousand one hundred twelve family were produced only with injection engines, and two varieties of these internal combustion engines are 16-valve. We will talk about them further. All VAZ-2112 sensors, their placement and appearance will be shown in the photo.
The excess oil pressure sensor, which is not connected to the computer, is shown here.
Malfunctions
A modern lambda probe installed on a VAZ has four outputs: ground, signal output and two for the heater.
The best way to read the lambda probe readings is with special software by connecting to the diagnostic bus of your car. This is the only way to find out the waveform it produces and the speed of configuration of these signals. First, when diagnosing the sensor, remove the connector from it and use a multimeter to check the presence of voltage on the signal wire from the ECU, it should be 0.45 volts. By the way, if this voltage deviates from the given value, in most cases it increases. This can be cured by installing an additional resistor. You can calculate the required resistor value as follows:
1) take an adjustable resistor, such as for volume control
2) We connect it one by one to the lambda signal power circuit.
3) connect the tester and twist the resistor until the voltage reaches 0.45-0.46 volts.
4) start the car, check if everything is OK, measure the resistance on it and select an ordinary resistor of the appropriate value. By the way, the resistor will not heat up; there is no high load.
Device and symptoms of malfunction
To completely burn one kilogram of fuel mixture, you need about 14.7 kilograms of air. Therefore, the lambda probe data is very important in the fuel supply system, because its performance directly affects the smooth and measured operation of your car’s engine. Repeated testing of its functionality is very important, but before checking the lambda probe, we need to study the device, as well as the mechanism of operation.
The oxygen concentration meter sensor, otherwise called a lambda probe, (in our case VAZ two thousand one hundred twelve lambda probe) contains the following elements:
- Metal body with threads for mounting
- Sealing ring
- Clay insulator
- Electronic signal current collector
- Wires
- Cuff that seals wires
- Live contact for heating circuit
- Protective shell (outer) with ventilation hole
- Clay tip
- A special tank with an incandescent coil in it
- Protective screen, with a hole for the passage of exhaust gases
All parts of the lambda probe are made of materials that are resistant to high temperatures, because the sensor itself has a fairly high operating temperature, so it is not afraid of overheating, while overheating, for example, a motor will have dire consequences (and this may be if the probe is faulty). Probe sensors can have from 1 to 4 wires in the device, respectively, the name comes from them: one, etc. up to 4 wired sensors. By the way, some craftsmen say that the VAZ two thousand one hundred twelve works well without a lambda probe, but they are mistaken, it’s just that until the engine is warmed up, the sensor readings are not taken into account during injection, because it has not reached its own operating temperature, therefore, trusting such The advice is that you can drive without it, only on a cool engine.
Failure of the oxygen sensor is often caused by violations in the maintenance and care of internal engine parts and certain other reasons, such as:
- Cleaning the housing (washing) with products that are not intended for this purpose
- Accidental contact with coolant or brake fluid on its body
- Excessive levels of lead (metal additives) in fuel
- Severe overheating (red hot) of the sensor housing, which is caused by an unrefined flammable mixture
- In addition, the ingress of highly contaminated gasoline may occur due to a malfunction of the gasoline pressure regulator, or the DTOZH (cooling water) temperature sensor, or a clogged fuel filter
Usually, if the VAZ 21124 lambda probe is faulty, this serves as a prerequisite for subsequent very tangible problems in the operation of the engine:
- Its need for fuel increases, its consumption increases
- The car jerks when driving
- Unstable engine operation appears
- The operation of the catalyst is disrupted
- Exhausts exceed permissible toxicity standards
Therefore, you need to closely monitor the operation of the probe and the condition of the exhaust gases; it is recommended to inspect its condition every 5000-10000 km, especially this is necessary before passing the vehicle certification for exhaust toxicity. So as not to bother with checking and replacing, no one bothers you to go to 100, they will change the sensor, they may not even find anything wrong, or even find a couple of additional (not always available) defects, which will raise the cost of repairs, well and the quality of work may require the best.
Lambda probe replacement kit
In the photo above we see what a replacement probe looks like, which is worth purchasing for independent replacement.
READ How to check the starter relay on a VAZ
How to repair a lambda probe
Repairing a lambda probe with your own hands is quite simple; to do this, you need to determine in which particular unit the failure occurred.
If the problem is related to the circuit contacts, then first of all you need to find the break point and check whether the contacts have oxidized. The signal may simply not come from the control unit. Therefore, check the lambda power supply. If the element contacts have oxidized, they must be treated with WD40.
If a lot of carbon deposits have formed on the probe body, it may be necessary to clean all parts of the system. And here a natural question arises: how to rinse the lambda probe. The fact is that it is strictly prohibited to process platinum electrodes and ceramic rods with sandpaper. Therefore, it is necessary to use specialized products designed to dissolve rust.
To clean the sensor, follow these steps:
- Remove the lambda probe after heating its housing to 50 degrees.
- Remove the protective cap.
- Soak the sensor in phosphoric acid for 30 minutes (it will cope with even the most difficult deposits).
- Rinse the lambda in water, dry it and install the element back. Don't forget to lubricate the sensor threads with a special agent to create a complete seal (but don't use silicone sealant).
Since the cost of sensors ranges from 1000 - 3000 rubles per element, it is quite reasonable to try to repair the lambda probe yourself (see video below), and only then proceed to install a new element.
Purpose of the oxygen sensor
The oxygen sensor is installed in the exhaust manifold (the specific location and quantity may differ for different cars), and monitors the presence of oxygen in the exhaust gases. In the automotive industry, the Greek letter "lambda" denotes the ratio of excess oxygen in the air-fuel mixture. It is for this reason that the oxygen sensor is often called a “lambda probe”.
The information provided by the sensor about the amount of oxygen in the exhaust gases is used by the electronic engine control unit (ECU) to adjust fuel injection. If there is a lot of oxygen in the exhaust gases, it means that the air-fuel mixture supplied to the cylinders is poor (voltage at the sensor is 0.1...0.3 Volts), and if there is a lot of oxygen, it means it is rich (voltage at the sensor is 0.6...0.9 Volta). Accordingly, the amount of fuel supplied is adjusted if necessary. Which affects not only the dynamic characteristics of the engine, but also the operation of the exhaust gas catalytic converter.
In most cases, the effective operating range of the catalyst is 14.6...14.8 parts of air per part of fuel. This corresponds to a lambda value of one. Thus, the oxygen sensor is a kind of controller located in the exhaust manifold. Some vehicles are designed to use two oxygen concentration sensors. One is located before the catalyst, and the second is after. The task of the first is to correct the composition of the air-fuel mixture, and the second is to check the efficiency of the catalyst. The sensors themselves are usually identical in design.
Description of the oxygen sensor
Let's start with a description of the device. We invite you to familiarize yourself with its purpose, structure, and operating principle.
Purpose and location
The VAZ 2110 lambda probe largely influences the stable functioning of the engine, ensuring the normal operation of its parameters. This controller is an electronic device used to determine the amount of oxygen present in the exhaust gases. This is necessary in order to reduce the volume of harmful impurities and elements contained in exhaust gases. In order to ensure the required proportion of the air-fuel mixture, which affects the reduction in the concentration of impurities, air must be supplied to the engine in the required quantity.
Lambda probe installation location
This is not always achieved, and the reasons may be different. If the controller fails, the carbon monoxide content in the exhaust gases will be about 3-7%, while the standard value is 0.3%. As for the location, this sensor on a VAZ is installed on the exhaust pipe of the muffler, from below. The readings recorded by the lambda probe are transmitted to the motor control unit. And the ECU, focusing on them, adjusts the composition of the combustible mixture, thus setting the required time for the injection phase.
Design and principle of operation
The VAZ 2110 oxygen sensor consists of the following elements:
- steel body;
- insulator component, which is made from ceramics;
- O-ring with wiring and cuffs;
- a special case with holes for ventilation;
- ceramic tip;
- conductive contact;
- a special shield, which also has holes through which gases are released;
- filament coil.
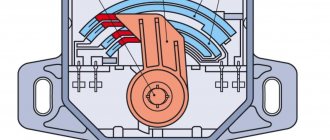
The device is based on two electrodes - internal and external, the first is made of zirconium, and the second is made of platinum. The zirconium electrode is in direct contact with the exhaust gases, and the platinum electrode is in contact with the air. The values that the controller receives are based on the potential difference between these elements. To ensure optimal operation of the oxygen controller, the device must be heated to 300-400 degrees (video author - MotorState channel).
The temperature is quite high, it is achieved through the use of a special heating component, which is built into the structure of the lambda probe. When the engine starts, the control unit adjusts the composition of the combustible mixture based on the readings of other controllers, and not just the lambda probe. In particular, we are talking about mass air flow sensor, throttle opening sensor, antifreeze temperature in the system, etc. And the control unit begins to refer to the lambda probe readings only after the device has warmed up to operating temperature.
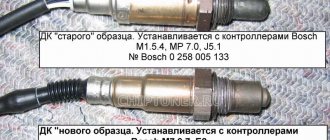
Kinds
The first “Ten” injection engines used standard oxygen controllers from the manufacturer Bosch. In 2004, when these car models began to be equipped with more modern injection systems, which were called January 7.2, Bosch M7.9.7, the cars began to be equipped with modernized versions of VAZ oxygen regulators. The latest version differs from the earlier one in that it is equipped with a ceramic heating element, thanks to which less electricity consumption is achieved.
But even this allowed the controller to warm up faster. Currently, Bosch produces seven different types of oxygen sensors with different powers - 12 and 18 W. It should be noted that these devices differ from each other, perhaps, in the values of energy consumption and the number of contacts. In all other respects they are identical.
Does the lambda probe affect startup - what will happen?
If you turn off the lambda probe, there will be an increase in fuel consumption, an increase in gas toxicity, and sometimes unstable engine operation at idle speed. However, this effect occurs only after warming up, since the oxygen sensor begins to operate at temperatures increased to +300°C. To do this, its design involves the use of special heating, which turns on when the engine starts. Accordingly, immediately at the moment of starting the engine, the lambda probe does not work, and in no way affects the start itself.
The “check” light for a malfunctioning lambda probe lights up when specific errors related to damage to the sensor wiring or the sensor itself are generated in the ECU memory, but the code is recorded only under certain engine operating conditions.
Correct probe replacement
Replacing a lambda probe on a VAZ 2112 requires the following actions:
- First, disconnect the probe wire from the electrical wiring. The procedure is carried out with the engine completely cooled and the ignition off. To replace an old device, you should purchase a sensor with the same markings as the previous one
- Then, using the key we need, we unscrew the old sensor. From a dead point, it is best to rip the device off with the ignition on, and, of course, the hot sensor and exhaust pipe, otherwise there is a risk of damaging, pulling or stripping the threads; in a cold state, any metal shrinks, and you will have to unscrew it with considerable effort. When you've pulled it off, you can turn off the engine. It will be much easier to unscrew further
Attention: when the engine is hot there is a danger of getting burned, so you should use thick cloth gloves and be careful
- The new probe is screwed in until it stops in order to create a tight seal.
- Connecting the electrical wiring
- We check the performance of the new oxygen sensor using an oscilloscope, and a voltmeter, as well as an ohmmeter, the engine temperature is not lower than 350 degrees, at this point the replacement of the VAZ 2112 lambda probe is completed
That's all, good luck in replacing and checking your sensor, and in addition we recommend video material on replacing it.
Source: https://masteravaza.ru/elektroprovodka-i-elektrooborudovanie/datchiki/zamenit-lyambda-zond-vaz-2112-1269
Signs of a malfunctioning oxygen sensor
Failure of the lambda probe is usually accompanied by the following external symptoms:
- Deterioration of traction and reduction of dynamic characteristics of the car.
- Unstable idle. In this case, the speed value can jump and drop below optimal. In the most critical case, the car will not hold idle speed at all and, without accelerating the driver, it will simply stall.
- Increased fuel consumption. Usually the overrun is insignificant, but can be determined by software measurement.
- Increased exhaust toxicity. In this case, the exhaust gases become opaque, but have a grayish or bluish tint and a sharper, fuel-like odor.
It is worth mentioning that the signs listed above may indicate other failures of the engine or other vehicle systems. Therefore, in order to determine malfunctions of the oxygen sensor, several checks are needed using, first of all, a diagnostic scanner and a multimeter to check the lambda signals (control and heating circuit). As a rule, problems with the wiring of the oxygen sensor are clearly detected by the electronic control unit. At the same time, errors are formed in its memory, for example, p0136, p0130, p0135, p0141 and others. In any case, it is necessary to check the sensor circuit (check the presence of voltage and the integrity of individual wires), and also look at the operation schedule (using an oscilloscope or diagnostic program).
Correct probe replacement
Replacing a lambda probe on a VAZ 2112 requires the following actions:
- First, disconnect the probe wire from the electrical wiring. The procedure is carried out with the engine completely cooled and the ignition off. To replace an old device, you should purchase a sensor with the same markings as the previous one
- Then, using the key we need, we unscrew the old sensor. From a dead point, it is best to rip the device off with the ignition on, and, of course, the hot sensor and exhaust pipe, otherwise there is a risk of damaging, pulling or stripping the threads; in a cold state, any metal shrinks, and you will have to unscrew it with considerable effort. When you've pulled it off, you can turn off the engine. It will be much easier to unscrew further
Attention: when the engine is hot there is a danger of getting burned, so you should use thick cloth gloves and be careful
- The new probe is screwed in until it stops in order to create a tight seal.
- Connecting the electrical wiring
- We check the performance of the new oxygen sensor using an oscilloscope, and a voltmeter, as well as an ohmmeter, the engine temperature is not lower than 350 degrees, at this point the replacement of the VAZ 2112 lambda probe is completed
That's all, good luck in replacing and checking your sensor, and in addition we recommend video material on replacing it.
Source: https://masteravaza.ru/elektroprovodka-i-elektrooborudovanie/datchiki/zamenit-lyambda-zond-vaz-2112-1269
Causes of oxygen sensor malfunction
In most cases, an oxygen lambda operates for about 100 thousand km without failures; however, there are reasons that significantly reduce its service life and lead to malfunctions.
- Oxygen sensor circuit malfunction . Express yourself differently. This may be a complete break in the power and/or signal wires. The heating circuit may be damaged. In this case, the lambda probe will not work until the exhaust gases warm it up to operating temperature. The insulation on the wires may be damaged. In this case, a short circuit occurs.
- Sensor short circuit . In this case, it completely fails and, accordingly, does not give any signals. Most lambda probes cannot be repaired and must be replaced with new ones.
- Sensor contamination with fuel combustion products . During operation, the oxygen sensor gradually becomes dirty for natural reasons and over time may stop transmitting correct information. For this reason, automakers recommend periodically replacing the sensor with a new one, while giving preference to the original, since the universal lambda does not always display information correctly.
- Thermal overloads . This usually happens due to problems with the ignition, in particular, interruptions with it. Under such conditions, the sensor operates at critical temperatures, which reduces its overall service life and gradually disables it.
- Mechanical damage to the sensor . They can occur during careless repair work, when driving off-road, or from impacts during an accident.
- When installing the sensor, use sealants that vulcanize at high temperatures.
- Multiple unsuccessful attempts to start the engine. At the same time, unburnt fuel accumulates in the engine, and in particular, in the exhaust manifold.
- Contact of various process liquids or small foreign objects on the sensitive (ceramic) tip of the sensor.
- Leaks in the exhaust gas exhaust system. For example, the gasket between the manifold and the catalyst may burn out.
Please note that the condition of the oxygen sensor largely depends on the condition of other engine components. Thus, the following factors significantly reduce the life of the lambda probe: unsatisfactory condition of the oil scraper rings, antifreeze getting into the oil (cylinders), and an enriched air-fuel mixture. And if, with a working oxygen sensor, the amount of carbon dioxide is about 0.1...0.3%, then if the lambda probe fails, the corresponding value increases to 3...7%.
How to determine a faulty oxygen sensor
There are a number of methods for checking the condition of the lambda sensor and its power/signal circuits. BOSCH specialists advise checking the corresponding sensor every 30 thousand kilometers, or when the malfunctions described above are detected.
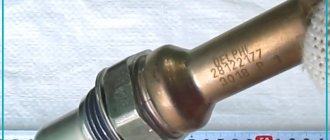
- It is necessary to evaluate the amount of soot on the probe tube. If there is too much of it, the sensor will not work correctly.
- Determine the color of the deposits. If there are white or gray deposits on the sensor element, this means that fuel or oil additives are being used. They negatively affect the operation of the lambda probe. If there are shiny deposits on the probe tube, this indicates that there is a lot of lead in the fuel used, and it is better to refuse to use such gasoline, and accordingly, change the brand of gas station.
- You can try to clean the soot, but this is not always possible.
- Check the integrity of the wiring with a multimeter. Depending on the model of a particular sensor, it may have from two to five wires. One of them will be a signal one, and the rest will be a supply one, including for powering the heating elements. To perform the test procedure, you will need a digital multimeter that can measure DC voltage and resistance.
- It makes sense to check the resistance of the sensor heater. In different lambda probe models it will range from 2 to 14 ohms. The supply voltage should be about 10.5...12 Volts. During the verification process, it is also necessary to check the integrity of all wires approaching the sensor, as well as the value of their insulation resistance (both in pairs and each to ground).
How to check a lambda probe video Please note that normal operation of the oxygen sensor is only possible at its normal operating temperature of +300°C...+400°C. This is due to the fact that only under such conditions does the zirconium electrolyte deposited on the sensitive element of the sensor become a conductor of electric current. Also, at this temperature, the difference between atmospheric oxygen and oxygen in the exhaust pipe will cause an electric current to appear on the sensor electrodes, which will be transmitted to the electronic engine control unit. Since checking the oxygen sensor in many cases involves removal/installation, it is worth considering the following nuances:
- Lambda devices are very fragile, so during testing they should not be subjected to mechanical stress and/or shock.
- The sensor thread must be treated with special thermal paste. In this case, you need to make sure that the paste does not get on its sensitive element, as this will lead to its incorrect operation.
- When tightening, it is necessary to observe the torque value and use a torque wrench for this purpose.
How to replace the oxygen concentration sensor, also known as a lambda probe, on a VAZ 2110-VAZ 2112?
Removal: 1) First, remove the “-” terminal from the battery, using a wrench to loosen the nut that holds this terminal. (How to loosen the nut and then remove the terminal from the battery, read the article: “Replacing the battery”, in the “first” paragraph)
2) Next, find the second end of the wiring harness, which comes from the oxygen sensor and connects to the block, and after finding it, disconnect them from each other.
Note! To make it easier for you to find the second tip of the wiring harness and block, in this case, start your search from the first tip, which is installed in the exhaust pipe of the car!
Accurate testing of the lambda probe
The most accurate way to determine the malfunction of the oxygen concentration sensor is to use an oscilloscope. Moreover, it is not necessary to use a professional device; you can take an oscillogram using a simulator program on a laptop or other gadget.
Graph of correct operation of the oxygen sensor The first figure in this section shows a graph of the correct operation of the oxygen sensor. In this case, a signal similar to a smooth sine wave is received on the signal wire. A sinusoid in this case means that the parameter monitored by the sensor (the amount of oxygen in the exhaust gases) is within the maximum permissible limits, and it is simply constantly and periodically checked.
Operating diagram of a heavily contaminated oxygen sensor.
Graph of operation of the oxygen sensor on a lean fuel mixture.
Graph of operation of the oxygen sensor on a rich fuel mixture.
Graph of oxygen sensor operation on a lean fuel mixtureThe following are graphs corresponding to a heavily contaminated sensor, the use of a lean fuel mixture by the car engine, a rich mixture, and a lean mixture. Straight lines on the graphs mean that the monitored parameter has gone beyond the permissible limits in one direction or another.
The cheapest way to replace a lambda probe on a VAZ 2112 is to do it yourself
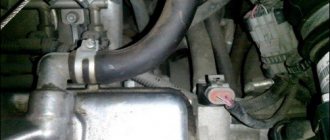
The lambda probe for the VAZ 2112 is located on the exhaust pipe of the exhaust manifold
VAZ 2112 lambda sensor (or oxygen sensor) is located in the exhaust manifold of the engine. Its readings enable the control unit to adjust the desired ratio of air to gasoline that enters the combustion chambers. And in the case when a lean or, on the contrary, very rich fuel mixture arrives, the electronic unit adjusts its composition, taking into account the readings given by the lambda probe on the VAZ 2112.
Method one
Involves cleaning the heating element from carbon deposits (used when a malfunction of the oxygen sensor heater occurs). To implement this method, it is necessary to provide access to the sensitive ceramic part of the device, which is hidden behind a protective cap. You can remove this cap using a thin file, with which you need to make cuts in the area of the base of the sensor. If it is not possible to completely dismantle the cap, then it is possible to make small windows about 5 mm in size. For further work, about 100 ml of orthophosphoric acid or rust converter is needed. When the protective cap has been completely removed, you will have to use argon welding to restore it to its seat.
The recovery procedure is performed according to the following algorithm:
- Pour 100 ml of phosphoric acid into a glass container.
- Immerse the ceramic sensor element in acid. Do not completely immerse the sensor in acid! After this, wait about 20 minutes for the acid to dissolve the soot.
- Remove the sensor and rinse it with running tap water and then allow it to dry.
Sometimes it takes up to eight hours to clean the sensor using this method, because if you don’t succeed in cleaning the soot the first time, then it makes sense to repeat the procedure two or more times, and you can use a brush to mechanically treat the surface. Instead of a brush, you can use a toothbrush.
Method two
It assumes carbon deposits have burned out on the sensor. To clean the oxygen sensor using the second method, in addition to the same orthophosphoric acid, you will also need a gas burner (as an option, use a home gas stove). The cleaning algorithm is as follows:
- Dip the sensitive ceramic element of the oxygen sensor into acid, wetting it generously.
- Take the sensor with pliers from the side opposite to the element and bring it to the burning burner.
- The acid on the sensitive element will boil, and a greenish salt will form on its surface. However, at the same time, soot will be removed from it.
None Ask in the comments. We will definitely answer!
The oxygen sensor (hereinafter referred to as OS) is designed to measure the amount of oxygen in the exhaust gases of a car for the purpose of subsequent adjustment of the enrichment of the fuel mixture. A rich and lean mixture is equally “bad” for a car engine. The engine “loses” power, fuel consumption increases, and the unit operates unstable at idle.
Domestic car brands, VAZ and Lada, among others, have one oxygen sensor preinstalled. European and American technical means are equipped with two controllers:
- Diagnostic;
- Managers.
They are no different from each other in design and size, but perform different functions.
Where is the oxygen sensor located on the VAZ 2112
In cars of the Lada (VAZ) family, the oxygen controller is located on the section of the exhaust pipe between the exhaust manifold and the resonator. Access to the mechanism for the purpose of prevention and replacement from under the bottom of the car. For convenience, use an inspection channel, a roadside overpass, or a hydraulic lifting mechanism.
The average service life of the controller is 85 – 115 thousand km. If refueled with high-quality fuel, the service life of the equipment increases by 10 - 15%.
Oxygen sensor for VAZ 2112: original, analogues, price, articles
| Catalog article/marking | Price in rubles |
| BOSCH 0258005133 (original) 8 and 16 valves | From 2400 |
| 0258005247 (analog) | From 1900-2100 |
| 21120385001030 (analog) | From 1900-2100 |
| *prices are as of May 2021 |
Mass-produced VAZ 2112 cars are equipped with German Bosch brand oxygen controllers. Despite the low cost of the original, not many car enthusiasts buy factory parts, preferring analogues.
Note to the driver!!! Service station mechanics strongly recommend purchasing parts with factory catalog numbers in order to prevent unstable operation of the power unit.
Installation and replacement of an oxygen sensor on a VAZ 2112
Preparatory stage:
- Key to "17";
- New controller;
- Rags;
- Multimeter;
- Additional lighting (optional).
Do-it-yourself diagnostics of the controller on a VAZ 2112:
- We turn off the engine, open the hood;
- Disconnect the terminal from the DC;
- We connect the limit switches of the multimeter (pinout);
- We switch the equipment to the “Resistance” mode;
- We read the scale readings.
If the arrow tends to infinity, the controller is working properly. If the readings go to “zero” - there is a short circuit, a malfunction, the lambda probe dies. Since the controller is not dismountable, it cannot be repaired; it must be replaced with a new one. The process of self-replacement is not at all difficult, but requires care on the part of the repairman.
- We install the machine on the inspection channel for ease of work. If there is no inspection hole, then use a roadside overpass or a hydraulic lift;
- We turn off the engine, open the hood, wait until the exhaust system cools down to a safe temperature, so as not to get burns to the skin of the hands;
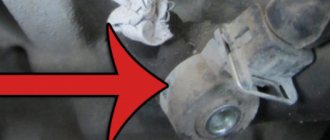
- Near the resonator (coupling) we find the oxygen controller. Remove the block with wires;
- Using a key set to “17”, unscrew the sensor from its seat;
- We carry out preventive maintenance, clean the threads from deposits, rust, and corrosion;
- We screw in the new controller;
- We put on the block with wires.
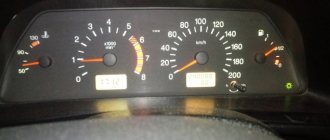
We start the engine, it idles. It remains to check the serviceability, functionality, and stability of the engine stroke. We look at the dashboard, error indication of the electronic control unit.
Oxygen sensor for VAZ 2112
The oxygen sensor on the VAZ-2112 is designed to measure oxygen in the exhaust gases of a vehicle. Thanks to the results obtained, it is possible to control the level of enrichment of the fuel mixture. It is worth noting that for the VAZ-2112 engine, both a too rich mixture and a lean one are critical. The engine may lose power or begin to consume a lot of fuel. In turn, when the engine is idling, unstable speed will be observed.
Location and service life of the controller
On a VAZ-2112 with engines with 16 valves, the measuring device is located at the exhaust pipe, between the exhaust manifold and the coupling. To replace the device, you must gain access to the underbody of the vehicle body. For the best convenience, you need to drive the car into a garage with a pit or drive onto an overpass located near the highway.
The service life of the oxygen sensor may vary. If a motorist uses a high-quality fuel mixture, the service life will be up to 110 thousand kilometers. In the case when a low-quality mixture is used, the service life is reduced to 85 thousand kilometers.
How to determine that the DC is faulty
Motorists often ask what symptoms of failure may occur with a faulty oxygen sensor. Here are the most common of them:
- Unstable starting of a cold and hot engine.
- Errors appeared on the dashboard. Signs of DC malfunction are failures P0137 and P0578. They also often occur when the DTOZH malfunctions, so a check is needed.
- There is too much fuel consumption at short distances.
- Ignition of the working mixture in the cylinders.
- Exhaust gases that are black or bluish-black are also signs of a DC malfunction. This may also indicate a poor quality fuel mixture.
- The engine begins to "trouble". Extraneous sounds are observed. Which indicates that the driver has been using a low-quality fuel mixture for a long time.
Why can a DC fail?
The reasons may be the following:
- manufacturing defects;
- damage due to mechanical impact;
- the car owner has not maintained the car for several years;
- damage to conductors or detachment of contacts;
- The electronic control unit does not work correctly, causing the initial data to be displayed with an error.
Functionality check
Many VAZ-2112 owners ask how to check the lambda probe (oxygen sensor) themselves. To do this you will need to do the following:
- It is necessary to turn off the engine and allow it to cool.
- After this, open the hood of the car and disconnect all contacts leading to the oxygen sensor.
- Take a multimeter and connect the end probes to the lambda probe.
- Then use the “Resistance” mode on the multimeter. If the arrow goes to infinity, then the device is working correctly and the readings are being transmitted correctly.
- In a situation where the arrow shows a value near zero, the measuring device is faulty and needs to be replaced.
How to independently replace the device on a VAZ-2112
To replace a faulty controller, you will need to perform the following algorithm:
- Drive the car into a garage with a pit or onto a roadside overpass for ease of work.
- Turn off the engine and give it time to cool.
- Then you need to look under the bottom and find the oxygen sensor near the clutch.
- Next you need to disconnect the block with wires.
- Use a wrench to remove the oxygen sensor.
- Clean the threads and contacts using cleaning fluid.
- After this, use a wrench to secure the new measuring controller.
- Place the block with wires.
To check, you need to start the engine at idle speed. If there is no error on the dashboard and the readings are determined correctly, then everything was done correctly.
How to extend the service life of a recreation center
To extend the service life of the sensor, you will need to follow the following recommendations:
- Conduct a technical inspection of the vehicle on time;
- use only original spare parts for the car;
- do not allow the use of low-quality fuel mixture;
- Contact a car service if you find problems with engine operation.
You can change the oxygen sensor on a VAZ-2112 yourself without going to a car service center. Only original components must be used. If there are problems starting the engine, you should check the correct operation of the lambda probe.
Video on the topic
Recommendations for care and maintenance of the VAZ 2112 car
- During the period of the factory warranty, comply with the technical inspection deadlines;
- Buy parts with original catalog numbers. The full list of indices is specified in the VAZ 2112 operating manual;
- If a malfunction or unstable operation of the mechanisms is detected, contact a service station for comprehensive diagnostics;
- After the expiration of the factory warranty, carry out a technical inspection of the car at intervals of 15,000 km.
Sources:
- avto-moto-shtuchki.ru
- etlib.ru
- zapchasti.expert