A little test
Before making a replacement, you need to make sure that it is the starter that is faulty, and not the fuse in the mounting block and the wiring. Also check the starter relay.
Let's look at all the steps in more detail. Let’s say that when you turn the key to the “II” mark, you hear a click and the starter shaft does not rotate. This means that the solenoid relay is working and voltage is supplied to the starter correctly. In this case, the starter itself must be replaced. If there is no click, try disconnecting the plastic connector and checking for voltage.
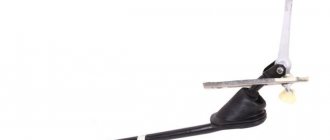
This connector needs to be disconnected
If there is no voltage at the connector terminal even when you try to start, it means the vehicle wiring is faulty and not the starter. To be sure, try closing the starter with a screwdriver; if it starts the car, then the starter and bendix are working.
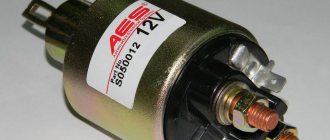
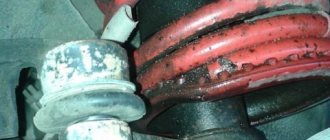
Also check the voltage on the power wire (copper nut). It must always be present. Read more in the article: why the Lada Granta engine does not start.
The power wire nut will be covered with a rubber cap. It needs to be removed.
Car with gearbox 2181 or automatic transmission
It is necessary to disconnect the battery (10mm wrench) and move the car to the pit. Using a 10mm spanner, unscrew the two screws holding the middle shield (see figure). Then you need to unscrew nine self-tapping screws - parts 1, 4 and 5. An “8” key will fit here.
Shield on cars with manual transmission
Finally, remove not only the middle, but also the left shield by unscrewing two more screws.
If we are talking about a sedan with an automatic transmission, it is enough to remove one shield (the main one). It is held in place by eight self-tapping screws - 4 in front, 2 on the left and 2 on the right (see figure).
Read also: Ford Focus 2 engine tuning
Shield on cars with automatic transmission
The self-tapping screws must be unscrewed with a 8mm spanner.
Dismantling
When access to the starter is open, the actions look trivial:
- Disconnect the control connector by pressing the latch tab;
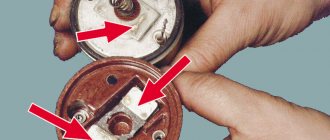
Plastic retainer varies in color
It’s better to move the cap up
Three fastening elements
The top screw is unscrewed last, holding the starter housing. Then this body is tilted back and they try not to touch anything unnecessary.
the starter has been removed
Installation can be carried out by performing the steps in reverse order. We wish you success.
general information
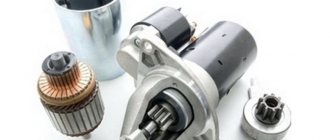
A starter is an electric motor operating on permanent magnets, having an electromagnetic two-motor traction relay and a planetary gearbox. Their cases are made of steel, six magnets are fixed to the case, and the case itself and the covers are tightened with several bolts. The starter armature shaft is put into rotation mode by two bearings, one of which, a ball bearing, is installed near the manifold, the second, a plain bearing, is installed next to the drive. Thanks to the gearbox, torque is transmitted to the starter drive shaft.
The drive shaft is equipped with an overrunning clutch with a drive gear moving along the splines of the shaft. It is the clutch that ensures the transmission of torque from the starter to the motor, separating these elements after the engine starts. This condition ensures proper protection of the starter from possible damage that it may receive due to its high rotation speed.
The relay is designed to engage the drive gear with the teeth of the crankshaft flywheel mechanism, as well as to activate the starter power supply. Thus, by turning the key in the lock, the driver begins the process of supplying electric current to the starter from the battery. The starter is set in motion and turns the crankshaft, starting the engine and igniting the combustible mixture.
After starting the engine, the crankshaft speed begins to increase, however, the clutch protects the starter from damage. After the driver returns the key in the lock to the “ignition” position, the relay winding will de-energize and its armature will return to its original position, while the relay contacts will open and the drive gear will disengage from the flywheel teeth. At the same time, the power contacts supplying electric current to the starter motor windings will open.
In addition, the starter is one of the most powerful energy consumers on a car; when starting the engine, the electric current it consumes reaches 400 A or more. For this reason, all electrical connections between the starter and the battery must have reliable contact.
The elements that Grants are equipped with are similar to the starters used by VAZ on its other cars of previous generations. When the engine is in normal condition, two or three turns will be enough to start. Deviations from the norm will be indicated by any of the existing signs of unstable functioning. Possible malfunctions of the drive and starter relay will be revealed by inspection carried out after disassembling the part.
Starter operating rules
According to AvtoVAZ standards, the time between failures is not regulated for starters, therefore, this indicator can be considered infinite. But they still have to be changed, and this is due to car owners violating operating rules. Car enthusiasts often complain about the quality of starters, pointing out that they are not able to last more than 50,000 km on domestically produced cars. But only a few of them know how to use this device correctly and correctly. Following a few simple recommendations will help you protect yourself from a whole list of starter malfunctions:
- When starting the engine, it is necessary to hold the PU for 10 to 15 seconds; restarting is carried out no earlier than half a minute later. Frequent and continuous operation of the PU leads to systematic overheating of the overrunning clutch, thereby provoking its premature wear. Remember - if there are three consecutive unsuccessful attempts to start the engine, the problem should be looked for in the wiring, fuel equipment or ignition system;
- After starting the engine, immediately turn off the starter, for which you will need to release the key in the lock;
- Many experienced car owners do not recommend using PU when temporarily driving a car (this is what novice drivers often do when the battery is discharged or there is damage to the power supply circuit).
Problems with the starter, ways to solve them on Lada Granta
Often breakdowns are associated with electrical and mechanical components. Therefore, it is important to be able to separate one from the other. Without experience in servicing a technical device, it is better to contact a service center with specialists. Sometimes unprofessional intervention is more likely to harm than restore a good condition.
Electrical
Damage is typical in the area where the current flows from the battery to the starting device (hereinafter referred to as the PU).
- Slow rotation of the rotor, the starter does not start;
- Lack of response when current is supplied to the control unit;
- The control unit clicks, but does not turn: short circuit on the turns, broken wiring, faulty solenoid relay;
- wear of brushes, armatures.
To exclude other breakdowns of adjacent mechanisms, check:
- battery charge level;
- tightness of terminals on the battery;
- electrical wiring in the area from the battery to the starter;
- condition of the ignition switch core.
Types of starters used on Grants
All cars produced in the first years of production of the model were equipped with a starter 21120-3708010-00, which was secured with three nuts. But gradually the manufacturer switched to producing cars with a cable transmission, after which the starter began to be secured with screws. The owner can find out about the type of starter installed on his car by looking at the box, for example:
- boxes 2190 correspond to parts 21120-3708010-00;
- on vehicles equipped with 2181 gearboxes, starters 21901-3708010-00 are installed;
- Jatco automatics correspond to starters 21902-3708010-00.
Sequence of actions when replacing the thermostat on a Lada Grant with 8 valve
- We park the car within the perimeter of the repair area.
- Drain the antifreeze (antifreeze).
- Remove the clamps and disconnect the pipes in the cooling system.
- Unscrew the three screws securing the regulator to the cylinder block.
- We remove the thermostat.
- We carry out troubleshooting.
- We install new parts and assemble the mechanisms in reverse order.
Where is the thermostat located on the Lada Granta
In the Lada Granta family of cars, the “flow regulator” is fixed on the outer casing of the cylinder block on the rear side. Schematically, it is located on a section of the line between the cylinder block and the radiator of the cooling system.
Spare part location
When the temperature reaches 90°C, the regulator redirects the flow of antifreeze from the small circle to the large one. The small circuit structurally consists of:
- water jacket;
- pump (pump);
- stove heater.
Note to the driver! In modifications of the Lada Granta, the heater is looped into a small circuit, and not in parallel, as was the case in previous VAZ models.
When the temperature reaches 90°C, the regulator valve opens and the antifreeze begins to circulate in a large circle, passing through the cooling radiator.
The advantage of a small circle is that the antifreeze, leaving the block, immediately goes to the flow regulator, which allows you to more accurately determine the degree of antifreeze.
At the same time, the thermostat on the Lada Grant opens at 85°C, and not 90°C, as the manufacturer indicates in the instruction manual. The actual range varies from 78°C to 93°C.
Fortunately, underheating does not have critical consequences, but it is not desirable. Such systematic actions lead to deterioration of lubrication, underheating of the combustible mixture, as a result of which the fuel does not burn completely in the cylinders.
Replacement and installation of Lada Granta starter
Dismantling begins only after the source of the breakdown has been accurately identified. We prepare in advance a set of tools, rags, lubricant, additional lighting, a screwdriver with a set of bits.
- We fix the car on the inspection channel, fix the wheel chocks, and activate the parking brake for personal safety. The presence of a hydraulic lift will become an indispensable assistant during repairs;
- We remove the terminals from the battery in order to prevent a short circuit in the circuit;
- From under the bottom, unscrew the left side of the engine protection, the mudguard. The board protects the engine compartment from below from dirt, stones, gravel, and mechanical damage to the crankcase and cylinder block;
- Using keys “15”, “13”, unscrew the locking nuts, remove the power terminal from the contact board, and remove the starting device from its standard place.
After dismantling, we install a new control unit and assemble the structure in the reverse order. If you want to reassemble an existing starter, then the operating algorithm is as follows: disassemble the PU into its component elements, clean it, wipe it dry.
We carry out troubleshooting of components, replacing worn components with new ones. It is unacceptable to use faulty parts for re-installation.
During installation, do not forget to lubricate the splines and shaft teeth to prevent friction, squeaking, and excessive wear.
If you encounter difficulties with installing the control unit, watch the video online and get advice from service station specialists.
If you need to replace the starter on a Lada Granta or repair it, then this article will help you learn more about the starter itself and how to manipulate it.
Instructions for changing the starter on a car with gearbox 2190
First, disconnect the negative terminal from the battery using a 10mm wrench. Then the sensor connector located at the air filter is disconnected and the filter box is removed with pliers from the three mounting points. After removing the box, it is recommended to put it aside; the assembly must be securely fixed using wire for this purpose.
Carrying out dismantling work
The starter module is held in place by studs, and nuts are screwed onto them, but dismantling should not begin by unscrewing them:
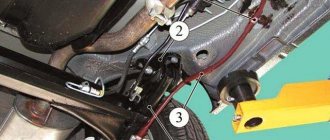
- The first thing you need to do is remove the rubber cap, then unscrew the copper nut with a 13mm wrench;
- The next step is to remove the power wire terminal, after which you should disconnect the connector intended for supplying control voltage;
- Next, use a 13mm wrench and unscrew the three nuts securing the starter. Particular attention should be paid to the bottom, most inaccessible nut;
- The part module is then carefully pushed back and removed from the studs. Installation work includes actions similar to dismantling, performed in the opposite sequence.
Instructions for changing the starter on a car with gearbox 2181 or automatic transmission
Initially, you will need to disconnect the battery using a 10mm wrench, then the car will be moved to the inspection hole. Using a size 10 spanner, unscrew the two screws holding the middle shield, after which all nine screws are unscrewed (to solve this problem, use a size 8 spanner).
Next, you will need to remove the middle and left panels, for which you need to unscrew two more screws. However, when changing the starter on sedans with automatic transmission, you can get by by removing only the main shield, which is held in place by eight screws, four of which are located in front, and two more on the left and right sides. They can also be unscrewed using a 8mm spanner.
Replacement and installation of Lada Granta starter
Dismantling begins only after the source of the breakdown has been accurately identified. We prepare in advance a set of tools, rags, lubricant, additional lighting, a screwdriver with a set of bits.
- We fix the car on the inspection channel, fix the wheel chocks, and activate the parking brake for personal safety. The presence of a hydraulic lift will become an indispensable assistant during repairs,
- We remove the terminals from the battery in order to prevent a short circuit in the circuit,
- From under the bottom, unscrew the left side of the engine protection, the mudguard. The board protects the engine compartment from below from dirt, stones, gravel, mechanical damage to the crankcase, cylinder block,
- Using keys “15”, “13”, unscrew the locking nuts, remove the power terminal from the contact board, and remove the starting device from its standard place.
After dismantling, we install a new control unit and assemble the structure in the reverse order. If you want to reassemble an existing starter, then the operating algorithm is as follows: disassemble the PU into its component elements, clean it, wipe it dry.
We carry out troubleshooting of components, replacing worn components with new ones. It is unacceptable to use faulty parts for re-installation.
During installation, do not forget to lubricate the splines and shaft teeth to prevent friction, squeaking, and excessive wear.
If you encounter difficulties with installing the control unit, watch the video online and get advice from service station specialists.
Components from AvtoVAZ and possible foreign analogues
Initially, KZATE starters were supplied to AvtoVAZ, but since 2011, Valeo has become the main supplier of these parts. For this reason, the current list of components with analogues is as follows:
- Starter 21120-3708010-00 (KATEK, KZATE, ZiT) - they are similar to Fenox ST32101C3 starters;
- Starter 21901-3708010-00 (VALEO) – its analogue is VALEO TS12E901;
- Starter 21902-3708010-00 (VALEO) – similar to VALEO TS12E902.
Do not forget that none of the three options above are interchangeable with the others: the second and third differ in the number of teeth, and elements from KZATE and VALEO are not compatible due to fastenings.
Originals, analogues, articles and prices
| Article / name / OEM | Price, rub.) |
| 3708010-81 | From 3100 |
| 438286 (Valeo) | From 3900 |
| TS12E901 (Pramo) gearbox | From 3700 |
| 21902-3708010-00 Automatic transmission (Valeo) | From 3400 |
| 21901-3708010-00 Manual transmission (Valeo) | —/— |
| 438285 (Valeo) | From 3100 |
| 2190-3708000 (8 valves) | —/— |
https://www.youtube.com/watch?v=ytadvertiseen-GB
*check prices at the time of purchase from an authorized dealer.
The manufacturing quality of domestic and foreign starters is approximately the same. It is not advisable to overpay 10–15% of the cost for a brand. Although, this is everyone's business.
Auto chemical goods
On elements from VALEO, the nut located on the terminal is coated with zinc, and the contact screw is also galvanized. Therefore, they can only be treated with WD-40 or one of its substitutes. But this processing option is not suitable for copper. All car owners using WD liquid on copper are strongly advised not to repeat their mistake - using WD-40 will lead to destruction of the outer layer.
That is why the threads on KZATE starters made of copper must be cleaned using special means. To do this, you can use: Molykote S-1002 solvent, WL remover, Kontakt 60 or 100 acid and CRAMOLIN ContaClean. When reusing an element after exposure to acid, it must be cleaned with a remover.