How to repair a muffler: materials and methods
Let's consider what materials are used for repairs, and in what cases each of them will prove to be better than others.
Bandage tape
Repairing a muffler without welding is a popular repair method that does not require a large investment of time and effort. In this case, a bandage tape is used, which is wrapped around the cylindrical parts of the body and exhaust pipes. Impregnated with high-temperature adhesives, the tapes withstand high temperatures and difficult operating conditions.
This option is not suitable when the hole sizes exceed a third of the part diameter. A bandage will be a temporary measure that will not solve the problem. You risk being left without a properly functioning muffler at any time, since tapes and analogues do not provide the necessary rigidity.
Sealants and putty
These are two more materials with which you can quickly restore the performance of the exhaust system. Special assembly sealants and high-temperature putties are available in car dealerships. They are used to seal small holes caused by mechanical wear. The main feature of silicate or ceramic based sealants and putties is that they are able to withstand high temperatures (up to 1000 °C inclusive).
Cold welding
The material has proven itself well where it is necessary to eliminate the effects of corrosion - another common problem with the exhaust system. On sale there are cold welding for metals, especially for cars and universal. The last two options will suit you. Cold welding is a two-part adhesive that gains strength after drying and withstands high temperatures and contact with chemically active substances.
Car owners love this material for its affordable price, easy use and the ability to repair any metal part in a matter of seconds. The main limitation is the scale of application. The material is only suitable for small cracks and other defects. It takes two days for cold welding to completely harden, and preparatory work takes no more than 10-15 minutes.
Welding
The most reliable but difficult way to restore a muffler. During welding, you can use bookmarks - this removes restrictions on the area of damage, as is the case with other repair materials. Welding also ensures the tightness and mechanical strength of the seams. It is recommended to perform the work with a semi-automatic welding machine. Additionally, you will need 1-2 mm thick sheet metal for patches, sanding tools and heat-resistant paint for the finishing coat.
Repair of corrugations and muffler pipes
Sometimes the problem of a non-functioning muffler lies in the pipes (straight or curved) that are used to remove exhaust gases. They burn out at bends and where they come into contact with hot gases, moisture, are exposed to high temperatures, etc. To restore pipes, the same methods are used as for a muffler (they are described above).
Repairing the muffler pipe is often not the only thing that needs to be done. Sometimes the problem of the exhaust system not working properly is caused by the corrugation that connects the pipe to the engine. It wears out a lot and it is better to replace it rather than restore it. If you are confident in the strength of the main part and do not plan to replace it in the near future, you will need the help of a specialist who will a) give a final assessment and b) suggest the optimal restoration method.
Muffler repair
It is better to entrust the restoration of any car part, even one that seems minor at first glance, to specialists. This will help avoid future operational problems and save time. Experienced service technicians will answer questions, perform diagnostics and repair work of any complexity.
To sign up, call the phone number listed on the website. We serve clients from St. Petersburg and the region by appointment daily from 10:00 to 23:00. You don’t have to search for components - the necessary spare parts are available in the service center or from our trusted suppliers. We guarantee a responsible approach, affordable prices and optimal deadlines for completing the work.
How and with what to seal a hole in the muffler?
I’ll tell you from my experience, I have a VAZ-2101 car and a decent hole appeared in the muffler, but I didn’t have the money to repair it. Naturally, there was a lot of noise when the engine was running, you understand how the tractor worked, and everyone turned around when I passed. And in the trunk I had a tube of cold welding lying around; I once bought it to seal a leak in the radiator, and its remains lay there. I took the muffler, cleaned it with a file and degreased the sealing area with sandpaper, kneaded the cold weld according to the instructions (it’s like plasticine) and sealed the hole in the muffler. True, it must dry for 24 hours, after which it can be processed at high temperatures, but in our case there is no need to process it, but it maintains a high temperature in the muffler to this day. Here is a handy, unusual method for sealing a hole in a muffler. Good luck!
Before you begin repairing the muffler, you should understand that this will only be a temporary measure that will delay the replacement of the muffler.
If the damage to the muffler is significant, then it is better to repair the damage by welding.
An alternative welding method is cold welding.
It is first necessary to clean the damaged area from dust and rust.
The next step is to degrease the area.
Before applying cold welding, you must wear gloves and work in a well-ventilated area.
If the cold welding is in a syringe, then it is already ready for use, apply the mixture to the surface and wait for it to dry.
You can apply a patch over the damaged area. To do this, you need to cut a metal patch of the required size, apply the mixture to the surface, quickly apply and fix.
The required time for final drying is one day; after one day, the muffler can be subjected to loads.
These sealants harden, withstand temperature and adhere reliably even to an oily or dirty muffler pipe.
Therefore, you need to clean the area and, using a sealant, wrap the muffler or pipe with foil in several layers in order to well cover the places of breakdown or burning, destruction of the muffler system.
If you need it quickly and not for long, then you can simply seal the hole with any high-temperature sealant until the places where the sealant grabs the muffler burn and there is no noise, or until the sealant flies out due to vibration.
But if this is done reliably, then it is best to weld the hole by applying a patch; sometimes you need to seal it with two patches, overlapping each other; first, use a small patch to seal the hole itself, welding it not along the entire contour, so as not to destroy the rusty material of the muffler, but then put another patch on top of the bottom, which needs to be welded in places where the muffler is not yet subject to severe corrosion.
Somehow I had to seal patches without a welding machine, in this way:
If there is a hole in the pipe, then clamps are used instead of rivets.
Alternative muffler repair methods
It should be noted that there is another welding method that does not require the use of welding machines - cold welding. Here, composite materials based on resins and fiberglass are used to repair the surface.
These two components are mixed with a hardener and reliably glued to the defect site. Composite material is not subject to corrosion and is not afraid of high temperatures. This method does not require connecting to an electrical outlet and does not require special equipment, which makes it most convenient for travel. Preliminary work before cold welding should be performed in the same way as before conventional electric welding.
Muffler burnt out
Like any machine part, the device is subject to wear, especially when in contact with high temperatures. If the muffler has a large burnt hole in the middle, is it safe to drive? No. At the first sign of such a problem, you should contact a technician. The muffler is dismantled, then the damaged area is cut out using a grinder.
Then a plate with an area larger than the hole is cut out of millimeter-thick metal and welded in the form of a patch with a continuous seam. The seams are cleaned, degreased, and coated with a special heat-resistant compound.
This method has an additional advantage: during the process, the technician can assess the condition of the internal elements of the device and repair or replace them if necessary.
Troubleshooting
There are several different methods to fix the problem:
- Using a bandage and special impregnated fabrics. This method is the fastest and easiest. But you can’t count on the long term. A special fiberglass fabric with impregnation will only allow patching for a while and reduce the negative impact on the damaged area. In addition, the bandage is very noticeable, which is not suitable for all owners of iron horses.
- The use of sealants that are resistant to high temperatures and chemicals. This method is also short-lived and is only suitable for small chips and cracks. Large-scale damage cannot be covered up by anything.
- Repairing a muffler using cold welding is a quick and easy way to fix the problem. It is convenient due to its mobility and ease of use; as for further operation, it is a fairly stable substance that can withstand significant loads.
- Electric welding is the most common classical method of muffler repair. The connections are the strongest and most reliable. True, you need certain skills or the help of a specialist.
Options for repairing a muffler at home
Which welding method should you use? – You can choose the option that is ideal for your car with us.
Main elements of the exhaust system
The design of the exhaust system becomes more complex, but with each new car model it includes all the same elements.
Collector
The exhaust pipe is an intermediate link between the car engine and the converter (catalyst). The collector is responsible for the removal of gases. Since in this case there is a very strong mechanical and temperature load, which can reach up to 1000 degrees, quite strict requirements are imposed on this part of the muffler. Therefore, in the manufacture of the intake pipe, only the best alloys of cast iron and steel are used.
Also, a vibration compensator (corrugation) is sometimes installed on this part, thanks to which engine vibration is damped and does not pass further through the exhaust system.
Neutralizer
The catalytic converter (or catalyst) “afterburns” unburned fuel residues and processes carbon monoxide. This element of the exhaust system is a special chamber or tank in which a ceramic or metal element in the form of a honeycomb is located. Thanks to these honeycombs, gas mixtures are purified through chemical reactions.
Now manufacturers have begun to produce multi-section neutralizers that meet all international standards, which process a wider range of harmful substances.
Front muffler (resonator)
The resonator is, in fact, one of those parts that are commonly called mufflers. This element performs the function of reducing noise, but not cleaning exhaust gases. When gases pass through the resonator, a lot of noise is created. Therefore, the internal “filling” of the front muffler consists of numerous grilles and holes that reduce the speed of escaping gases, as well as vibration. By and large, a resonator is a tank with a perforated pipe.
If water drips from the muffler
The condensate formed in the muffler is ordinary water that appears during the transition from a gaseous to a liquid state. This sounds quite harmless if this moisture did not have a detrimental effect not only on the exhaust pipe itself, but also on the internal systems of the car.
If we talk about why water drips from the exhaust pipe, then it is worth highlighting several reasons:
- Active use of the vehicle, especially in the cold season, when the engine is very hot and the air temperature is low.
- Car with auto start function. In this case, the pipe will heat up in approximately 20 minutes. At this time, the frozen condensate melts, but does not evaporate completely. Due to this, under the influence of a strong flow of exhaust gases, the liquid splashes out of the muffler.
Also, condensation can burst out of the pipe with force if you sharply press the gas pedal.
It is worth considering that the formation of condensation in the muffler is a normal phenomenon, only if it does not appear:
- In the engine itself. In this case, a light coating forms on the neck of the oil filler cap or near the valves.
- In the gas tank of a car. The reason for this is most often low-quality fuel, which contains water.
In this case, it is necessary to understand the problem immediately, especially if you notice that the car’s engine has begun to get very hot and fuel consumption has increased.
Causes of muffler failure
Since the muffler has virtually no protection from the influence of the external environment, it is made of durable materials so that its service life is longer. The quality of the roads, obstacles and even simple stone bounces lead to damage to the muffler.
However, mechanical influence is not the most common reason leading to breakdowns. Mostly, chemical corrosion causes breakdowns. The environment in which the muffler operates can be called aggressive. Because its body is exposed to water, snow, and various reagents to protect roads from icing. All this sticks to the surface and leads to muffler burnout.
Ultimately, a hole appears in the muffler, which is made by rust, or due to those very obstacles on the roads. If the damage is serious, the muffler is usually replaced. But if the damage is minor, then one of the methods for repairing it is used.
Faulty muffler
What to do if the muffler explodes
Due to other vehicle malfunctions, a situation may occur that fuel vapors accumulate inside the muffler housing. As a result, the device becomes explosive. When the ignition and fuel supply systems are unbalanced, the vapors spontaneously ignite and an explosion occurs.
This kind of damage cannot be repaired. The muffler needs to be completely replaced. But you also need to consult with a specialist so that he can determine the original cause of the malfunction and prevent its recurrence.
DIY muffler repair
In essence, this is carrying out restoration work in order to restore functionality.
Repair is only advisable when the damage is minor.
If the plug is badly burned out, or corrosion has seriously corroded the pipe body, it is better to immediately change the product.
How to brew
Welding work allows you to eliminate the most difficult metal defects - holes and burnouts.
To perform welding, you need to prepare in advance:
brushes for cleaning metal;
flat blade screwdriver.
The repair is local in nature: before welding, you need to clean the edges of the hole or burnout and degrease them.
Next, a patch cut from metal is installed in place of the defect and tacked in several places around the perimeter.
The size of the patch should be slightly larger than the defect itself. Afterwards you can begin to apply the weld.
When the welding has cooled down, it is recommended to clean the seams from slag and paint the “glushak” with heat-resistant paint.
The seams should not stand out too much on the body; the seam itself should be smooth and uniform
What sealant should I use?
The main property of any muffler is its tightness. Therefore, when carrying out repair work, car enthusiasts often use sealants.
However, conventional sealing products are not suitable for these purposes: after all, the product is exposed to high temperatures, so the silicone will quickly spread throughout the body.
To seal small cracks or minor metal burns, you must use the following brands of sealants:
Liqyi Moly is a reliable paste based on ceramic substances. Withstands high temperatures and prevents corrosion.
Abro is one of the most common brands of ceramic sealants in Russia. The main advantage of this paste is the complete sealing of small metal defects and a reduction in the noise level of the system.
CRC - this sealant hardens very quickly, which makes it suitable for repairing exhaust system components on the road. CRC perfectly seals pipes and prevents moisture from forming inside.
Permatex takes a long time to dry - almost a day. In addition, it can be used for repairs on cars with low power, as it has temperature restrictions.
The composition of sealants may not include aluminum, but copper - in this case, much wider cracks in the metal can be sealed, since copper is more ductile
High Temperature (Ceramic) Repair Tape
There is the easiest way to repair damage to a muffler - using a bandage.
It is made from a special high-temperature tape, which is wound around the damaged area and fixed there.
The tape is usually made of fiberglass, aluminum chips and reinforced ceramics, which can withstand even very high heating temperatures.
To make the tape more convenient to attach, it usually contains adhesive components - epoxy resin or silicate substances.
The area with a hole or burnout is wrapped with tape; after it has completely hardened, it is recommended to paint the product with heat-resistant paint.
Such a bandage will increase the service life of the device and create a complete seal of the entire exhaust system.
High temperature material suitable for repairing mufflers made of any metal
Replacing the gasket between the exhaust manifold and muffler
Car enthusiasts who have at least once changed this part with their own hands know well that between the muffler and the exhaust pipe there is a strategically important object - a reinforced gasket.
This element controls the temperature of the exhaust gases and reliably fixes the joint between the two parts of the exhaust system.
During operation, the gasket may burn out, so it is recommended to change it every time it is replaced.
The main thing is to install it in the same position as the old one and securely screw it with new bolts.
The process of replacing a reinforced gasket usually takes no more than 5 minutes.
Depending on the design of the muffler and the make of the car, the gasket may have different shapes
How to make a muffler quieter
Due to the strong roar, it is sometimes impossible to drive, so drivers come up with different ways to make it quieter:
Make a nozzle for the exhaust pipe - this element will significantly reduce the exhaust noise level and will look beautiful, complementing the overall style of the car.
Replace with a new one that has basalt filler.
Make sure that all exhaust system pipes are sealed and tightly connected to each other. In some cases, it is precisely because of the instability of positions or small cracks that the “glushak” begins to emit a strong roar.
Prevention measures
In order not to encounter a problem when the car does not start or the muffler fails while driving, you need to foresee and eliminate all possible causes of breakdowns. There are several simple rules for this. They are relevant for all types and brands of cars - VAZ 2114 / 2107 / 2110, UAZ, as well as Gazelle:
- Always monitor the condition of the muffler and the exhaust system as a whole. Even a simple visual inspection will help identify burnout or determine that part of the device has rotted. Failures detected in the early stages are much easier to eliminate.
- Any car enthusiast forum will confirm to you that it is necessary to regularly use anti-corrosion compounds on the muffler. Usually it is coated with anti-corrosion at the factory, but the composition wears out over time and needs to be updated.
- Destructive processes will proceed more slowly if you periodically wash the muffler. The device is not always made of stainless metal, so dirt, snow, water, and reagents collected from the road lead to rapid corrosion.
- Drive carefully. Mechanical damage breaks parts even more often than burnout or corrosion. If you often run into hard objects or hit the bottom on an uneven road, you will often have to repair or even change the muffler.
- Use a corrugated pipe between the muffler body and the manifold. This is an effective protective measure that eliminates friction, reduces operating temperature and partially absorbs vibration.
If trouble does occur, we recommend contacting our company. We have been professionally repairing exhaust system components for over twelve years.
How to weld a muffler using electric welding yourself
A car muffler, operating in an aggressive environment at high temperatures and humidity, quickly becomes unusable. Corrosion, corroding the metal, destroys the muffler. In addition to the negative effects of rust, the muffler is easily holed on rough terrain due to its low location. The consequences of such damage are very unpleasant. The roar of a running engine begins to grate the ear, and the exhaust gases, losing their directional flow, enter the car interior. Of course, replacing the muffler with a new one solves all these problems. But you can get by with a less expensive method - welding. At first glance, welding a muffler may seem like a difficult task, but there is nothing difficult in this process if you understand a little theory.
How to repair a hole in a muffler
The metal from which a car muffler is made wears out one way or another over time. The exhaust system is exposed to negative environmental influences - moisture, frost, condensation, salt solutions from roads, which results in pockets of corrosion and subsequently holes in the muffler. Also, a hole can appear instantly due to a sudden and strong mechanical impact, for example, in an accident or driving on an uneven road.
How to weld a muffler in the garage?
If the muffler is burnt out and the damage site is large, more comprehensive repairs may be required.
It is not difficult to recognize serious damage - first a “whistling” sound appears, which only intensifies if left unattended.
Smoke from the exhaust pipe enters the cabin, making it impossible to drive the car.
The most reliable method of repair is welding the damaged element. There are two ways here - entrust the work to a master or do it yourself.
In the second case you will need:
- Welding machine (it is better to choose a semi-automatic type device);
- Tool set (hammer, wrenches, screwdrivers, etc.);
- Brushes with metal bristles, as well as sanding paper;
- Grinder with attachments;
- Heat-resistant paint;
- Pieces of metal sheets having a thickness of 1-2 mm.
Muffler repairs are carried out exclusively in the damaged area (in the place where the unit burned out). If there are rusted areas, it is advisable to remove them completely.
Then proceed like this:
Cut out a fragment of the resonator or muffler; Remove rusted areas; Pay attention to the condition of the internal components. If the partitions and tubes inside the muffler are damaged, restore them or replace the unit as a whole.
For welding, it is better to use a semi-automatic welding machine, which carefully patches the damage
This is due to the fact that carbon dioxide used in the welding process prevents the metal from overheating and changing its structure. During the repair process it is worth making continuous seams.
Read more about welding machines in the article - how to properly weld a car body.
If rust has reached the junction of the pipe and the casing, you need to cut out the corroded area that has become unusable, then replace the damaged unit and weld the muffler back into place.
At the final stage, it is worth painting the surface, because at the factory this work is performed only formally. This stage should not be skipped, because with its help it is possible to extend the service life of the muffler (we will talk about this below).
The muffler cuts
Sometimes cracks appear on the barrels of the device. The first sign that the muffler is cutting (at a junction, from under a clamp, at a connection) is characteristic clicking sounds. It is easy to detect the damaged area, as a black spot quickly appears near the crack. Most often, the problem occurs at pipe bends, along weld seams - where the metal is most stressed.
There are two main ways to eliminate a section:
- Classic welding (one seam or patch making method).
- Cold welding (a composite material that hardens over time after application).
It is not necessary to remove the muffler during repairs. But it is important, regardless of the chosen method, to clean the area around the damaged area with sandpaper and a wire brush, and treat it with a solvent.
Adhesive-sealant for cold welding is purchased ready-made. To use it, you need to knead the plasticine in your hands until the plasticine is soft and the texture is completely homogeneous, then seal the hole and carefully level it with a spatula. After this, you can drive a car only after 24 hours.
There is another DIY repair method, but it is only suitable for short-term troubleshooting and is not complete. This is the rewinding of the muffler section with insulating material. The material is sold in stores, but you can make it yourself:
- Soak the asbestos by adding liquid glass to it.
- Seal the hole with the resulting composition.
- Wrap the repair area with asbestos thread.
- Wrap the top with copper wire.
We remind you that the method is temporary and will allow you to hold out a little until the real repair. It can also be used when the muffler is broken, but only if the hole is small.
Muffler repair with ceramic tape
Muffler repair tape is another equally popular way to quickly bring your muffler back to life. All tapes are heat-resistant and can withstand up to 1000 °C as they have a ceramic base. If the damage is small, only two or three millimeters, then the tightening tape is suitable for local repairs, but in no case for repairing the entire muffler. Typically, the typical places for holes are the resonator or the muffler itself. Also, if the device is rotten, it is better to use sealants or bandages. The repair process is simple:
- The muffler needs to be cleaned.
- Moisten the tape with water to react.
- Seal the damaged area with tape, wrapping it around the muffler in a circle.
You cannot rely on the long service life of the ceramic tape; it will not be possible to eradicate the problem completely with its help. It is only a temporary measure for approximately three months.
Muffler malfunctions on VAZ 2106
Like any part of a car’s structure, the muffler also has its “weaknesses”. As a rule, any malfunction of the muffler leads to the following:
- the cabin begins to smell strongly of exhaust;
- the motor loses its power characteristics;
- Clouds of black gas burst out of the exhaust pipe.
One way or another, having noticed any of these signs, the driver must immediately stop and figure out the cause of the breakdown. A muffler, especially a low-quality one, can quickly burn out, get a dent or hole when driving on uneven roads, rust, or lose its position under the bottom.
Black exhaust gases are the first sign of a muffler malfunction.
Knocks while driving
Muffler knocking while driving is perhaps the most common malfunction of all VAZ cars. At the same time, knocking can be eliminated very simply and quickly:
- It is necessary to find out why the muffler is knocking and what part of the car it hits when driving.
- It will be enough to shake the pipe a little with your hand to understand why the knocking occurs when driving.
- If the muffler hits the bottom, then stretched rubber suspensions are to blame. It will be necessary to replace the suspensions with new ones, and the knocking will stop immediately.
- In rare cases, the muffler may touch the gas tank housing. You will also need to change the hangers, and at the same time wrap this part of the pipe with insulating material - for example, reinforced mesh with asbestos. This, firstly, will reduce the load on the muffler during the next possible impact, and, secondly, will help protect the gas tank itself from holes.
By shaking the muffler with your hand, you can understand which part of the body it is knocking on.
What to do if the muffler burns out
On forums, drivers often write “help, the muffler is burned out, what should I do?” Holes in metal can usually be repaired with standard repairs such as patching.
However, if the muffler burns out while driving, it is not recommended to start the engine, since the exhaust system will not work normally.
Corrosion, dents and long-term use lead to the fact that the muffler can burn out while driving
Do-it-yourself muffler repair
It will not be possible to repair the muffler under “road conditions”. As a rule, repairing an old silencer involves welding - installing a patch on a hole in the body.
Therefore, repairing a muffler is a job that can take a lot of time. You need to prepare tools and materials in advance:
- two keys for 13;
- two keys for 17;
- screwdriver with a flat thin blade;
- welding machine;
- Bulgarian;
- stainless steel sheet for patch;
- brush for cleaning metal;
- degreaser;
- heat-resistant paint.
Muffler repair is carried out according to the following scheme:
- Dismantling a failed product.
- Inspection.
- A small crack can be repaired immediately, but if there is a fairly large hole, you will have to install a patch.
- A piece of metal is cut out of a sheet of steel, 2 cm larger on each edge than is necessary to install the patch.
- The damaged area is treated with a brush to remove all rust.
- Next, you can begin welding work: the patch is applied to the damaged area of the muffler and first tacked on all sides.
- Afterwards the patch is boiled around the entire perimeter.
- After the welding seam has cooled, it is necessary to clean it, degrease it and paint the welding areas (or the entire muffler) with heat-resistant paint.
Video: how to repair small holes in the muffler
Such a simple repair will allow you to use the muffler for a long time, however, if the hole or burnt-out part of the body has a large diameter, it would be advisable to immediately replace the muffler with a new one.
How to replace an old muffler with a new one
Unfortunately, the mufflers on the VAZ 2106 have one not very good quality - they quickly burn out during operation. Original products last up to 70 thousand km, but a self-made product is unlikely to last at least 40 thousand km. Therefore, every 2-3 years the driver should replace his muffler.
Before starting work, it is necessary to allow the entire exhaust system to cool down, otherwise you can get serious burns, since the pipes become very hot when the engine is running.
The easiest way to replace it is on a lift or inspection pit.
To replace the muffler you will need the simplest tools:
- two keys for 13;
- screwdriver with a straight blade.
It is also recommended to prepare WD-40 fluid in advance, since rusted fastening bolts may not be dismantled the first time.
The procedure for dismantling the muffler on a VAZ 2106 is not much different from removing the pipe from other VAZ models:
- Place the car on an inspection hole or on jacks.
- Climb under the bottom, use 13 keys to loosen the fastenings of the exhaust pipe clamp. Use a screwdriver to loosen the clamp and lower it down the pipe so that it does not interfere.
- Next, unscrew the bolt that holds the rubber cushion.
- Disconnect the cushion itself from the bracket and pull it out from under the car.
- Remove all rubber hangers that secure the muffler itself to the bottom.
- Lift the muffler, removing it from the last suspension, then pull it out from under the body.
Video: procedure for replacing the muffler and rubber bands
Accordingly, the new plug will need to be installed in the reverse order. Usually, with a new muffler, fastening elements are also changed - bolts, clamps and rubber suspensions.
Which welding method is better to weld a muffler?
The type of welding does not play a special role if you adhere to two basic parameters:
- Minimum current.
- Minimum electrode thickness.
Semi-automatic welding has advantages when repairing a muffler compared to conventional electric welding. Its modes are more gentle on thin metal, and protective carbon dioxide will prevent overheating and oxidation of the weld. Thanks to this, the structure of the base metal will not change and will not lose strength. When working with conventional electric welding, it is necessary to select suitable electrodes for the metal being used.
Before welding the muffler, the battery should be disconnected to avoid a short to ground. Moreover, it is not at all necessary to take it out. It is enough just to disconnect the ground - the wire with a minus sign. It is usually black.
How and with what to seal the muffler
Let's look at the main methods, the most common and effective today.
Electric welding
The method is reliable, but due to its complexity and cost, not everyone wants to resort to it. You can choose either conventional or semi-automatic electric welding - this does not play a big role, the most important thing is that two criteria are met:
However, semi-automatic welding is usually chosen due to the presence of modes that are more gentle on thin metal. In addition, the risk of weld oxidation or material overheating is reduced due to the protective effect of carbon dioxide. If you follow safety measures, the metal will not lose strength and will not change its structure.
Before starting welding, be sure to disconnect the car battery (it is not necessary to completely remove it), otherwise there is a risk of a short circuit. The wire marked “minus” (usually black) is disconnected.
High temperature sealant
It is possible, in some rare cases, to repair the muffler using a specialized sealant that is resistant to elevated temperatures. Muffler sealant allows you to make minor repairs to exhaust system components if they are damaged without dismantling the pipe.
The lifespan of the sealant depends on many factors, but in any case it is a short-term solution to the problem. When working with sealant, it is necessary to properly prepare the surface on which the composition will be applied. This will provide better adhesion to the metal.
Cold welding
“Cold welding” is a special two-part adhesive that can be used to join metal elements together. This glue is very often used to repair certain car systems with your own hands.
Features of sealing a hole in the muffler using cold welding:
It is very easy to use - just cover the hole and wait for it to dry completely, the time indicated on the packaging of the product. Then clean the resulting seam. After this, the car can be used as normal. It is important to carry out work in a warm environment, since at temperatures below +5 cold welding does not adhere to the metal.
Both sealant and cold welding are a temporary solution to the situation. Most often, if a corrosion hole appears in the muffler itself, it will have to be replaced in the near future. And, unfortunately, after using cold welding or sealant, welding work will take more time and money, because all these materials will have to be cleaned down to living metal.
We remind you that our car service technicians in St. Petersburg repair exhaust systems on any type of transport. We invite you to call or write to us to make an appointment for diagnostics.
Source
What is a resonator?
One of the main parts of the combustion exhaust system is the muffler resonator. What it is?
The resonator is an important part of the exhaust gas exhaust system of any vehicle, which in appearance is similar to a small muffler. As a result, this part is sometimes called an additional muffler.
This unit itself reduces the noise level of the operating power unit, but this is only a secondary effect of performing its most important function - to ensure an even flow of burnt gases throughout the exhaust system of the vehicle. During operation of a car engine, regardless of the number of revolutions, intermittent gas pressure levels appear in the manifold
Their frequency largely depends on the number of cylinders used in the engine and its crankshaft speed. The resonator is precisely designed to eliminate these intermittent levels
During operation of a car engine, regardless of the number of revolutions, intermittent levels of gas pressure appear in the manifold. Their frequency largely depends on the number of cylinders used in the engine and its crankshaft speed. The resonator is precisely designed to eliminate these intermittent levels.
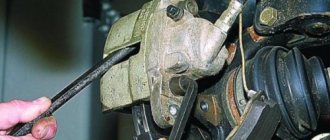
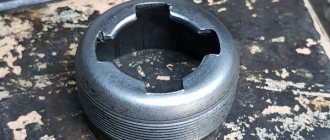
How to Replace a Graphite O-Ring
The graphite sealing ring of the muffler has become an engine part that allows you to isolate the gas joint in the area of connection between the main (or rear) muffler and its middle part (additional muffler) - the resonator. It is also designed to ensure smooth movement of the mutual movement of two connected pipes.
To carry out this repair you will need:
- new o-ring;
- lift or overpass;
- liquid key product;
- wrench with 13" head;
- lubricant for high-temperature zones - will be used on the brake caliper guides;
- wire brush or emery to remove rust;
- personal protective equipment - gloves and goggles.
There is no provision for replacing this part; if the o-ring is burnt out, it simply needs to be replaced. This process is quite simple and does not require special knowledge:
- It is enough to unscrew the bolts connecting the pipe joints. Often these flanges (spring-loaded bolts) become covered with rust over time, so you need to have a special tool on hand to facilitate the unscrewing process, for example, “liquid wrenches”. If the car is quite old, and you are unable to overcome rust, then you can cut them off with a grinder and then replace them with new ones.
- When the flanges are removed, all you have to do is tilt the resonator pipe and remove the damaged O-ring from its pipe. Sometimes it sticks tightly to the pipe, so pry at it with a screwdriver and it will come off.
- If the flanges have been safely removed, then before putting them in place, clean them with sandpaper or a brush to remove rust and carbon deposits.
- Next, install a new o-ring on the flange of the resonator itself and connect the muffler pipes.
- The last step is to fasten the pipes with a clamp and bolts, which most often come with a new ring.
Be careful when working. Although the process is quite simple, when removing the old o-ring, it may rupture, especially if it has already become fairly stuck to the pipe
The ring, made of metal-ceramic, is therefore fragile and can shoot off splinters, so protect your eyes with special glasses.
If you do not promptly replace the muffler sealing ring, then you will constantly breathe exhaust fumes in the cabin. In addition, due to its breakdown, an incredible amount of soot will accumulate under the hood, which is extremely difficult to clean; this process is long and expensive.
Why does a muffler burn out and how to extend its life?
One of the most common exhaust system breakdowns is muffler burnout. Recently, this problem has become relevant and is of great concern to motorists. Let's figure out why this happens?
Causes of burnout
Car enthusiasts are looking for the cause of rapid muffler damage in the car itself. Exhaust gases come out of the engine crankcase with such force that they overheat it greatly. As a result, the damper becomes deformed and must be urgently replaced. Experts identify three main reasons for the appearance of holes:
1. Low quality.
If a muffler is made of a “suspicious” alloy, is extremely cheap and is sold without a quality certificate, then it is clearly a fake. After the first thousand kilometers it can be thrown away.
It is important to remember that the damper is an external part of the machine, therefore, unlike other parts, it is most susceptible to the influence of an aggressive external environment. If the car is not constantly in the garage, then this circumstance also shortens the life of the muffler.
2. Prolonged engine idling.
The fact is that if the car is driven over short distances, the damper wears out faster. The reason is that natural cooling does not occur, as when riding long distances.
Sequence of muffler repair by cold welding
How to repair a muffler using cold welding? The list of actions is very simple:
- Clean the surface with sandpaper and degrease.
- Mix the ingredients included in the composition - you should get a thick, uniform composition.
- Apply the substance to the surfaces to be glued and press tightly against each other.
- Fix the parts in the required position until completely cured.
- After an hour, you can give the part the required shape. Only after a day does complete hardening occur and the muffler can be subjected to any load.
The repair is really simple, so even an inexperienced beginner can handle it! It is a little more difficult to restore a muffler using electric welding, which requires a number of special skills and the availability of related tools.
Types of cold welding
The choice of this material should be approached carefully, since cold welding comes in several types, among which only the following are suitable for car repairs:
- Liquid formulations. Usually sold in special syringes and also available in packages where they are mixed automatically. Such liquid welding is most convenient to use, but after application the composition hardens “tightly” and cannot be mechanically corrected.
- Plasticine-like compositions. Such welding can be one-component or two-component. The first interacts with air, resulting in a chemical reaction that activates the material. Two-component welding reacts with compounds.
Also, materials differ depending on their manufacturer. For the muffler, it is best to choose welding:
Abro Steel (USA). Which has excellent characteristics and high reliability.
Titan (Russia). It is not inferior, and in some parameters even surpasses its American counterpart.
To repair a muffler with any of these compounds you won’t have to put in a lot of effort.
What to do with other cars
Now let's look at repairs on several more cars. For example, let's take Nissan. If the assembly gasket burns out, it is better to replace it. For Nissan Note, like other cars, repairing the muffler gasket yourself does not make sense.
But repairing the muffler exhaust pipe with your own hands without welding is just appropriate. For this you will need:
- ceramic sealant;
- tin tape;
- metal scissors;
- pliers with thin ends;
- hammer.
- Be sure to clean the leaky area. The unit does not need to be removed from the vehicle.
- Apply ceramic sealant generously with your fingers (we use gloves to protect your hands) directly onto the hole.
- We wrap this part of the pipe with tin tape. We cut off the protruding ends of the tape, leaving 2 centimeters from the pipe.
- We bend the remaining ends with pliers.
- We beat the bend with a hammer so that the resulting clamp tightly squeezes the pipe.
With the result obtained, you can travel more than one hundred kilometers.
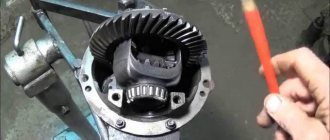
In addition, we will consider repairing the muffler of the Gazelle. Let's say the resonator is broken. This element of the system uses a tube with many holes. Due to them, low frequencies are damped - the gas, passing through many holes, rubs against itself.
It is not difficult to repair the muffler resonator yourself if the outer wall is leaky. Suppose the place where the pipe comes out of the resonator has burned out. Removing the unit from the car is practically not required here. For our work we take the following things:
- cold welding;
- sandpaper.
You need to do some simple manipulations.
- Carefully clean the crack that appears with sandpaper.
- We fill it generously with the composition, mixing the components. Spread a large layer on top; you should wear gloves on your hands.
- We give the composition time to set.
- Lightly clean with sandpaper.
With such repairs of the muffler with your own hands and without welding, you can also drive a decent number of kilometers.
The price of capital works from craftsmen
However, if such a muffler repair turns out to be short-lived, it is better to call in a service center. There you will definitely have major welding work done, this will allow you to travel hundreds of thousands of kilometers without thinking about release. Moreover, everything will not cost that much.
The cost of welding work, along with removing the element and installing it back from car service technicians, is indicated in the table, in relation to different large cities of the Russian Federation. Here is the table.
So, various types of do-it-yourself car muffler repairs have been described above. The instructions provided may be useful to many motorists who find themselves in difficult situations.
Now find out where the fuel filter and the high-pressure fuel pump device of a diesel engine are located.
Ceramic Repair Tape
Ceramic tape is a popular and effective muffler repair tool.
A small hole in the muffler is sealed in the following sequence:
- The metal is cleaned of rust and carbon deposits.
- The ceramic tape is wetted with water.
- The hole is sealed by repeatedly wrapping the muffler with ceramic tape.
This method is temporary, but during the entire service life of the “bandaged” muffler, its function will not be impaired, and in case of repeated burnout, you can easily wind a new layer of ceramic tape.
Repair in a garage
DoneDeal DD6785 is a high-temperature ceramic sealant reinforced with steel, which allows you to easily install a metal patch on the old muffler in the place of gas leakage, as well as better assemble a new exhaust system when replacing it. The process of installing a patch using the DD6785 requires some plumbing skills, but overall it is very simple - at least for those who did not skip labor classes at school.
As a rule, repairs with patches are practiced in case of burnouts in the muffler banks - directly in the muffler, resonator, flame arrester. A rectangle is cut out of a steel sheet 0.8–1 mm thick, the size of which is 30–50 percent larger than the size of the burnout. Holes are drilled around the perimeter of the patch for metal screws (every 2–3 centimeters), after which the patch with a layer of DoneDeal DD6785 applied is screwed using a screwdriver onto the surface of the muffler element cleaned with a steel brush.
The sealant contains high-temperature additives that are resistant up to 1400 degrees: sodium silicate, clay, steel powder, synthetic fiber. The time for complete polymerization of the sealant at normal ambient temperature is a day, but you can warm up the engine, speeding up the process, in 2–3 hours. The same goes for assembling a new exhaust system. The connections between pipe flanges and sealing gaskets do not always provide complete tightness due to rough processing, and even a new muffler can slightly smoke at the joints and “whistle” until the cracks become coked with soot. By lubricating the connections with DoneDeal DD6785, this will not happen, and the exhaust tract will be sealed immediately.