How to install heated mirrors on a VAZ 2114?
Heated rear-view mirrors of the VAZ 2114 are a rather convenient option in the car, which, unfortunately, the manufacturer did not provide for.
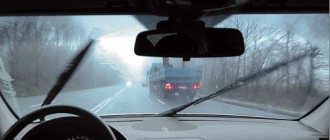
Installing heated mirrors on the VAZ 2114 will save you from the need to clean your mirrors from freezing and frost formation in winter. By the way, visibility will also improve in damp summer weather. This publication will tell you how to install heated mirrors on a VAZ 2114. As with installing a heated windshield, which was described in the previous article, you will need to buy new mirrors, the heating of which will be carried out through a special button in the cabin. You can purchase such a set of electrically heated mirrors in specialized stores.
Installing heated mirrors on the VAZ 2114 will increase the visibility sector and image clarity, which will ultimately affect traffic safety. Before installation
Instructions for installing ready-made components
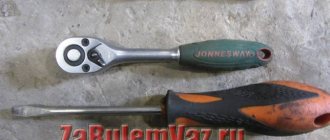
Installing commercial heated mirrors is a relatively simple operation. To carry it out, it is necessary to remove the part from the car and disassemble it. Glued products are heated with a hair dryer or by soaking in boiling water, after which the reflective overlay is easily removed. » alt=»»> Products fastened with bolts are disassembled using the appropriate tool. Do-it-yourself installation of heated rear-view mirrors purchased in a store is permissible only on clean and dry surfaces.
Before starting the procedure, it is necessary to evaluate the dimensions of the heating element and housing. If printed circuit boards are used, it is possible to remove the stiffeners. The film is cut to size while retaining the heating strips.
The boards are glued to the inside of the case with glue, the films are fixed directly to the reverse side. In both cases, wires are soldered to the contacts of the thermoelement, which go to the power source.
Installation of heated mirrors for VAZ 2114
— Work begins with dismantling the old mirrors. First, remove the front door trim and the inner mirror trim.
For convenience, use a screwdriver, prying in the right places.
— The original VAZ 2114 mirrors are secured with three bolts. Unscrew the nuts and remove the mirror.
— Please note that the kit for new heated mirrors includes a template with appropriate markings for correct installation. Cut it out, attach it and transfer the markings to the door. For example, you can use an awl to transfer. Then use a file to increase the size of these holes.
— Now let’s move on to the most difficult part of the work - carrying out the necessary wiring. First, run the wires into the inner cavity of the doors. To go from the doors to the inside of the counter, use corrugated tubing.
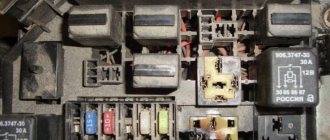
— Now you need to connect the wires to the relay responsible for heating the rear window of the VAZ 2114. Here we will take the control signal. Using the diagram, connect the electrical circuit. We advise you not to simplify the scheme; let the heating of the mirrors be separate from the glass.
— Stretch the negative wire into the passenger compartment and strengthen it tightly, connecting it to the metal body.
— Place the external button for turning on the heated mirrors in the cabin in the same place where the heated rear window is turned on.
- Now you can continue installing the mirror. Strengthen the mirror adjustment knob. Thus, it will be possible to rotate the mirror from the interior.
— Having returned the cladding to its place, strengthen the mirror with three self-tapping screws.
— Check operation by turning on the heating. Do the same with the other mirror.
The following video demonstrates heated mirrors assembled with your own hands.
You can purchase rear-view mirrors for domestically produced cars here. The catalog contains mirrors of different shapes, sizes, with and without a turn signal. Reasonable cost and delivery to regions.
Lada 2114 › Logbook › Installation of electric mirrors for VAZ 2114 from Intraavto LLC
I purchased such a set of electric mirrors in Togliatti. I couldn’t find any articles on installation, so I’m sharing my experience here.
Connection diagram out of the box:
Here's a video of how mirrors work:
We begin work by disassembling the mounting block. By the way, to easily pull the chip out of the block, use a chisel (the widest one): apply the chisel to the desired connector and tap it with a hammer. According to the diagram, block Ш9 is needed (according to the new X9).
How to disassemble the mounting block, connect the wires according to the diagram
Then we remove the decorative strip from the driver's pillar and make a hole in the same pillar where we will lay the wiring. Drilling is not very convenient, I drilled with 3 drills, the final diameter is 10 mm.
During the installation process, it would be a good idea to insulate the wires in the place where there is contact with the hole made or put a rubber seal.
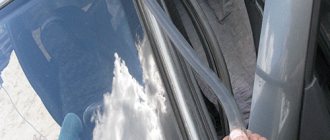
The wiring will run together with the power window wires, i.e. under the rubber corrugation between the door and the body. We remove the door trim, bend the corrugation, take a moderately flexible/rigid wire, thread it through the corrugation, wrap our wiring to it and pull it out on the other side.
I must say that the wires are not the longest and you will have to tinker with this layout. This is still better than disassembling the entire panel in order to get to the common channel, which has a rubber seal and where you can’t stick anything. There is only one piece of advice: when you have installed one mirror (we install the left one first), drag the entire free length of the wiring under the panel to the right mirror. I had difficulty snapping the terminals into place; they were long enough, but the connection fell out at the door. You can lengthen the wires and all difficulties will disappear. About the panel on the dashboard, when you put it back together, make sure that the wires don’t get under the handbrake, otherwise it will bite at once. Good luck!
source
Selecting and replacing mirrors on a VAZ 2114
To control the situation on the road, each car is necessarily equipped with rear-view mirrors. Two are located outside on the sides or one more is located inside the cabin. As a result, the driver receives a 360-degree view.
But it happens that the integrity of these mirrors is violated. This can happen as a result of an accident, banal looting, or some kind of accidental blow to them caused by the driver himself.
In any case, it is advisable for you to know how they are removed, disassembled, installed in place, adjusted and even insulated. Today our article will be devoted to these issues.
How to disassemble a side mirror
Sometimes a complete replacement of the side view mirror of a VAZ-2114 is required. It is quite possible that everything can be done by installing a separate element on the left or right side.
Let's see how we can disassemble the structure as carefully as possible. First you need to press the plastic case from the inside. The holders are carefully snapped off using a flat-head screwdriver. This method is not very reliable - there is a considerable chance that the mirror element or other parts will break.
The second option carries even greater risks - here you need to quickly hit the glass on the surface (but it is better if it is soft). This is a quick option for dismantling and replacing the element. The blow should be light and fast. To replace the plastic housing or main fastener, remove the adjusting rods and pin. The assembly is done exactly the opposite.
Price issue
First of all, we will orient you a little on the price tags that are presented on the market today.
The cost may vary depending on the manufacturer, technical features of the product and the region of its sales. Therefore, prices are average.
Mirror type
approximate cost
Outdoor heated
Obviously, the characteristics of the panoramic interior mirror provide a better view, and the presence of heated exterior mirrors provides comfort and does not require constant wiping. It is better to pay more, but buy new functional products.
We connect the heated mirrors — Lada 2114, 1.5 l., 2005 on DRIVE2
Solina mirror elements with filter and heating were purchased about a year ago. I installed them quickly then, but I only got around to doing the heating now (but I managed to do it before winter). A connection diagram drawn by myself is attached, I’ll go over the installation steps a little. I brought the positive wires in the doors through the corrugations into the interior, and secured the masses of heating elements in the doors. I didn’t remove the front panel, it was a lot of hassle, so I did it like this. I connected the positive wires together and to the 87th contact of the relay. I secured the relay mass (pin 85) to the stand to which the front panel cover is attached. The 86th and 30th contacts of the relay are closed, a fuse is connected to them and into the button. I took the power for the button from the yellow-blue wire coming into the rear window heating button block. The logic is simple - heated mirrors are needed not only when the rear window fogs up or freezes, thus reducing the load on the wiring and the standard fuse in the mounting block. Since the button in the stash was without a power indicator, only with a glowing symbol, I connected it. Later I’ll take another one, most likely also for heating, all that remains is to add 2 wires to the indicator - I assembled the block with terminals myself. All connections are made on terminals with crimp and heat-shrink tubing, the wires are fixed with electrical tape.
Hasty field tests showed that they get hot! Within a couple of minutes the glass becomes noticeably warm.
Issue price: 100,500 ₽
Page 2
Solina mirror elements with filter and heating were purchased about a year ago. I installed them quickly then, but I only got around to doing the heating now (but I managed to do it before winter). A connection diagram drawn by myself is attached, I’ll go over the installation steps a little. I brought the positive wires in the doors through the corrugations into the interior, and secured the masses of heating elements in the doors. I didn’t remove the front panel, it was a lot of hassle, so I did it like this. I connected the positive wires together and to the 87th contact of the relay. I secured the relay mass (pin 85) to the stand to which the front panel cover is attached. The 86th and 30th contacts of the relay are closed, a fuse is connected to them and into the button. I took the power for the button from the yellow-blue wire coming into the rear window heating button block. The logic is simple - heated mirrors are needed not only when the rear window fogs up or freezes, thus reducing the load on the wiring and the standard fuse in the mounting block. Since the button in the stash was without a power indicator, only with a glowing symbol, I connected it. Later I’ll take another one, most likely also for heating, all that remains is to add 2 wires to the indicator - I assembled the block with terminals myself. All connections are made on terminals with crimp and heat-shrink tubing, the wires are fixed with electrical tape.
Hasty field tests showed that they get hot! Within a couple of minutes the glass becomes noticeably warm.
Issue price: 100,500 ₽
Internal
Let's start with the rearview mirror installed inside your car.
Interior rear view element
There are several reasons why the driver will want or have to dismantle this element:
- The desire to replace with a more advanced, new model;
- Installation of electronics, parking sensors;
- The glass or plastic case is damaged, broken and does not allow further use of the component;
- There is a need to install sensors that are not included in the standard equipment of your car.
Replacement
Do not rush to remove the old mirror if you have not yet purchased a new product. Sometimes you have to wait for weeks because of the speed of delivery, and sometimes it’s enough to go to the market or store, where you will immediately find the desired product.
VAZ 2114 were produced until 2009, which requires the use of a standard type of fastening consisting of two bolts. This method of fixation has been used since 1976.
The downside of bolt-on mounting is the impossibility of installing an interior mirror from a foreign car. It’s good that there are many domestic products on the market that perfectly match the VAZ 2114.
You can start working.
- Remove the plug from the bolts. Although it is not always present.
- Holding the mirror body with one hand, begin to unscrew the mounting bolts with the other.
- Remove the old mirror.
- Check the condition of the seat and clean it.
- If the old bolts are covered with rust, it is better to replace them with similar new ones.
- Screw in the new mirror using the bolts.
- Insert decorative plugs so that the bolt heads do not spoil the appearance of the interior.
The simplest fasteners
The bolts should be fixed as tightly as possible to avoid damage to the glass as a result of shaking and vibration.
Adjustment
The interior rear view mirror is tilt adjustable.
- The ideal setting is when, when you look into it, you can see everything that is happening behind your car;
- Some cars have high seats, which means you can see part of your ear and headrest in the reflection. This is a normal phenomenon, so there is no need to change the settings;
- A panoramic product with backlighting is best suited for the role of a rear mirror, since the glass used is flat and there is no image distortion, which has a positive effect on safety.
Procedure
Now you can begin installing the heater. First, remove the holder with the mirror from the case. On most cars, it is enough to pry it with a screwdriver or something flat from below and pull it towards you.
READ How to connect USB to 88 Pioneer
Based on the characteristics of the holder, we choose the method of fastening the wire. If the inner surface of the holder is smooth (as in the photo), then stick double-sided tape on it.
Then we lay a piece of wire on this surface. This can be done arbitrarily, for example, in a zigzag or something else. The main thing is to place it so that the thread covers as much of the surface of the holder as possible. In this case, the wire should not intersect anywhere. Scotch tape will hold the nichrome thread well.
If the inner surface of the holder has any protrusions or fastening elements, then it will not be possible to stick the tape. In this case, a soldering iron will help to secure the wire. Everything is simple here - we apply a nichrome thread to the surface and press it with a heated soldering iron. The plastic will begin to melt and the wire will sink into it. Once cooled, the plastic will become hard and will hold the thread. But here it is important not to overdo it with heating the plastic, so as not to “push” it to the mirror. It is enough just to “drown” the wire in it a little and that’s it.
In this way, we fasten the wire along the accessible surface of the holder without touching the fasteners.
When laying the wire, its ends should be placed towards the side of the holder that is closer to the door, and so that they do not touch each other. To these ends we solder terminals for connecting to the wiring or simply the ends of prepared wires. Then the resulting connections need to be insulated.
All that remains is to provide insulation. If the wire was secured with tape, then to insulate it you can simply stick several more layers of regular adhesive tape on top. This will provide thermal insulation and prevent the wire from peeling off and shorting.
As for the holder where the wire is secured with a soldering iron, you can simply fill the entire surface where the thread passes with sealant and wait until it dries. In this case, the fastening elements will not be affected, which will ensure ease of fastening, and the wire itself will be insulated.
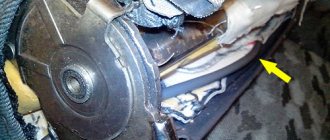
Before installing the holder in place, we pull the wiring through the mirror body into the door, the wiring for powering the heaters. Only after this we assemble the mirror.
Lateral
There can also be many reasons for removing side mirrors. But mainly this is replacement, painting or installing a heating system.
Regardless of the situation specifically with your VAZ 2114, the first thing you will have to do is remove the elements. How to do it?
Side mirrors
Dismantling
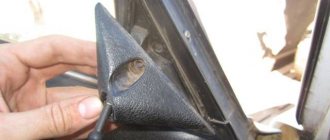
Removing side mirrors is not a difficult task. Here you only need a screwdriver to work. Perhaps not alone.
- Pry off the plug located on the side mirror control knob.
- Behind the plug there is a screw that needs to be unscrewed with a Phillips screwdriver.
- Remove the triangular plug. In the case of the VAZ 2114, it is held in place by special clamps. So to remove it you need to carefully unscrew the latches. Use a flathead screwdriver to pry the plug and remove it without too much trouble.
- Next, three mounting screws appear in front of you.
- By unscrewing them, you will thereby remove the side mirror.
- Do the same procedure with the second rear view element.
As you can see, removing the components is quite simple; simple fastening is provided. This is largely why they love domestic cars, since even a person without much experience can disassemble and assemble most components.
Connecting heated mirrors — Lada 2115, 1.5 l., 2001 on DRIVE2
Having bought new “Polytech” mirrors with heating, I installed them at first, but didn’t turn on the heating; after driving one winter without heating, I finally got around to the next! Somehow, initially there were no plans to connect a heated rear window from one button. I made a separate button. For connection, I bought: - rear window heating button + block - 4-pin relay + block - 7.5A fuse + block - bolt terminals - wires I don’t have my own photos, as I did this last summer, I took the photo from a person BZ who did all this)))
The following circuit is used for connection
Wiring diagram for heated mirrors
Part of the circuit can be twisted at home)))
As it turned out, the ground wire at the mirrors is short, clearly designed to connect the ground in the door, but I think it’s no secret that the hinges on the doors tend to rust, hence poor contact, it’s better to connect the ground in the cabin! Also, the plus was also not long enough to reach the center console. We extend both wires (I used heat shrink to connect, I don’t like snot with electrical tape) and pull them from the door into the salon. From the mirror, we pull the wiring down along the inner wall of the door, making sure that the wires do not interfere with the glass lowering. To prevent the wires from wandering, it is better to secure them, for example with electrical tape, to the existing wiring.
Next, we pull out the rubber corrugation on both sides and pull both wires (+ and ground) into the corrugation. They don’t get through that easily, so it’s better to take a wire, for example, and pull the wires through with the wire. I didn’t bother with the wire, but tied the wires with electrical tape to the speaker wires on the doors that were extended into the cabin to the radio and pulled the speaker wire where needed.
We run the wires from the mirrors under the carpet to the center console. We twist the bolt terminal to the negative wire, and you can place it on the metal frame inside the torpedo.
Next, we connect everything according to the diagram and install a button instead of a plug!
This is already my photo
Everything works great, both mirrors heat up))) I am completely satisfied with the work done! And as it turned out, heated mirrors are a very useful thing, especially in the rain, the mirrors are dry and everything is clearly visible.
And here is my video of the heated mirrors working
How to connect heated mirrors to a VAZ 2114
Due to the winter, constant snowfalls, 5% tint, and even the fact that the mirrors already have built-in heating, I decided to connect it
It warms perfectly, melts the ice once or twice, droplets of rain (or melted snow) soon disappear completely, so it’s a great thing! Now I don’t understand how you can drive in bad weather without heated mirrors
Need to buy: 3m. wires (it took me that much), a regular 4-pin relay + a wire block for it, a 7.5A fuse (10A is possible), a button for heating the rear window of a VAZ 2114 + a wire block for it. POLARITY OF THE MIRRORS WIRES DOESN’T CARE Remove the on-board computer, connect it stupidly diagram of all the wiring, I also wrapped the relay with anti-squeak so it wouldn’t rattle
I downloaded the diagram somewhere, then showed it to the electrician, he approved it, made his own small changes (I changed them), so enjoy it)
Heated rear-view mirrors of the VAZ 2114 are a rather convenient option in the car, which, unfortunately, the manufacturer did not provide for. Installing heated mirrors on the VAZ 2114 will save you from the need to clean your mirrors from freezing and frost formation in winter. By the way, visibility will also improve in damp summer weather. This publication will tell you how to install heated mirrors on a VAZ 2114.
As with installing a heated windshield, which was described in the previous article, you will need to buy new mirrors, the heating of which will be carried out through a special button in the cabin. You can purchase such a set of electrically heated mirrors in specialized stores.
Installing heated mirrors on the VAZ 2114 will increase the visibility sector and image clarity, which will ultimately affect traffic safety. Before installation
Switch button VAZ-2115, 2123 heated mirrors AVAR
| Moscow, Khabarovskaya st. | 1 PC. |
| Saburovo | 4 things. |
| Lyubertsy, Mira st. | 5 pieces. |
| Mashkovo village, Lyubertsy district | 58 pcs. |
| Moscow, Ketcherskaya st. | 3 pcs. |
Data updated: 05/19/2021 at 07:10
| Moscow, Khabarovskaya st. | 1 PC. |
| Saburovo | 4 things. |
| Lyubertsy, Mira st. | 5 pieces. |
| Mashkovo village, Lyubertsy district | 58 pcs. |
| Moscow, Ketcherskaya st. | 3 pcs. |
Data updated: 05/19/2021 at 07:10
- Parameters and characteristics
- Availability (71)
- Applicability (1)
- Description
- Certificates (1)
- Product categories
Characteristics
| Order code | 151446 |
| Articles | |
| Catalog group | Electrical equipment, ..Electrical equipment |
| Width, m | 0.015 |
| Height, m | 0.025 |
| Length, m | 0.05 |
| Weight, kg | 0.012 |
Options
| Brand (TM) | ABAR |
| Delivery time upon order | 22 |
| Purpose of the switch button | heated mirrors |
| Manufacturer | ABAR |
Shipping territory
Other partner warehouses and stores
+7 (ext. 7576 or 7585) [email protected] Shipments only for legal entities by pre-order
Mon-Fri: from 9:00 to 18:00, Sat, Sun: closed
+7 [email protected] Mon-Fri: from 9:00 to 20:00, Sat: from 9:00 to 18:00, Sun: from 9:00 to 16:00
+7 [email protected] OPT: Mon-Fri: from 9:00 to 18:00, Sat-Sun: closed. Retail: Mon-Fri: from 8:30 to 17:30, Sat: from 10:00 to 16:00, Sun: closed
+7 [email protected] Mon: from 8:30 to 18:00, Tue-Thu: from 9:00 to 18:00, Fri: from 9:00 to 17:30, Sat-Sun: closed
Switch 996.3710
The switch is designed for switching various electrical consumers of the car.
- Weight: no more than 0.014 kg;
- Connection: block 2114-3724564;
- Applicability: Lada Kalina (1117, 1118, 1119), Lada Samara (2113, 2114, 2115), Chevrolet Niva, GAZ.
Advantages: the most widespread network in Russia, delivers to any corner of the country, including remote ones. Flaws:
- high cost of delivery of heavy or large parcels, as well as the weight of one parcel should not exceed 20 kg;
- long delivery times and queues in large cities for receipt.
Installation of heated mirrors for VAZ 2114
— Work begins with dismantling the old mirrors. First, remove the front door trim and the inner mirror trim.
For convenience, use a screwdriver, prying in the right places.
— The original VAZ 2114 mirrors are secured with three bolts. Unscrew the nuts and remove the mirror.
— Please note that the kit for new heated mirrors includes a template with appropriate markings for correct installation. Cut it out, attach it and transfer the markings to the door. For example, you can use an awl to transfer. Then use a file to increase the size of these holes.
— Now let’s move on to the most difficult part of the work - carrying out the necessary wiring. First, run the wires into the inner cavity of the doors. To go from the doors to the inside of the counter, use corrugated tubing.
— Now you need to connect the wires to the relay responsible for heating the rear window of the VAZ 2114. Here we will take the control signal. Using the diagram, connect the electrical circuit. We advise you not to simplify the scheme; let the heating of the mirrors be separate from the glass.
— Stretch the negative wire into the passenger compartment and strengthen it tightly, connecting it to the metal body.
— Place the external button for turning on the heated mirrors in the cabin in the same place where the heated rear window is turned on.
- Now you can continue installing the mirror. Strengthen the mirror adjustment knob. Thus, it will be possible to rotate the mirror from the interior.
— Having returned the cladding to its place, strengthen the mirror with three self-tapping screws.
— Check operation by turning on the heating. Do the same with the other mirror.
The following video demonstrates heated mirrors assembled with your own hands.
You can purchase rear-view mirrors for domestically produced cars here. The catalog contains mirrors of different shapes, sizes, with and without a turn signal. Reasonable cost and delivery to regions.
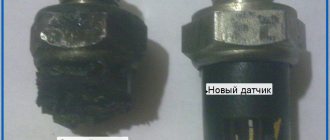
Unfortunately, older Samaras do not have such a useful feature as heated rear-view mirrors. This option improves visibility through the mirrors in wet weather, during snowfall and also in frost, when the mirror glass is covered with frost. When installing heated mirrors, several scenarios are possible. You can purchase assembled heated mirrors, since the choice is quite varied. This option is suitable for those who are not satisfied for some reason with the standard mirrors on the “nine”. The downside is the relatively high price, about 2,000 rubles; installation often requires drilling additional holes in the door. Plus - convenient adjustment using a cable mechanism, much better than the standard system
Button for turning on the rear window heating VAZ 2113, 2114, 2115 reviews
For any online payment option from a private individual, a fiscal receipt will be sent to your email in electronic form in full compliance with the law on the use of cash register equipment 54-FZ, which does not give you any additional reason to worry about our store)
The following payment methods are available in our online store:
— FOR INDIVIDUALS, payment for orders is carried out in real time on the website of the ROBOKASSA payment system, 0% for transfers: plastic cards of any banks, credit cards, mobile payments (MTS / Beeline / Tele2), electronic money (Yandex.Money, WebMoney) and more (Samsung Pay, Viber) .
— FOR LEGAL ENTITIES (LLC and individual entrepreneur of the Russian Federation), through any bank on an issued invoice (non-cash payment) “without VAT” , by transferring funds to a current account.
Note ! After your first purchase, you can use the VS-AVTO BONUS PROGRAM to pay for your order.
Please note that delivery is at the customer's expense and is not included in the initial cost of the order.
The term for the formation and dispatch of an order is from 3 working days after receipt of payment to our accounts in accordance with the offer agreement and depends on a number of factors: movement of goods between warehouses, part painting, individual tailoring/execution.
After sending your order, you will be sent an email notification with the tracking number of the shipment, using which you can track the movement of the cargo on the carrier’s website.
An order for pick-up is made upon full prepayment of the order (after placing an order on the website, please wait for it to be confirmed by managers). The order is received at the pick-up point during business hours.
Delivery point address:
RF, Samara region, Tolyatti, GSK "Plamya", st. Officer 14
Pick-up point opening hours:
daily 8:00 - 19:00, Moscow time
Delivery is carried out by Russian Post with 100% payment for the order and delivery. The cost and approximate terms are calculated individually upon confirmation of the order. As a Federal client of Russian Post, we can provide the most favorable delivery rates from 200 rubles. depending on size, weight, value and remoteness of the region. We ship from Tolyatti 5 days a week (Monday - Friday).
Note! The shelf life of parcels at Russian Post offices is up to 15 days! In this case, a repeated notification will not be sent to the address specified in the parcel.
Delivery to the departure terminal in Tolyatti is free of charge, the rest of the delivery cost is paid by the customer upon receipt at the TK terminal in your city. The advantages of delivery using TC include the absence of restrictions on the volume and weight of goods.
Attention! Sending parts made of plastic, glass, abs, glass mat, etc. Recommended by transport companies only in rigid packaging (crate)!
Delivery times are determined by the transport company and are their area of responsibility. VS-AVTO cannot influence delivery times once the cargo has already been sent.
In connection with the amendments dated July 6, 2021 to Federal Law No. 374-FZ “On Combating Terrorism”, as well as the adoption of the anti-terrorism “Yarovaya package”, from July 20, 2016, in order to send cargo, the sender must provide information about himself, the recipient and payer. In particular, our clients require identification document details (Russian passport, driver’s license).
Installation of heated mirrors on a VAZ 2114
heated mirror elements
. But in winter, as everyone knows, it is cold. Therefore, I left the heating connection for warm days. With the arrival of spring, they actually came, but for some reason I didn’t get around to it))
And so I decided to connect them. What I used: — 4-pin relay (I took it with a fastening element) — Block for the relay — Block for the button — Terminals: ring-shaped 3 pcs. — Nut, bolt and washer to secure the relay. — Wire — Electrical tape — Fuse and fuse bulb (in my case it was not needed, because there is a separate mounting block)
I connected everything according to the diagram taken from DMMC. Because After reading his post, I decided to quickly turn on the heating))
After installing the mirrors, the wires were already routed into the door. And they hung there for half a year)) The mass from the mirror elements was secured to a bolt holding the window lift motor. But I pulled the positive wire into the cabin, it was not an easy task)) But thanks to the wire, I pulled it through.
As it turned out later, the positive wire was not long enough to reach the relay, so it had to be extended. I secured the relay near the injector brains, and this is where I needed a fastening element for the relay. I screwed the relay ground there in the same way as the ground from the emergency gang.
12V after turning on the ignition I took from the trip computer (Thanks again DMMC, otherwise I would have gotten tired of looking