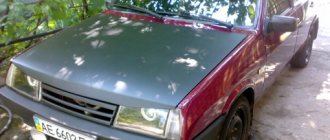
It would seem that we are talking about German quality products, which by definition should be better than their domestic counterpart. But in reality things are somewhat different.
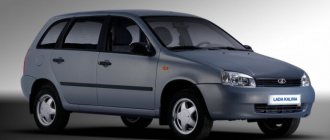
Let's look at the key features of Kirzhach and Bosch headlights to determine which ones you should choose for your VAZ 2110 model.
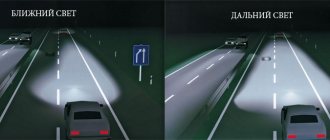
- The purpose of any low beam is to provide good visibility of the roadway at night, while at the same time avoiding dazzling oncoming traffic. Headlights from German and domestic manufacturers cope equally well with these functions.
- The headlights from Kirzhach have a low beam lens, and a reflector is provided for the high beam. German products have two reflectors - for low beam and high beam. The lighting is ultimately the same, but Bosch has better brightness.
- Lenses are actually better than reflectors. They create a clearer line of light and allow the installation of xenon optics.
- As a study of reviews of VAZ 2110 owners using German devices shows, they are characterized by worse illumination in low beam mode.
- Bosch headlights have a very important advantage for many - when the car is driving in cloudy and rainy weather, it provides a better quality glow compared to Kirzhach devices. It's all about the larger surface of the low beam reflector.
- This Bosch plus also comes with a minus - you are deprived of the opportunity to install xenon optics.
- Note that, regardless of the manufacturer, these headlights contain H1 format lamps.
- If we take into account all other characteristics, then the undisputed leader here will be the products of the domestic manufacturer.
Based on all that has been said, it becomes clear why headlights from Bosch are cheaper than Kirzhach, and also why experts recommend installing a headlight unit from a domestic company on a domestic car.
It is noteworthy that this is one of the few exceptions when domestic products turned out to be better than foreign ones. Sad but true.
What kind of bulbs should I put in the foglights on a VAZ 2110?
Lamps used in Lada 110 sedan VAZ-2110 cars
| Light device | Quantity, pcs | Lamp type |
| Front fog lights (depending on configuration) | 2 | H3 or H1 |
| Side direction indicators (depending on configuration) | 2 | W5W or WY5W (yellow bulb) |
| Rear direction indicators | 2 | P21W |
| Rear fog lights | 2 | P21W |
Question about glass color for fog lights
On older cars, the fog lamp glass was yellow.
, because many believe that this should be the case now, it is more correct and more effective.
In reality, everything is different. Today, auto industry leaders use exclusively clear glass for fog lights, which are superior to yellow ones in many components.
The current fog lights on the VAZ 2110 are available in two versions - transparent and corrugated. Most people choose transparent glass, although in fact, corrugated glass is better. They provide a clear directional beam that can show its best side during fog or rain.
What kind of light bulbs are in the PTF VAZ 2112?
Lamps used in Lada 112 hatchback VAZ-2112 cars
| Light device | Quantity, pcs | Lamp type |
| Front marker light | 2 | W5W |
| Front direction indicators | 2 | PY21W |
| Front fog lights (depending on configuration) | 2 | H3 or H1 |
| Side direction indicators (depending on configuration) | 2 | W5W or WY5W (yellow bulb) |
Fog lights VAZ 2110 wiring diagram
Wiring diagram for fog lights.
connection option 1
1) Open the fuse box, then unscrew the screw, pull it out and turn the fuse box over. Wires marked in green do not come from the factory and must be added.
Reverse side of the fuse box.
2) From the bundle of wires included in the kit, cut off two wires, 15 centimeters each. At the ends of both wires we attach female connectors.
- The red wire, marked 1 in Figure 2, is positive, you can even check it with a test light. We stretch it to the leg number thirty on the back of the relay.
We connect the first positive wire.
3) The wire labeled number 4 in the figure as 2 is the pole running from pin 87 back to the fuse box.
We connect the second positive wire.
4) We connect the red positive wires to the fuses in Figure 5 (they are intended for PTF), after which they separate one at a time to the right and left headlights.
Fuses for PTF (10 amps each) installed from the factory.
5) We mount the wires as shown in Figure 7. We attach thirty-centimeter wires with “mothers” at the ends to the double-female connector.
We create a convenient installation connection.
6) We insert the wires with single “mothers” into the white plug, in the places marked with circles on the fuse block.
Connection points for single females on the fuse block.
7) We remove the double female connector from the fuse block and connect it to the double male connector, which is located behind the trunk release button.
We connect our connector to the connector behind the trunk release button.
 The black wire numbered 3 comes from pin 86 located on the relay and is a minus. It is best to draw the negative from the top of the fuse block. There are already factory black wires there, inserted under the 10 nut. The wire marked with the number 4 is responsible for turning the PTF on and off.
Negative and PTF switching wire.
- Several options for where to run the PTF control wire.
1) From the side lights directly, when the side lights are turned on, the PTF turns on.
2) From dimensions with an additional button. Then turning on the dimensions only supplies power to the button, and the button itself turns on the PTF.
3. We run the wire from the ignition switch through the button, as in method 2. This is the most convenient option.
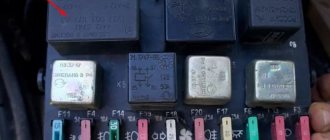
- In photo No. 11, number 1 indicates the PTF turn-on relay, and number 2 indicates the place for the electric lift relay. We take two wires from it, extend them and connect them to the headlight switch button. One of them (pink thin in our case) when you turn on the ignition, a “plus” will appear, and the black wire will be a “minus”.
- To correctly connect the PTF, it is important to know that the left output is located near the radiator, under the left headlight, and is easily secured with a clamp to the car body. The right exit is located symmetrically under the right headlight.
Adjustment
You managed to install the PTFs, but in order for them to perform their task, they must be configured. Place the Lada Priora on a flat surface. There should be a wall opposite the front bumper; motorists usually use a garage for this. Check the tire pressure - it should be the same.
Now you need to measure the distance from the ground to the middle of the headlight. On the wall, draw an even strip corresponding to the distance from the coating to the middle of the PTF. Draw another strip 5 cm below, the top one can be erased. The fog lights need to be adjusted so that the upper limit of the light is located on the horizontal line that we drew on the surface. As you can see, the headlight adjustment scheme is quite simple.
fog lights VAZ 2110 installation outside
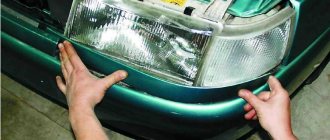
1) Remove the plugs in the bumper to install the headlights.
Remove the plugs in the bumper.
2) Install the fog lamp trim.
3) We fasten the fastenings with two self-tapping screws.
We fasten the PTF fasteners with self-tapping screws.
4) It remains to connect the fog lights to the VAZ 2110 by connecting the connectors.
We connect the wires by connecting the “male” - “female” connectors.
- If the PTF is equipped with xenon, then you need a headlight range control to adjust the light output.
connection option 2
1) choose a place for installation - usually a small compartment located under the bumper. For VAZ2110 there are two types of PTF: corrugated (scattering light) and transparent (light comes in spots). Transparent ones are a more fashionable option, but the least useful.
2) you need to purchase a key with a yellow indicator, wires, relays, a ground terminal, narrow wide male terminals and corresponding female terminals, as well as blocks and frames for headlights.
3) Under the hood, disconnect the wires going to the fluid level sensor and washer reservoir. To do this, unscrew the washer reservoir nut and pull out the bundle of wires located under the left side member.
4) In connector Ш-1 we need three wires: two yellow-black and one yellow.
5) Then we cut off two pieces from the yellow wire and stretch them inside the car. We strip the wires, attach wide male-type terminals to them, then insert them into the block so that the marked wire connects to the yellow-black one. We connect the block and press the two yellow wires to the harness, put the washer reservoir in place.
6) Next, take two more pieces of wire, each 50cm long. We attach a ground terminal to them and screw it to the stud along with the ground wire from the headlights.
7) stretch the fog lamp wire from the front side member, pull out both wires where the headlight itself will be attached. We attach a wide ground terminal to each wire.
Next, we put the brackets on the bumper, and the wide female terminal blocks on the wires
9) Insert the light bulbs into the headlights.
Tip: insert the light bulbs into the headlights without touching the light bulbs with your fingers. Otherwise, after heating, the bulbs will burst. If you happen to touch the light bulbs, degrease their surface.
10) Connect the yellow wire to the light bulb and the black wire to the body.
- The entire PTF installation procedure takes about two hours.
connection option 3
2) Take the PTF block, and stretch the red wire to the black box (BY), connect it to the relay block No. 85.
This is the same wire.
3) Contact No. 3 in block Ш-1 is powered from terminal No. 30 located on the relay block.
4) Contact No. 5 from block Ш-1 is connected to terminal No. 87 in the relay block.
Contact number five.
5) Using a connector, we connect the black wires on the relay block No. 86 and on contact No. 4 from the Sh-2 block.
6) Then we connect the yellow wire to contact No. 1 of the Ш-1 block, and lead it to the left headlight.
We connect the Ш-1 block to contact No. 1.
7) We connect the right headlight to contact No. 6 of the Ш-1 block using a yellow-black wire.
Connect the right headlight.
We insert the Ш-1 block into the connector.
Connected block Ш-1.
9) Place the relay block on the back wall of the black box.
10) Go to the dashboard. We connect the green wire from the PTF block, located on contact No. 10, to contact No. 58R (in the photo it is on top).
Above we see the same wire.
11) Connect the two white wires. One from the PTF block, and the other from the light switch using a connector. Black wire with black respectively. We return the instrument connections, buttons and visor to their places.
We connect the white and black wires with connectors.
12) Return the button with the PTF wires back to the dashboard housing.
We return the wires and the button to the housing.
13) The remaining two wires: black coming from contact No. 7 and pink coming from contact No. 9 are connected to the fog light indicator through the block.
We connect the wires through the block.
14) Insert the button into the panel.
Attention: Be sure to check whether the button backlight and the PTF on indicator are working.
We check the operation of the backlight.
Let's check the indicator's operation.
The connection of the fog lights is completed; we also recommend watching the training video.
We install xenon in the foglights of a VAZ 2110 with our own hands
- First, we install the H1 bulbs in the cap of a plastic bottle. Then, using sealant, into the headlight.
A light bulb installed in a bottle cap.
- There are often cars with xenon installed in the main headlights. If the beam of light has even boundaries, it is even possible to legalize xenon when preparing documents for a car.
We install the light bulb using sealant into the headlight.
- When there are no lenses in the headlights (there is only a reflector), your car exhibits glare beyond the permissible limits and leads to dazzling of other road users.
Xenon fog lights with lenses.
- All the benefits of xenon light come with a focusing lens that ensures the correct distribution of the light beam. PTF with xenon light - they do not dazzle if they have a focusing lens, and make the fog function better.
In the next section we will tell you how to install a zero resistance filter on a VAZ 2110.
The latest VAZ 2110 models received fog lights, but most cars were left without this useful element. PTF significantly increases safety on the road, because the driver feels confident in foggy weather. As a result, there are fewer accidents. Installation of fog lights can be carried out either in a car workshop or on your own. Some motorists prefer to upgrade their optics with xenon, after installing which the glow becomes even more spectacular.
Features of PTF: difference from headlights
So, the main task of fog lights is to illuminate the road in poor visibility conditions (rain, snow, fog, etc.). However, unlike the head light, there are features.
First of all, PTFs must have the clearest possible upper cut-off line, and the beam of light must be strictly below and be as wide as possible. If these conditions are not met, this can become a problem both for the driver of the vehicle and for other road users driving in the oncoming lane.
We also note that even if the headlights have the most powerful lamp, the features, purpose and installation location of such headlights do not allow them to effectively illuminate the road in fog or rain.
The fact is that the head light should illuminate the road as far as possible, not blind oncoming drivers and cover the side of the road. However, in conditions of limited visibility, neither high nor low beam can cope with this task. The reason is that a powerful luminous flux is reflected from moisture particles, causing a cloudy “wall” to appear in front of the driver. This is especially noticeable when the high beams are turned on.
In turn, high-quality PTFs are characterized by lower power, and the optics themselves are made and installed so that the light from the fogs literally “breaks through” moisture and fog. The main secret is that usually the fog does not touch the ground, and the fog lights are as low as possible.
On the one hand, fog lights do not shine as brightly and far as the headlights, but in poor visibility conditions they illuminate several meters of the road in front of the car. The main thing is to follow the rules for installing PTF and setting up such optics.
- In a nutshell, there are clear norms and standards that must be adhered to during installation. Additional adjustments allow you to set the fog lights so that the light flux falls on the road, does not blind the driver, does not form a “wall” in the fog in front of the car, etc.
At the same time, it is important to understand that cheap and low-quality PTFs, as well as incorrectly installed fog lights of a VAZ or any other car, will blind oncoming cars, but are not able to fully illuminate the road. For this reason, when selecting fogs, first of all, you need to pay special attention to this optics.
Lada 2112 › Logbook › Is it worth taking Chinese optics? Review using the example of PTF VAZ 2110
It’s no secret that the market is filled with Chinese “analogs” of all kinds of spare parts, including optics; the price of such units is up to 4 times lower, which makes them attractive to consumers. Let's try to figure out whether it is worth taking such devices and whether they meet the required characteristics. For example, let's take the VAZ 2110 fog lights of Chinese and Russian production and see what their differences are. We have 2 experimental Russian-made PTFs, their cost ranges from 800-1000 rubles and the Chinese equivalent costs from 150 to 400. Externally, the differences are not particularly noticeable on the Chinese ones, even the frame fits more tightly to the headlight itself; fewer gaps look quite nice (but even this is not a plus more on that below)
there's not much difference
Let's look at the power wires, here too there is no difference except that in the Russian headlight the wires are hidden in a protective tube and this is a plus, in the Chinese there is some kind of tube stub on the wires (it would be better if there was none at all)))
Let's look at the protective casing:
Russian made of thick rubber, tight but stretches (as it should be) there is a tongue that makes it easier to remove for replacing lamps
Chinese or rubber or soft plastic does not stretch very difficult to put on and even more difficult to take off
The glass is visually the same and the center of the headlight (needed for adjustment) and the type of lamp used are indicated here and there.
center of the headlight and type of lamp used
center of the headlight, type of lamp used, manufacturer
everything is loose, it’s hard to tuck the antennae because... they are not folded properly, if you look inside the screen is missing
installing and removing the lamp is easy, everything snaps into place, the lamp does not dangle, there is a screen on the lamp
in Chinese, a self-tapping screw is simply screwed in; reliability is of course in doubt
on Russian ones there is a screw with a fine thread, and there is also a spacer spring
At the beginning, I said that on the Chinese there are no gaps between the plastic and the headlight (and this is bad), so because of this the headlight does not tilt, therefore it will not be possible to adjust it (it will not be possible to tighten the screw deeper than in the photo) Now let’s move on to the most interesting and most important thing, How do these headlights shine and what do we see:
This is the kind of light beam produced by the Chinese PTF, the beam is narrow and high plus huge glare, therefore it will be terribly blinding, there is no talk of any glow under fog or illumination of the side of the road, the conclusion is: it will blind oncoming traffic, in fog or snow it will not only not help but may also cause harm
Other manufacturers and types of lamps
Of course, many are trying to install other types of light sources and other types of lamps. All headlights discussed above have a halogen lamp. That is, it is actually the same incandescent lamp, but its filament operates in a gas environment (bromine or iodine halogens).
There are also alternative fog lights.
Xenon PTF
Difficult to install and expensive lighting devices.
Standard PTFs converted to xenon fog lights.
The old xenon PTFs worked on lamps D1 and D2, the new ones received lamps D3 and D4 without the use of mercury vapor. Theoretically, the efficiency of such fog lights and the luminous intensity are higher than those of halogen lights. However, do not forget about the specificity of PTF - not to cause reflection of the beam from the water suspension. And all inexpensive xenon headlights require very precise adjustment of the light beam and are not able to provide a low horizontal stripe to combat fog.
In addition, the maximum color temperature for the effectiveness of fog lights is 3000-4500 K , otherwise they will be of no use and blinding light will be provided for oncoming drivers. The prices of such foglights are not lower than 5-7 thousand ( Hella Micro DE , for example). Anything cheaper is useless and even dangerous.
LED PTF
Intelligent LED PTFs are very expensive, and it makes no sense to buy cheap ones.
The main disadvantage of effective LED fog lights is their huge price and low efficiency..
The low efficiency is explained by the fact that a conventional LED produces light that is bright and pleasant to the human eye with a temperature of about 6000 K. This is not bad for head optics, but not for PTF. However, there are exceptions. For example, Osram LEDriving FOG 101 . A high-tech device with LEDs of a proprietary proprietary design with a color temperature of about 3000 K, which is just suitable for PTF.
Price - no less than 16,000 rubles.
Necessary tools and elements
Before purchasing everything you need, decide on the color. Today, white optics are most popular among VAZ 2110 owners, but you can also find classic yellow. Now to the purchase: some people prefer to take a ready-made kit, which includes wiring, while others choose the parts separately. The second option is not only cheaper, but also provides more installation options.
To work we will need:
- Headlight kit;
- Key as well as indication;
- Relay;
- Plastic pads;
- Headlight frames;
- Terminals called “male/female.” Recommended to be purchased separately, no wiring included;
- The terminal that will go to ground;
- Wiring.
The wires of the VAZ 2110 need to be given special attention. It is recommended to go to a specialized electronics store to get them. We need an option with two copper cores, as well as double insulation. As for the cross section, here you need to build on the power of the lamp. If the power indicator is high, then it is better to take 0.75 millimeters. At normal power, 0.5 mm wires are used.
Useful videos on the topic
Wiring diagram for fog lights VAZ 2110 in VAZ 2112
I decided to add a photo of instructions for connecting fog lights, maybe someone will find it useful.
equipment (not all kits include a PTF power indicator, see the note on the package)
Connecting PTF to VAZ 2110, 2112, 2111 with an old panel
PTF button. 7 - weight, 9 and 10 on Ш1-5, 58R
Today I figured out how to connect the PTF. (Yesterday they started working, but then went out). The point was this: the Internet is full of diagrams with PTF relays. I did with him. Today I realized that a relay is not needed AT ALL. It heats up and turns off. It is needed for a short launch. It works on the principle of a magnet (current is conducted, the plate is magnetized, closes the contacts, and supplies “+”). In short, it is needed for short starts (for example, a starter). And here we need burning PTFs all the time. Therefore, we remove it from the diagram. (The fog lights go through fuses 4 and 14, so don’t be afraid that all the wiring will short out). Today I made a wiring diagram for fog lights, I hope it will help someone. The colors are conditional to make it easier to see, so look at the facts. I present to your attention a diagram for connecting fog lights. Well, my little engine :3