The knock sensor on the 16-valve VAZ-2112 has the same causes of malfunction as some GAZ, Toyota, Gazelle, Priora and Kalina cars. Of course, not every motorist will be able to determine that this is exactly the sensor, but you can consider the direct and indirect causes of the malfunction.
The video provides an overview of the main faults and diagnostics of the wide-band knock sensor on the VAZ-2112:
Signs of a malfunctioning knock sensor
Resistance that should be in the sensor in good condition
Before considering the causes, it is necessary to look at the symptoms of the malfunction. So, let's look at what could be a warning sign that the knock sensor has failed:
- The engine is losing power.
- Overclocking potential drops.
- Fuel consumption has increased.
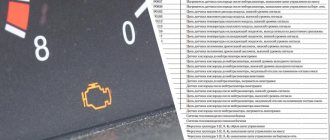
- The CHECK light came on on the instrument panel.
- Smoky exhaust.
- Presence of detonation.
- The engine started to stall.
Of course, an important reason for the failure of the knock sensor is the fuel mixture, namely the quality of gasoline itself. The lower the octane number, the lower the resistance to detonation. If the fuel detonates, it will not completely burn through the engine and you will hear the muffler firing.
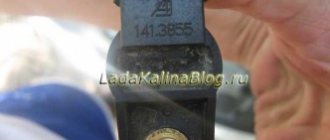
Knock sensor diagnostics
The sensor is checked with a multimeter. In this case, the sensor is “knocked” with a screwdriver
To diagnose the knock sensor, it is removed from the engine and a voltmeter with a measurement limit of up to 200 mV is connected to it.
Next, they “knock” the sensor on a hard surface and look at the voltmeter readings. When tapping, the readings should change. If they do not change, this means that the sensor is not working. If they change, then the sensor readings change, but whether they are correct is in question!
ECU signal about malfunction
Failure of the sensor will be immediately obvious by a characteristic knocking sound. Many motorists simply reset the “minus terminal” to reset the readings of the electronic control unit, but it is worth understanding the very reasons for the effect and eliminating them. Let's look at the ECU error codes that signal a failure of the knock sensor:
- code-0325 hints at network problems. For example, a break in the wiring or acidification of the plug contacts. In this case, we call the electrical circuit connecting the sensor, clean the electrical contacts ;
Error 0325 on the BC STATE screen (Open circuit of the knock sensor)
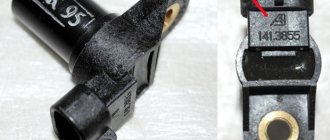
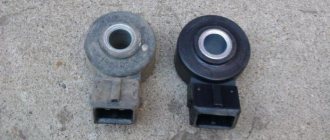
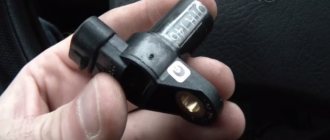
Type of knock sensor
Knock sensor on Priora - we check and change it ourselves
Knock sensor on Priora - all the details of operation and replacement
Purpose and location of the knock sensor
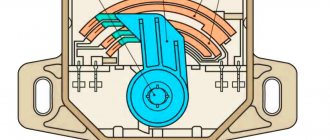
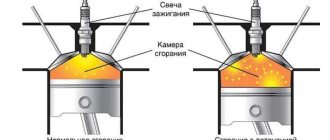
A knock sensor (DS) is a device that is installed on the outside of the cylinder block wall to monitor the occurrence of abnormal vibrations caused by detonation in the engine. that is, explosive self-ignition in the combustion chamber of the working mixture. The DD produces an alternating current signal, the voltage amplitude and frequency of which depend on the vibration parameters of the cylinder block.
Each level of intensity and frequency of oscillations of the engine walls corresponds to its own signal. The engine control controller constantly analyzes the data received from the engine. When detonation occurs in the cylinders, the amplitude of vibrations of the corresponding frequency increases, and the DD generates a signal, after processing which the controller adjusts the ignition timing, making it later, which leads to the suppression of detonation of the working mixture.
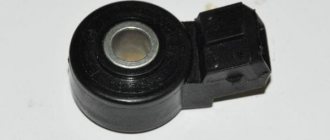
The Priora DD consists of a washer-shaped plastic body, which has a hole in the center for a bolt with a 13-head head, and on the side there is a two-pin connector for connecting wires from the controller. The main part of the DD is located inside the case - a sensitive piezoceramic disk element, which, in fact, generates voltage (signal) when exposed to vibration.
The DD Priora is installed on the cylinder block, namely: on its front wall under the intake module, next to and slightly above the dipstick socket for monitoring the oil level in the engine. It is not visible from the top of the hood. It can only be seen from below, for example, from a pit, when the lower engine protection is removed.
When is the DD changed on Priora?
The DD is removed for inspection or replacement if signs of its malfunction appear or if it is diagnosed at an engine operation test bench. The sensor cannot be repaired, and if it breaks, it must be replaced. When the DD or the electrical circuit from it to the controller fails, the latter (control unit) signals this to the driver by turning on a warning lamp on the instrument panel.
At the same time, the controller switches to another engine control mode, called reserve, in which the ignition timing is constantly at a late angle. This mode is characterized by increased fuel consumption and lower engine power.
The error code indicating a breakdown of the Priora DD is 0327.
The appearance of this error is the main reason why the sensor is changed. However, in some cases, the DD may be only partially faulty, that is, it will work, but incorrectly. In this case, the warning lamp will not light up, no error will be displayed, but the engine will begin to detonate in certain modes. However, there can be many reasons for such motor operation, and if a malfunction of the motor is suspected, it is removed for inspection.
How to remove and check the sensor?
Access from above to the Priora DD is difficult due to the intake module located above it. The easiest way to get to the sensor is from below, first removing the engine protection or at least unscrewing and folding its front part. When working from above, you will have to do everything by touch. In any case, before starting work, it is necessary to disconnect the ground wire attached to the “negative” terminal from the battery.
To remove the crankcase protection, you need to:
- unscrew 5 nuts with a 10mm head;
- unscrew the 2 19 nuts installed on the back of the shield;
- remove protection.
- by pressing the metal latch of the DD connector, disconnect the block of wires going to the controller;
- using a 13mm wrench, loosen the bolt securing the sensor;
- Unscrew the bolt and remove it from the threaded hole, removing the sensor.
- We connect a multimeter to the DD terminals. We set the device to voltmeter mode, choosing a measurement limit of up to 200 mV.
- We take a metal object - pliers or a bolt - and lightly tap it on the DD.
When you tap on a working sensor, the voltmeter will show voltage surges. A faulty DD will not react in any way. A more accurate diagnosis of a removed sensor can only be done using a special stand.
Installation of a new DD is carried out in the reverse order of dismantling. Experts recommend installing a similar Bosch instead of the “native” one. Before going to the store for a new sensor, you should write down the markings of the removed sensor. The bolt securing it to 13 must be tightened with a slight force - 10.4–24.2 Nm (1.1–2.5 kgf). Tightening too tightly will affect the operation of the sensor.
https://carnovato.ru
conclusions
It is quite easy to determine the malfunction of the VAZ-2112 16 valve knock sensor. The first sign will be the presence of errors in the electronic engine control unit and the “Check Engine” light on the instrument panel. Next, a simple check with a multimeter will show whether this particular product has actually failed or not. If the sensor is faulty, it must be replaced.
1200 rub. for the photo report
We pay for photo reports on car repairs. Earnings from 10,000 rubles/month.
Write:
Replacing the knock sensor
Removal
- To replace the knock sensor, first turn off the ignition.
- Then remove the wiring harness block by first pressing the latch.
- Unscrew the fastening bolt with a replaceable head x13 or an appropriate wrench (the head is preferable to prevent “licking the edges”).
Installation
Install the sensor in place so that the connection block is directed towards the free space.
Touching hot engine parts may damage the insulation of the wiring harness. Touching cold elements is a point of chafing due to the natural vibration of the engine in relation to the body.
Try to keep the block “looking” down in case of water ingress. Make sure the pad is clean and dry - the fastening bolt is wrapped in a block and thus connected to ground. Contact between the bolt and the pad through a layer of dirt that has been exposed to oil or water will lead to engine malfunctions.
The fastening bolt must be tightened using a torque wrench with a replaceable head of 13. The tightening torque is 15. 24 N.m.
In this case, the correct tightening torque affects the sensitivity of the sensor to engine vibrations. Incorrect tightening leads to malfunction of the motor.
Work progress
The replacement process is the same on different LADA models.
First of all, you need to press the latch, and then disconnect the plug with wires from the sensor itself.
Next, using a 13mm wrench, unscrew the fastening bolt and remove the assembly itself.
The replacement is also demonstrated in the video using the Lada Grant as an example.
The Lada Kalina knock sensor is checked using a multimeter, which for this purpose is switched to the voltmeter operating mode with an upper measurement threshold of 200 mV.
To check you need:
- Connect the multimeter probes to the sensor;
- Lightly tap the metal base of the assembly with another metal tool;
- If the Lada Kalina knock sensor is working correctly, voltage drops will be displayed on the multimeter.
As for a deeper and more complete check, it is possible, but only at a special stand.
Sometimes component failure occurs due to poor contact of the plug. If this is the case, it is necessary to treat them with graphite grease or other composition for cleaning electrical contacts, and then remove oxides from their surface. Don’t forget about contaminants that also need to be removed.
In addition, experts note that detonation is possible if the engine operates under heavy load. In such a situation, the reasons may be as follows:
- The octane number of the fuel does not correspond to that recommended by the factory.
- The heat number of the spark plugs does not correspond to that recommended by the factory.
- The basic ignition timing is incorrectly adjusted.
As you can see, checking and replacing the Lada Kalina knock sensor is not difficult and you can do all the work yourself.
tweet
back Car window tinting – conditions for each glass
Next The Lada Kalina multimedia system is being discontinued
Knock sensor malfunction
The most common fault is “low signal level” code 0327 . With the ignition off, the integrity of the circuits from the sensor block to the controller, and from the block to the sensor, is checked. It’s a good idea to check the tightening torque. If the torque was insufficient and it was necessary, you can restore it and test for the absence of code 0327.
If the circuits are serviceable, the serviceability of the knock sensor is determined. Here are a couple of methods for checking the sensor itself without using special diagnostic tools.
- With the engine idling and the wiring harness block disconnected, connect a voltmeter to the sensor contacts in AC mode. The presence of a signal on the DD contacts indicates serviceability.
- The second method is to remove the DD from the engine. Then a bolt is installed in the sensor hole and a voltmeter is connected to the contacts. By lightly tapping the head of the bolt, the presence of a reaction to vibration is determined by the deflection of the voltmeter needle.
How to check the functionality of the sensor
To determine whether the knock sensor is working or not, it must be tested. To check, the device will need to be dismantled. Also in the process you need to stock up on a multimeter that connects to the sensor terminals.
To carry out the test, the necessary measuring parameters are set on the device, after which the working side of the knock sensor is knocked on a metal surface. Simultaneously with the action being performed, you should pay attention to the indicators of the multimeter. If no changes occur on the device screen during tapping, then the sensor is faulty.
If you don't have a multimeter at hand, you can use another diagnostic method. It consists of checking the voltage supplied to the DD terminal block. To perform the test, you will need to disconnect the block from the sensor and take measurements using another measuring device - a voltmeter.
The engine must be running while using the device, and the voltmeter must be in AC mode. The malfunction will be proven if it turns out that the voltage does not change.
During the check, you need to pay attention to the fact that the problem may not always be associated with a sensor malfunction. Sometimes the absence of the necessary indicators or reactions of devices can be caused by a break in the wires in the system or the oxidation of an element.
What is a knock sensor and why is it needed?
This part is found in cars that use gasoline as fuel. It is intended for injection types of engines. The sensor is located on the engine cylinder block. This is an important part of the control system, the main purpose of which is to control the level of detonation.
In answering the question of what the knock sensor is responsible for , it should be noted that thanks to it the following vehicle capabilities are realized:
- Fuel economy.
- The ability of the engine to develop maximum power.
The sensor monitors the vehicle's starting system and regulates its proper operation.
What are the main components of a knock sensor?
The main details of this mechanism are:
- Vibrating plate.
- Piezo type electrical element.
- Signal wire.
- Braid.
Where is the knock sensor located?
Depending on the make of the car, the location of the sensor may vary, but it is always located on the engine body. The part itself is very small, about the size of a matchbox.
Part installation features
An important feature of installing the sensor is the presence of an electronic ignition system in the car. If it is not there, then there is no sensor. Older models do not have a knock sensor. It is also not installed on carburetor engine systems.
Replacing the sensor on a VAZ, video:
Sensor operation
There is a "Check" icon on the car's dashboard. In English this translates as check or control. If it is not active, then the knock sensor is working and working as expected.
The operating principle of the knock sensor is based on a piezoelectric mechanism. Inside the sensor there is a plate with a piezo effect. When detonation occurs, voltage is created at the input and output, and the engine vibrates. Otherwise, this is called the creation of a potential difference. If the voltage level at one end is too high, the sensor corrects this process.
If for any reason the sensor breaks down, the “Check” icon will light up on the dashboard. This will mean only one thing: urgent repair or replacement of the element is required.
If the electrical circuit of the sensor is not broken, but a breakdown exists, the “Check” icon will not light up. Therefore, it is worth listening to your car sometimes.
Checking the Sensor
To check the phase sensor, you must use a multimeter. Using this device you can check almost all sensors in the car.
Step by step verification process:
- Turn on the ignition on the car, check the voltage on the battery and make sure that it corresponds to the operating voltage of 11.8-12.6V. To check the voltage, you need to set the switch on the multimeter to constant voltage mode, on the 20V division scale.
- Now you need to check the power supply to the sensor necessary for its operation. To do this, remove the connector from the sensor and connect a multimeter to it. We connect one multimeter probe to ground, the second to the central connector of the block - the voltage should be 12 V. The outermost connectors of the block should show up to 5V.
- After the sensor's power supply circuit has been checked and no damage has been detected, it is necessary to begin checking the DF itself. To check it, it must be removed from the cylinder head. After dismantling, we connect the sensor to the connector and check the voltage on the back side of the block with multimeter probes. At contact “B” the voltage value should be at least 0.9V. Then you need a small metal plate, which needs to be inserted into the slot of the sensor and when the plate is in the sensor, the voltage on the multimeter should drop to 0.4V. If all parameters match, then the Priora phase sensor is working. If the parameters differ, then the sensor must be replaced, since it is not repairable.
Symptoms of sensor malfunction
You can determine whether the sensor is broken without a dashboard. But this will require experience and a special approach to your car. You need to know him very well. We list the signs by which you can understand that the device is broken, from here it will be immediately clear what the knock sensor affects:
If you determine the breakdown yourself, then it’s not far to independently diagnose the sensor, as well as replace it yourself. In principle, this is not difficult, but it requires some understanding of the process.
Malfunctions and their elimination
Like any electronic system, the knock sensor is also susceptible to malfunctions, as indicated by the CheckEngine indicator. Most often, the knock sensor fails in the event of a signal wire break, short circuit, damage to the sensor itself, or damage to the wire insulation. If the signal wire is broken, you need to check the connection between the wiring harness and the knock sensor plug. If it is not damaged, then there is a violation of the integrity of the socket contacts or wires.
In the event of a short to ground, disconnect the mass air flow sensor (MAF) from the wiring harness and check the condition of the circuit with the ignition off using an ohmmeter. If a short circuit occurs in the on-board network, disconnect the cover of the sensor socket and check the voltage between the socket and ground by turning on the ignition. If the voltmeter readings do not exceed 12 V, you need to check whether there is a short circuit in the harness circuit.
Replacing the knock sensor
If it requires replacement, then it is necessary to purchase a new device and install it as soon as possible. All car enthusiasts are primarily interested in the price of a new device. It is low and depends on the make of the car and on the country in which the part was manufactured.
You can carry out the replacement yourself when the engine has cooled down by disconnecting the negative terminal of the battery. It is necessary to achieve the most convenient access to the sensor so that it can be removed. The fact is that it also depends on the car model.
Thus, the knock sensor is a simple device, yet very useful for an electronic control system. It is not difficult to determine its malfunction; you can check it yourself, even in rural areas.
It will also be inexpensive to replace the sensor. It doesn’t matter whether this is done by a specialist or independently.
>
Features of phase sensor and shock sensor
The phase sensor (PF) of the Lada Kalina is installed on the cylinder block plug. Its signal is used by the ECU to sequentially inject fuel into the cylinders, that is, the phase sensor helps the ECU monitor the so-called engine strokes (intake, compression, combustion, exhaust) and supply fuel when needed.
It is possible to verify that the phase sensor is faulty only with the help of diagnostic devices, because the nature of engine operation when the phase sensor fails usually does not change. Fuel consumption may only increase slightly. Sometimes the engine starts with a slight delay because the ECU is looking for a signal from the sensor, but does not find it.
If it is necessary to replace the DF, you need to remove the plastic cover of the cylinder block to make it easier to get to the device itself. Carefully remove the connector with wires from it and, using a 10mm wrench, unscrew the fastening bolt, after which the sensor can be removed from the engine.
The new device is installed in the same place. DF is also called camshaft position sensor. When dismantling the device, it may happen that the sensor seems to grow to its place and does not want to be removed. In this situation, special pliers will help.
The shock sensor is installed as part of the standard anti-theft alarm system for the Lada Kalina. As a rule, a car of this model has a mount for such a sensor, and of a single-level type. However, car enthusiasts have learned to install non-standard two-level devices. The two-level shock sensor is connected quite easily without major changes to the standard wiring.
Sensors with an output transistor are often installed, configured for certain security zones (for example, the hood or doors). A two-level impact sensor is the most preferable because it reacts differently to impacts of different strengths, which allows you to assess the degree of danger to the vehicle. But it is important to consider that this device requires fine tuning. As a rule, it is done using a special adjusting screw.