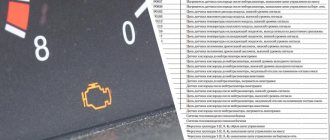
The VAZ 2114 is a people's car that is quite popular in the CIS countries due to its low cost and unpretentiousness. This car is equipped with a 1.5 or 1.6 liter injection engine. ICE 2114 is reliable and easy to maintain, but since it uses a large number of different sensors, which can fail and cause the engine to operate incorrectly, which will put the engine into emergency mode and the “check engine” lamp will come on.
In this article we will talk about the knock sensor on a VAZ 2114 car, namely the signs of its malfunction, the causes of the breakdown, methods of checking and self-replacement.
What is DD for?
The knock sensor in cars is used to detect knocks that occur in the engine due to improper combustion of the fuel mixture, which can occur due to poor fuel, insufficient spark and dirty air filters.
Most often, engine detonations occur due to low quality fuel at Russian gas stations.
The sensor helps protect the engine from overloads that occur during detonation, as well as significantly extend its service life and delay major repairs of the internal combustion engine indefinitely.
DD cost
The knock sensor cannot be repaired. If it fails, it is replaced. The part is sold in almost any VAZ spare parts store. It costs on average about 300 rubles . Its cost depends on the manufacturer. There is no point in buying the cheapest or most expensive spare parts. High price does not mean excellent quality. Therefore, it is recommended to take mid-priced items. These are, for example, products produced by Avtopribor (Kaluga), KRAFT or Pekar.
Sometimes more expensive foreign-made spare parts are on sale. Their cost can be around 1000 rubles. But there is no point in overpaying. Domestic products of the above brands serve quite well.
What does detonation lead to in an internal combustion engine?
Engine detonation leads to dire consequences for the engine. If there is constant detonation in the engine, it will lead to breakdown of the entire unit and expensive repairs. You should pay attention to the operation of the internal combustion engine and, if detonations are detected, quickly eliminate the causes of engine vibrations. In the picture below you can see what detonation in the engine leads to.
Signs of malfunction of the knock sensor VAZ 2114
The first and serious reasons to carry out in-depth diagnostics are: - twitching of the car’s internal combustion engine; — reduction in power indicators; — an error appears on the instrument panel; — increase in engine operating temperatures and rapid heating; — increased fuel consumption; - persistent smell of gasoline. In order to understand the reason for the incorrect operation of the internal combustion engine, it is necessary to connect a diagnostic tool. Such a device allows you to read and display the code of a particular error. In our case, the following codes are distinguished: from 0325 to 0327 inclusive. All of them indicate that the sensor is not working properly.
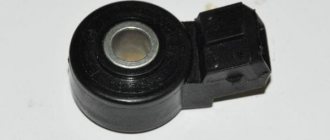
Design
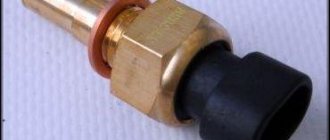
The sensor has a plastic case inside, which has a piezo element encased in a metal case. The metal part of the sensor comes into contact with the engine, thereby detecting detonations occurring in it.
The DD has a connector that is connected to the engine control unit.
Principle of operation
The operation of the sensor is based on the generation of small voltages due to impacts on the sensor. The sensor has contact with the engine, when detonations occur in the internal combustion engine, vibrations occur through it, the sensor senses these vibrations and generates an N-value voltage and transmits it to the ECU.
The engine control unit, receiving signals from the engine control unit, adjusts the fuel mixture in the proportions necessary to reduce detonations; after adjustment, the fuel mixture with changed air and fuel parameters enters the combustion chamber, after which detonations disappear.
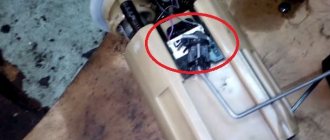
Independent replacement of DD on Samara-2
There are two types of sensors installed on VAZ family cars:
- single-contact;
- two-pin.
Please note - they are not interchangeable. For this reason, you need to clarify in advance which device is installed on your car, and only then buy a new knock sensor.
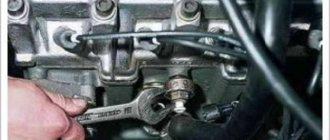
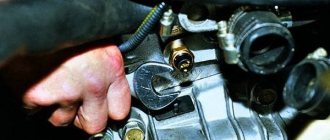
The process of replacing the DD is simple. The mechanism we are interested in is located between the second and third cylinders on the engine block. If you have a sensor with one contact installed, you need to turn off the ignition, then disconnect the connector from the sensor and unscrew it. We put a new one in place of the old device and tighten it with a torque of 10 to 24 Nm. After all these manipulations, you should connect the block with electrical wires.
When dismantling the VAZ 2114 knock sensor with two contacts, you need to discard the terminal with the minus sign from the battery (the ignition is not turned off). Further actions are as follows:
- the block with wires folds down;
- the nut connecting the engine block and the DD is unscrewed;
- the washer is removed and the sensor is detached from the stud;
- a new device is installed.
Experts say that after installing a new sensor, it is imperative to drive the vehicle in order to reset errors and diagnose the functionality of the installed mechanism.
Home →
Device →
Fuel and exhaust systems →
Fuel injection system →
Where is
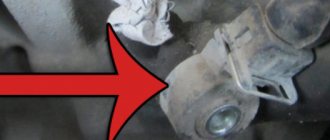
The knock sensor on the VAZ 2114 is located on the cylinder block in the middle between the second and third cylinders. This location was not chosen by chance, since most of the detonations occur in cylinders 2 and 3, because they are subject to greater temperature loads than the outer ones.
The DD is attached to a stud or a bolt (in different ICE models the sensor is mounted differently) to the BC.
Checking DD yourself
Knock sensor for VAZ 2110
The knock sensor is located between cylinders 2 and 3 on the radiator side directly on the engine block. Checking the knock sensor is a simple matter, especially if you have ever looked under the hood of the fourteenth.
Replacing the knock sensor VAZ 2114
- The key end is 13 for a single-pin DD (resonant) and 22 for a two-pin DD (broadband)
- Simple screwdriver
- Multimeter
How to check the knock sensor
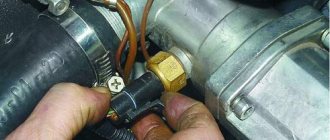
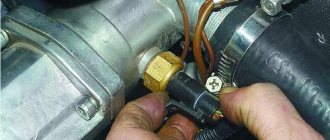
The first thing to do is remove the DD. It’s easier to remove the single-pin one: don’t touch the ignition, turn it off and unscrew the sensor from the engine. The two-pin one is more complicated: we also don’t touch the ignition, but we also need to remove the negative from the battery. Then, remove the wires of the block, unscrew the DD fastening and remove it.
Second, we switched the multimeter to a voltmeter and set the limit to 200 MV. We connected it to the DD and carefully hit it with some piece of iron (the same screwdriver). When impacted, the voltage should jump; if there is no jump, the sensor is dead, go to the store for shopping.
When a two-pin DD is connected, its terminals cling to the multimeter, when a single-contact DD is connected, one contact and its body are clinging.
Third, we look at the wiring, as already mentioned, most often it’s a matter of frost, or broken contacts.
A simple plan on how to check the knock sensor in your garage with properly trained hands.
Opinions agree that a non-working DD should not be replaced with an analogue from the factory. You will buy a pig in a poke with a 1 in 10 chance that you will get a working one. For the fourteenth, DD from 406 engines for the Volga or a universal imported Bosch are perfect.
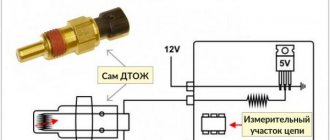
Sensor check
Checking the DD is carried out using diagnostic tools or using a multimeter. A multimeter, also known as a tester, allows you to check a large number of automotive sensors by measuring resistance and voltage. Checking the DD consists of measuring the voltage at the sensor output.
Since the sensor operates on the principle of a piezoelectric element, therefore, when it is struck, it must generate voltage.
Let's start checking
- Remove the knock sensor;
- On the tester we set the constant voltage measurement parameter to a limit of 20 Volts;
- We connect the tester probes to the sensor connector;
- Then, using a metal tool (for example, a screwdriver), we hit the metal part of the sensor. An N-quantity voltage of 1V and higher should appear on the device screen for some time.
If the device does not display voltage when the sensor is struck, then the DD is in a faulty state and must be replaced.
How to check the knock sensor
Sometimes while driving, a car's gasoline engine begins to make a suspicious metallic knock. Drivers call it "tapping fingers." This sound is a sign of detonation, a highly undesirable phenomenon that can lead to engine failure and costly repairs. To prevent this from happening, a knock sensor is installed on the cylinder block. If it breaks, you can check it with your own hands.
How the sensor works
The phenomenon of detonation occurs for various reasons. This includes the use of low octane gasoline, a high compression ratio, and many other factors. What matters is driving in certain gears, the degree of soot, and the presence of certain components in the working mixture.
The knock sensor is an accelerometer that analyzes the mechanical vibrations of the cylinder block and converts them into electrical impulses. The principle of operation is simple: the device constantly sends signals to the electronic control unit of the power unit. That, in turn, changes the composition of the mixture and the ignition timing depending on these signals. The result is proper use of resources and engine operation at optimal power.
Appearance and diagram of the knock sensor
How to understand that it is out of order
The product is installed in cars with an electronic control circuit. Diagnosing faults in such machines is simple - if everything works correctly, the sensors on the dashboard remain inactive. The main sign of a malfunctioning knock sensor is the appearance of the inscription “Check engine” (CHECK). It can burn constantly, or it can appear and disappear.
If the sensor breaks down, acceleration performance deteriorates. The car starts, but works worse - it accelerates poorly, vibration occurs at rpm below 1000, power drops and fuel consumption increases, and the amount of smoke from the exhaust increases.
Why is this happening? Sensor malfunctions are related to automotive electronics. The following reasons are possible:
- the signal wire is broken;
- a short to ground has occurred;
- there was a short circuit in the on-board network of any wire of the device;
- the shielding braid is damaged;
- the power unit control unit has failed;
- something is damaged inside the sensor itself.
Checking the knock sensor
Since breakdowns occur for various reasons, you will have to check several elements of the system. Inspect the condition of the sensor wires, check the harness sockets and sensor plugs. Evaluate the reliability of their connections. If everything is in order here, check the contacts of the socket. Found damaged components? Replace them. It is also recommended to examine the condition of the tourniquet. Turn off the ignition, disconnect the harness from the sensor and check it with an ohmmeter. This way you will know if the chain is intact.
Sometimes the problem lies in the condition of the shielding braid. In this case, we proceed as follows.
- We look to see if the harness sockets and plugs are securely connected;
- We study each of their components;
- We check whether the shielding braid is intact.
If the cause of the malfunction is a short to ground, you must proceed using another method:
- We disconnect the entire block from the harness, along with the knock sensor;
- We check the integrity of the chain, look for heavily worn places;
- Turn off the ignition and, using an ohmmeter, examine the place where the engine mass is connected to the harness circuit.
We find and dismantle the sensor
Checking parts for one or two wires using a multimeter
The first thing to do is to find out what resistance is typical for a properly functioning sensor in a particular car. The figure varies greatly among different manufacturers.
This is interesting: resistance indicators can be the most unexpected. So, in VAZ cars with injection engines it is almost impossible to measure it because the indicators are too high. In Nissan and Subaru the figures are about 550 kOhm, in Hyundai - about 5 MOhm (megaohm).
To carry out the tests, you will need a multimeter, and a fairly sensitive one, as well as a socket wrench of size “13” or “22”, depending on the size of the installed sensor. To test resistance, switch the tool to kOhm resistance mode and attach it to the probe. If a two-pin sensor is installed in the car, the connection is made to the terminals; in the case of a single-contact model - to the contact and the body.
Now lightly tap the sensor with a metal object - a screwdriver or bolt. Pay attention to the multimeter readings. If there are deviations from the values specified in the instructions, a breakdown has occurred.
It is recommended to check whether there is voltage at the electrical ends. Disconnect the electrical connector of the sensor and remove it from the engine. Switch the multimeter to millivolts and connect the “+” probe to the signal pin. The “—” probe must be connected to the sensor ground. This part is easy to recognize - it is a hole through which the mounting bolt to the motor passes.
Hold the sensor in your palm and lightly tap it on a surface. The result should be a voltage - typically between 30 and 40 mV. If no potential difference occurs, then the sensor has failed.
There are no particular differences in testing for broadband and resonant sensors.
Diagnostics with a dial tester or voltmeter
- In addition to a multimeter, you can use a pointer tester - the actions are similar to working with a multimeter.
- There is another way. With the engine idling, connect an AC voltmeter to the sensor. Tap the knock control component with a hard, non-metallic object. If the voltmeter shows that the signal amplitude from the device is below 0.1 V, the device is faulty.
Video on how to check
Repair or replacement?
You decide. The cost of the product depends on the car model and the manufacturer of the component - for a replacement you will need to pay an amount approximately equal to its price. You can change the device yourself; for this you will need a room with a pit. Self-repair is also possible: if you are well versed in cars, it will take no more than an hour.
Checking the knock sensor is an easy task that doesn't require expensive tools. Of course, a computer check at a service station will be more accurate, but if you don’t want to spend money, you can do it yourself.
Replacement
Replacement does not require a large amount of tools. You just need to prepare a 13mm key.
- Remove the connector from the sensor;
- Unscrew the sensor fastenings to the block;
- We clean the contact surface of the sensor with the block;
- Install the new sensor in reverse order;
Diagnostics and replacement of the knock sensor
Signs of sensor malfunction
If you begin to notice that your car’s engine is running unevenly (troiting), or its dynamics have deteriorated and the “CHECK ENGINE” indicator lights up on the instrument panel when you start to climb or when accelerating, then you should check the knock sensor for possible malfunction. The following instructions will help you diagnose and replace the knock sensor yourself.
Examination
So, on VAZ 2110, 2112, 2114, 2115, replacing the knock sensor begins with reading engine fault codes:
Error code 0325 indicates that there is a break in the electrical circuit of the sensor circuit.
It is necessary to carefully inspect and, if necessary, “ring” the entire circuit and clean the contacts in the sensor connectors, since the main cause of this error is oxidized contacts. In addition, it is necessary to check the timing belt, namely, whether it is installed correctly according to the marks; perhaps it has become loose and has jumped several teeth.
Error number 0328 indicates a high signal level from the knock sensor.
In this case, you need to pay attention to high-voltage wires. This error is issued when there is a breakdown of the power supply and the piezoelectric element, as well as when the valve clearance is increased
Again, recheck the timing belt.
Error codes 0326 and 0327 indicate that the signal level from the sensor is too low.
As in previous cases, we check the electrical circuit circuit; with the sensor removed, we treat the sensor and its contacts with special anti-corrosion agents. Pay special attention to the tightening torque of the sensor, which should be 10-24 N*m. If the instrument panel does not signal you with the “CHECK ENGINE” indicator light, then replacing the knock sensor on VAZ 2114, 2110, 2115 is accompanied by checking it with a voltmeter, for which:
If the instrument panel does not signal you with the “CHECK ENGINE” indicator light, then replacing the knock sensor on VAZ 2114, 2110, 2115 is accompanied by checking it with a voltmeter, for which:
- In the multimeter, set the voltmeter mode and enter the reading limit of 200 MV;
- On a two-contact sensor (broadband type) we connect the multimeter probes to the contacts, and on a one-contact (resonance type) - one to the contact, the second to the sensor body;
- Lightly tap the sensor body with a subsequent increase in impact force with a metal object (screwdriver or bolt) and observe the voltmeter readings;
- When impacted, a voltage surge should be observed: a stronger impact means a higher surge, otherwise the sensor definitely needs to be replaced.
Also, replacing the VAZ 2115 knock sensor may be accompanied by checking it with an ohmmeter, in which the resistance reading should be on a scale of 1-10 MOhm.
Replacement
Replacing the knock sensor of a VAZ 2112, 2110, 2114, 2115 is not difficult at all, so this instruction will not contain any additional video materials. As mentioned above, sensors of both types are installed on the engine cylinder block. The entire replacement process consists of the following:
- With the ignition off, disconnect the wire connector from the sensor, or one wire for a resonant type of sensor;
- In the first case, use a key set to “13” to unscrew the bolt securing the engine...
Replacing the knock sensor VAZ 2115
...and in the second, using a key set to “22”, we unscrew the block from the body and dismantle the device itself;
3. Install in reverse order.