How to change the timing belt on a VAZ 2105 yourself: detailed instructions
The timing belt is responsible for synchronizing the camshaft and crankshaft. It is important to monitor its condition and prevent it from breaking, as this can lead to failure of the piston group and, in the worst case, repair of the cylinder head. Even a novice car enthusiast can easily replace the belt on a VAZ 2105, following the step-by-step instructions.
Features of the timing belt drive and replacement timing
Either a chain or a belt is installed on the gas distribution mechanisms of cars. The VAZ 2105 uses a belt drive. It has the following advantages over the chain:
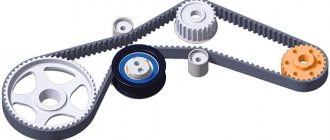
The timing belt is a rubber product, on the inside of which there are teeth that ensure good engagement with the shaft gears. Its task is to ensure synchronous operation of two shafts: camshaft and crankshaft. The first one should turn at a speed half as fast as the second one.
The main disadvantage of a rubber belt is its short service life. Therefore, you need to regularly check its condition.
According to the regulations, the timing belt on the VAZ 2105 must be changed after 55-60 thousand kilometers. This is not the main indicator of replacement. It is necessary to regularly check the technical condition of the strap. The product must be replaced if the following defects are revealed during visual inspection:
Signs of timing belt wear.
If the belt is very worn or poorly tensioned, it may jump over the teeth. This leads to disruption of the gas distribution mechanism. The air-fuel mixture ignites either too early or too late, which leads to unstable engine operation, uncertain starting, severe vibration, and loss of power.
If the supply of fuel assemblies is disrupted, the mixture does not completely burn in the engine cylinders and the residues end up in the exhaust system. The malfunction can be determined by black smoke coming from the exhaust pipe. If there are traces of working fluids on the belt, it may be antifreeze leaking at the joints or oil from under a damaged crankshaft oil seal.
The fraying of the material and cracks on the surface of the belt are manifested by clicking or ticking sounds that are emitted from under the protective casing. The frequency of sounds depends on the number of engine revolutions; the higher they are, the more frequent the sounds. The reason may be wear on the tensioner bearing or pump. It is necessary to find the cause and eliminate it. If there are traces of working fluids on the belt, it may be antifreeze leaking at the joints or oil from under a damaged crankshaft oil seal.
The service life of the belt drive depends on the following factors:
It is recommended to change the belt if the car was purchased secondhand. When buying a used car, it is better to perform a full range of maintenance: replace all consumables and working fluids.
Detailed instructions for replacing the belt
To carry out the replacement you need to buy a new timing belt. You should not save money by buying something cheaper; you should purchase a high-quality and reliable product. A low-quality belt stretches quickly and becomes unusable before its service life. By saving on cost, you will have to make a replacement earlier.
Experts recommend changing the tension roller at the same time as the belt. Therefore, it also needs to be purchased in advance.
Tools you will need:
You will need the VAZ 2105 instruction manual and a clean rag to clean the parts.
The replacement procedure consists of a sequence of steps:
In this case, the marks on the crankshaft and camshaft will be aligned at the same time.
You can check the condition of the timing belt on a VAZ 2105 and change it, if necessary, on your own in your own garage. To avoid troubles along the way, you should carry out regular inspections, paying attention to the timing belt.
Source
VAZ 2105 engine repair
Most power unit malfunctions can be fixed without removing it from the car. Especially if they relate to ignition, cooling or power systems. But if we are talking about problems in the lubrication system, as well as failure of the elements of the piston group, the crankshaft, then dismantling is impossible.
Removing the engine
Dismantling a power unit is not so much a labor-intensive process as it requires special equipment, namely a hoist or other device that will allow you to pull a heavy engine out of the engine compartment.
In addition to the telpher, you will also need:
- garage with inspection pit;
- set of wrenches;
- Screwdriver Set;
- a dry container with a volume of at least 5 liters to drain the coolant;
- chalk or marker for making marks;
- a couple of old blankets or blankets to protect the paintwork on the front fenders when removing the engine.
To remove the engine you need to:
- Drive the car into the inspection hole.
- Remove the hood completely, first marking the contours of the canopies with a marker or chalk. This is necessary so that when installing it you do not have to worry about setting the gaps.
- Drain the coolant from the cylinder block.
Video: engine removal
Replacing earbuds
To replace the liners, you must:
- Clean the power unit from dust, dirt, and oil stains.
- Using a 12mm hex wrench, unscrew the drain plug and drain the oil from the pan.
Video: installing earbuds
Replacing rings
To replace the piston rings, follow steps. 1–14 of the previous instructions. Next you need:
- One by one, push the pistons out of the cylinders along with the connecting rods.
- Thoroughly clean the piston surfaces from carbon deposits. To do this, you can use kerosene, fine sandpaper and a dry rag.
- Use a screwdriver to remove the old rings.
Further assembly of the engine is carried out in the reverse order.
Video: installing piston rings
Oil pump repair
Most often, the oil pump fails due to wear of its cover, drive and driven gears. This type of malfunction is eliminated by replacing worn parts. To repair the oil pump you need:
- Execute p.p. 1–3 of the first instructions.
- Using a 13mm wrench, unscrew the 2 oil pump mounting bolts.
Replacing the timing belt on a VAZ 2105 with your own hands
The VAZ timing belt is replaced after 60 thousand kilometers or if signs of excessive wear appear on the surface of the belt (cracks, threads, burrs, etc.). I won’t tell you what a timing belt is and what the consequences of a broken timing belt are, since I already wrote about it in this article, if you’re interested, you can read it. I suggest going directly to the replacement process.
In order to replace the VAZ 2105 timing belt you will need:
Model features
If we turn to history, then for the first time the belt drive of the gas distribution mechanism in cars of the Volzhsky Automobile Plant began to be used on the VAZ 2105 model: an engine with such a drive was an experiment, and was not installed on all cars (some of them used a motor from the VAZ 2101 and 2103 models, having a timing chain drive).
And also, this version was the first in the Soviet era to drive the gas distribution mechanism using a belt instead of a chain, like other models. This experience can hardly be called a success, because the engine became known for its unstable operation and frequent leaks of engine oil.
But, thanks to the efforts of Soviet engineers, the mechanism is absolutely safe to use. A broken belt on a VAZ 2105 does not lead to a collision of pistons with valves, since the former have special rounded recesses on top, and this will not require engine repair.
During standard use, belt replacement in 2105 is necessary in the following cases:
Engine parameters and features
The VAZ 2105 engine is used on the VAZ 2104, 2105 and 21072 models. It has a camshaft belt drive and the following main parameters:
Cars based on this engine use 5W-30-15W40 oil and AI 93 fuel. The engine life, according to the factory, is 125, in practice - about 200, 4 cylinders and 2 valves, power system - carburetor, type - in-line. Torque is approximately 94 Nm at 3400 rpm. The piston stroke and cylinder diameter are 66 and 79 mm, respectively.
And also, when repairing the timing belt on the 2105, do not forget about the features of this engine. The use of a toothed belt in the gas distribution mechanism drive instead of a classic metal chain made it possible to achieve quieter operation of the machine. In addition, the belt tension has become automatic, removing an extra lubrication point, which has significantly reduced engine oil losses.
In what cases is replacement necessary?
The purpose of the timing belt is to synchronize the operation of two shafts - the camshaft and the crankshaft. Instead of a rubber product, a chain can be installed. The belt is a rubber product with an inner surface in the form of teeth. Since rubber is short-lived, this part is a consumable item that requires regular replacement. The chain also needs to be changed after a certain mileage, but it has a longer lifespan than a strap and never breaks. The disadvantage of the chain is increased noise.
Consumables are replaced in the following cases:
- according to the regulations specified in the instructions for the VAZ 2105 car;
- when broken;
- if there are defects.
A broken belt on a VAZ 2105 does not have serious consequences in the form of engine overhaul, as in other cars due to the design of the timing belt. But if it breaks, the car will still not be able to move independently. Although according to the regulations for replacement, a mileage of 45 to 60 thousand kilometers is provided, there are a number of factors that reduce the service life of both the chain and the belt.
Therefore, every 20 thousand kilometers it is advisable to carry out a technical inspection of the consumables and replace them in the following cases:
- the surface is worn out, both internal and external;
- frayed sides;
- wear, tear, missing teeth;
- oil marks on any side;
- stretched belt;
- cracks, surface build-ups.
Cracks on a worn product
It is advisable to change the tension roller along with the strap.
This is interesting: Stabilizer struts for Kia Seed: selection and replacement
How to change the timing belt on a VAZ 2105?
Every motorist can change the timing belt of a VAZ 2105 on his own if he has the desire and time. Thanks to the relatively simple design of VAZ classic models compared to modern cars, almost all maintenance work can be done with your own hands. Even a beginner will need no more than 1 hour to replace the timing belt, provided that he has the necessary tools.
When is replacement necessary?
The VAZ 2105 is the first car of the Soviet era in which the gas distribution mechanism is driven using a belt rather than a chain, as in other classic models. This first experience cannot be called successful, since this engine became famous for its instability and numerous leaks of engine oil.
But the mechanism is conceived and made absolutely safe to use. If the timing belt breaks in the “five,” the valves will never meet the pistons, because the latter have special round-shaped recesses on top. If an incident happens somewhere on the road, then if the driver has spare parts and tools with him, he can easily make a replacement and move on. If the belt breaks on a VAZ 2105, engine repair will not be necessary.
Taking advantage of this circumstance, many unscrupulous motorists drove with the old belt “to failure,” which is fundamentally wrong. Under normal operating conditions, replacement must be performed in the following cases:
When replacing by mileage, the manufacturer recommends changing the element along with the tension roller. But due to the characteristics of the power unit, oil often gets on the belt, which is why the part is not able to work out its full service life. Often, a belt damaged by motor lubricant has to be replaced without a tensioner roller, because the latter is in excellent condition.
Basic timing belt faults
The main malfunctions of the timing belt are:
- deformation;
- cracking and delamination;
- cutting teeth;
- gap
Deformation occurs due to displacement of the axis of the tension roller or toothed pump roller. With further use of the belt, it will certainly lead to its delamination or breakage.
Cracks and delamination can also be the result of long-term use, high belt tension, or problems associated with malfunctioning water pump. These same factors, as well as mechanical damage to the teeth of the crankshaft pulley or timing gear, often cause belt teeth to cut off.
A belt rupture is the result of the influence of the listed problems, as well as the car owner’s irresponsible attitude towards his car, often leading to major engine repairs.
Preparing and disassembling the unit
To perform the work of replacing the timing belt, no special devices are required, nor is an inspection ditch required. From the tool you will have to look for a 30 mm open-end wrench; it will be needed to turn the tension roller.
The remaining tools are listed below:
A new timing belt and tension pulley should be purchased from a reliable supplier or dealer. When purchasing, you should not go for cheapness, but check the part for detachment of rubber or threads. When the preparation is completed, you can begin disassembly, which is more convenient to perform on a cooled engine in this order:
The distributor cover is removed to monitor the position of the slider. This is very important when replacing a belt as a result of a break, when all the marks are lost.
Replacement procedure
The first step is to align all the marks by turning the crankshaft until the groove on the generator drive pulley aligns with the long mark on the front cover of the cylinder block. At the same time, the mark on the camshaft gear should be in front of the protrusion on the valve compartment cover. At the same time, the contact of the slider will be opposite the wire going to the spark plug of the 4th or 1st cylinder.
Further steps are performed in the following sequence:
When replacing the timing belt drive, it is important to consider one point. In addition to the crankshaft and camshaft, the belt rotates another gear - the drive shaft of the oil pump and mechanical ignition distributor. There are no marks on this gear, and it rotates quite easily, which is why, when replacing, you can accidentally disturb its original position.
This will not affect the operation of the oil pump in any way, but the distributor slider will move in one direction or another. This will lead to early or late formation of a flash in the cylinder, and the operation of the power unit will be extremely unstable.
Therefore, when removing the old belt and installing a new one, it is necessary to monitor the initial position of the runner, which is why its cover was removed.
A motorist whose V-5 belt broke while on the road will probably encounter this problem. In this situation, the procedure is as follows:
After this manipulation the engine will start. There is an easier way - swap the wires on the cover, but then you may forget about it and not set up the ignition as expected.
Source
Also check out
- Replacing power steering fluid in a VAZ 2115 without going to a service station
- How to install a rear view camera on a VAZ 2112 with your own hands
- How to replace brake fluid on a VAZ 2110 yourself
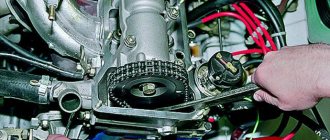
- Align the marks on the camshaft and crankshaft. The mark on the camshaft pulley on the VAZ 2105 looks like a thin strip, and not a dot, as on the VAZ 2101 or VAZ 2106. The mark on the crankshaft should correspond to the longest mark on the camshaft.
Replacing the timing belt on a VAZ 2105 with your own hands
- The mark on the camshaft should also match the mark on the timing belt pulley.
Replacing the timing belt on a VAZ 2105 with your own hands
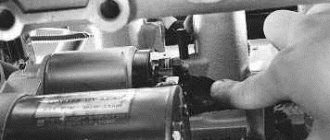
- The distributor slider should be in position 1 or 4 of the cylinder. If errors occur, it is possible to quickly return the ignition to normal by turning the third drive pulley of the oil pump and distributor.
- Remove the second and third halves.
- To make the timing belt tension less, you need to loosen the roller fastening with a key to “13”, and turn the roller from right to left with the head to “30”.
Replacing the timing belt on a VAZ 2105 with your own hands
- After reducing the tension, move the timing belt to the side and try to remove it from under the hood.
- Install a new belt, tension it using the tension roller.
Replacing the timing belt on a VAZ 2105 with your own hands
Correct tension of the VAZ 2105 timing belt in the video:
- It is important that the existing marks match. If this does not happen the first time, you need to repeat the entire algorithm from the beginning until the desired result is obtained.
- Fully tighten the roller with the key set to “13”.
- Check the position of the distributor slider.
After this, you can start the engine to make sure it is working properly. If no defects are found, you can reassemble in the reverse order, while not forgetting about the tension of the alternator belt.
Replacing a timing belt or chain on a VAZ 2105
The installation of a camshaft in the cylinder head of passenger cars led to a reduction in the metal consumption of the engine design, since the need for rods and rocker arms disappeared. But it was necessary to provide a camshaft drive. Initially, a chain was used for this, but over time it was replaced by a belt, although it did not completely replace the chain.
Timing drive diagram of a VAZ 2105 car
For the first time, a belt drive in VAZ cars was used on the VAZ-2105 model. But the engine with such a drive was experimental, so it was not installed on all cars; some models were sold with an engine from the VAZ-2101 and 2103, which had a timing chain drive.
Main malfunctions of VAZ 2105 engines
If you do not take into account the power plants of the BTM 341 and VAZ 4132, the VAZ 2105 engines are not much different from each other. They have a similar design, and, therefore, they experience the same malfunctions. The main signs that the motor has failed are:
- impossibility of starting it;
- unstable operation at idle;
- violation of normal temperature conditions (overheating);
- power drop;
- change in exhaust color (white, gray);
- the occurrence of extraneous noise in the power unit.
Features of the timing chain and belt
One of the components of servicing the VAZ-2105 engine, like any other, is replacing the gas distribution mechanism drive. But the difficulty of performing this operation on this car depends on the type of drive used. Replacing a VAZ-2105 timing belt is easier than replacing a chain, but it also needs to be changed more often.
The ease of replacing the belt is one of its most positive qualities. Additionally, the belt is not so noisy, costs much less, and does not stretch very quickly.
The main disadvantage of the belt is the possibility of it breaking. And although the negative consequences of this breakage are structurally reduced by applying special grooves on the pistons, eliminating the possibility of a collision between the open valve and the piston bottom, the fact of the breakage itself remains unpleasant. In addition, the service life of the belt can be significantly reduced due to engine fluids getting into it.
The possibility of a chain break when the engine is running is practically eliminated, given the fact that the VAZ-2105 timing chain is double-row. Another positive quality of the chain is that it has a significantly longer service life than a belt.
But the chain stretches over time, and although there is a mechanism for tensioning it, when stretched, the noise of the engine increases significantly. Also, the chain requires lubrication, so it must be located inside the engine, which makes replacing the VAZ-2105 timing chain more complicated.
Required Tool
Next, let's look at how to replace the chain and belt on the 2105. First, you need to understand the tools and accessories required to perform this operation; there are not many of them.
To replace the chain drive you will need:
And to replace the belt you will need even fewer tools:
Having all this, you can start working. First, let's look at the chain replacement sequence. To do this, it is better to place the car on an overpass or inspection hole, and put wheel chocks under the wheels.
Replacing the timing chain
First, access to the camshaft sprocket is provided, for which the valve cover is removed from the car.
Then you need to set marks on the engine. To do this, you need to turn the crankshaft by the pulley mounting bolt clockwise until the marks on the camshaft drive gear align with the mark on its housing, made in the form of a cast.
In this case, the mark on the crankshaft pulley should align with the length of the mark on the timing chain cover. If they match, you can continue working, and if not, rotate the crankshaft until all the marks match.
Then you need to unscrew the crankshaft pulley mounting bolt. For the convenience of unscrewing it, it is better to engage 4th gear at the gearbox and also use the handbrake.
After the bolt comes off, you should once again check that the marks match, and then unscrew the bolt and remove the pulley.
Then you need to unscrew the bolts and nuts securing the chain cover and dismantle it. To loosen the chain tension, you can act in two ways related to the tensioner.
The tensioner itself is a small housing containing a spring-loaded rod that automatically tensions the chain. To ease the tension, you can recess the rod into the body and then fix it. But it’s easier to remove the tensioner itself along with the shoe.
After loosening the tension, you need to unscrew the bolts securing the camshaft sprocket and the auxiliary shaft sprocket, having first pressed out their lock washers with a screwdriver.
| Bend the lock washer | Unscrewing the sprocket mounting nut |
| Bend the lock washer | Tightening the sprocket bolt |
Next, the chain is removed from the auxiliary shaft sprocket, and the sprocket is also removed. Then the camshaft sprocket is removed along with the chain. These operations must be performed carefully so as not to rotate the shafts.
Having removed the camshaft sprocket, it will be possible to lower the chain slightly in order to remove it from the crankshaft sprocket. A new chain is put on in place of the removed chain, and then assembly is done in the reverse order. After installing all the sprockets, you need to check the alignment of the marks; if they have not moved, finally assemble the engine.
The mark on the crankshaft sprocket must match the mark on the block
Video on the topic: “Replacing the timing chain”
Replacing the timing belt of Zhiguli 2105
Replacing a belt on a VAZ-2105 is much easier. To gain access to it, you must first remove the alternator drive belt and the timing belt protective cover.
Removing the alternator belt
Afterwards, marks are placed on the camshaft gear with a mark on its body, as well as on the crankshaft pulley and the drive cover. Then remove the drive belt protective cover, which consists of three parts.
| Marks on the crankshaft pulley | Marks on the camshaft pulley |
The next step is to loosen the tension pulley bolt and turn it to loosen the belt tension. Then the belt is carefully removed from the camshaft gear, removed from the tension roller and removed from the crankshaft gear.
Tension roller location
After putting on a new belt and after tensioning it with a roller, you need to check that all marks match. Then everything is put back together.
As a result, it should be noted that the main condition for replacing a belt or chain is that the installation marks match, so when removing the drive and installing a new one, watch the shafts so that they do not turn, so everything must be done extremely carefully.
Source
How to replace a belt yourself
Installing this component is easy if you follow the detailed instructions:
- Gain access to the timing mechanism by first removing the alternator belt.
- Start by disconnecting the battery terminals, and then remove the battery completely. Use a 17 mm socket wrench to loosen the generator mount and lift this unit. This is necessary to relieve the belt tension.
- At this stage, use a 10 mm wrench to unscrew the fastenings of the upper part of the composite protective casing. There is no need to dismantle 2 more parts yet.
- We combine the marks on the shafts – camshaft and crankshaft. The mark on the timing pulley looks like a thin stripe. In other versions of the VAZ, a similar mark is made in the form of dots.
- The mark on the camshaft should align with the mark on the belt pulley.
- Check that the crankshaft mark is on the longest line.
- The correct setting of the shafts can be checked by the distributor slider; ideally it is in position 1 or 4 of the cylinder. If you made a mistake, get the ignition back to normal. To do this, just move the third pulley of the oil pump and distributor. There are no marks on these nodes, so you need to be extremely careful.
- Now you need to remove the remaining parts of the timing belt guard.
- To loosen the tension roller, use a 13mm wrench. Do not remove this unit completely, but turn the head to 30mm so that the belt loosens.
- Gently slide the belt out from under the hood.
- Now you only need to replace this component with a new one. Use a roller to adjust its tension. The optimal tension force is that at which you can grasp the belt over a long section with two fingers and turn it 90 degrees.
- Check the placement of the marks, they should still match.
- Tighten the 13 pulley completely with a wrench. Then reassemble the mechanism.