Replacing the timing belt Lada 2107 (VAZ 2107)
The belt is necessary to connect the generator and crankshaft pulleys, and on front-wheel drive classic models, the water pump pulley also takes part in the connection.
It is not so difficult to independently replace a torn or stretched alternator belt in a VAZ-2107 with an injector-type engine that has an additional carburetor.
For this you will need:
This is quite enough to carry out repairs. Of course, if you at least have an idea where this very belt is located.
How to tighten the timing chain on a VAZ 2106
Before we begin tightening the slack timing chain, let's decide on the tools that we will need for the job. Here they are:
Sequencing
Before adjusting the chain, you will have to perform one preparatory operation: remove the air filter. The fact is that its body will not allow access to the timing chain. The filter is held on by four 10mm nuts, which are not difficult to unscrew.
Video: we independently tension the timing chain on a “classic”
In what situations is replacement necessary?
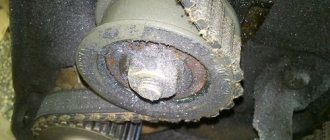
Wear of the element is characterized by such manifestations as cracks or tears in the blade, worn teeth and uneven edges. If you ignore such a deplorable state of a very important element, it will come back to haunt you with overheating and boiling of the engine, independent operation of the battery, which will lead to its rapid discharge.
If the belt is severely worn, it also shows signs of noise to the owner - it begins to whistle, especially at low speeds. Another reason for a whistling belt may be moisture getting on its surface, which occurs due to worn-out pipes of the cooling system - antifreeze begins to leak.
Some belts - oak - whistle when the car is started in frosty weather, and after warming up the sound disappears. A weak tension is expressed by a whistle, but in this case it is enough to simply tighten it.
DIY belt replacement process
To remove the belt, you will need access not only to the upper front part of the car, but also to the lower one. Therefore, if a crankcase protection is installed, you will need to remove it. Some craftsmen, for convenience, to facilitate access to the belt, also remove the battery.
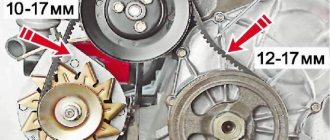
Once you have access to the required element, inspect it. If there is no visually visible damage to the canvas, just check the tension, it may have weakened. This is easy to do, just press the belt with your fingers, simulating a pressure of approximately 10 kg, and by the distance of deflection you can determine whether the element is in acceptable tone. The maximum standards in a narrower place are 10-15 mm, and in those where the space between the pulleys is wider - 12-17 mm.
You only need to remove the belt from the pulleys if it is completely replaced; you do not need to do this to retighten it. At the bottom of the car, unscrew the nut securing the generator underneath by one turn. In the engine compartment, loosen the upper fastening nut of the same device a few turns. Under no circumstances should you completely unscrew the fasteners, just loosen them until they begin to turn freely.
To remove the belt, you will need to press the alternator slightly against the engine, but under no circumstances do this with your bare hands. Then remove the belt. You need to start with the top pulley, and then with the rest. Only in this order will it be easy to remove the element. On injection car models, you will also need to remove the crankshaft position sensor, otherwise it will interfere with the removal of the belt.
In what cases is replacement necessary?
The alternator belt on the VAZ 2107 is changed when worn. If you find cracks on it or its edges are frayed or the teeth are worn out, then do not wait, but replace it immediately. If it breaks, the motor will heat up and may even boil. In this case, the battery will remain without recharging and will quickly discharge.
What can you do if this unit breaks on the road?
Video: features of replacing the timing belt
As you can see, replacing a belt on a VAZ 2107 is not very difficult and can be done even by a novice driver. The power, reliability and efficiency of the car depend on the correct location of the marks and the correct belt tension, so you should show maximum attention and accuracy in your work. Only in this case can you count on the fact that the engine will not fail on a long journey and the car will always return to its home garage under its own power.
Source
Step-by-step replacement instructions
Replacing the alternator belt on a VAZ 2107 is a very simple job and can be done in normal garage conditions without the involvement of a specialist.
Tools
To change the belt, we need:
Stages
A malfunction of the VAZ 2107 alternator belt can be expressed in two manifestations:
In the first case, the generator stops rotating and producing electricity, which is indicated by a warning lamp on the instrument panel. Moreover, since the VAZ 2107 generator belt transmits torque from the crankshaft to the water pump, if it breaks, the pumping of coolant through the cooling radiator and cylinder block stops, which leads to rapid overheating of the engine. Therefore, if the belt breaks, the vehicle cannot be used.
The drive of the generator and pump on the injection and carburetor variations of the VAZ 2107 is identical. Therefore, their problems are the same. The only difference between the injection model is the presence of an engine crankshaft position sensor, which has to be removed during the operation to replace the alternator belt.
If you correctly determine what exactly is causing the slippage, it is quite possible to fix the problem yourself. There are two reasons why the alternator belt slips:
Also, a whistle, similar to the sound of slipping, can be produced by a faulty generator bearing. In any of these cases, repairs do not require particularly high qualifications and do not take much time. Specialized devices and instruments are also not required. You will need a pry bar and two open-end wrenches (or heads) for 17 and 19.
To check the length of the alternator belt, it is not necessary to remove it. We can assume that if the belt can still be tensioned, its length is within acceptable limits. To tension the belt you will need to do the following:
If a generator bearing fails, repairs are required. To do this, it is necessary to dismantle the generator by unscrewing the mounting nuts indicated above, disassemble the generator and replace the shaft bearing with a new one. This operation is not simple, therefore, if you are not confident in your skills, the best solution would be to turn to specialists. This will help to avoid problems associated with the further operation of the generator and obtain certain guarantees of the quality of repairs.
If the belt is contaminated with oil, you can try to clean it by first loosening the tension and removing it from the pulleys. However, substances that can efficiently clean oil contaminants can harm the alternator belt. Considering the low cost of the belt, you can immediately replace it without wasting effort trying to wash it. Of course, this advice is only suitable if you have a spare parts store at hand.
Source
The alternator belt whistles on a VAZ 2107
Often, the appearance of any malfunction in a VAZ 2107 car has a sound accompaniment, which allows you to diagnose the problem with a high degree of confidence. One of these problems is the alternator belt slipping, as a result of which it whistles due to friction against the pulleys. Due to this malfunction, the generator is unstable and the battery is no longer charged.
Since the VAZ 2107 generator, be it an injector or a carburetor, has the same type of drive, which means they have the same problems. The only difference is that the injector has a crankshaft position sensor, which will have to be removed if the belt needs to be replaced.
In fact, the reason why the belt whistles can be easily eliminated with your own hands, without the help of specialists. You just need to make the correct diagnosis, and then it’s a matter of technique. Here are the main reasons for slipping:
- Weak tension;
- Generator bearing failure;
- Pollution with fuels and lubricants (fuels and lubricants).
For all of the above cases, DIY repairs will not take much time. In this case, no special tools are required. You only need two keys, 17 and 19, and a pry bar.
Now let's look in order at how to repair each of the indicated faults in the VAZ 2107 with your own hands. Let's start with the simplest thing - weak tension. Most likely, during operation the belt simply stretched and began to slip on the pulleys. If its size does not yet exceed the maximum allowable, then we simply tighten it, otherwise it will need to be replaced with a new one. To tighten it with your own hands, you need to:
- Using a 17mm wrench, loosen the nut securing the generator to the bracket;
- Using a 19mm wrench, loosen the generator rod nut;
- Most likely, it will not be possible to tighten it manually, so we use a pry bar as a lever;
- Having fixed the position of the generator with a nut on the adjusting bracket, we check the tension. When you press the belt between the pump and the crankshaft, the deflection should be within 12-17 mm, and between the pump and the generator - 10-17 mm. After you manage to tighten the belt in accordance with the specified requirements, tighten both nuts to prevent spontaneous loosening. If the cause of slipping is the difficult rotation of the VAZ 2107 generator pulley caused by bearing failure, it will need to be repaired. You just need to remove the generator by unscrewing the nuts mentioned above, after which the bearings are replaced. Having completed the repair, you need to put it back in place and tighten the belt, according to the previously given recommendations. Not everyone can replace bearings with their own hands; do not hesitate to seek the help of specialists. This will help you avoid problems with the generator in the future. And the last thing that can cause slipping is belt contamination. Most likely, only replacing it can solve the problem, since it is almost impossible to completely clean the surface of the belt from fuels and lubricants without damaging it. That is why replacement is the most optimal solution to the problem. In some cases, especially in the cold season on a cold engine, a whistle may occur due to a not very high-quality belt that has become stiff in the cold. After the engine warms up, the whistle disappears. This is a completely normal phenomenon and no repairs to your VAZ 2107 will be required. You just need to make sure that the belt is intact to avoid its possible breakage on the road.
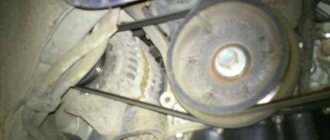
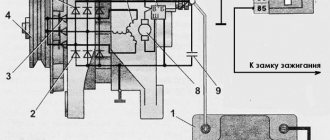
WHERE IS THE GENERATOR LOCATED ON THE VAZ 2107
The generator on the VAZ 2107 functions in close connection with the battery. As with any other car, this device generates electricity to power all elements of the car. In this case, the generator performs its function only when the engine is running.
On the VAZ 2107 this mechanism is located directly on the surface of the power unit on its right side. This position is due to the fact that the generator is started by the movement of the crankshaft through the V-belt.
The generator housing is adjacent to the right side of the engine
The cost of replacing a VAZ-2107 timing chain with your own hands
The cost of replacing a timing chain primarily includes the cost of the component itself. If it is replaced as a whole, together with other parts - sprocket, tensioner, damper, the monetary equivalent is 1,800 rubles.
At what price can you buy quality parts?
- The chain varies from 350 to 600 rubles.
- The stars, which are installed on the crankshaft, camshaft, and also the oil pump, cost a total of 400 rubles.
- The tensioner shoe, the mechanism damper, equipped with a rubber gasket, reaches 100 rubles.
- If the shoe is improved (star bearing), the price is close to 1,400 rubles.
- A chain damper will require an expenditure of 80 rubles.
When you buy a timing chain for a VAZ-2107 in a car store, pay attention to the condition of the rivets - ideally, absolutely all of them should be flattened, only such components guarantee that the pin will not pop out and the target will remain intact. Even if the tensioner is not cheap, there is no need to save money - a model with a sprocket on a bearing will extend the life of the chain, and the noise level will be comfortable for the ear.
The timing chain on the VAZ 2107 is one of the most important parts that requires monitoring its condition. When Lada family cars have a mileage of more than 60 thousand km, it is necessary to check this element. The life of the chain depends not only on the vehicle’s mileage, but also on such factors as the nature of the vehicle’s operation. Damage to the product may cause it to break while the motor is running, which can have serious and costly consequences. If uneven operation of the engine or extraneous sounds during operation is detected, it is necessary to diagnose the gas distribution mechanism, and, if necessary, replace the timing chain on the VAZ 2107 with your own hands. We will find out how to do this further.
Replacing the VAZ 2107 timing chain: basic repair methods
When operating a vehicle, the timing chain is stretched. This is due to an increase in the pitch between the links. The elongation of the chain on the VAZ 2107 must be controlled by checking the possibility of its tension
In this case, auto mechanics advise paying attention to the phases. If the mark of the timing gear sprocket coincides with the mark of the bearing housing, when this indicator on the crankshaft pulley is located 10 mm below the mark on the front cover of the engine, you will need to change the timing chain yourself
This work is also carried out when the bushings are chipped and there are cracks in the brushes. Replacement of the VAZ 2107 chain tensioner shoe is carried out when defects in this part are identified.
What is the risk of a circuit malfunction?
Due to the increase in the chain pitch of the VAZ 2107 engine, the injector operates unevenly at idle. This is explained by the fact that each link wears out differently. In some cases, the guide rail, stop pin, or corner of the shoe may break off. Replacing the VAZ 2107 timing chain is carried out taking into account these nuances.
If you jump several teeth, the car engine may stall or fail. To prevent such consequences, auto mechanics recommend adjusting the tensioner more carefully and more often. Sometimes the chain tensioner shoe is replaced.
Before installing the VAZ 2107 timing chain with your own hands, it is recommended to carefully inspect it. Links and bushings must be hardened. If raw metal is detected, this spare part will not be installed. You can check the tensioner by hand. If the deflection is 7-10 mm, it is considered new and suitable for use. The original products of this type are the products of the manufacturer Sachs.
Replacing the VAZ 2107 timing chain tensioner is done with your own hands, taking into account the length of the main part. If necessary, install the tensioner shoe. When choosing this product, you should remember the following nuance:
Chains are distinguished as follows: when they are stretched, the outermost links on the right and left are studied. If the links are located equally, outside or inside, then the chain consists of 116 elements. With different links, their number is 114.
Basic methods for replacing parts
Experienced auto mechanics know how to install a chain on a VAZ 2107. They distinguish 2 methods.
To install the VAZ 2107 timing chain, you will need the following equipment: keys, vice, pencil (chalk), ruler.
The master removes the chain
The first step of the second method is to drain the coolant from the system. It is recommended to remove the hood cover. After loosening and removing the generator belt from the engine, the cylinder head cover is dismantled. If necessary, the tensioner is replaced. To do this, you will need to align the marks on the crankshaft and the camshaft sprocket. Next, the nut is unscrewed and the pulley is removed. In this case, you will need to dismantle the radiator. If you bend the lock washer, you can unscrew and remove the sprocket from the camshaft.
Replacing the chain involves dismantling the front motor shield. You need to remember the 3 bolts from the bottom, they secure the pallet. After removing the cover, it is recommended to mark the position of the sprocket of the additional elements. This step eliminates serious ignition adjustment, which is performed after installing a new circuit on the VAZ 2107.
When installing new sprockets, the old ones must be removed. Replacing the VAZ chain tensioner shoe involves similar actions
When purchasing this part, great attention should be paid to its quality.
Replacing the timing chain of a VAZ 2107 requires installation work, and the location of the marks is taken into account. If you do not pay attention to them, the piston will meet the valves, resulting in the need for a major engine overhaul.
Correct step-by-step instructions for replacing the VAZ-2107 timing chain
Step-by-step instructions for replacing a part, taking into account the correct technology, consists of the following steps:
- Remove the shield located in front.
- Remove the radiator.
- Get rid of other structural components that impede easy access to the timing chain.
- Prepare the necessary tools: keys of different sizes, a vice, a pencil or chalk, a metal ruler.
- Drain the coolant, antifreeze or antifreeze from the cooling system by placing a 5-liter container under the drain hose.
- Remove the hood cover.
- With your own hands, loosen and remove the cylinder head cover from the VAZ-2107 generator belt motor.
- Replace the old tensioner with a new one. To do this, connect the markings made on the crankshaft and the camshaft sprocket. Unscrew the nut and remove the pulley.
- Remove the radiator device.
- Having bent the corkscrew washer, unscrew and remove the sprocket from the camshaft.
- When starting to dismantle the shield, which is located in the front part of the engine, take into account the unscrewing of 3 bolts located at the bottom, they just fix the pan. With the cover set aside, mark the sprocket position of the optional components. Such a simple move eliminates serious ignition adjustment, which must be done after installing a new VAZ-2107 chain.
- Replace the old sprockets and tensioner shoe with new ones and return all components to their original places, following the reverse procedure of this instruction for replacing the GDV chain.
Some beginners ignore the marks, but such experiments end in failure. The so-called side effect is the coincidence of the piston with the valves, which ultimately requires a major overhaul of the engine.
How to make tension
As already mentioned, poor belt tension can lead to rapid failure of the battery, as well as rapid wear of the generator drive. In addition, in some cars you can hear a characteristic whistle. This means that the belt has already begun to slip.
If it happens that the belt is overtightened during tension, this will lead to its rapid stretching and possible breakdown of one of the generator bearings.
Checking the tension is quite simple. When pressing on the drive between the crankshaft and the pulley with a load of about ten kilograms, the degree of its deflection should be no more than ten to fifteen millimeters.
You need to adjust the tension using a bolt that is designed for this. When turning the bolt clockwise, the belt is tightened, and counterclockwise, it is loosened. It is also worth considering that if the car has power steering, then tensioning is done with a tension roller.
Purpose of the timing chain on the VAZ 2106
The timing chain in the engine of a VAZ 2106 car connects two shafts - the crankshaft and the timing shaft. Both shafts are equipped with toothed sprockets, on which the chain is put.
After starting the engine, the chain ensures synchronous rotation of the two above shafts. If the synchronization is disrupted for some reason, this leads to malfunctions in the operation of the entire gas distribution mechanism of the car. In addition, malfunctions in the operation of the cylinders occur, after which the car owner notes the appearance of dips in engine power, poor response of the car to pressing the gas pedal and increased fuel consumption.
Timing chain characteristics
Classic VAZ cars are equipped with timing chains, which differ only in the number of links. The length of the chains is the same:
The timing chain pins on the VAZ 2106 are made of high-quality alloy steel, which has high strength and wear resistance.
Checking the timing chain for wear
A car owner who decides to find out the degree of wear on the timing chain on a VAZ 2106 will have to solve a very difficult problem. The fact is that a worn and stretched chain is not much different in appearance from a new one. An old chain, as a rule, does not have serious mechanical damage, and it is almost impossible to notice the wear of its pins with the naked eye.
But there is one simple wear test that every car enthusiast should know about. It is carried out as follows: a piece of old chain about 20 cm long is taken from one side, placed horizontally, and then turned in the hand so that the chain pins are perpendicular to the floor.
After this, the overhang angle of the chain is assessed. If the hanging section of the chain deviates from the horizontal by 10–20 degrees, the chain is new. If the overhang angle is 45–50 degrees or more, the timing chain is severely worn and needs to be replaced.
There is a second, more accurate method for determining timing chain wear. But here the car owner will need a caliper. On an arbitrary section of the chain, you need to count eight links (or 16 pins), and use a caliper to measure the distance between the outer pins. It should be no more than 122.6 mm.
Another random section of the 16-pin chain is then selected and the measurement is repeated. Then the third and last section of the chain is measured. If in at least one measured area the distance between the outer pins exceeds 122.6 mm, the chain is worn out and should be replaced.
DISMANTLING WORK
It is recommended to remove the generator from the “seven” after the engine has cooled down. It is not recommended to work with vehicle components immediately after driving due to high temperatures and the risk of injury.
Immediately before removing the generator, you will need to remove the right front wheel, since the installation can only be reached from under the bottom of the car through the right fender.
It is imperative to securely fix the position of the car with a jack and auxiliary devices (hemp, stands) in order to eliminate the risk of the car falling during operation.
The jack must be rested against the beam of the car.
The progress of work comes down to the sequential implementation of the following actions:
Immediately after dismantling work, you should inspect the generator landing site. All joints and fastenings must be cleaned of dirt and, if necessary, treated with acetone.
Accordingly, installation of the new generator will need to be carried out in the reverse order, paying special attention to tensioning the new belt.
VIDEO: INSTRUCTIONS FOR REPLACING THE GENERATOR ON A VAZ 2107
Performing tension
If there is no wear on the V-belt drive, but there is a whistle, first of all, check the tension level. We will not use complex terminology, but will simply advise you to press with some force on the belt in the middle.
If the tension is done correctly, then the belt will bend no more than 8 millimeters. If the deflection is greater, then the element will have to be tensioned, and if it practically does not deflect, the tension will have to be loosened.
The problem is not the whistling. Due to weak tension, the battery does not charge effectively, and the drive itself begins to wear out faster. Excessive tension can lead to damage to the alternator bearings and stretching of the belt.
Correct tension of the VAZ 2110 generator belt is performed as follows:
About malfunctions of the tensioning mechanism
The timing chain tensioning mechanism on the VAZ 2106 is a system consisting of three important elements:
All malfunctions of the tensioning mechanism are in one way or another related to wear or breakdown of one of the above elements:
So, tensioning a slack timing chain does not require any special skills or knowledge. This task is quite within the capabilities of even a novice car enthusiast who has held a wrench in his hands at least once. All you need to do is follow the recommendations given above exactly.
Source
HOW TO CORRECTLY TENSION THE BELT ON THE GENERATOR
When installing a generator on a VAZ 2107 yourself, the most difficult moment is considered to be proper belt tension. After all, it is through the belt that the generator mechanism will be launched, therefore, any errors and miscalculations when tensioning the rubber product will affect the performance of the car.
The belt tension is performed as follows:
The diagram shows places for tension quality checks
Next, the quality of the belt tension is checked. Using two fingers, press firmly on the free part of the belt and measure the existing deflection. Normal sagging should not be more than 1.5 centimeters.
The service life of a typical belt for a VAZ 2107 generator is usually 80 thousand kilometers. However, it is recommended to change the belt drive earlier if the generator set is being replaced.
Thus, the generator on the “seven” can be replaced with your own hands, but you must adhere to strict rules and observe safety precautions. If you have problems with the operation of the motor after replacing the device yourself, it is better to contact a professional.
If you have any difficulties or problems, you can contact a certified specialist who will definitely help!
Didn't find the information you are looking for? on our forum.
DIY belt replacement process
To remove the belt, you will need access not only to the upper front part of the car, but also to the lower one. Therefore, if a crankcase protection is installed, you will need to remove it. Some craftsmen, for convenience, to facilitate access to the belt, also remove the battery. Once you have access to the required element, inspect it. If there is no visually visible damage to the canvas, just check the tension, it may have weakened. This is easy to do, just press the belt with your fingers, simulating a pressure of approximately 10 kg, and by the distance of deflection you can determine whether the element is in acceptable tone. The maximum standards in a narrower place are 10-15 mm, and in those where the space between the pulleys is wider - 12-17 mm.
You only need to remove the belt from the pulleys if it is completely replaced; you do not need to do this to retighten it. At the bottom of the car, unscrew the nut securing the generator underneath by one turn. In the engine compartment, loosen the upper fastening nut of the same device a few turns. Under no circumstances should you completely unscrew the fasteners, just loosen them until they begin to turn freely.
To remove the belt, you will need to press the alternator slightly against the engine, but under no circumstances do this with your bare hands. Then remove the belt. You need to start with the top pulley, and then with the rest. Only in this order will it be easy to remove the element. On injection car models, you will also need to remove the crankshaft position sensor, otherwise it will interfere with the removal of the belt.
To adjust the blade tension, place a previously stored spatula or a flat piece of crowbar between the engine and the generator, using it as a lever. Having moved the generator in this way, without releasing the blade, but holding it in this position, tighten the nuts of the upper and lower fastenings, after which you can release the “lever”. It will be easier if someone helps you with this.
After the manipulations have been completed, check the belt tension again using the previously described method.
To put on a new belt, you need to know some of the nuances of this process. For example, one of the most important points: you need to put the belt on, starting with the crankshaft pulley, then on the generator pulley, and only finally on the pump pulley.
Thanks to the video instructions, you can learn in more detail and clearly how to change or tighten the alternator belt if you plan to do it yourself for the first time.
Source
Procedure for tensioning or replacing the timing chain
As the vehicle operates, the timing chain, which operates under high voltages, is gradually stretched. Because of this, the chain pitch may change and the engine begins to operate unstably at idle. Floating speeds appear. It is even possible for the chain to jump several links and then the internal combustion engine will begin to stall. To prevent this, experts recommend periodically adjusting the chain tension. If the driver heard that the VAZ 2107 chain is rattling, this is a sure sign that on the VAZ 2107 chain tension is simply necessary.
Before you begin troubleshooting, you must make sure that the chain, sprockets and other drive elements have no mechanical damage and can continue to be used. To do this, simply remove the drive cover and perform an external inspection of the parts.
How to tension a chain on a VAZ 2107 - this can be done in several ways. Car enthusiasts choose any of them based on experience and time available for work.
To begin with, you need to place the car on level ground and secure the wheels with chocks so that it does not move, and also set the gearshift knob to the “neutral” position. Before starting work, you need to prepare a tool - a wrench for “13” and “36”, sockets for “8” and “10”, pliers and a screwdriver. To gain access to the chain, you need to remove the drive cover by unscrewing the bolts holding it in place.
— slightly loosen the chain tensioner located next to the pump;
- using a special wrench or a 36 socket, turn the crankshaft two turns;
— tighten the tensioner until it stops;
— after starting the engine, check the chain tension;
— close the drive cover, tightening all the bolts and nuts well.
— this requires, in addition to the drive cover, to remove the valve cover from the cylinder head; this frees the camshaft sprocket and the chain tension can be checked manually
- loosen the tensioner slightly
- turn the crankshaft two turns and tighten the tensioner completely
- check the chain tension manually, there should be no sagging in any places, the chain should be elastic
— install the valve cover and the side cover of the drive
Experts know that patience is required when adjusting chain tension. The fact is that the desired result may not be achieved the first time; moreover, this procedure can be done several times until the characteristic ringing in the timing drive area disappears.
In addition, it is necessary to remember that it is necessary to make similar adjustments after any repair work, during which the timing drive was manipulated up to the point of removing the chain.
— first you need to release the pressure in the tensioner and unscrew the nut;
- as soon as the nut is loosened, the tensioner shoe should snap off;
- if this does not happen, then you need to knock on the tensioner, the plunger is probably stuck in it, the shoe should snap off;
- use the key to make two turns of the crankshaft, it should stop itself when it feels the greatest resistance;
- using a wrench to fix the crankshaft in this position, tighten the cap nut;
— having connected the tensioner and checked its fixation, put the cover in place;
- finally, start the engine and check the operation of the drive.
Since the standard engine configuration of the car requires constant monitoring of the timing drive, you can buy and install an automatic VAZ 2107 chain tensioner. The big advantage of installing the ANC is that it does not require an oil line, and the overall drive circuit is simplified. This device itself monitors the tension and adjusts the shoe forces as the chain is pulled.
If, upon inspection of the drive elements, mechanical damage is detected - chips, scuffs or cracks, then replacement of the failed spare part is required. And, as a result, removal or complete replacement of the chain.
When removing the chain, you must remember that before starting all work, the camshaft and crankshaft sprockets must be aligned with the existing marks on the bearing housing and cylinder block. If there is a need to remove the sprockets themselves, then under no circumstances should the shaft rods be turned; to do this, marks must be placed on them in advance.
Design and features of the timing belt drive of the VAZ 2107 car
Production of the 8-valve 1.3-liter VAZ power unit with a belt instead of a timing chain began in 1979. Initially, the VAZ 2105 internal combustion engine was produced with the index 21011 and was intended for the Zhiguli model of the same name, but was later installed on other Tolyatti cars - the VAZ 2107 sedan and the VAZ 2104 station wagon. The decision to install a belt drive instead of a timing chain drive was caused by the increased noise of the latter. The engine, which was not the quietest, began to make even more noise as the mechanism parts wore out. The modernization made the power unit more modern, but in return it required increased attention to the condition of individual structural elements.
The functions that were previously performed by the chain were assigned to a belt drive. Thanks to it, it is set in motion:
Transverse teeth on the timing drive parts prevent slipping of the rubber structural element and ensure synchronous operation of the crank and gas distribution mechanisms. At the same time, during operation the belt stretches, so to prevent it from jumping on the pulley teeth, the drive was equipped with an automatic tension unit.
Interchangeability of VAZ timing belts
The prototype of the VAZ “belt” engine was the OHC power unit, which was installed on the FORD Pinto passenger car. Its timing mechanism drove a fiberglass-reinforced timing belt that had 122 teeth. Due to the fact that the VAZ 2105 belt has exactly the same number of teeth and similar dimensions, some owners of the domestic “classic” had an alternative to Russian-made belts. Of course, only a few had such an opportunity - in times of total shortages, one had to be content with less reliable products. Initially, only belts from BRT were installed on the engine, but a little later, more durable belts from Gates, which is the world leader in this market segment, began to be supplied to the conveyors of the Volzhsky plant.
Today, the owner of a VAZ 2107 has a huge selection of spare parts, including for the timing belt drive. When purchasing, you must keep in mind that the VAZ 2105 power unit is suitable for timing belts with catalog number 2105–1006040 (in another spelling 21051006040). It has already been said above that rubber products produced by Gates and Bosch are considered to be some of the best. The products of global industry giants such as Contitech, Kraft, Hanse, GoodYear and Wego are no less high-quality. The cheaper offers of domestic Luzar cause the most criticism, despite the fact that they are not represented in the retail network as widely as the market leaders.
On my own behalf, I can add that owners of “sevens” can use a standard timing belt from FORD cars. Belts from OHC engines of Pinto, Capri, Scorpio, Sierra and Taunus cars of 1984 and later are suitable for the “five” engine. Please note that until 1984, the 122-tooth belt was installed exclusively on power units with a volume of 1800 cm3 and 2000 cm3. The drive element of the weaker 1.3 and 1.6 cc power units was shorter and had 119 teeth.
Tension mechanism
In order for the timing belt of the VAZ 2107 to be constantly tensioned, a simple (one might even say primitive), but at the same time extremely effective and reliable design is used. Its basis is a shaped metal plate (hereinafter referred to as the tensioner lever), on which a smooth roller with a pressed-in rolling bearing is mounted. The plate base has a hole and a slot for movably attaching the lever to the cylinder block. The pressure on the belt is carried out thanks to a powerful steel spring, which at one end is connected to a bracket on the rotating plate, and at the other is rigidly attached to a bolt screwed into the cylinder block.
Quick replacement of timing chain and sprockets on a VAZ 2107 with an injection engine
Recently they brought us a car with a broken cylinder head gasket, and since when replacing the gasket we would have to remove the timing chain, we decided to change it along with the sprockets. We’ll talk about replacing the gasket in another article, but here we’ll look at replacing the timing chain of a VAZ 2107, as well as sprockets and a tensioner with a damper, with your own hands in an ordinary garage. In principle, the procedure is applicable to all cars of this family, because all classics were equipped with one chain motor with a slight difference in volume.
This engine is equipped with a double-row chain, which lasts a very long time; 100 thousand kilometers is not the limit for it, provided that the original Lada parts are in place. It is very simple to diagnose a stretched chain by the characteristic sound from the front of the engine; at the end of the article we will look in detail at how to diagnose and tension the timing chain.
Replacing the timing belt on a VAZ 2107
The manufacturer declares the need to carry out routine maintenance to replace the timing belt every 60,000 km. At the same time, reviews from real owners of “belt” VAZs with a classic layout speak of the need for such a replacement, sometimes even immediately after 30 thousand, arguing that cracks and breaks appear on the surface of the belt. And, I must say, such statements are not unfounded - everything depends on quality. Russian-made rubber products are not durable, so it is recommended to change them much earlier - after 40 thousand km. Otherwise, the risk of getting stuck on the road with a non-working engine increases significantly. If we talk about the products of well-known foreign brands, then practice has shown that they easily fulfill the required term and even after that are in normal working condition. Still, you shouldn’t wait until the timing drive fails. The belt should be replaced immediately in the following cases:
Routine work is best carried out on a lift or from a viewing hole. Before starting the replacement, you need to prepare:
In addition, you need to have a metal brush and rags that can be used to clean dirty drive parts.
How to remove a worn belt
First of all, you need to disconnect and remove the battery from the car, and then remove the alternator drive belt. Using a “17” socket mounted on the extension, unscrew the nut that secures the electrical unit and move it towards the cylinder block. Once the belt is loosened, it can be removed from the pulleys with virtually no effort.
The timing mechanism drive protection casing has three components, so it is dismantled in several stages. First, using a 10mm wrench, remove the upper part of the casing. It is held in place by a bolt at the front of the valve cover. The middle and lower sections of the protective box are attached to the cylinder block - their dismantling also does not require much effort. Having gained access to the timing drive parts, you can begin to replace worn parts.
To remove the old belt, use a 13mm socket wrench to loosen the bolt securing the tensioner arm - it is located opposite the slot in its plate. Next, use the “30” key to turn the roller - this will loosen the tension of the toothed belt and allow it to be moved with the pulley, and then completely removed from the engine compartment. During replacement, try not to move the auxiliary drive shaft, otherwise the ignition will be completely misregulated.
From my own experience, I can recommend turning the crankshaft before dismantling the old belt so that the mechanism is aligned to the marks. After this, remove the cover of the distributor (ignition distributor) and look at which cylinder its slider points to - the 1st or 4th. When reassembling, this will greatly simplify starting the engine, since it will not be necessary to determine in which of these cylinders the compression stroke of the fuel mixture occurs.
Marks on the crankshaft
Synchronous rotation of both shafts will only be ensured when they are initially installed correctly. As a starting point, internal combustion engine developers select the end of the compression stroke in the first cylinder. In this case, the piston must be at the so-called top dead center (TDC). On the first internal combustion engines, this moment was determined by a probe lowered into the combustion chamber - it made it possible to tactilely feel the location of the piston when turning the crankshaft. Today, it is much easier to install the crankshaft in the correct position - manufacturers make a mark on its pulley and put marks on the cast-iron cylinder block.
When replacing the belt, turn the crankshaft until the mark on its pulley is aligned with the longest line on the cylinder block. By the way, this applies not only to VAZ 2105 engines, but also to any other power unit of the VAZ “classic”.
The installation of timing marks must be distinguished from work on adjusting the ignition timing. In the latter case, the crankshaft is installed so that the piston does not reach TDC slightly. Several degrees of advance are needed for earlier ignition, which allows the fuel mixture to ignite in a timely manner. Two other marks on the cylinder block allow you to correctly determine this moment. Combining the mark on the pulley with the shortest line (it is in the middle) will give an advance of 5 degrees, while the outer one (of medium length) will allow you to set the earliest ignition - 10 degrees before TDC.
Aligning the camshaft marks
The VAZ 2105 power unit with a belt drive differs from the 2101, 2103 and 2106 engines in that the mark on the camshaft gear is a thin mark, and not a dot, as can be seen on the sprockets of the mentioned engines. The response line is made in the form of a thin tide on the aluminum camshaft cover, next to the hole for attaching the belt drive protective cover. To set the marks one opposite the other, turn the camshaft by holding the gear bolt with a wrench or rotating the pulley itself by hand.
Split camshaft gear
During operation, the timing belt, made of rubber, is irreversibly stretched. To compensate for its weakening and avoid jumping on the pulley teeth, manufacturers recommend tensioning the belt at least once every 15 thousand kilometers. But a change in the linear characteristics of one of the drive elements also has another negative consequence - it causes an angular displacement of the camshaft, as a result of which a shift in valve timing occurs.
With a significant elongation, it is possible to align the mechanism according to the marks by turning the upper pulley by one tooth. In the case when, when the belt is thrown, the marks shift to the other side, you can use the split camshaft gear (pulley). Its hub can be rotated relative to the crown, due to which the position of the camshaft relative to the crankshaft can be changed without loosening the belt. In this case, the calibration step can be tenths of a degree.
You can make a split pulley with your own hands, however, to do this you will have to buy another similar gear and use the help of a lathe. You can take a detailed look at the manufacturing process of the upgraded part in the video below.
Video: making a split timing gear for a VAZ 2105 with your own hands
Tension adjustment
Having aligned the marks, carefully install the spare belt. After this, you can begin to adjust its tension. And here the manufacturer has made life as easy as possible for the mechanics. It is enough to turn the crankshaft a few turns clockwise for the steel spring to automatically create the required tension force. Before final fixation of the video, you need to check the coincidence of the marks again. If they are displaced, the drive installation process is repeated and after successful completion of the test, the tensioner is clamped with a key “13”.
All that remains is to check whether the distributor rotor is in the 1st cylinder position and try to start the engine. If this was not possible, then the ignition distributor must be lifted by turning its shaft so that the slider is opposite the contact of the 4th cylinder.
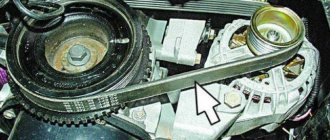
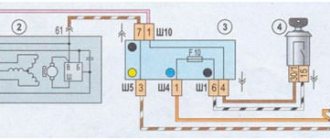
Timing drive device for VAZ 2107
The timing belt on an injection engine consists of:
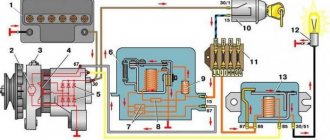
Diagram of the camshaft drive mechanism and auxiliary parts of VAZ 2101 to 2107
The timing drive (also called the camshaft drive) on the VAZ 2107 is not very complicated structurally, but there are a number of nuances that must be taken into account when replacing or tensioning the VAZ 2107 chain. This engine timing element includes:
Determining how many links there are in a chain is quite simple. It is necessary to stretch the chain to its entire length and if the links are the same at both ends, then there are 116 of them, if they are different, then there are 114 links.
There is a mark on the crankshaft sprocket; when installing or adjusting the chain, it should “look” at a special mark in the form of a boss on the cylinder block. The special mark on the camshaft sprocket should be located opposite the influx mark on the bearing housing. As a result, the crankshaft and camshaft marks should be directed towards each other.