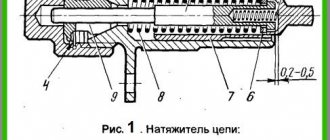
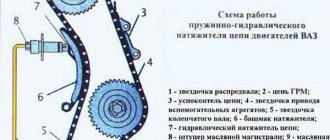
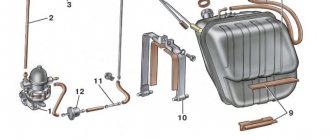
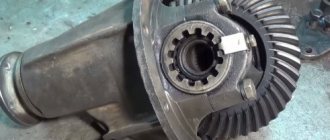
PURPOSE OF THE TIMING CHAIN AND ITS LENGTH
To understand the purpose of the timing chain, it is necessary to outline what the engines of classic VAZ models are. All these engines are overhead engines. That is, the timing shaft (aka timing) is located in the upper part of the engine, above the crankshaft and above the oil pump shaft.
The timing chain is the main connecting link in the VAZ 2107 engine
All these shafts are equipped with sprockets, onto which the timing chain is placed. The chain's job is simple: it must transmit torque from the timing shaft to the crankshaft and to the oil pump shaft. From the crankshaft, torque is transmitted to the chassis, and from there to the drive wheels. They begin to rotate and the car moves forward. Thus, the timing chain is the most important connecting link between the three engine shafts, and any breakdown of this link will inevitably lead to either serious problems in the operation of the motor or to its complete jamming if the chain breaks.
LENGTH OF TIMING CHAINS FOR VAZ ENGINES
If the driver decides to replace the timing chain on his “seven”, he will go to the spare parts store, where he will inevitably be faced with the question: which chain to choose?
You should know a simple rule: all engines on the VAZ “classic” are equipped only with chains. The only difference is in the length of the chains, or more precisely, in the number of links:
- chains with 114 links. They are installed on VAZ 2102, VAZ 2101 and VAZ 21011 (these short chains are designed for small engines - from 1.2 to 1.3 liters);
- chains with 116 links. They are installed on VAZ models from 2103 to 2107 inclusive. The same chains are installed on the Niva (VAZ 21213). The need for a longer chain is due to the increased volume of engines, which varies from 1.5 to 1.7 liters.
Based on all of the above, the driver in the store will have to determine what kind of chain he is buying - short or long. There are two ways to do this:
- The first way is obvious: simply count the number of links. If there are 116 of them, the chain for the VAZ 2107 has been found;
- the second method is simpler: you need to fold the chain in half, and then look at the pair of end links. If these links are symmetrical, then the chain has 116 links. If not, the chain is short, 114 links.
It should also be noted here that recently counterfeit timing chains have often been found on store shelves. Fortunately, the fakes are made rather carelessly, so an attentive car enthusiast can immediately suspect something is wrong.
VIDEO: HOW TO RECOGNIZE A FAKE TIMING CHAIN
MAIN ELEMENTS OF THE TIMING CHAIN TENSIONING SYSTEM
The timing chain in the engine is supported not only by the three sprockets mentioned above. It is supported by several other important devices.
The timing chain tensioning system consists of several critical elements
Let's look at them in more detail.
TIMING CHAIN STOP PIN
The timing chain in the VAZ 2107 engine is supported by a complex tensioning system. One of the elements of this system is the limiting finger. This is a small cylindrical part screwed into the wall of the cylinder block. The pin is located next to the crankshaft sprocket. The purpose of the pin is as follows: if the timing chain tension suddenly weakens, the pin will prevent the chain from jumping off the crankshaft sprocket.
The design of the restrictive pin is extremely simple - it is a regular bolt with a head truncated on the sides
At the same time, the chain will begin to touch the limiter with a characteristic ringing sound, which will certainly attract the driver’s attention, since this sound will be heard even in the cabin. If the chain breaks, the limiter will not allow it to completely fly off the sprocket and break the nearby oil pump and timing shaft sprockets. If the timing chain is tensioned normally, it does not touch the limiting pin, since in this case there is a constant gap of about 1.5 cm between it and the pin.
ABOUT TIMING CHAIN TENSIONERS
The purpose of the timing chain tensioner is easy to guess from its name. He must constantly tension the chain, preventing it from sagging. If the chain sags by even half a centimeter, it may fly off one of the sprockets (although this happens quite rarely, much more often there are situations when the chain remains on the sprocket, but at the same time jumps several teeth forward, as a result of which the uniformity of its tension is completely disrupted , and the sagging increases even more). At different times, different types of tensioners were installed on the VAZ 2107.
MECHANICAL TENSIONERS
In a mechanical tensioner, the force required for the tension shoe to press on the chain is created by a conventional spring. It presses on the rod, it moves out of the body and presses on the shoe. And the shoe, in turn, puts pressure on the chain, constantly dampening its vibrations.
The main element of the mechanical tensioner is the plunger spring
The spring in such a tensioner is adjusted with a conventional plunger nut. If the driver needs to tighten the chain a little, he simply tightens the nut slightly, eliminating any slack.
Mechanical tensioners for VAZ 2107 are reliable and simple in design
AUTOMATIC TENSIONERS
Automatic tensioners were installed on later models of the VAZ 2107. Unlike mechanical devices, the design of this tensioner includes a toothed bar with a ratchet.
The main element of the automatic timing chain tensioner is a toothed bar
The plunger spring presses on this bar, and the bar transmits this force to the shoe. The ratchet prevents the bar from returning to its original position. This keeps the timing chain tension constant.
Finding automatic tensioners for VAZ 2107 on sale has become increasingly difficult lately.
HYDRAULIC TENSIONERS
These tensioners were installed in the latest VAZ 2107 models. The main difference between these devices is the principle of their operation. The force in the hydraulic tensioner is created not by a spring, but by oil pressure. It is supplied to the tensioner through a reinforced high-pressure hose.
Oil is supplied to the hydraulic tensioner through a special reinforced hose
TIMING CHAIN SUPPORTER
The timing chain tensioner is another indispensable element of the tension system, without which uniform operation of the timing chain is impossible. The damper is a metal plate that is attached to the wall of the cylinder block.
The timing chain adjuster on the “seven” is a simple metal plate held on by two bolts
This plate is located opposite the tensioner, that is, the damper acts on the second half of the chain. Since the tensioner presses the chain very sharply, the opposite side of the chain inevitably begins to vibrate. To dampen this vibration, a damper is needed. The chain, touching the damper plate, loses some of its energy and the amplitude of its oscillations decreases significantly. Without the restraining effect of the guide, the chain will stretch much faster.
How often does tension need to be applied?
During operation, the chain is subjected to heavy loads, so its service life is 60-80 thousand km. Adjustment should be carried out every 15 thousand km, but if the driver discovers earlier that something has begun to rattle when the engine is running, then it should be diagnosed. Before tensioning, you need to check its serviceability.
It is also necessary to check the tension in the case when the timing belt repair on the VAZ 2107 was carried out or in the case when, after tensioning, knocking of the product is still observed. The knock, or more precisely, the rustling of the chain, will not be difficult to distinguish even for an inexperienced driver. This rustling noise can be clearly heard if you lift the hood and listen to the engine at idle speed. If you add gas, the rustling disappears, which actually means that it’s time to tighten the timing chain. For this, a timing chain tensioner is used, which come in different types: automatic and mechanical.
Step-by-step instructions for stretching
Now let’s pay attention to the question of how to properly tension the timing chain on a VAZ 2107. Initially, it is worth noting that the timing mechanism on VAZ 2107 cars with an injector and carburetor fuel supply system are absolutely identical. The tension on the VAZ 2107 is performed in the following sequence:
- The car is placed on a flat surface, the “neutral” is turned on, and the wheels are fixed.
- The tensioner cap is loosened (using a 13 key), which is located near the pump.
- The crankshaft is turned 2 turns clockwise, for which a special key is used (pictured).
- After this, the tensioner is tightened to failure.
- Next, we start the engine and listen to see if the clanging remains.
- If it disappears, then the chain is tight. If there is any left, we recommend repeating the procedure from point No. 2.
If the actions taken are not successful and the noise remains, you will have to resort to a visual inspection of the timing mechanism, and for this you will have to disassemble the engine.
The chain tension must be adjusted by rotating the crankshaft. If you don’t have a special key to rotate the crankshaft, you can hang up the rear of the car or one of the wheels, then engage 5th gear and rotate the wheel.
Tension check
The VAZ 2107 chain is located in the front part of the engine. It is not visible, since it is covered by the cylinder head cover and the block itself. Before you start disassembling the VAZ 2107 engine, you need to understand the features of visual inspection and checking its tension. It is rational to check the chain tension only in cases where regular tensioning does not help solve the problem.
To visually check the tension of the VAZ-2107 timing chain, you must first remove the air filter housing, then the cylinder head cover. To do this, you will need a “10” wrench, with which you need to unscrew 8 fastening nuts.
When removing the cylinder head cover, special attention must be paid to the integrity of the gasket. If necessary, it is better to replace it, since in most cases an engine oil leak may occur.
After removing the valve covers, access to the upper part of the product becomes available. Here you need to inspect the tensioner shoe and damper for integrity, and then check the chain mechanism with your hands, and if that doesn’t work, you can use a pry bar or a large screwdriver.
The mount must be installed so that it stands between the chain mechanism and the block body. As a result, we get a lever that is used to check the chain tension on a VAZ 2107 car. If it bends easily, then its tension needs to be adjusted or replaced. The ideal tension is one at which the product does not bend and is taut like a string.
It is important to know! When checking the tension of the timing mechanism chain, it is necessary to avoid applying large forces, as this may lead to deformation of the device links.
Repair of VAZ 2107 tensioners is not carried out, so the product will have to be replaced with a new one. Replacement is rarely required, but the ANC “Pilot” automatic tensioner is best suited for this. After installing it, you will forget about the noise and clanging of the engine for a long time. But if you already have an automatic tensioner installed, and the engine is knocking or the chain is making noise, then there is no point in making adjustments. You will have to immediately disassemble and replace the timing mechanism parts.
Source
TIMING CHAIN JUMP AND ITS SIGNS
The chain, like any other part of the car, wears out over time. Wear usually shows up as chain stretching. The cause of stretching is the so-called metal fatigue, which affects almost all parts that experience cyclic loads. Having stretched, the chain begins to sag significantly. If the driver does nothing, then sooner or later a situation will arise when the chain on one of the sprockets jumps one or two teeth forward. After this, all valve timing in the engine will be disrupted, as will its operation. Here are the main signs of a skipped timing chain:
- the engine runs intermittently, and they occur even at idle;
- while driving, power dips appear, which most often occur during the acceleration of the car;
- the engine starts very poorly, and this does not depend on the outside temperature;
- A characteristic jingling sound is heard from under the hood, which intensifies as the engine speed increases.
All these signs indicate that the timing chain has not only weakened, but also jumped. And the driver needs to replace it as soon as possible. If this is not done, the engine will sooner or later seize, after which you will have to make expensive major repairs.
External signs of malfunction
When wear is critical, the chain begins to rattle; the noise does not disappear as the power unit warms up. With further lengthening of the chain, the beating of the branches increases, which leads to an increase in acoustic noise. Since the design does not have a hydraulic tensioner, attempts to compensate for chain wear by rotating the adjustment bolt do not lead to restoration of functionality. Further operation of the vehicle with a stretched chain is not recommended due to the risk of irreversible damage to the cylinder-piston group.
ABOUT ASSEMBLY OF THE TIMING MARK AND INSTALLING THE CHAIN ACCORDING TO THE MARKS
As mentioned above, the timing system has a marking system that allows you to correctly install the guide sprockets and timing chain after replacement.
- If the timing chain was changed on a carburetor “seven”, then the oil pump sprocket, which was loosened above, is tightened first. In this case, the mark on the sprocket is aligned with the protrusion on the body (and if the “seven” is injection, this point does not play a big role).
- The chain guide and tension shoe are returned to their place.
- Now the crankshaft sprocket is put in place. It also has a recessed mark, which also needs to be aligned with the protrusion on the timing case, and only after that tighten the fastening nut on the sprocket and install the cotter pin in place.
- After aligning the crankshaft sprocket according to the marks, a new timing chain is put on it.
- Now all that remains is to install the camshaft sprocket in place. The asterisk does not tighten. The timing chain is put on it. In this case, the sprocket must be turned so that the mark on it coincides with the mark on the cylinder block. If there is no match, the chain should be removed from the teeth and the sprocket should be turned in the desired direction until the marks completely coincide.
Before tightening the sprocket on the camshaft, the marks must be carefully aligned - When the risks coincide, it is necessary to check the coincidence of the marks on the remaining sprockets. If there is no discrepancy between the marks, you can tighten the camshaft sprocket and install a cotter pin on it.
- Now all that remains is to return the timing cover to its place, and then replace the previously removed radiator.
VIDEO: HOW TO INSTALL THE TIMING CHAIN ACCORDING TO THE MARKS ON THE “CLASSIC”
ABOUT REPLACING A SINGLE-ROW CHAIN WITH A DOUBLE-ROW CHAIN
In early VAZ 2107 models, predominantly double-row timing chains were installed. This technical solution had its advantages:
- the distribution of mechanical load along the chain was more uniform, which significantly extended its service life. Double-row timing chains travel 100–120 thousand km, and no signs of stretching are observed in such chains;
- Double row chains are safer. If for some reason one link in such a chain fails, the chain will not break completely. This gives the driver a chance to stop the car in time after he hears the characteristic clang of a half-broken chain coming from under the hood. And timely stopping, in turn, allows you to avoid engine jamming and expensive overhauls.
The main disadvantage of the double-row chain was its heavy weight. It is for this reason that in later VAZ 2107 models they decided to abandon it. However, drivers concerned about engine safety and reliability can always return the double-row chain back. To do this, you will need to replace not only the chain itself, but also the entire tensioning mechanism, from the sprockets to the damper and tension shoe. The shoe, as you might guess, should be wider, i.e., designed for two rows of links. The shaft sprockets must also be double-rowed.
To install a double-row chain on the “seven” you will have to install special double-row sprockets
Previously, all these parts could be purchased in a single set. Nowadays, such kits are becoming increasingly rare, so drivers have to buy everything separately. Products are in great demand. This manufacturer produces not only chains, but also double-row sprockets.
Chains from are in great demand among owners of "sevens"
The sequence of installing a double-row chain on a VAZ 2107 is no different from the above. There is only one peculiarity: instead of single-row sprockets, double-row sprockets are installed. The same goes for the tension shoe. The procedure for installing a double-row chain using marks is no different from that described above.
So, the timing chain is the most important part of the engine. The consequences of failure of this part can be catastrophic. In especially severe cases, a seized engine cannot be restored at all. It is for this reason that the car owner must carefully monitor the condition of the circuit and change it at the slightest suspicion of a malfunction. Even a novice car owner can replace the chain. Despite the apparent complexity of this procedure, there is nothing terrible about it. The main thing is to correctly install the chain according to the marks, and no problems with its further operation will arise.
Types of chain drive
The VAZ “Seven”, like other “classics”, is equipped with a double-row timing chain. However, there is a single-row chain that, if desired, can be installed on a Zhiguli.
Single row chain
A chain drive with one row has less noise when the engine is running compared to two rows. This factor is one of the main factors in favor of choosing single-row chains. Therefore, some VAZ 2107 owners decide to replace the timing drive. The lower noise level is due to the fact that fewer links are driven. Plus, it is easier for the entire engine to rotate such a chain, which has a positive effect on the increase in power. However, due to the low noise level when such a chain is stretched, it is not always clear that the part needs tension.
Double row chain
Despite the advantages of a single-row chain, a chain drive with two rows is the most common, since it is characterized by high reliability and if a link breaks, the entire chain does not break. In addition, the load on the timing drive parts is distributed evenly, as a result of which the chain and gears wear out more slowly. The life of the part in question exceeds 100 thousand km. Although recently, in order to reduce the weight of power units, automakers have been installing chains with one row.
Replacing a double-row chain with a single-row one
If you are thinking about replacing a double-row chain drive with a single-row one, you will need to purchase the following parts:
All of the listed parts are taken, as a rule, from the VAZ 21214. Replacing the chain should not cause difficulties. The only thing that is required is to replace the sprockets, for which you unscrew the corresponding fasteners. Otherwise, the steps are similar to the procedure for replacing a conventional double-row chain.
Replacement of sprockets and timing chain of VAZ-2107i
I did this operation on my car last summer. I think it will be useful to someone.
The car had already covered 200 thousand km, so I decided to do a mini-overhaul, almost completely replacing the timing mechanism myself. I decided not to touch the rocker with the camshaft for now and work on the chain with sprockets that have been there since the factory. Various sources write that the life of the chain is somewhere around 100-150 thousand, although even at 220 thousand it was tensioned well by the tensioner, and I didn’t notice much noise, perhaps due to timely maintenance and good oil. However, during diagnostics at the service center, the technician said that the valve timing angles had already dropped a little, so it was better to replace it. I decided to play it safe and replace it along with the stars, as is done wisely.
We buy a set of sprockets, a chain, a new stabilizer and shoe, a front cover gasket, a front crankshaft oil seal, nuts, sealant, etc. from a trusted store.
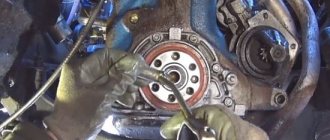
First, let's provide access to the front cover - remove the cooling fan, radiator, drain the antifreeze from it, and decorative grille.
Then the engine protection and mudguard to provide access to the three cover mounting bolts from below.
Now we unscrew the crankshaft pulley nut (ratchet), we need a 36 wrench, or better yet a head, but we couldn’t find one, and the standard stamped wrench was bent and did not want to be unscrewed.
I also had to weld pipes from it for a 40 key, long enough to rest against the right side member.
It was not possible to unscrew it manually; I had to tear it off with the starter, resting it on the spar.
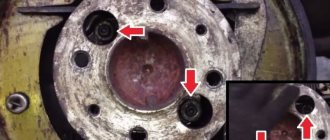
Next, remove the PCV sensor, alternator belt, valve cover and set the timing marks on the crankshaft pulley and camshaft sprocket at TDC of the 4th cylinder. Oddly enough, they completely coincided.
Then we remove the crankshaft pulley and the front cover, dismantle the shoe, damper, limiter and gears with the chain. We make sure that the marks do not go astray.
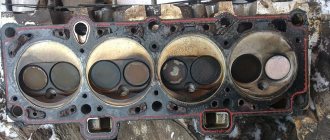
When comparing the old and new parts on the stars, I didn’t see any special workmanship, except for polishing on the sides.
The chain is also intact on the outside. The shoe and damper have minimal wear, as they have already been replaced relatively recently.
However, the old chain turned out to be 4-5 mm longer than the new one, which, according to the same data from the Internet, is already above the tolerance of 4 mm and requires its replacement.
Before installing new parts on the new camshaft sprocket and crankshaft pulley, we use a center punch to make additional marks at 90 and 180 degrees for convenience when adjusting the valves.
We put them in reverse order according to the marks and keys: first the shoe with the damper, then the upper sprocket with the chain, then the small sprocket and the middle one, check the marks again and tighten the chain.
We carefully double-check everything and lock the retaining rings.
During assembly, due to inattention, I placed the small crankshaft gear with the “skirt” outward instead of inward, which is why the crankshaft was blocked when tightening the ratchet nut—I had to remove the cover again and rearrange it.
The marks coincided exactly again, as if nothing had changed.
Seal the front cover seal and gasket with sealant.
Also, instead of the usual nuts with engravers, I tightened the front cover with nuts with a nylon ring, which means they have the ability to unscrew and leak oil).
Let's do the math:
- Set of stars - 680 rub.
- Chain - 630r
- Calmizer - 70 rub.
- Shoe - 90 rub.
- Oil seal - 110 rub.
- Nuts, washers, gasket - 200 RUR
- Ratchet key - 150r
It took a couple of days to do everything, although it could have been done in one. After replacing, I did not notice any major changes in the operation of the motor. After a couple of thousand, after grinding in the parts, you will need to tighten the chain again. But then you can sleep peacefully with another couple of hundred thousand mileage). A short video of the process:
Design of the VAZ 2106, 2107 chain drive
To drive the VAZ 2106/2107 with a carburetor, a double-row roller chain is used. It transmits force from a sprocket mounted on the crankshaft to another sprocket mounted on the end of the camshaft. The chain is a structure that develops large inertia, so a chain drive requires vibration damping. Even a well-tensioned chain retains the property of “playing” in those places where there are no sprockets or tensioners.
The chain has virtually zero ability to stretch and compress, and fairly limited flexibility. Therefore, in order to provide it with constant tension while working in its place at any speed, it has to be literally shackled, using a system of tensioners and dampers.
This problem on the VAZ 2106/2107 is solved by a damper - an additional spring-loaded clamping bar. It has a steel frame covered with a layer of durable rubber. Tensioners and dampers dampen vibration and noise quite effectively. The chain is prevented from falling off by a stop pin that is screwed into the block or cylinder head. During normal operation the chain does not touch it.
How to tension the chain in a VAZ car yourself
The system consists of a spring-loaded rod, a collet and a shoe. Use a socket wrench to unscrew the cap nut. Moving the shoe will tighten the chain. The fuel hose must be disconnected from the bracket that goes to the carburetor. If the rod is stuck, lightly hit the nut with a hammer several times. Turn the crankshaft a couple of turns with an open-end wrench. It is inconvenient to get to the nut, especially on an injector. To still cope with the injector, find a suitable key. Therefore, rotate the crankshaft through the transmission (the starter cannot be used). Secure the machine on a horizontal platform in advance. Lift the rear wheel and engage 4th or 5th gear and release the brake. Rotate the wheel a turn or one and a half until you feel resistance and stop turning. Leave the open-end wrench in this position. When the tensioner nut is tightened, the adjustment is complete. Put the cover back.
After all the work has been done, start the engine and check the result. If the motor is working properly and no unnecessary sounds are heard, then nothing else needs to be changed.
Source
Reasons for replacing the timing chain drive on a VAZ 2106, 2107
The performance and durability of the timing chain drive depends on the material and quality of heat treatment of the chain and sprockets themselves. Manufacturing accuracy and cleanliness of working surfaces are of great importance. A broken circuit is a rare occurrence. The deterioration of its condition can be monitored by increased noise when the engine is running.
For engines 2101 and 21011, where the block is lower, the number of chain links is 114, and for 2103/2106 the number of links is 116.
A method on how to replace the timing chain on a VAZ 2106 may be required when its critical wear has occurred, its resource has been exhausted, and tightening it with all sorts of “cunning” methods no longer gives results. These methods include:
- increasing the length of the working part of the tensioner by pressing on a piece of tube of a suitable diameter;
- “addition” of an additional bracket to the shoe and other “bullying” of the engine.
An extended timing chain no longer ensures accurate valve timing, which negatively affects engine performance. In addition, she wears out the shoe and constantly “beats the head off” the pacifier. In addition, engine noise increases, fuel consumption increases and engine starting becomes worse. It is also worth saying that the chain sometimes breaks with all that it entails.
To remove the timing chain, you do not need to remove the crankshaft sprocket!
For work we will need: keys “10”, “13”, “17”, a special wrench for the crankshaft pulley nut (or a head “36”), a screwdriver, a mounting blade, a hammer, and a bit.
After removing the sprocket, do not turn the drive shaft, because this may disrupt the initial ignition setting!
When to change the timing chain
The chain drive on VAZ family engines has a longer service life. The life of the chain ranges from 100 to 200 thousand kilometers.
If high-quality materials were used in the manufacture of components, and proper tension and abundant lubrication of the drive were ensured during operation, then the chain will last no less than the engine itself.
The optimal frequency for changing is every 200 thousand km.
Timing chain on a VAZ 2107 car: originals, analogues, part numbers and price
Technical characteristics of the drive: length 1141 x number of links 114 x width 8.5 mm.
| Name/article | Price in rubles |
| AT H2X98 (1006040) | From 550 |
| AT H2X114 | From 550 |
| AT H2X116 | From 550 |
| VAZ 100604082 | From 650 |
| AVTOVAZ 100604694 | From 600 |
| AVTOVAZ 100604030 | From 600 |
| Optimal FENOX RS 45874 O4 | From 750 |
| Optimal FENOX RS 26581 O4 | From 750 |
| —/— RS 21387 O5 | From 550 |
| Chain stabilizer VAZ 1006100 | From 350 |
*check prices with an authorized dealer at the time of purchasing parts.
Before purchasing components, check with the managers about the compatibility of the part. Check the article numbers with the data specified in the operating instructions.
When replacing, do not forget to place marks on the crankshaft and camshaft. Do not neglect the rule, as the engine will not start, it will operate unstably, and the ignition timing will shift.
Which manufacturer is better: domestic or imported? Russian analogues are not inferior in quality to foreign ones. Decide whether it’s worth overpaying individually, but still listen to the opinion of experts.
Causes of timing chain wear on VAZ 2107
- Duration of vehicle operation without intermediate prevention and diagnostics;
- Installation of non-original parts, poor workmanship;
- Inconsistency in length, width, number of links;
- Aggressive driving style, speed limits;
- Critically high (low) temperature conditions.
Signs of wear on the chain drive on the VAZ 2107
- Unstable engine starting: excessive wear or weak tension leads to malfunction of the ignition system;
- A large amount of smoke from the exhaust pipe due to the enrichment of the combustible mixture;
- The appearance of third-party sounds when the engine is running;
- The power unit does not start, the starter rotates.
Consequences of untimely replacement of the timing chain drive
- Wear of pistons, crankshaft liners, camshaft, valve mechanism;
- Increased engine oil consumption;
- Deformation of gears, cylinder head (cylinder head).
Which timing chain and tensioner should I install on the VAZ 2106, VAZ 2107?
The original timing chain number is 2103-1006040, the average price is 380 rubles.
Analogues:
- Fenox PC2103C3 — 519 rub.
- Kraft KT 017736 — 620 rub.
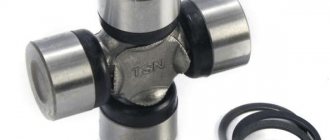
The original number of the timing chain tensioner is 2101-1006060, the average price is 364 rubles.
Analogues:
- TSN 671 — 254 rub.
- Riginal RG2101-1006060 — 230 rub.
- Trialli MT 151 — 407 rub.
Prices are current for 2021, although the cost has not changed much in three years.
How much does it cost to replace a timing chain on a VAZ 2107/2106
When you replace the timing chain on a Zhiguli yourself, you can save a lot by spending only on spare parts. In 2021, the original chain 2103-1006040 has risen in price significantly, now it costs about 910 rubles. The price for timing chain analogues for classics has changed by 150-200 rubles, as follows: Fenox (PC2103C3) - 770 rubles, Kraft (KT 017736) - 830 rubles.
Chain tensioners cost: original (2101-1006060) - 620 rubles, TSN 671 - 400 rubles, Riginal (RG2101-1006060) - 260 rubles, Trialli (MT 151) - 450 rubles. In total, if you choose the original chain and tensioners, you can only spend about 1,530 rubles.
The very cost of replacing a VAZ 2106 timing chain at a service station in Moscow starts from 3200-4800 rubles. At some services, prices for replacing the timing chain of a VAZ 2107 can start from 4400 to 6800 rubles.
Replacing the VAZ 2106 timing chain without disassembling
Replacing the timing chain without disassembling
There is a simple way to replace the timing chain of a VAZ 2106 without removing the front cover. To do this, you only need to remove the valve covers and prepare a new chain.
The principle of how to change the timing chain on a VAZ 2106 is as follows: you need to disconnect one link of the old chain, as well as one link of the new one. After this, the edges of the old and new chains must be connected by making a corresponding mark at the junction with chalk or a corrector. Then you need to take the second end of the old chain and pull it out of the mechanism, while the new chain will gradually be put on the sprockets.
When the old chain comes out completely, it must be disconnected from the new one, and carefully rivet the links of the replaced chain.
How to change the timing chain on a VAZ 2107 with an injector
Replacing the timing chain on a VAZ 2107 injector is carried out according to the same principle as on a Zhiguli 2106. Moreover, you can install a new element either in the standard way by removing the front cover, or in a simpler way.
Checking the timing chain quality
Before changing the timing chain on a VAZ-2107, you should decide on the manufacturer and quality of the chain.
The reliability of a new product can be roughly checked by taking the chain by one end and lifting it horizontally. Holding the chain edge up, its second end will bend down slightly - the smoother this bend is, the stronger and more reliable the product!
Prepare the necessary keys and be sure to put proofreader or chalk somewhere nearby.
Chain tension
Every owner of this car should know how to tension the timing chain on a VAZ 2107. To carry out the work you need to prepare:
The procedure is carried out in the following order
Video: chain tension on the “classic”
Sometimes it happens that when you unscrew the nut, the tensioner does not snap off. To do this, you need to knock on the mechanism body with a hammer.
To understand whether the chain really has good tension, you must first remove the valve cover before making adjustments.
The procedure for replacing the timing chain on a VAZ 2106
Let's consider the procedure for changing the timing chain of a VAZ 2106 on a carburetor engine.
First, remove the block head cover.
Now we turn the crankshaft until the mark on the camshaft sprocket aligns with the mark on the housing.
The mark on the crankshaft will also need to line up with the mark on the camshaft cover.
Next, bend the lock washer of the camshaft sprocket bolt. Then we engage fourth gear and put the car on the handbrake.
Then loosen the camshaft sprocket bolt.
Using a 10mm spanner, unscrew the two nuts of the studs connecting the parts of the casing. Using a 10" socket with an extension, unscrew the bolt securing the upper casing to the bracket. We remove the casing. Using the key “10” we unscrew the “propeller”.
Using a “10” wrench, unscrew the three nuts and six bolts securing the camshaft drive cover to the cylinder block.
Remove the camshaft drive cover.
Using a “17” wrench, unscrew the bolt securing the tensioner shoe...
... and remove the shoe.
Using a chisel, bend the edge of the lock washer on the oil pump drive sprocket bolt.
Using a “17” wrench, unscrew the bolt securing the oil pump drive sprocket.
Remove the bolt and washers.
We remove the star. We take out the camshaft drive chain. Then, lifting the chain, remove the camshaft sprocket.
Using the “10” key, unscrew the chain limiting pin and remove it.
Before installing the chain, align the mark on the crankshaft sprocket with the mark on the cylinder block.
Using a socket on “13”, loosen the cap nut of the chain tensioner. Turn the crankshaft clockwise one and a half to two turns. In this case, the tensioner spring, acting on the tensioner shoe, will automatically adjust the chain tension. Tighten the tensioner cap nut.
Timing system and main malfunctions of the device
During operation of the VAZ 2107 car, the chain gradually stretches. In order to reduce noise during stretching, tension is used, but over time and wear it ceases to help, and the noise can no longer be eliminated. If this happens, then it’s time to think about repairs. A stretched chain on a VAZ-2107 car leads to the fact that the gear teeth of both the camshaft and the crankshaft are “eaten”, and this leads to the replacement of all timing drive parts. Therefore, if the car’s lifespan already exceeds the norm, and extraneous sounds are heard when the engine is running, then you immediately need to replace the timing chain with a VAZ 2107.
Replacing a chain quickly
Before changing the product, you must purchase a new part. The cost of a new product varies from 400 to 600 rubles. The gas distribution mechanism on VAZ 2107 cars, the injector and the carburetor, are the same, so the replacement process will be appropriate for both types of engines. First, let's look at a quick way to replace a chain, which is unreliable and incorrect. If you make a replacement in this way, then know that this is wrong.
This replacement method is suitable when the chain breaks on the road and you need to quickly replace it in order to get home.
The replacement principle involves removing only the valve block cover. A new circuit is disconnected. The old chain is dismantled, for which its links are disconnected, after which the end of the new chain is connected to one end. Next, use the key to turn the crankshaft until the old chain pulls the new one behind it and comes completely out of the engine. When this happens, disconnect the old chain and connect the two ends of the new one. With this replacement method, it is only possible to change the chain, but the sprockets, tensioner shoe and damper cannot be replaced.
Replacing the timing chain
Now let's look at how to replace a product in the correct and reliable way. First you need to make sure you have the basic tools. Withdrawal consists of the following steps:
- To provide access to the timing mechanism, it is necessary to remove the radiator grille, fan, as well as the radiator and cylinder block cover.
- It is necessary to turn the crankshaft until the marks on the camshaft gear coincide with the cast on its cover (pictured above).
- Next, you need to loosen the generator mount and remove the belt, pump pulley and unscrew the chain tensioner.
- After that, turn on 3rd or 4th gear and squeeze the handbrake. The camshaft sprocket mounting bolt is not completely unscrewed, having first bent the washer.
- Now you need to remove the front engine cover. Unscrew the 9 nuts located on the cover and the 3 bolts from below. We now have access to the lower timing gears.
- We unscrew the tensioner shoe nut, take it out, and if it is worn out, buy a new one.
- We recommend that you unscrew the two bolts at the same time and remove the chain guide for diagnostics. And if necessary, replace it with a new one.
- The lock washer securing the distributor drive sprocket and the oil pump is bent, after which we unscrew it and then remove it.
- Next, the crankshaft gear limit bolt is unscrewed, after which the chain is released.
- Now we completely unscrew the camshaft gear, take it out, remove the chain from it, and now we take the chain out of the engine.
This completes the process of removing the chain. Now we take new parts and begin installation:
- We check whether the crankshaft gear key matches the required mark, as shown below. If the marks do not match, you will need to rotate the crankshaft until they do (photo below).
- Now we install the timing chain. First, we put it on the crankshaft gear and tighten the limit bolt.
- We install the damper and tensioner shoe into place.
- Having put the chain on the middle sprocket, you need to screw it on and secure it with a stopper.
- Using a wire, you need to grab the product and pull it up to the camshaft and tie it or fix it with something.
- After this, we put the chain on the camshaft sprocket. But this must be done so that the gear is in the same position in which we removed it from the shaft, i.e. the mark on it should coincide with the protrusion on the camshaft bed. After which the latter is installed in place, screwed and locked.
- Next, screw in the pre-charged tensioner and activate it.
- Before installing the front cover, you need to make sure that the timing belt is installed correctly according to the marks. Therefore, using a 22mm wrench, turn the crankshaft clockwise two full turns and align the key with the casting. At the same time, you can tension the chain. Then we check the marks on the top sprocket. If everything matches, then the timing belt is set according to the marks. If they don’t match, then we look for and correct the error. At this point the installation stage is complete, we continue with the assembly.
- We install and screw the front engine cover (we recommend changing the crankshaft oil seal in it before doing this). Don't forget to install a new gasket or use sealant.
- Next, we install all the other removed parts and mechanisms, and do not forget to adjust the ignition, since we removed the distributor drive star.
In conclusion, it should be noted that the chain mechanism cannot be repaired, so it needs to be replaced. All gas distribution mechanisms of classic VAZ models are almost the same, and it is possible to replace them in your garage.
Replacing the timing chain on a VAZ 2107 with your own hands
The timing chain is the most important part in a VAZ 2107 car, so it is necessary to carefully monitor its condition. If your car has a mileage of more than 60 thousand km, you should definitely check this part to avoid possible damage in the future. It can break in one moment, which will disable the entire car, which will only be restored by lengthy and expensive repairs. Therefore, if you notice uneven operation of the engine, we recommend diagnosing the chain so that, if necessary, it can be replaced.
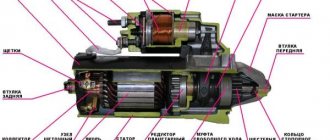
WHAT IS TIMING?
The timing belt is the gas distribution mechanism of the engine, which controls the launch of fuel mixed with air into it and the release of burnt gases. It is based on a mechanism for opening and closing the intake and exhaust valves of cylinders driven by a cam mechanism and a camshaft. That is, the fuel-air mixture ends up in the cylinders thanks to the open intake valves, and, having burned, is removed in the form of gases through the exhaust valves. The camshafts are responsible for the actions of these valves.
To enable them to rotate, a special drive was created, operating using a chain or belt.
Timing belt - timing chain;
Valves – intake valves;
Camshafts - camshafts.
REPLACING THE CHAIN
If the mileage of your VAZ 2107 is high enough, then the chain has probably already stretched naturally, and the pitch between the links has increased. In such a situation, replacing it is simply necessary, and you can do it yourself.
Prepare screwdrivers and wrenches in advance (a special wrench is needed for the crankshaft).
To simplify the work process, we recommend removing the VAZ 2107 radiator grille, the radiator itself (draining the liquid before doing this) and the cylinder head valve cover. Now turn the crankshaft pulley clockwise with a wrench until the mark on the camshaft gear matches its cast on the bearing housing and shaft cover.
After slightly loosening the generator, remove the V-belt, water pump pulley and camshaft chain tensioner. Please note that now it is necessary to engage fourth gear and also put the car on the handbrake. Then slightly unscrew the sprocket mount, after bending its washer.
Unscrew the tensioner shoe nut. Remove it if you need to replace it. Bend the lock washer of the upper sprocket bolt, unscrew it, remove the gear along with the chain, having first removed the limit bolt.
Now completely unscrew the camshaft gear bolt, lift the chain, and remove the sprocket. After lowering the chain all the way, carefully remove it from the teeth.
After this, check again whether the crankshaft gear mark matches the desired mark.
Otherwise, rotate the crankshaft until they align.
Mitos1 › Blog › It's time to start somewhere. Single-row chain for VAZ 2107 injector.
I have long wanted to replace the chain with a single-row one and finally decided to do so. It was scary to climb into the timing belt, but as they say: hunt is better than captivity.
Pros of the single-row: It rustles a little quieter compared to the double-row. Longer service life due to the roller chain. It is easier for the engine to turn the timing belt due to the reduction in the weight of the entire system and the tension principle. My injector, accordingly, the star of the auxiliary mechanisms (pig) is smaller, and the oil pressure is higher.
Cons: Rework of the entire system. Risks of breaking something or not assembling it correctly (straight hands). The chain stretches faster (compensated by the auto-tensioner).
Initially, I’ll say I looked for information in many places, but the most worthy one: www.semerkainfo.ru/odnoryadka
Now to the point: To remake the injection engine you will need:
Chain 21214. Split camshaft star 2123. Crankshaft star 21214. Medium sized auxiliary star 21214. Chain guide 21214. Chain tensioner shoe 21214. 2 lock washers. You can't install old ones! Front cover gasket. Valve cover gasket. The tensioner shoe bolt 2101 in my block has the same thread. (On the old type block, the chain stopper on the crankshaft sprocket has an M8 thread, which corresponds to a bolt from Volga 3102. The pilot chain tensioner is from 2101 or isai (I recommend it). Front engine oil seal.
Disassembly: I removed the battery terminals. I turned off the dpkv and removed it. Removed the belt from the crankshaft pulley. Removed the radiator fan. Removed the valve cover. I installed the pulley according to the mark at TDC! I put the car on the handbrake and in 4th gear! I removed the crankcase protection and anthers. Using a 38 wrench, I unscrewed the crankshaft nut. Removed the crankshaft pulley. I took off the front cover. !I unscrew the crankshaft chain limiter bolt (gas wrench). In general, it should be easy to unscrew, but for some reason at the factory they are tightened tightly, there were cases when the bolt broke (therefore, I decided to start disassembling the entire mechanism with this part)! Without removing the chain and tensioner, flare the lock washers (I used a gas wrench) and loosen the sprockets. We put the car in neutral. I installed the RV and KV pulley according to the mark at TDC! Block and remove the chain tensioner. I'm taking off all the stars. !When removing the crankshaft sprocket, be careful not to lose the key! I compare the position of the camshaft star with the split one (in the middle position) and lo and behold, their marks match one to one! You won’t have to punch :) The marks on the non-cut version from 21214 don’t match!