If you have become the proud owner of a LADA Priora, then from time to time you will have to drive it into the garage and modify something with your own hands. A frequent breakdown is the electric power steering of the Priora, the problem here is the dampness of the structure. Namely, the replacement of an expensive German electrical circuit with a domestic one, which, of course, has been modified, but failures do occur.
Before you start repairing the Priora's electric power steering, you should figure out what's broken. First you need to find out under what conditions the EUR failed. There could be several reasons why it failed:
- after charging the battery;
- when turning the steering wheel at a large angle;
- in car parking mode;
- when driving over 110 km/h.
Battery problems
Based on this, we can draw the first conclusions about the cause of the breakdown. A common cause of malfunction is low voltage in the on-board network. The fact is that for the amplifier to function, a supply voltage of 13.5V is required.
First of all, we test the battery, if everything is fine with it, then we’ll look into it further. The problem may have occurred when you removed the battery for charging. To make the electric booster work again, turn the wheels to the extreme position and back 5-6 times, very often this is enough to resume operation.
Wiring fault
In the case when the battery is in order, we look at the wiring; weather conditions, frost, rain or heat may be associated factors. If the electric power steering on a Priora turns off when weather conditions change, then this is a clear sign of a wiring fault. Check the soldering and insulation of the winding; a short circuit may occur.
The Priora's electric power steering does not work all the time. The maximum load on the electric motor occurs at low or no speed, and the minimum at high speed. So, in the Priora, at a speed of 110 km/h, the electric booster is completely turned off. At the same time, feedback to the steering wheel becomes maximum. Electric power steering "Kalina" turns off already at 60 km/h.
Chip errors
When a situation is observed that the wheels turn on their own, the reason is the electronic filling of the Priora electric power steering control unit. As mentioned above, quality was sacrificed for the sake of economy. Now the situation with this seems to have improved and everything has been finalized, but if suddenly you feel that the steering wheel is starting to move by itself, go for repairs.
If, along with the electric power steering, the speedometer also fails, then you need to look at the speed sensor. It was either simply dirty or broken. The same applies to the torque sensor installed on the amplifier. Clean them well and check their functionality.
Don’t forget to reset errors on the on-board computer; this can be done in several ways.
- Remove the terminal from the battery, wait a few seconds and put it back, the error should go away.
- Using a computer, the corresponding software can be found on the Internet.
Fuse box location
If you suspect that a fuse has blown and you want to check it, then the question arises: where is the Priora electric power steering fuse located? The control mounting block is located to the left of the steering wheel. Its opening scheme is simple. All you need to do is turn the three latches 90˚ and remove the cover, as shown in the photo, and you get to the brain stuffing of the car.
Here you can check and replace the failed fuse, then close the lid by pressing it tightly and snapping the three latches back 90˚ in the opposite direction.
Bottom line
You can carry out diagnostics and minor repairs to the Priora's electric power steering with your own hands. To do this, it is enough to determine what caused the failure and fix the problem, following our advice. It is better to entrust a complete replacement of the electric amplifier to professionals.
Most Lada Priora cars were equipped with electric power steering from the factory, produced by Avtoelektronika Kaluga. It is these EURs that are considered quite reliable and rarely fail. For comparison, problems with amplifiers produced in Makhachkala are much more common.
If for any reason you need to replace the EUR or simply remove it from the car, you can perform this repair yourself. For this procedure we will need a tool such as:
- 8 and 13 mm head - preferably deep
- ratchet or wrench
- extension
- hammer
- chisel
Priora, EUR, where to dig?
Priora, EUR, where to dig?
Slavec » 02 Jun 2021, 17:41
Re: Priora, EUR, where to dig?
dmiha.73 » 03 Jun 2021, 02:24
Re: Priora, EUR, where to dig?
meidger72 » 03 Jun 2021, 03:16
Re: Priora, EUR, where to dig?
Slavec » 03 Jun 2021, 19:16
Re: Priora, EUR, where to dig?
dok2607 » 04 Jun 2021, 22:59
Re: Priora, EUR, where to dig?
Slavec » 05 Jun 2021, 03:10
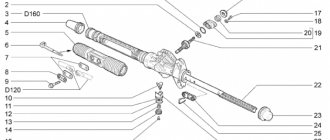
How to remove the EUR on a Priora with your own hands
In fact, the electric power steering can be removed without any problems, you just have to remove quite a lot of parts first. Namely, you will need to do the following:
After that, using an 8 mm socket and a ratchet, unscrew and remove the contact group.
We remove it from the shaft completely so that it does not interfere.
Now you need to disconnect all the power wires from the power steering control unit, which are clearly shown in the photo below.
Each of the plugs has its own lock, so be sure to first look at the design of the lock so as not to damage it when removing it. When you have dealt with the wires, you need to unscrew the coupling bolt at the fastening of the driveshaft with the steering rack.
Using a chisel and a hammer, we slightly expand the coupling “collar” of the cardan shaft. Then you can begin to unscrew the nuts securing the EUR to the body. Two nuts are located at the front.
And two from the bottom.
Of course, when unscrewing the last fastening nuts, it is necessary to hold the EUR so that it does not fall. Next, we pull it off the steering rack shaft and remove it completely. If necessary, we replace it with a new one. This mechanism is installed in the reverse order and we connect all the necessary wires to their places.
Replacing the EUR
So, you need to replace the electric booster on the Priora or simply check the condition of its contacts. In any case, repair involves complete removal of the unit. Prepare the necessary tools:
- Chisel and hammer.
- Deep head for 8 and 13.
- Extension and ratchet, alternatively you can use a wrench.
It’s quite easy to remove the amplifier itself with your own hands, but in order to get to its mounts and the control unit, you will need to remove many parts of the dashboard: the steering wheel along with the airbag, the casing and the ignition switch. Once these components are removed, repairs to the amplifier can begin.
Step-by-step instruction
- We take the “eighth” head, put on the ratchet and remove the contact group, as shown in the photo below;
Now you can study the contacts in detail and, if necessary, make repairs. If you know that the main components (control unit, motor) have failed, then you need to replace them. Installation of a new device occurs in the reverse order. The DIY repair is complete.
Modern cars are significantly different from their relatives produced in the last century. They are now filled with a large number of electronic sensors and other devices that facilitate the process of driving a vehicle, help save fuel and increase the safety of both the driver and passengers.
The steering wheel has not bypassed the progress - now the car owner can keep the car on course with just a few fingers. What contributes to this? Availability of electric power steering.
However, this device (abbreviated as EUR) sometimes breaks down.
In this article we will tell you how the electric power steering works on the Lada Priora, and also describe the most common malfunctions.
Price for the new EUR Priora
Recently, prices for electric amplifiers have risen so much that not everyone can afford even a used option. For example, a new EUR produced by Kaluga on Priora can be purchased at a price of 23,0000 rubles, while a few years ago the price was half as much.
As for used options, used EURs are sold at scrapyards for 10 to 12 thousand rubles.
On the Lada Priora, a device such as electric power steering is offered as a standard feature as a comfort feature. It is this device that we will talk about in this article. We invite you to find out what malfunctions the car owner of this car may encounter and how to replace the unit yourself.
Advantages and disadvantages of amplifiers
The design of the steering system on the Lada
The advantage of the hydraulic booster is the complete transmission of the influence of the road surface from the wheels to the steering wheel, which provides good feedback. The disadvantages of power steering include the fact that it absorbs part of the engine power, which is why you have to constantly monitor the fluid level in the power steering reservoir and the condition of the pipelines.
The electric amplifier does not have these shortcomings, moreover, it is somewhat easier to operate and repair, and it also affects power to a lesser extent. But it also has its drawback. It affects the fact that the transmission of impact from the wheels occurs to a much lesser extent, so the feedback is less, which affects the so-called “feeling of the road.” The absence of this feeling, especially in winter, can lead to an incorrect assessment of the situation while driving.
Lada Priora can be equipped with both a hydraulic booster and an electric booster. Many car enthusiasts increasingly prefer cars with EPS, although it would be more accurate to call it EMUR - electromechanical power steering.
The role of the electric power steering in the steering of the VAZ 2170 Priora
It's no secret that the electric control method plays an important role in ensuring safety while driving. EUR or power steering of Priora performs the option of reducing the level of load on the steering wheel while turning it. The key advantage of using such an EUR device on the Priora is comfort when moving as a result of improved feedback between the steering wheel and wheels.
The electric amplifier is a more modern and improved unit, which is not only easier to use, but also does not require the introduction of additional highways to ensure operation. In addition, this device does not take power from the power unit. The main advantage of the EUR is that it does not require frequent maintenance and fluid monitoring, unlike power steering.
But it should be noted that such a system has several disadvantages, one of them is rather weak feedback between the road surface and the control system. As a result, it may become difficult to drive in snow. Unlike Prior, foreign cars are equipped with additional mechanisms and units for blocking and stabilization, so the method of controlling the electric power steering in the domestic version is less reliable. In addition, in practice, a faulty electric booster with poor traction is a fairly common occurrence.
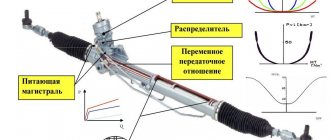
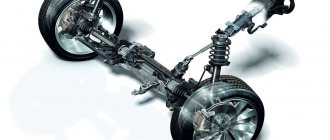
Electric power steering Lada Priora: power steering device and operating principle
So, electric power steering provides the necessary ease when turning the steering wheel at a standstill or in motion. The mechanism creates a force that is transmitted to the steering system.
At the same time, unlike the power steering, the power steering amplifier does not take away engine power, does not require a complex system for pumping hydraulic fluid under high pressure, is less noisy, does not leak, and theoretically should be more reliable.
For this reason, at first VAZ installed power steering on some models, but then they began installing electric power steering on Priora, Kalina, etc. However, in fact, the power steering is also not without its drawbacks; this unit breaks down, and in some cases more often and earlier than the power steering.
Let's start with the EUR device. The main components of electric power steering can be divided into three groups:
- Mechanics;
- electrician;
- control electronics;
The mechanics actually represent the steering elements (for example, input and output shaft, etc.). Electrics involves an electric amplifier motor, leads, terminals, contacts. The electronics includes an EUR control unit (EUR ECU), a group of EUR sensors, and connectors. Taken together, the Priora steering rack with electric power steering is designed so that the electric motor can create force. At the same time, the “weakest” part is considered to be the electronics, and not the mechanical part.
As for the operating principle of the EUR, it is quite simple. When the driver turns the steering wheel, sensors record the rotation of the steering shaft, after which the electric motor is connected, which creates the necessary additional force. It would seem that the solution is simple and reliable, but this is not entirely true.
Common faults and solutions
Many prior drivers encounter device breakdowns, in particular, we are talking about a malfunction of the control unit. If the system control unit does not work correctly or is faulty, a corresponding error will appear on the on-board computer display. Having deciphered it, you can understand that the computer reports a failure of the EUR connection, which in most cases indicates the presence of problems in soldering. In particular, we are talking about the connection point between the amplifier board and the controller.
This malfunction can be solved either by replacing the system at the dealer, if the car is under warranty, or by repair. If you do not have experience in chip tuning or working with electronic devices, then solving such a malfunction should be entrusted to professionals. Of course, in order to accurately make a “diagnosis”, you will need to conduct computer diagnostics.
It often happens that the speed sensor malfunctions, which again contributes to the appearance of an error on the on-board computer. This type of malfunction can be solved by reprogramming the device or replacing the wires in the places where the regulator connects to the controller. If the regulator itself is not working, then it will have to be replaced (the author of the video is Alexey a-skorp).
Too low a voltage level in the car's on-board network is also a common problem. In this case, it is necessary first of all to pay attention to diagnosing the generator device or wiring. Use a tester to check. In any case, if problems are detected in the operation of the system, it is necessary to repair the steering rack yourself. Operating a car with a non-functional ESD is not allowed until the problem is completely eliminated.
How to determine mechanical damage to the EUR and steering mechanisms?
Mechanical diagnostics are carried out if it is not normal, but the on-board computer does not generate errors. To check for mechanical damage, you need to turn the steering wheel left and right as much as possible, while the engine must be running. It should be noted that when turning the steering wheel, the vehicle must remain in one place.
If you notice that when turning the steering wheel you need to apply more force than usual, this may indicate a failure of parts or components of the amplifier. But this may also indicate a breakdown of other elements of the steering system (a video about diagnosing power steering using a paper clip is presented below, the author of the video is Gosha Vakhromeev).
To accurately identify what caused the problem, you will need to conduct a more thorough diagnosis. To do this, the vehicle first needs to be driven onto a lift and raised, while carefully checking all the elements of the chassis for operability. Racks, tie rods, etc. must be checked. This procedure can be carried out without any problems at any service station or on your own, but only if you have a lift and certain diagnostic skills. There is a possibility that repair of the EUR is not required, since it itself is operational, but repair of other elements is required.
To prevent the occurrence of malfunctions associated with the electric amplifier, it is necessary to clean the system, as well as contact nodes, from time to time. To carry out service yourself, you will need to remove your EUR, completely disassemble it, clean it and put it back. We will tell you more about this below.
Popular steering rack lubricants
Domestic car enthusiasts mainly use the above-mentioned lithium lubricants. Based on reviews found on the Internet, a rating of popular lubricants for steering racks was compiled. The list is not commercial in nature and does not advertise any lubricant. If you have valid criticism, write about it in the comments.
"Litol 24"
Universal lubricant "Litol 24" is an anti-friction, multi-purpose, water-resistant lubricant used in friction units. It is made on the basis of mineral oils and with the addition of lithium. It has an optimal operating temperature range - from -40°C to +120°C. The color of "Litol 24" may vary depending on the manufacturer - from light yellow to brown. Meets almost all of the above requirements for steering rack lubricants - high anti-corrosion properties, no water in its composition, high chemical, mechanical and colloidal stability. It is Litol 24 lubricant that is recommended for the steering rack of domestic cars. In addition, Litol 24 can be used in many other systems and mechanisms of a car, as well as when performing repairs at home. Therefore, it is definitely recommended for purchase by all car owners. The only thing you need to pay attention to when purchasing is its compliance with GOST.
Please note that Litol 24 727 does not conduct electricity, so it can be used to process steering racks equipped with electric power steering.
1
"Fiol-1"
Fiol-1 grease is an analogue of Litol, but is a softer lithium grease. It is also universal and multifunctional. Many craftsmen recommend using it in a rack without power steering or for electric steering racks. Its operating temperature range is from -40°C to +120°C.
Fiol-1 can be used for friction units lubricated through grease nipples, in flexible shafts or control cables with a sheath of up to 5 mm in diameter, for processing low-power gearboxes, lightly loaded small-sized bearings. It is officially believed that in many lubrication units “Fiol-1” and “Litol 24” can be mutually replaced (but not in all, this needs to be further clarified).
In general, Fiol-1 is an excellent inexpensive solution for lubricating the steering rack, especially for inexpensive budget-class cars. Numerous reviews say exactly this.
2
Molykote EM-30L
Many greases are sold under the Molikot brand, but one of the most popular for lubricating the steering rack is a new product called Molykote EM-30L. This is a synthetic frost- and heat-resistant grease for high loads based on lithium soap. Temperature range - from -45°С to +150°С. Can be used in plain bearings, sheathed control cables, slide guides, seals, enclosed gears. Safe for rubber and plastic parts, does not contain lead, is resistant to washing off with water, increases the wear resistance of the material.
Molykote EM-30L 4061854 is recommended for lubricating the steering rack worm, in particular, those equipped with an electric power steering. The only drawback of this lubricant is its high price compared to budget analogues. Accordingly, it makes sense to use it only if the car owner managed to, as they say, “get” it, and not buy it.
3
EFELE MG-213
EFELE MG-213 4627117291020 is a universal heat-resistant grease based on a lithium complex containing extreme pressure additives. Excellent for use in mechanisms operating under high temperatures and high loads. Thus, the operating temperature range of the lubricant is from -30°C to +160°C. It is stuffed into rolling and sliding bearings and other components where metal-to-metal surfaces operate. It has excellent anti-corrosion properties, is resistant to being washed off by water, and increases the service life of the part.
In general, the lubricant has proven itself well when used in the steering rack. However, as in the previous version, it makes no sense to specifically buy it for bookmarking, but you can only use it if there is such an opportunity. The price of this lubricant is above the market average.
4
Liqui Moly Thermoflex Spezialfett
Liqui Moly Thermoflex Spezialfett 3352 is a NLGI Class 2 grease. It can be used in the operation of bearings and gearboxes, including highly loaded ones. It is highly resistant to moisture and foreign chemical elements. Safe for rubber, plastic and composite materials. Features a high service life. Temperature range of use from -50°С to +140°С.
Liquid Moly universal lubricant can be used on all steering racks - with power steering, with electric power steering, as well as on racks without power steering. Considering its versatility and high performance properties, it is definitely recommended for use not only in the steering system of a car, but also for repair work on other elements, including in everyday life. The only drawback of Liqui Moly brand products is their high price.
5
The means listed above are the most popular, including due to their relatively low cost.
You can also separately recommend StepUp SP1629 lubricant. This is a universal heat-resistant synthetic lubricant with molybdenum disulfide, made from synthetic oil thickened with a calcium complex. The lubricant contains metal conditioner SMT2, which provides the product with very high extreme pressure, anti-corrosion and anti-wear properties. It has a wide temperature range - from -40°C to +275°C. The only drawback of Step Up lubricant is the high price, in particular, for a jar of 453 grams, stores are asking approximately 600 Russian rubles as of the summer of 2021.
A couple more good domestic and proven options are “Ciatim-201” and “Severol-1”. "Ciatim-201" is an inexpensive lithium anti-friction multi-purpose lubricant with a wide temperature range (from –60°C to +90°C). Similarly, Severol-1 is a lithium grease very similar in composition to Litol-24. Contains antioxidant and antifriction additives. Well suited for use in northern latitudes.
Many car enthusiasts put grease for angular velocity joints in the steering rack - “CV joint-4”. It also has the properties listed above - high adhesion, antioxidant properties, low volatility, protective properties. Temperature operating range - -40°C to +120°C. However, it is better to use such a lubricant only if it is, as they say, at hand. Otherwise, it is better to use the lithium lubricants listed above.
Removing and installing EUR at home
In order to remove the device from the car, you will need to prepare in advance everything that may be useful to you in the process. In particular, we are talking about flat-head and Phillips-head screwdrivers, as well as a set of socket wrenches.
So, how does the procedure for removing and installing the electric amplifier take place:
- First of all, you need to turn off the power to the on-board network; to do this, disconnect the negative terminal from the battery. Then dismantle the steering wheel by first removing the plastic cover under it and on the control panel. The steering wheel is dismantled in accordance with the service book for the car.
- Using a Phillips screwdriver, you need to unscrew the four bolts that secure the decorative trim on the steering panel.
- Having done this, you will be able to see the wiring pads - they need to be disconnected from the steering column switch, and the slip ring is also disconnected.
- Using a size 8 wrench, you need to unscrew the screw that secures the wire blocks that run from the ignition switch.
- Next, you need to press on the plastic fixing elements and disconnect the pads with wires at the top and bottom of the column itself.
- In the place where the electric power steering wheel is attached to the column itself, you will need to dismantle the so-called plastic curtain; to do this, disconnect the clamps.
- Using a socket wrench, you need to slightly loosen the nuts that secure the assembly to the bottom of the column.
After completing these steps, the amplifier itself is removed - it is dismantled along with the intermediate shaft. But in order to make it more convenient for you to clean the assembly and then perform the installation in reverse order, it is advisable to disconnect these components from each other in advance. To do this, use a 13mm wrench to unscrew the screw securing the universal joints to the shaft itself. Then you will need to unscrew the two fixing nuts at the ends, after which the steering column itself can be removed.
Then you will need to remove the screw and remove the cardan from the splined pulley of the unit. To make the reinstallation procedure more convenient after removal, it is advisable to make sure that all marks match. We are talking about marks on the protective cover, pulley, and also the starter cover. Cleaning the contact group mechanism and other elements of the system must be done carefully so that all components remain intact and undamaged. If you turn to specialists for help in this matter, the cleaning procedure will cost you on average about 30-50 dollars, depending on the region.
In VAZ Priora cars, the electric power steering performs the function of making the vehicle easier to control. With the help of the ESD, the driver can easily turn the steering wheel with one hand. What malfunctions are typical for the amplifier and how to replace the EUR in a garage - we will talk about this below.
Possible malfunctions: signs and causes
In what cases is the steering rack, power steering and power steering disassembled and repaired, what is the diagram, what functions does the torque sensor perform?
First, let's look at the main malfunctions of the system, why it does not work and how to fix them:
- Incorrect operation or breakdown of the control unit is one of the most difficult reasons for the inoperability of the EUR and power steering in the Lada Priora. If such a problem occurs, a corresponding error message will appear on the on-board computer screen. If you decipher it, you will find out that the computer has detected that the control module is inoperable. Such problems are usually associated with soldering problems. Most likely, the reason is a lack of connection or poor contact between the amplifier circuit and the controller. Such a malfunction can be solved by repair, that is, re-soldering, or replacement if we are talking about a car under warranty. You can find out more accurately about problems by conducting computer diagnostics.
- Failure of the speed controller. If the speed sensor breaks down, the electric booster turns off spontaneously or does not work at all, and an error message about inoperability will appear on the computer display. In this case, you can try to reconfigure the device or change damaged sections of the electrical circuit at the junction of the sensor and the control unit. Sometimes the reason lies in poor contact of the sensor with the on-board network, then the connector will simply need to be corrected. If the malfunction is associated with a non-functioning sensor, the device must be removed and replaced.
- The steering wheel turns with great difficulty. First of all, the reason should be sought in the lack of lubrication. If there is little oil in the system, the steering wheel will be difficult to turn, and uncharacteristic noise or creaking may be heard during rotation. Check the lubricant level and add oil if necessary.
- Prolonged operation of the electric booster without lubrication can lead to pump failure. The malfunction is accompanied by sounds uncharacteristic of the operation of the EUR, as well as difficult rotation of the steering wheel. If the pump can be repaired, then you can consider yourself lucky, but if it can’t, then the device will have to be replaced.
- Malfunctions in the operation of the electric amplifier can also be caused by reduced voltage in the machine's electrical network. If the voltage in the on-board network really jumps, then you should initially check the generator and the electrical circuit for its connection. For diagnostics, it is recommended to use a multimeter or voltmeter (video author - Alexander Loginov).
Installation and arrangement of electric power steering for Lada Priora
The content of the article:
1. Electric power steering for Lada Priora
2. Installation of EUR on Priora
Electric power steering for Lada Priora
Many questions arise about power steering and electric power steering. But it turns out there is also an EGUR
.
Electric power steering (EGUR).
Electro-hydraulic power steering systems
, sometimes abbreviated as
EPS
, and also sometimes called "hybrid" systems, use the same auxiliary hydraulic technology as a standard system, but their hydraulic pressure is provided by a pump driven by an electric motor, instead of a belt drive from the engine.
The belt is removed, and the pump drive rotates the electric motor, which is controlled by the controller.
Electrohydraulic systems can be found in some Ford, Volkswagen, Audi, Peugeot, Citroen, Skoda, Suzuki, Opel, MINI, Toyota, Honda, and Mazda vehicles.
Electro-hydraulic power steering operates depending on the speed of rotation of the steering wheel and vehicle speed. The power steering pump unit consists of a gear pump and an electric motor.
Instead of a vane pump (in conventional power steering), the electrohydraulic power steering pump unit uses a gear pump. This pump is driven not by the car engine, but by an electric motor built into the pump unit. The electric motor operates only when the ignition is on and the car engine is running.
Typically a pumping unit
made in the form of a single block. The pump unit bracket is bolted to the side member between the front bumper and the wheel well. The pump unit is suspended from the bracket by means of elastic rubber elements.
Electronic amplifier control unit
For the pump to operate, the following signals are required: 1. Vehicle engine speed. 2. Vehicle speed. 3. Steering wheel rotation speed. Basic functions The unit controls the gear pump drive depending on the steering wheel speed and vehicle speed. Additional functions Protection of the power steering from overheating. Protection against restarting in case of malfunction. On-board diagnostics The control unit recognizes faults that arise during operation and registers them in ROM.
If you enter a quick search, then the owners suffer with it: Ford Focus 2, Peugeot 307, Skoda Fabia, Opel Vectra and Astra, Skoda Roomster.
Installing EUR on Priora
I’ll say right away that first of all it’s better to disconnect the battery and the steering wheel with cushion, and it’s better to remove it together with the steering column switches (more precisely, with what the switches are held on).
It’s difficult to find an EUR, a new one is expensive, and they don’t hang on Avito for a long time. There was an EUR for sale not far from me; it cost 7500 including the driveshaft. I had to buy the wires separately; they cost 1300.
Installation is simple: remove the steering column, driveshaft, and spacer. A spacer is needed for a steering column without an EUR. You can install the EUR and a new cardan. For other VAZ models, an adapter plate is required, as far as I know. But I think it’s not difficult to make if you have the material. There are two connectors in the EUR block. The first one is with thick “plus” and “minus”. The second is for sensors and diagnostics. “Plus” goes directly to the battery, minus - it can go to the battery, or it can go to ground (body).
We remove the dashboard and connect the speed sensor, tachometer and warning lamp to the necessary wires. You also need to connect one wire to the ignition, and the black one to ground. There are diagrams on the internet. But the colors there may not match the colors on the purchased wires, this happened to me. I found the wiring and connection more difficult than the installation itself.
https://www.drive2.ru/l/17211, https://www.drive2.ru/l/7983311/16/
next article:
Adjusting the uneven steering wheel position in Lada Priora
The steering rack was repaired. After installing the rack back, to get the bolt into the steering wheel mounting slots
Rating 0.00 [0 Vote(s)]
Methods for determining mechanical damage to electric power steering and steering mechanisms
Mechanical damage is checked only when the EUR as a whole is not functioning correctly, but there are no errors on the on-board computer display. To diagnose mechanical breakdowns, turn the steering wheel in different directions until it stops while the engine is running. Of course, the car must be in one place. If you have to exert significantly more force than usual when turning the steering wheel, this indicates a malfunction in the system and a breakdown of one of the components. The same problem may indicate a failure of other components of the steering system.
To more accurately identify problems, a thorough performance check should be carried out. You will need to drive your Lada Priora onto an overpass, pit or lift, and then carefully diagnose all components of the chassis. It is necessary to check the racks, steering rods and other components, since there is a possibility that the amplifier itself is working, and the signs of malfunction are associated with other problems. To service an electric amplifier at home, you will have to completely disassemble the system, clean its components and put it back together.
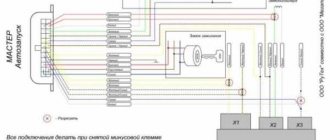
Pinout diagram and designations of EUR contacts
Methods for determining EUR malfunction
Well, of course, the first sign of a breakdown in the system is the activation of the ECU warning light on the instrument panel. Usually on a standard one, this is an icon in the shape of a steering wheel with an exclamation mark. When you turn on the ignition, it lights up for a few seconds, and then, if the computer decides that everything is in order, the light goes out. And accordingly, when a breakdown of the Priora’s electric amplifier is detected, it lights up and remains on.
So, carry out computer diagnostics, contact the ECU, get error codes with or without decoding. Even if the scanner only produces codes, it’s not scary. You can just know that faults associated with the Priora ESD begin with the symbol “C”. For example, C1013, means that the voltage in the network is low, and this is not enough for the electric amplifier.
Well, there may be several options. The most common case is the weakening or burning of one of the two power wires going to the EUR. These are red and black wires, large cross-section, included in a separate connector on the device. They are quite easy to check. It could also be a large fuse for the device, everything is clear here. Well, the third reason is a deficiency in the car’s network, for example, a weak or faulty battery or generator. In case of such a malfunction, contact a specialist, and nothing else. To an auto electrician.
“Folk” method of checking a malfunction, or “control”
Well, if the indicator does not light up, and there are doubts about the serviceability or malfunctions of the Priora ESD, or after repairs you need to do a “check,” proceed as follows: you need to turn the steering wheel without turning on the ignition. Remember the effort. And repeat the operation by starting the engine. If there are no changes, something happened to the Priora EUR!
What malfunctions exist in the Priora electric booster?
And again the same list, mechanics, electrical, electronics. Well, everything is clear with mechanics, this is a failure of shafts, connections and fittings. With this malfunction, the wheels simply will not respond to the steering wheel turning. And this problem is easiest to fix. But with other faults it is much more complicated. If the malfunctions are related to the failure of the servomotor, amplifier, or Priora itself, there is no point in thinking about repairs. It’s easier to buy a new EUR at the store and replace it yourself. Or take it to a service center and try to repair it there. If the connection with the Priora ESD ECU is lost, then this is most likely the second connector, with a trail of wires, the same is true if the unit does not receive a signal from external sensors - the crankshaft and camshaft. Yes, yes, they are also important for the operation of the device. In these cases, an inexpensive bundle of wires can be removed and repaired, or replaced.
Self-removal and installation of the amplifier
You can do the procedure for dismantling and installing a new electric amplifier yourself, but for this you will need to prepare all the tools. To complete the job, you will need two screwdrivers - one with a flat head and the other with a Phillips head. You will also need a set of socket wrenches.
How to complete the DIY removal and installation task:
- Before performing work, you will need to turn off the power to the on-board network of your Priora. To do this, turn off the ignition, then open the hood and disconnect the battery from power. After this, you will need to remove the steering wheel, but first remove the plastic trim located under the steering wheel and under the dashboard. The casing is attached to several bolts; they must be unscrewed and set aside. Removing the steering wheel is carried out taking into account the recommendations described in the service manual.
- When the trim is removed along with the steering wheel, you will see the connectors of the steering column switches to which the wires are connected. These plugs will need to be disconnected. The contact ring must also be dismantled.
- Using a 8-mm wrench, you will need to unscrew the bolt that secures the connector with the wires from the ignition switch. Set the bolt aside so you don't lose it.
- Once these steps are completed, press down on the plastic fasteners and disconnect the wiring connectors at the top and bottom of the steering column.
- Having done this, you will see a plastic curtain in the place where the electric amplifier is fixed directly to the speaker. You will need to remove it, which will also require you to remove the fasteners.
- Using a socket wrench, you will need to slightly loosen the nuts that secure the amplifier to the bottom of the speaker. Just loosen it, not twist it. When the nuts are loosened, you need to remove the electric amplifier from its seat; its removal is carried out with the intermediate shaft. But we recommend that you still disconnect the amplifier from the shaft; this will allow you to quickly clean the EUR and simplify the installation procedure. To disconnect the shaft, you will need to unscrew the screw that secures the universal joint to the shaft using a 13mm wrench. Having done this, you will also need to unscrew the two nuts located on the end parts, after which the entire steering column must be removed.
- Then you will need to remove the bolt and cardan from the splined pulley of the mechanism. In this case, pay attention to the labels - during further installation they must match in any case. The marks are located on the protective cover, pulley and starter mechanism cover. Now you can clean the electric booster and other system components or replace the failed EUR with a new one. The assembly procedure is carried out in reverse order.
Photo gallery “Removing the EUR”
Thematic materials:
What tires are suitable for the UAZ Bukhanka Standard UAZ Bukhanka tires The main parameters of wheels for a Hyundai Creta car What is the wheel offset for the Hyundai Gretta Decoding of symbols and abbreviations Cordiant Snow Cross is the best budget studded tire Lamels as a factor that increases traction What kind of tires are on the Mazda CX 5 Diesel land cruiser 100 Toyota land cruiser 100 new How to correctly convert inch wheel size to millimeters
103583
If you notice an error, select a piece of text and press Ctrl+Enter
Frequent electric power steering malfunctions and repairs
Once you are convinced that the ESD does not work fully or partially, you must stop using the vehicle. Next, you should check and try to more accurately determine and localize the fault. There are many possible reasons for this.
The total cost of repairs will also depend on the nature of the damage. In some cases, a new steering rack on a Priora is needed, while in others it is enough to inspect the connectors or contacts.
Please note that it happens that on the Priora model the steering rack is out of order (for example, it bites). At the same time, the electric power steering in this case is not a problem, since the Priora rack relates not to the amplifier, but to the steering. In fact, when turning the steering wheel, malfunctions may occur, the force increases, but the EUR itself works normally and the problem is in the mechanical parts of the rack itself.
Let us also add that usually in terms of mechanics, failure of shafts, connections and other elements may occur. Electrically, cases of failure of the Priora power steering servomotor are not uncommon. In this case, it is better to abandon attempts to repair it and immediately buy a new EUR.
There is also a situation when the EUR unit cannot communicate with the vehicle's ECU. In this case, connector 2 with a cable of wires often fails. Also, the signal may not reach the unit from external sensors DPKV and DPRV, and this problem has a direct impact on the EUR.
In parallel, in the list of problems it is worth highlighting problems with the electric booster unit itself, as well as shaft position sensors. It is better to change the sensors immediately; it is also recommended to replace the control unit. If you have the tools, you can change many components of the electric power steering with your own hands in a regular garage.
How to replace electric power steering on a Priora
Often, owners buy an EUR for a Priora and change the faulty elements of the amplifier themselves. At the same time, the Priora steering rack with electric steering is not in the most accessible place, however, all the work can be done with your own hands, since, unlike the power steering, you do not have to work with the rack itself.
- To replace the EUR on a Priora, you must have a socket wrench 8, a head with a wrench, or a socket wrench 13. You will also need a cross-head screwdriver. You will also need separate tools to remove the steering wheel itself. It is advisable to have a puller or separately study the material on how to remove the steering wheel on a Priora.
- So, when the steering wheel is removed, you need to disconnect the battery (if this was not done while removing the steering wheel).
It is enough to remove the “+” terminal from the battery. Next, remove the plastic covers from the steering column (unscrew a couple of screws and unclip a couple of clips). We also recommend reading the article about what kind of oil to fill in the power steering. From this article you will learn how to select power steering oil, what oil should be poured into the power steering, and also how to select power steering fluid. - Then use a screwdriver to unscrew the 4 bolts and remove the lower part of the trim.
Then you will need to remove the lock, as well as the wiper and turn signal switches. First you need to disconnect the wiring from these elements, then you will need to loosen the fixing clamp with a size 8 key and remove the elements from the shaft casing. The next step is to disconnect the connectors from the ESD ECU and remove the plastic cover from the stud. The lower nuts should not be completely unscrewed (it is enough to loosen them with wrench 13). As for the coupling bolt of the intermediate shaft hinges, its nut should be completely unscrewed with a 13mm wrench and the bolt should be pulled out. - Having removed all the fasteners, the EUR can be removed by disconnecting the lower shaft from the splined joint using a 13mm wrench. Then you can remove the EUR, perform repair work or replace individual components. Once completed, assembly is carried out in reverse order.