Causes of stove malfunction
There are as many reasons for stove malfunctions as there are drivers. The forums are full of requests for help: first one reason, then another, then a third. As a result, there is no consensus on how to eliminate similar faults.
This article is devoted to only a few, the most important problems of repairing your favorite iron horse with your own hands. Don't judge harshly if you didn't find a solution here that would help you.
You should not forget that you are just a car enthusiast, and not a professional master from a large service center that services equally cool cars. You shouldn’t consider yourself a woodpecker or complain that your hands are growing from the wrong place, you just need to start small.
This video shows how to repair a VAZ stove, and you can decide for yourself whether this adjustment method is right for you:
Some car owners solved the problem immediately. Suitable for the case when warm air blows directly in the center or on the legs, and only a stream of cold or slightly warm air flows on the sides or on the windshield.
For winter, such a malfunction is simply a disaster: you suffer so much that it doesn’t seem like much. After watching this video and adjusting the heater, you can at least temporarily make sure that hot air hits the windshield. The cabin will also become warmer. But don’t overdo it: there is an unpleasant trick: with “headless efforts” you can break off the plastic to which the cable is attached.
You can move the damper to the “hot” position: just secure it tightly, covering it with a sealed mass. In this case, send the ill-fated drive cable to the place where your spare parts are stored. You will feel the positive effect immediately, although the positive temperature of the cabin is now regulated exclusively by the “stove” tap.
The heat will increase so much that you can forget about earflaps and sheepskin coats: you, as a driver, will feel comfortable behind the wheel even in forty-degree frost. The cold air is now tightly sealed and has nowhere to penetrate. But the air on the right will still be somewhat colder. Depends on the deformation of the flap during operation of the car: on the opposite side of the cable, the lid will no longer close tightly.
Video “Reconstruction of the VAZ heating system”
This video explains how to make the cabin warmer and therefore more comfortable (the author of the video is Alex ZW).
The stove installed on the VAZ-2114 copes with its functions relatively well. But she has weaknesses. One of them is dampers. In a car, the position of the dampers is adjusted by three cables. Over time, they lose their properties, stretch or loosen their tension. If the heating system is not adjusted, then hot air will only flow through the central air ducts. And the passenger and windshield will remain without heat and heating. In this case, it is important to figure out how to close the heater dampers on a VAZ-2114 and adjust them.
Step-by-step replacement of the VAZ-2114 stove
For those for whom this method is not suitable, you can completely remove the stove and adjust it. This is done in stages.
Before you remove the heater (1), do not forget to disconnect the ground wire, otherwise the battery will play a trick on you. At the same time, drain the coolant from the system.
Now remove the instrument panel, as well as the floor tunnel lining. Now carefully disconnect the air duct (under No. 19) to heat the interior.
Start a new round of work:
Carry out the same manipulations with the electrical wires from the resistor (No. 18), the electric motor (No. 2) of the fan, the inlet (No. 12) and outlet (No. 13) faucet hoses.
- Sequentially unscrew the 2 nuts securing the faucet directly to the front panel.
- Remove the seal from the faucet pipes.
- It's time to unscrew the 4 nuts securing the stove to the body.
- You can easily remove the heater of your vase with control assembly.
- Once you finish the adjustment process, carry out the installation in strict reverse order.
How to replace the radiator of a VAZ 2114 stove
In this section you will learn how to replace a stove radiator yourself. Start by draining the coolant that is in the system. After you have completed this work, you can remove the instrument panel. Now let's go through the points:
- In your cabin, directly under the instrument panel, disconnect the pair of hoses that go to the heater tap pipes.
- To perform these manipulations without problems, loosen the clamps.
- Do the same steps in the space under the hood: disconnect the hoses from the valve nozzles themselves, unscrew the nuts that secure the radiator, remove the valve from the shield.
- Remove the faucet rod holder.
- Disconnect the rod from the lever.
- Go to the interior, remove the cover from the gear shift knob.
- Remove the plastic trim: it is located under the brake (manual).
- Unscrew and remove the floor trim (rear): it is located between the seats. For convenience, slide it back.
- Disconnect the air vent (cabin) from the heater body and remove it.
- Disconnect the connector from the motor and resistor.
- To the right and left of the heater, unscrew 2 pairs of nuts.
- Remove the radiator with the control panel.
- Make a replacement.
- Start the assembly process in reverse order.
In addition to what has been said, you can watch a video with the repair of the radiator frame, also more about the stove radiator and its replacement here and here
and one more small story:
REPLACEMENT
Replacing the radiator of a VAZ 2115 (VAZ 2113) heater is no different from replacing it on a 2114 model, so this work is performed in the same way for the listed brands. To carry out the work you will need the following tools:
- Various screwdrivers (phillips, slotted, different lengths and sizes);
- Set of combination keys;
- Skillful hands and maximum patience and accuracy.
You need to prepare a container to drain the coolant. Instead of screwdrivers, it will be convenient to use a screwdriver.
If you need to remove the entire stove, then the instrument panel is completely removed. To remove the heater radiator, the panel is disassembled partially, halfway. Such repairs are not very easy to carry out, but you can still do it yourself without any special plumbing skills. You just need to do everything carefully and slowly. So, what is needed to remove the heater radiator on a VAZ 2114:
Don't forget to drain the coolant first.
- Drain the coolant. First, remove the expansion tank cap and drain the antifreeze from the main radiator, then unscrew the cap in the cylinder block and drain the liquid from the block.
- Remove the car radio in the cabin.
- Remove the plug, then unscrew the screws of the instrument cluster mounting frame (four screws in total - two on top and two on bottom). The instrument panel cannot be removed.
- Remove all sliders and knobs from the stove control unit.
- Remove the steering column cover (fastenings at the top and bottom).
- Remove the cover of the diagnostic connector (located under the cigarette lighter), unscrew the screws securing the connector itself.
- Disconnect the cigarette lighter connector.
- Next, you should disconnect all the plugs that are located on the center console. It is better to mark them so as not to confuse them later during assembly.
- We take out the signaling unit by unscrewing two screws. Now the central frame of the instrument panel is free, you can dismantle it. Now it’s also convenient to get to the cigarette lighter illumination plug; we disconnect it too.
- The glove compartment is held on by 6 screws. We remove the glove compartment.
- There are fasteners on the sides of the instrument panel (one screw on the top and one on the bottom). We turn them away.
- We unscrew the bolts of the bracket securing the engine control unit and from below the bolts securing the iron frame on the left and right sides (to the bottom of the car).
- We unscrew the screws that hold the heater control unit.
- Remove the plastic trim of the front upper body pillars. They are fastened with self-tapping screws.
- There is a screw on the panel between the panel and the steering column, unscrew that too. Now the entire panel is loosened, you need to move it towards the seats and slightly up. It is advisable to use a diamond-shaped jack on the right side to fix the panel in the depressed state and get to the heater radiator.
- We get to the clamps on the heater radiator pipes and loosen them. We pull off the pipes. It is advisable to first place a rag under them so that the remaining draining liquid is not absorbed into the carpet of the floor covering.
- The radiator itself in the stove body is held on by three screws. We unscrew the screws and take it out.
Now all that remains is to install the new part in place and assemble everything in reverse order. To make the interior warmer, we cover its surface with a layer of foam rubber approximately 1.5 mm thick.
A performance check after replacement is carried out before the instrument panel is assembled. The heater radiator is installed, the pipes are attached, antifreeze is poured in and the engine is started. If the antifreeze does not leak and the heating system of the VAZ 2114 is functioning normally (the air in the cabin is heated properly), it means that the replacement of the heater radiator was successful, and all parts can be completely installed in place.
Repair of the stove on a VAZ 2114 (radiator) can only be performed if the material of the radiator housing is not aluminum. Even if you manage to solder an aluminum case, there is no guarantee that the soldering will be reliable.
The VAZ 2114 stove does not heat well
Oh, those stoves! Let's try to figure it out.
Situation: The car owner’s interior is poorly heated by the stove, although warm air is supplied, and the engine temperature remains within 90 degrees. According to external signs, the radiator of the heating system is also hot and the pipes are in normal condition.
Question: What should I do?
Answer: Unscrew the side of the passenger torpedo (the brains) yourself and inspect in the area of the engine shield there are 2 hoses that go to the heater. Feel how hot they are. If there is no heat there, then they are clogged. Clean it and everything will be as it should! Now check the engine using the sensor or on-board indicator.
The VAZ 2114 heater motor does not work
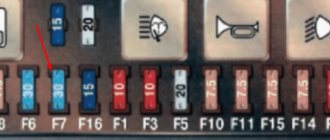
It happened: The owner got into his car, started his girlfriend, turned on the stove fan and heard... silence. He was not an experienced driver, but he immediately figured out how to get into that same fuse box. I was not confused and changed one of them. But time passed, and the motor still did not work.
Urgent questions: Is the electric motor covered, has the contact come loose?
- If the driver is just a beginner, then go straight to a car service center.
- For an experienced owner, the following steps: crawl under the panel and inspect the contacts on both the fan and the switch.
- Unplug the connector and check the voltage to the motor with a probe. If it is, then remove the motor.
- It is possible that the “minus” has fallen off from the electric motor itself. In his place! Five minutes later, your car is already warm.
Heater cables VAZ 2114
Winter has come and you, anticipating a comfortable and warm ride in your car, start its engine and wait for it to warm up. And now, the moment to turn on the stove has come! You redirect the airflow towards you, and what happens? Absolutely nothing! It's all because of the VAZ 2114 stove cables.
The side and central deflectors give out a portion of barely warm air, and blowing the glass does not melt the ice as quickly as we would like. Many car owners put up with such injustice, the quirks of the domestic automobile industry. But you and I are not one of them and are going to radically move the situation forward!
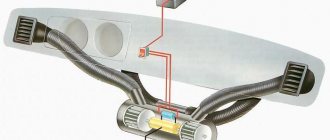
The principle of operation of the heater cables on the VAZ 2114
The operation of a car's heating system is to transfer and redirect the heat that is released as a result of engine operation. Heat is removed by the cooling system and supplied, among other things, to the heater radiator. Then, when the switch is turned on (turned on), the heating system starts a motor that blows out hot air and passes it through the car panel deflectors. Air redirection to a particular area is carried out directly by the driver by switching the airflow positions.
When clicked, the picture enlarges
Most cases of stove malfunctions are associated with just one reason and this is the VAZ 2114 stove cable. The fact is that over time the tension of the cable weakens. This occurs as a result of its constant tension, weakening when moving the lever for adjusting the heating mode (cold and hot). There are also cases when the cable completely flies off the stove tap. As a result, the stove valve does not open completely, thereby you do not receive significant portions of hot air from the heating system.
What to do? To change or not to change? Here are the most common questions from car enthusiasts. Let's answer this: before replacing anything, you should find the cause of the malfunction and try to eliminate it.
Problematic cables
In total, problems can arise with two types of cables:
It is these elements that VAZ-2114 car owners have to deal with when the heater stops functioning effectively. It is recommended to first check other elements of the system for serviceability and operability, so as not to carry out unnecessary disassembly, assembly and adjustment work in vain.
Adjustment
Hot antifreeze for the heating system on the VAZ-2114 model is supplied mechanically, for which appropriate cables are used. Over time, they become dirty and stretched out. The moment of weakening of the fastening element is also taken into account. Because of this, the stove begins to function incorrectly. When the cable is loose or stretched, moving the heater tap slider on the panel does not make it possible to fully open or close it.
The first thing you can do in such a situation is to try to tighten the crane cable. For adjustment you need:
Important! Do not start working on a hot engine immediately after entering the garage. And it is also recommended to first remove the ground from the battery, since you will be working in the wiring area.
The damper cable is adjusted in approximately the same way:
Important! In some cases, adjustment only gives a temporary effect. If the wear is severe, such operations may not produce results, so the only way out of the situation will be a full replacement.
Replacement
You can change the elements yourself, but it is recommended to allocate several hours of your time for this in advance.
Important! After the measures taken, be sure to check how correctly the stove is working and whether everything was done in accordance with the instructions. If the heater is not working properly, double-check that it was replaced correctly. If the problem does not go away, you will have to look for the cause in other nodes.
The stove on VAZ-2114 cars is considered quite capricious. But this mainly applies to conditions under which the heater has to operate under maximum loads. VAZ-2114 car owners living in regions with fairly warm winters rarely complain about the stove. They have to use it less often, and therefore it breaks down less often.
Diagnostics of the operation of the VAZ 2114 stove cables
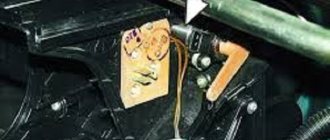
In order to inspect the valve cable of the VAZ 2114 stove, you need to dismantle the side panel trim on the driver's side (to the right of the gas pedal). Further details:
- Start and warm up the car engine thoroughly.
- Unscrew the three side trim mounting bolts.
- Turn your gaze towards the heater valve.
- Check to see if the cable has come loose from the faucet.
- Move the heater lever on the instrument panel to maximum heating mode.
- Pull the cable towards you and hold it in this position
- Check if hot air is coming from the deflectors.
Now that the source of the problem has been identified. It is required to fix, give constant tension and thereby ensure good operation and correct throughput.
One of the options for increasing the tension is a method in which a part (0.5-1 centimeter) of the cable is bent at the point of direct connection to the heater lever. To do this you will need:
- Remove the second trim, only from the passenger seat side.
- Take pliers and pull the cable towards you (at this moment, the temperature switch should be at maximum heating mode).
- Bend the additional amount of cable formed (its amount is selected experimentally, and in each specific case it differs and, as a rule, amounts to 0.5 centimeters).
- We hook it up to the temperature switch of the stove.
Attention! To avoid damage, perform all tension-related actions carefully and do not use excessive force. If you overdo it with tension, you can damage the system and the functionality of the heating system.
Adjustment
Drivers solve this problem at the same time as replacing the radiator. to combine work. Or you can do without replacing the radiator if everything is fine with it. But it is imperative to check the screening devices for leaks. If the seal is broken, glue them with foam rubber or other insulation. Leaks will lead to cold air mixing with hot air, which will prevent the stove from working properly.
To adjust the device, you need to work on the faucet and the valve itself. It's better to start with the faucet.
- Remove the panel under which the device you need is located. It is not necessary to remove the dashboard, but for clarity it is possible. Plus, this will allow you to modify the cut-off device itself, glue it with foam rubber or other insulation. Basically you need a cable that responds to the cutoff. You will find it under the side dashboard cover near the gas pedal. On the body of the faucet itself there is a bracket that holds the cable sheath on itself. It needs to be removed.
- Remove the cable from the lever, after which you need to open the tap in the maximum open position.
- Now the cable can be disconnected from the lever block. You don't need the old cable, so throw it away. Close the faucet as needed.
- Adjust the length of the sheath and the cable itself. In this case, on the lever block, with the lever in the right position, the tap should be completely open.
- With the help of a latch, the cable is securely fixed in its place.
Replacing heater cables on a VAZ 2114
Sometimes situations occur when, for one reason or another, the product becomes bent or even breaks off. Such cases require removing the device and replacing it with a new one. Recommendations for analysis are as follows:
- The metal clips that hold the cable in place must be disconnected.
- One end of the cable is connected to the tap, the other side to the lever for adjusting the air temperature in the cabin. Any sequence of disconnection can be followed. But it will be most convenient to first disconnect the end from the stove tap, unfasten all the clips and, last of all, disconnect it from the lever.
- Now the product should be carefully removed from the case.
- When reinstalling the new part, start by attaching it to the tap.
There are a lot of different models on the auto goods market that differ in length, thickness, various types, and shapes of both ends. In order not to make a mistake when purchasing a new product, we advise you to take it with you to the store. Usually cables are sold in one set of several pieces at once.
So we learned how to change the heater cables on a VAZ 2114. The most important thing when carrying out work is not to rush, to understand the principle of operation of the hot and cold air supply mechanism. We wish you warm heaters!)
How to choose the right stove tap
Finally, we would like to give some useful recommendations on choosing a heater tap for your car.
The modern market offers several varieties of these devices:
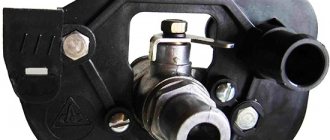
- The simplest option is a crane installed at the car manufacturer. It is built on a membrane element made of rubber, which often cannot withstand elevated temperatures and “sticks.” The solution to this problem is to replace the product. This is why it is better not to buy factory taps;
- a ball valve, which will cost much more than a membrane valve, but will also last much longer;
- ceramic device. The best option, which is deservedly considered the most reliable and durable. To make the body of such a faucet, a metal or polymer material that is resistant to overheating is used, and a pair of ceramic plates is used as a locking element.
Which faucet to choose for the VAZ-2115 stove? We recommend not saving on purchasing this part and choosing the most durable option. This will avoid frequent replacement and save a very decent amount of money.
Causes of stove malfunction
There are as many reasons for stove malfunctions as there are drivers. The forums are full of requests for help: first one reason, then another, then a third. As a result, there is no consensus on how to eliminate similar faults.
This article is devoted to only a few, the most important problems of repairing your favorite iron horse with your own hands. Don't judge harshly if you didn't find a solution here that would help you.
You should not forget that you are just a car enthusiast, and not a professional master from a large service center that services equally cool cars. You shouldn’t consider yourself a woodpecker or complain that your hands are growing from the wrong place, you just need to start small.
This video shows how to repair a VAZ stove, and you can decide for yourself whether this adjustment method is right for you:
Some car owners solved the problem immediately. Suitable for the case when warm air blows directly in the center or on the legs, and only a stream of cold or slightly warm air flows on the sides or on the windshield.
For winter, such a malfunction is simply a disaster: you suffer so much that it doesn’t seem like much. After watching this video and adjusting the heater, you can at least temporarily make sure that hot air hits the windshield. The cabin will also become warmer. But don’t overdo it: there is an unpleasant trick: with “headless efforts” you can break off the plastic to which the cable is attached.
You can move the damper to the “hot” position: just secure it tightly, covering it with a sealed mass. In this case, send the ill-fated drive cable to the place where your spare parts are stored. You will feel the positive effect immediately, although the positive temperature of the cabin is now regulated exclusively by the “stove” tap.
The heat will increase so much that you can forget about earflaps and sheepskin coats: you, as a driver, will feel comfortable behind the wheel even in forty-degree frost. The cold air is now tightly sealed and has nowhere to penetrate. But the air on the right will still be somewhat colder. Depends on the deformation of the flap during operation of the car: on the opposite side of the cable, the lid will no longer close tightly.
Step-by-step replacement of the VAZ-2114 stove
For those for whom this method is not suitable, you can completely remove the stove and adjust it. This is done in stages.
Before you remove the heater (1), do not forget to disconnect the ground wire, otherwise the battery will play a trick on you. At the same time, drain the coolant from the system.
Now remove the instrument panel. as well as lining the floor tunnel. Now carefully disconnect the air duct (under No. 19) to heat the interior.
Start a new round of work:
Carry out the same manipulations with the electrical wires from the resistor (No. 18), the electric motor (No. 2) of the fan, the inlet (No. 12) and outlet (No. 13) faucet hoses.
- Sequentially unscrew the 2 nuts securing the faucet directly to the front panel.
- Remove the seal from the faucet pipes.
- It's time to unscrew the 4 nuts securing the stove to the body.
- You can easily remove the heater of your vase with control assembly.
- Once you finish the adjustment process, carry out the installation in strict reverse order.
How to replace the radiator of a VAZ 2114 stove
In this section you will learn how to replace a stove radiator yourself. Start by draining the coolant that is in the system. After you have completed this work, you can remove the instrument panel. Now let's go through the points:
- In your cabin, directly under the instrument panel, disconnect the pair of hoses that go to the heater tap pipes.
- To perform these manipulations without problems, loosen the clamps.
- Do the same steps in the space under the hood: disconnect the hoses from the valve nozzles themselves, unscrew the nuts that secure the radiator, remove the valve from the shield.
- Remove the faucet rod holder.
- Disconnect the rod from the lever.
- Go to the interior, remove the cover from the gear shift knob.
- Remove the plastic trim: it is located under the brake (manual).
- Unscrew and remove the floor trim (rear): it is located between the seats. For convenience, slide it back.
- Disconnect the air vent (cabin) from the heater body and remove it.
- Disconnect the connector from the motor and resistor.
- To the right and left of the heater, unscrew 2 pairs of nuts.
- Remove the radiator with the control panel.
- Make a replacement.
- Start the assembly process in reverse order.
In addition to what has been said, you can watch a video with the repair of the radiator frame, also more about the stove radiator and its replacement here and here
and one more small story:
The process of replacing the stove radiator
When replacing the heater radiator, we recommend also changing the hoses. They are not expensive, but can save a lot of nerves
Of course, it would be much easier to dismantle the dashboard to replace the heater radiator, but this process is long and requires a lot of time. Therefore, as practice shows, many motorists change the heater radiator without removing the central dashboard.
Right away, we can say that to complete the operation you will need another pair of hands, that is, an assistant.
So, when the main aspects are sorted out, you can proceed directly to the operations. Let's consider the sequence of actions aimed at replacing the stove radiator:
- We dismantle the center console.
Removing the center console
We remove the glove compartment. Removing the glove compartment
Places for attaching the glove compartment to the panel
We unscrew the fastenings of the torpedo so that it can be moved in different directions.
Unscrew the torpedo mounts so that it moves in different directions
We unscrew the cable drives for controlling the stove modes. They come on both the driver's and passenger's sides.
Remove the heater drive cables
Remove the radiator cap.
Unscrew the radiator cap and remove it
In order to remove the pipes, it is necessary to either partially drain the coolant, or place a container so that the antifreeze (antifreeze) does not spill.
A plumbing hose is ideal for draining, which can be placed on one of the hose outlets on the stove faucet.
Now unscrew the heater radiator pipes.
Unscrew the clamps and remove the coolant pipes
Unscrew the bolt securing the entire instrument panel to the body (to the leg).
Attaching the panel to the body
Next, when everything is ready, with the help of an assistant, move the dashboard and pull out the radiator. It is necessary to pull out the spare part very carefully so as not to damage the other components located inside the panel.
Move the instrument panel to the side
Important! When dismantling the heater radiator, extreme care must be taken, since residual coolant can spill from the product onto the vehicle’s electronic devices, including the electronic control unit, which can damage them or completely disable them.
Installing a new radiator
The controversial issue of using sealant. On the one hand, sealant cannot be used in the cooling system; its remains can jam the pump. On the other hand, the radiator slots are often crooked and the hoses do not hold. You decide.
Nuances
Installing a new stove radiator is carried out in the reverse order, but there are some installation nuances.
Let's consider the main ones:
- New clamps must be installed on the pipes.
- In order for the pipes to be easily put on, they must be lubricated with soap. This will also improve their fit to the tubes.
- After assembling the stove drive unit, you need to make sure that the faucet and damper are connected correctly.
- After filling the system with coolant, you need to check whether there is any air left in the system.
Radiator selection
This radiator is leaking. Traces of antifreeze are visible!
The choice of a stove radiator should be approached responsibly, since a quick failure will entail not only additional material investments, but also the time spent on the entire process.
So, let's look at possible options for purchasing a heater radiator for a VAZ-2114.
Original
2108-8101060 – original catalog number of the factory radiator of the VAZ-2114 heater. It is produced by the AvtoVAZ plant. The average cost is 750 rubles . Parts from are produced under the same catalog number, so the original can easily be confused with an analogue.
AvtoVAZ heater radiator
Analogs
In addition to the original spare part, there are several analogues that are recommended for installation. They are all certified and have the same mounting hardware as the original. So, let's look at what similar parts can be installed:
| Manufacturer's name | Catalog number | Price |
| Weber | RH 2108 | 900 |
| Master-sport | 2108-8101060-PCS-MS | 1000 |
| Kroner | K201008 | 1200 |
| Termal | 112108BA | 1400 |
| Pekar | 2108-8101060 | 1500 |
| Fenox | RO0004C3 | 1600 |
Analog heater radiator
Reasons for failure of the stove radiator
Many motorists, when the heater radiator comes out, do not even understand the reasons why this happened. So, let's look at what causes the product to fail:
- Clogged coolant passages . With this effect, significant pressure is created in the radiator, which contributes to depressurization of the system.
- Clogged radiator honeycombs also contribute to its failure.
- Wear or corrosion damage to the surface structure can cause the radiator to leak.
The VAZ 2114 stove does not heat well
Oh, those stoves! Let's try to figure it out.
Situation. The car owner's interior is poorly heated by the stove, although warm air is supplied, and the engine temperature remains within 90 degrees. According to external signs, the radiator of the heating system is also hot and the pipes are in normal condition.
Question. What to do?
Answer. Unscrew the side of the passenger torpedo (the brains) yourself and inspect in the area of the engine shield there are 2 hoses that go to the heater. Feel how hot they are. If there is no heat there, then they are clogged. Clean it and everything will be as it should! Now check the engine using the sensor or on-board indicator.
The VAZ 2114 heater motor does not work
It happened. The owner got into his car, started his girlfriend, turned on the heater fan and heard... silence. He was not an experienced driver, but he immediately figured out how to get into that same fuse box. I was not confused and changed one of them. But time passed, and the motor still did not work.
Pressing questions. Is the electric motor covered, has the contact come loose?
- If the driver is just a beginner, then go straight to a car service center.
- For an experienced owner, the following steps: crawl under the panel and inspect the contacts on both the fan and the switch.
- Unplug the connector and check the voltage to the motor with a probe. If it is, then remove the motor.
- It is possible that the “minus” has fallen off from the electric motor itself. In his place! Five minutes later, your car is already warm.
- Electrical equipment
- Engine
- Brake system
- Other
- Steering
- Transmission
- Suspension
- Tuning
- VAZ 2110
- Other
- Engine
- Steering
- Electrical equipment
- Transmission
- Brake system
- Suspension
- Tuning
Repair of VAZ 2114 stove: radiator (heater) and other components
With the arrival of winter, car enthusiasts often encounter problems with the operation of their heating stove. The VAZ 2114 model is no exception.
The cause of the breakdown can be any part or component of the car's heating element. You can repair the heater yourself, without using the services of a car service, so first you need to understand the principle of operation of the heating system on a VAZ 2114 car.
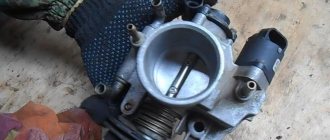
The heater tap is used to regulate the air supply to the cabin. It is used to regulate the supply of coolant to the heater radiator. The liquid heats up to 95 degrees and heats the air to an elevated temperature, which already enters the cabin. When the heater is on, the heater fan runs, which “drives” air into the cabin.
Stove control
The control of the flaps and valve on the VAZ-2114 remains mechanical and remote, just like on the VAZ-2109. The heater control unit on this car consists of three sliders (lever) and a knob for selecting the fan operating mode. The sliders are connected via cables to the stove tap and dampers. To control the heater, the driver moves the sliders, acting on the dampers and tap.
The control mechanism for the VAZ-2114 stove is implemented in an interesting way:
- The lower slider is connected by cables simultaneously to the tap and the main valve. When moved to the extreme left position, the valve opens, and the damper provides hot air into the cabin through the radiator - the stove operates in heating mode. By moving the slider to the extreme right position, the driver closes the tap, and the damper directs air bypassing the radiator - the heating system operates in interior ventilation mode.
- The upper left slider is responsible for directing air to the footwell area or through the air ducts for heating the side windows and supplying heat to the cabin (central deflector).
- The upper right slider is connected by a cable to the air supply flap to the windshield area.
The main reasons for the VAZ 2114 heater not working and repair methods
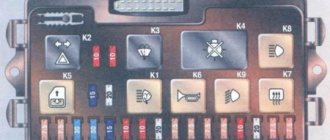
The cabin air filter needs to be replaced
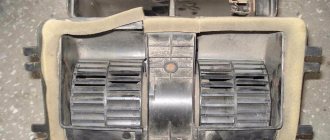
The filter is located in the engine compartment - under the frill (furnace casing). On older 2114 models there is no cabin filter. To check, press on the stove casing and also watch for the reaction. If the casing fails, then there is no filter. The elasticity of the casing will indicate the opposite.
Replacing the cabin filter VAZ 2114
Let's take a closer look at replacing the VAZ 2114 cabin filter:
- Remove the rubber seal with all fixing devices;
- Unscrew all the screws and nuts. Don't forget about the plastic plugs;
- Disconnect the frill. You need to unscrew the screws and remove the plastic mesh;
- We change the cabin filter and restore everything in the reverse order.
Even if everything is fine with your heater, and there is no need to talk about repairs, try to change the filter once every 7-8 thousand km, because you will be breathing dust that comes from the street.
Lack of required pump pressure
If your stove does not heat up at idle, but only when you press the gas, then the reason is insufficient coolant circulation. No repairs are required here; the main problem is the insufficient amount of antifreeze.
Checking the antifreeze level in the expansion tank
To check, open the hood and check the amount of antifreeze or antifreeze. Do not exceed the maximum value indicated on the tank.
Fan problem
To check the operation of the fan, you just need to start the car, turn on the heater and try changing the position of the speed control. If you do not hear any sound, then the fan is not working and needs to be replaced.
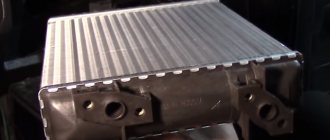
Checking and replacing the radiator
If your stove radiator is clogged, then it is worth flushing it with cleaning fluid and clearing it of dirt. If these steps do not help, then you will not be able to do without replacing the radiator.
Drivers recommend the DAAZ radiator, but it is very difficult to find.
This is what a radiator for a VAZ 2114 looks like
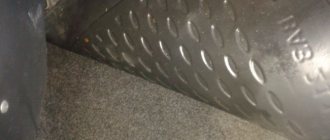
To remove the radiator, you need to do the following:
- Apply any cream to your hands generously (it will help with cuts and will make it easier to wash later);
- Drain the coolant (screw in the hose from the mixer instead of the drain plug to minimize the loss of antifreeze);
To drain the liquid, screw the hose from the mixer into the heater coolant drain plug.
Let's move on to the side panels and the glove compartment (consists of 3 parts). Remember there are two fastenings to the floor: near the ECU;
We unscrew all the screws securing the glove compartment, as well as the fastenings to the floor near the ECU. The glove box is easy to remove.
Unscrew the fastening screws holding the cables. They need to be unscrewed on both the left and right sides. Plus, 3 screws on the driver's side;
Unscrew the screws securing the cables. It is done on both sides.
Carefully try to pull the panel towards you. If it is difficult, then you need to check everything again for the presence of fasteners. After all, repairing the panel will be an unnecessary problem for you;
Let's try to remove the panel. We carefully pull it towards us. If it doesn’t work, check that all the fasteners are loose.
All we have to do is unscrew the two clamps from the radiator. But there is no need to rush, prepare a container for the remaining antifreeze, which will definitely “hide” in the heating system.
Use a screwdriver to remove the heater pipe clamps and remove the radiator.
All the fluid has been drained, the clamps and other fasteners have been disconnected, and the radiator is already visible. All we have to do is get him out.
It will be difficult for you to get by without the help of a friend. The VAZ 2014 panel is very heavy and you need to lift it quite high. One should lift it to a sufficient height, the second should pull out the radiator. The same steps must be followed during assembly.
Remember that all the coolant we drained will be fine for us to refill.
Stove valve malfunction
Unsatisfactory operation of the stove can be corrected by taking the time to repair the faucet. In order for the faucet to open completely, you need to take pliers and pull the cable near the gas pedal, increasing the tension. It doesn't hurt to be careful in your actions - by making a sudden movement, you can fill the interior with coolant.
Thermostat not working
To check the thermostat, try starting the car and waiting a few minutes. Next, find the pipe connecting the thermostat to the radiator. If it is warm, then the thermostat is not closed well, and the liquid simply remains in the radiator. In addition to problems with the operation of the stove, such a breakdown increases fuel consumption. Please take this into account.
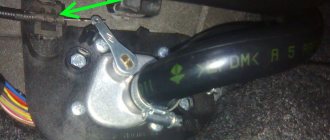
Thermostat and thermostat pipes VAZ 2114.
Air lock formation
An air lock occurs after air appears in the upper part of the radiator, and then in the thermostat. To remove the plug you need:
- Disconnect the hose from the fluid supply fitting to the carburetor starter;
- Unscrew the cap of the expansion tank;
- Blow until coolant flows out of the fitting;
- Reconnect the hose.
Repair of VAZ 2114 crane
As a rule, faucets are not repairable and if they become sour, leak, or changing the lever does not produce the desired result, they are replaced. This is much faster than trying to repair it. But what if it is not possible to buy a new faucet, and the problem has already occurred? Then there is only one way out - to try to repair the heater control valve. When liquid runs out from under the rod, you, of course, are unlikely to be able to somehow eliminate this, because only a few can select bushings or machine a new rod and sealing rings. But if the through pipe bursts or shrinks, then installing a tube of the same diameter into it and coating it with sealant will help for a while.
In the case when we are dealing with plastic, the cause of the leak is a damaged rubber membrane; the problem is also fixable, although not simple. You need to remove the valve from the heater and disassemble it. You will have two parts: the body itself and the lid with a cone and cuff. To remove the cover from the body, it is necessary to cut off the rolling belt from the side of the cover. The easiest way to do this is with an electric drill, in the chuck of which you attach a chisel or scraper.
Where to loosen the clamps
Next we have to do the flaring. To do this, drill 4 holes through (size from 0.1 to 3 mm.). This should be done strictly along the edge of the rolling. Do not allow the drill to deviate towards the middle of the cover. If this happens, further work on repairing the VAZ 2114 crane will be greatly complicated due to damage to the sealing band located on the seating surface of the cuff in the body.
The next step is to drill out the rivet that is in the cone, remove the old cuff and the remains of the rivet. You will get a hole where you need to make an M4 thread.
The new cuff can be cut from a car inner tube (preferably from a truck). The heater valve must be in the closed position. Next, you need to cut along the contour of the cover (top), making four holes for fasteners at their location (along the edges and in the middle).
A new cuff is secured to the top of the cover using a screw (M4 - the hole for it is already ready), as well as the valve itself, then you need to align the holes and tighten them with screws (M3). In this case, the nuts will be on the side of the cover.
In general, the work on repairing the VAZ 2114 heating tap is completed; now we check the tightness by first closing the outlet channel and blowing from the inlet pipe.
Think about whether you have the strength to repair it yourself? No? Then there is only one way out - only replacement.
Refinement of the stove in a VAZ car: how you want real warmth...
As a rule, it is the GDP that causes the most complaints about the operation of the stove - a rare example blows normally into the legs and onto the windshield, and if the air is also hot, it’s a great success. Moreover, now some new cars are equipped with a “modernized” heater (also known as the “14th”), which, in addition to everything, blows cold air out of the side nozzles!
In reality, everything is not so scary - it can be treated, even the “14th” heater. The most disgusting thing is that you need to do this... There are plenty of manuals on this topic, one of the most complete is in FAK and belongs to the pen of the famous handmaker VIC78. I went through my stove using it, and the results were simply excellent. True, this happened a long time ago and there was not the slightest desire to take everything apart again for photographing.
Therefore, an action was carried out to upgrade the stove in the M(i)tenka car - VAZ-21093i 1999. with the “14th” heater on board. The fine-tuning of the stove was combined with noise insulation of the torpedo. I did not plan to make fundamental changes to the design of the heater, but only wanted to properly assemble and adjust it.
Disassembling the heater
First you need to drain the antifreeze - unscrew the plastic tap in the radiator (opposite the generator), but coolant will still remain in the heater radiator. Therefore, to drain it, a piece of hose with a funnel was used, which was placed directly next to the radiator hose. And if you pour the antifreeze into a clean container, then you can pour it back later...
First you need to drain the antifreeze - unscrew the plastic tap in the radiator (opposite the generator), but coolant will still remain in the heater radiator. Therefore, to drain it, a piece of hose with a funnel was used, which was placed directly next to the radiator hose. And if you pour the antifreeze into a clean container, then you can pour it back later...
To assess the misalignment of the heater output nozzles with the holes in the dashboard, you need to remove the air duct cover. As a rule, the stove is shifted slightly forward. If the misalignment is more than 50%, then the stove will have to be filed.
The torpedo will have to be removed. This procedure has also been described more than once, including in the magazine “ZR” No. 10 for 1999. Connectors for buttons and light bulbs can be labeled (with a felt-tip pen or on a piece of paper tape) so as not to be confused during installation. You also need to remove the steering wheel with pads and pull out the steering column switches.
How to diagnose the performance of the VAZ-2115 heater
- Turn on switch 1 first, then second and third speeds.
- Using levers 2 and 4, you can adjust the desired direction of the air flow, and the latter also makes it possible to select the desired temperature.
The reasons for the breakdown may be different:
- A faulty fan means the stove does not work at all.
- If the radiator still shows signs of life, then the breakdown may be a failure of the additional resistor or the interior heater does not respond to switch commands.
- But the stove tap can also leak or become stuck, in which case it must be urgently replaced.
- When the fan is running at full power and the temperature is at maximum, and the engine is warm, then perhaps the heater radiator is clogged. To clean or replace it, you will need to disassemble it.
Heater modification: 3 comments
Hello! Same problem on my car! I want to make repairs according to your scheme. Please tell me what is outdated in the article, can the materials be replaced with more modern ones? I’d be grateful if we could chat by email! Thank you
I think silicone sealant and screws are still in use, 13 years later.