Replacing the tap
To replace the faulty faucet of the VAZ-2114 stove, we will need 10/13 wrenches (socket ones will work much more conveniently), rags, a Phillips-head screwdriver, and a container for draining the coolant. Dismantling algorithm:
- we drive the car onto an overpass/inspection hole, place a prepared container with a capacity of about 5 liters under the drain hole, unscrew the plug and wait until all the antifreeze is drained;
- go to the interior, unscrew the screws that secure the left panel cover;
- on the right side under the panel we find the heater tap, to which the pipes from the engine compartment are connected, put a rag under them and use a screwdriver to remove both pipes;
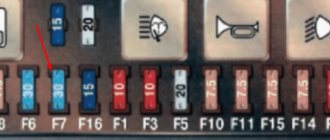
- go back to the engine compartment, find the studs on which the faucet is attached to the car body, unscrew the bolts with a 10mm wrench;
- now nothing is holding the crane, we go into the interior and pull it out, disconnecting the drive fastening cable;
- We attach the cable to the new tap, install it in its original place and reassemble it in the reverse order.
We look in the engine compartment for the pipes connecting the power unit to the tap, use a screwdriver to loosen the fastenings in the form of clamps, and remove the pipes;
Preparing for replacement
The negative terminal is disconnected from the battery. Then, using a 10mm wrench, unscrew the 16 screws holding the engine splash guard.
Removing the mudguard is not so easy
Next we will drain the antifreeze. Unfortunately, on a VAZ-2114 there is no other way to replace the faucet. And on the 11183 engine, to do this, remove the ignition module with the bracket (three 13mm key screws). The main thing is to open the cap on the expansion tank, disconnecting the sensor connector from it.
First, the antifreeze is drained from the engine, then from the radiator. Using the “13” key, unscrew the cap on the engine, replace the container... Then we do the same with the radiator cap (see photo).
Two drain plugs
Both plugs will need to be tightened.
To fill in new antifreeze, remove the pipe from the throttle valve module. There are three pipes, and the one closest to the windshield is removed. The liquid is poured into the tank, and the pipe is put on closer to completion.
The rules for choosing antifreeze were discussed earlier. By the way, when draining old antifreeze, do not leave the stove tap closed.
What to check
Before replacing the faucet, you need to make sure that:
- The network is de-energized;
- The car is secured with a handbrake;
- There is no liquid in the cooling system.
Replacing pipes
As a rule, when replacing a faucet or heater radiator, all pipes are replaced, especially if they have been in place for a very long time and have not been replaced before. The operation of replacing the pipes of the VAZ-2114 stove will also be required if one of the pipes is damaged. Unfortunately, in the latter case, you will have to complete all steps from 1 to 25 described in the instructions for replacing the heating radiator. After access to the radiator and tap has been opened, loosen all the clamps and carefully remove all four pipes. They can stick to the seats, so you need to work very carefully so as not to damage nearby nodes or injure your hands.
Installing new pipes, as a rule, does not cause much difficulty, but you should not immediately tighten the clamps to working condition. First, we reassemble in the reverse order, fill in fresh antifreeze, start the engine and let it run for 15–20 minutes to check for coolant leaks. After the engine is turned off and cools down a little, you can tighten the clamps until they are fully tightened.
Thermostat repair
Replacing the radiator of a VAZ 2114 stove: how to remove and replace it yourself step by step with photos and videos
The thermostat sensor also serves to maintain the set temperature norm. It blocks the movement of the cooling mixture into the radiator until the engine heats up to the desired temperature of approximately 90 degrees. Liquid begins to flow through the thermostat when Celsius reaches 95 degrees. Using a thermostat, the engine takes minimal time to warm up. The thermostat is located between the engine and the cooling radiator.
Common problems:
- The valve is closed - the engine, when not warmed up, holds speed very poorly and may stall.
- With the valve open, you can drive during frosts, or turn on the heater to maximum mode, otherwise the engine will overheat.
When carrying out repair work on the thermostat, it is allowed to lightly tap the housing with a screwdriver to move the valve.
If it is necessary to completely disassemble the thermostat, it is important to tightly close the pipes to avoid antifreeze leakage, only then disassemble the thermostat. At the end of the repair, it is better to replace the antifreeze
- Electrical equipment
- Engine
- Brake system
- Other
- Steering
- Transmission
- Suspension
- Tuning
- VAZ 2110 Other
- Engine
- Steering
- Electrical equipment
- Transmission
- Brake system
- Suspension
- Tuning
- Electrical equipment
- Steering
- Video publications
- VAZ tuning photo stream
- Operation and repair manuals
Repair/replacement of resistor
A faulty resistor may be indicated by the fan operating in one mode, when manipulations with the switch do not affect its blowing speed. To replace the resistor, you need to prepare a screwdriver with a Phillips head, fine-grain sandpaper and a multimeter. Algorithm of actions:
- disconnect the negative terminal of the battery;
- unscrew the screws that secure the right console cover;
- Use a screwdriver to unscrew the screws securing the right cover of the center console;
- you will have access to the resistor, from which you need to disconnect all the wiring and evaluate the contacts for burning. If the contact surface is oxidized, use sandpaper to clean it down to metal;
- It may well be that the resistor has lost its functionality precisely due to burning/oxidation of the contacts, so we assemble everything in the reverse order and check whether the fan will work in all normal modes;
- in case of a negative result, again remove the negative terminal, the panel cover and unscrew the screw that secures the resistor to the body;
- We remove the resistor and use a multimeter to measure the resistance at the resistor inputs and at the inputs of both windings. In the latter case, the indicator indicating the working condition of the additional elements is 0.2 Ohm. For the entire resistor, the standard resistance should be 0.8 ohms. If the multimeter readings do not match the specified values, replace the resistor with a new one, and then reassemble in the reverse order.
Product delivery options
Note! Below are the shipping methods available specifically for this product. Payment options may vary depending on the shipping method. Detailed information can be found on the “Delivery and Payment” page.
Parcel by Russian Post
Available payment methods:
- Cash on delivery (payment upon receipt)
- Using cards Sberbank, VTB, Post Bank, Tinkoff
- Yandex money
- QIWI
- ROBOKASSA
Shipping throughout Russia. Delivery time is from 5 to 12 days.
Parcel by Russian Post 1st class
Available payment methods:
- Cash on delivery (payment upon receipt)
- Using cards Sberbank, VTB, Post Bank, Tinkoff
- Yandex money
- QIWI
- ROBOKASSA
Shipping throughout Russia. Delivery time is from 2 to 5 days. More expensive than regular delivery by Russian Post, approximately 50%. Parcel weight up to 2.5 kg
Express Parcel EMS
Available payment methods:
- Cash on delivery (payment upon receipt)
- Using cards Sberbank, VTB, Post Bank, Tinkoff
- Yandex money
- QIWI
- ROBOKASSA
Switch replacement
If, after repairing or replacing the heater resistor, the fan continues to show signs of life in only one mode, regardless of the position of the switch, it is necessary to check the functionality of the latter. To do this, we again need a screwdriver, as well as scissors (or fairly powerful tweezers). Work order:
- remove the negative terminal from the battery;
- unscrew the 4 screws that secure the right panel cover;
- remove from the slots and pull out the switch by pulling it towards you;
- Using scissors, tweezers or another suitable tool, unscrew the nut that holds the switch;
- on the right side of the console, remove the switch, identifying and disconnecting all connectors from it;
- inspect the contacts for scale, rust or other defects, clean them with fine sandpaper;
- We install the switch in place, connect the terminal and check its operation. If there is no effect, the switch must be replaced with a new one.
If you perform any of these operations for the first time, it may take a lot of time, but you can save on buying extra spare parts and gain invaluable experience in replacing a VAZ-2114 stove. It is worth noting that for VAZ 2112 - 2115 models there are no fundamental differences in the repair or replacement of heating system parts.
Replacing the tap
Under the hood
Let's go to the salon.
In the cabin
Three final steps
Under the hood
Let's go to the salon.
In the cabin
Three final steps
It was said above that one of the reasons for the appearance of antifreeze in the car interior may be leakage from the heater radiator.
Below you will learn how to replace a leaking heater radiator. First of all, of course, you need to drain the antifreeze. Then you get comfortable in the cabin and begin to disassemble the front panel: glove compartment, consoles, sides. Unscrew all the screws and screws. To avoid losing them, collect them on a magnet or in a small plastic cup. There is one hidden screw under the plug on the dashboard console, so be careful.
When you remove all the panels and access to the heater radiator opens, loosen the clamps on the pipes, release them, but do not forget to place a mug or other container under the hoses so as not to flood the interior with antifreeze residue. Now you have to remove the VAZ 2114 stove, or rather, the heating radiator.
Assembly is done exactly the opposite. Install the new radiator in place. Experienced drivers recommend lubricating the fittings with soap to make the rubber pipes easier to put on. It is recommended to install new clamps for them, purchasing them together with the radiator. Also install the panel, glove compartment and other parts in the reverse order.
When pouring antifreeze, check that no air pockets form. To do this, remove one of the hoses leading to the throttle valve and release the air. Reattach the hose to its place.
Don't forget about the air lock when replacing antifreeze
If you did everything correctly, there will be no more antifreeze leaks, and the cabin will become warm and comfortable.
If owners of classics quite often complain about malfunctions of the interior heater, then the VAZ-2114 stove in this regard works quite stably, coping “well” with its immediate responsibilities. If the interior is in good condition, even in severe frost, the stove will be able to provide a comfortable temperature, and ice on the windshield will be removed within a few minutes.
The most common causes of radiator failure are:
- depressurization of the device;
- clogged tubes.
When clogged, the internal radiator tubes become covered with deposits, narrowing their clearance and impairing the circulation of coolant. Clogging most often occurs as a result of using poor-quality coolant. The advanced age of the car also leads to the appearance of this problem, as does the entry of dust, dirt, water, and friction products of the power unit into the heating system.
The appearance of a leak in the radiator is a consequence of mechanical damage, corrosion processes and drying out of the material from which the radiator tubes are made. In this case, a decrease in the volume of antifreeze leads to an increase in its temperature and a deterioration in engine cooling, as evidenced by the readings of the temperature sensor.
The second reason for the inability to change the heater operating mode is a malfunction of the switch itself. True, its failure is a rather rare phenomenon, occurring due to oxidation of the contact surfaces.
It is quite possible to clean the radiator pipe system from deposits and scale. To do this, you can use the same cleaning products that are usually used in everyday life (“Silit”, “Mole”, Comet). However, any chemically active compositions will do, including Coca-Cola (you’ve probably repeatedly seen materials devoted to this drink regarding its chemical properties).
As practice shows, better results can be achieved by working with the radiator removed, but this is not critical. Completely satisfactory cleaning can be performed without dismantling the radiator. The flushing scheme is very simple: the antifreeze is drained, all pipes are disconnected, after which a cleaning agent is poured into the filler neck. Then the engine starts, which, with the heater on, should idle for about 40 - 120 minutes.
After cleaning, the radiator is thoroughly washed, for which you can use running water from a tap connected through a suitable hose. The final stage is to dry the radiator with compressed air (if a compressor is available) or naturally, which will take at least a day. The presence of a leak is a much more serious problem.
Soldering is also difficult, since the radiator tubes are made of aluminum. For such work you need a very powerful soldering iron, supplemented with special solders and flux. The quality of soldering also depends on the skills of the worker performing such repairs: if they are small, there is a high probability that over time the leak will be restored in the same place. Therefore, it makes sense to replace the radiator with a new one, the cost of which varies within a thousand rubles.
If you believe the VAZ-2114 manual, then any radiator repair is impossible without removing the panel. In reality, only partial dismantling of the panel is required. A set of tools required for this operation:
- Phillips head screwdriver;
- wrenches (wrench or socket) for 7/10/13;
- rags;
- containers with a volume of 5 liters or more for draining antifreeze from the VAZ-2114 cooling system;
- a small but wide container for draining antifreeze from the stove radiator;
- high density polyethylene film.
Instructions on how to remove the stove on a VAZ-2114:
- We install the car on an overpass or other place with good access to the bottom of the engine compartment.
- Remove the negative terminal from the battery.
- Remove the motor protection, which is held in place with 10mm bolts.
- Drain the coolant by unscrewing the bolt plug (after placing a prepared container under it) with a 13 key.
- Unscrew the screws that hold the radiator in place and remove it.
- We install a new radiator and perform all operations in reverse order.
As you can see, you will have to tinker a lot, the main thing is to adhere to the specified sequence of disassembly and assembly.
Is it possible to replace the radiator of a VAZ-2114 stove without removing the control panel
With the onset of autumn cold weather, many owners of VAZ cars complain that the interior heating works very poorly and does not provide a comfortable temperature.
There are many reasons for this problem, but the most basic of them is a clogged stove radiator, which gets dust, small stones, poplar fluff, etc. How to determine that this is the case? Diagnostics is quite simple - you just need to put your hand on the supply and discharge pipes of the device for a few seconds. If their temperature is noticeably different (the inlet pipe is hot and the outlet pipe is cold), then you will need to replace the radiator of the VAZ-2114 heater. Otherwise, you should pay attention to such details as the temperature sensor (thermostat), pump impeller and others.
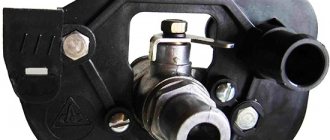
WHICH TAP IS BETTER?
All owners of VAZ 2114, 2115 and other models unanimously claim that the original faucets that are equipped with the stoves of these cars are the most unreliable. The locking mechanism is a rubber membrane. Aluminum housings are susceptible to corrosion and quickly turn sour. True, the price of these parts is low - 80-120 rubles. Apparently, the price is calculated on the fact that the faucets will change every season.
Ceramic faucet is considered the most wear-resistant
But car owners don’t want to crawl under the car every time it gets cold, spoil their shoes with leaking antifreeze, and freeze inside the car. Yes, and this is a troublesome task - replacing the faucet on the VAZ 2114 stove. Therefore, motorists give preference to more reliable models of faucets:
- ceramic, their locking mechanism is made of ceramic plates, and the body is made of high-quality plastic;
- Ball valves, the locking element of which is a ball with holes.
Most VAZ 2114 owners prefer the Yavva ceramic faucet as one of the highest quality and most reliable. Although these models have lower heat transfer than ball models. The latter are susceptible to oxidation, but to a lesser extent than the duralumin models of AvtoVAZ cranes.
How to remove a stove radiator
The process of dismantling the heater radiator on VAZ-2114 cars can be carried out in two main ways. The first involves removing the entire control panel, as well as other elements surrounding the part being replaced. We recommend carrying out repairs in this way only if you have the appropriate experience and are completely confident that after completion of the work there will be no “extra” components left. No such confidence? Then it is better to contact a car service or carry out repairs in a simpler way, which we will describe below.
It does not require dismantling the torpedo, but to perform repairs in this way you will definitely need an assistant. Work is carried out in the following order:
- remove the console and glove compartment;
- unscrew the bolts and screws that hold the front panel so that it moves freely in different directions;
- remove the cables for controlling the operating modes of the stove, which are located on the driver’s and passenger’s sides;
- remove the radiator cap;
- dismantle the rubber radiator pipes. It is advisable to first place a basin or other container under the device so as not to spill antifreeze on the floor;
- We hire an assistant. His task will be to carefully move the torpedo to the side, which will allow the radiator to be removed. In this case, you need to be extremely careful not to break anything or tear out the front panel of the car by the roots.
Three different methods for removing air from the cooling system
Let's see how the throttle assembly on the 11183 engine is arranged. Antifreeze flows through hoses 1 and 3, and hose 2 is a tube with air (do not touch).
Pipes on the throttle assembly VAZ-11183
Method 1 (remove the hoses on the throttle body)
If the engine has been warmed up, remove either of the two hoses by placing a container under it. 100-200 ml of liquid may leak out. The hose is immediately returned to its place, the fastener is tightened, and antifreeze is added through the neck of the tank. “Method 1” is discussed here.
The first time the air usually comes out. But, if the procedure is repeated, the plug can be completely removed.
Method 2 (tank cap off)
The engine remains cold. Open the tank cap. Then we do it as in “method 1” (see photo).
Pipes on the throttle assembly of the VAZ-2111
As you can see, antifreeze does not leak. Let's help him a little:
- We take the tube, bring it to the tank and create an airtight seal with our fingers;
The tank is ready for use - Blow into the tube, placing the container under the hose removed from the throttle assembly;
- If antifreeze begins to flow into the empty container, return the hose to its place;
- Tighten the fastening, add antifreeze.
This method is universal. It is used on any car, including the VAZ-2114, and it is possible to expel air from the system immediately.
Method 3 (remove air without disassembling parts)
Let's consider the simplest method. You don't have to disassemble anything:
- We place the car on an overpass or hill so that the upper part of the radiator is higher than other parts;
- Open the cap on the expansion tank;
- We start the engine. The system will warm up;
- The antifreeze level may drop abruptly. The liquid is then added.
The point is that a steam exhaust hose is connected to the radiator. Air will escape through it into the tank.
Steam outlet on the tank (do not remove!)
It will be possible to increase the engine speed, but then make sure that the antifreeze does not boil. With the cover removed, this option is not excluded!
Features of installing a new radiator
Installation of a new radiator and assembly of the car is carried out in the reverse order. At this stage, it is important not to accidentally lose the panel fasteners, and also to follow the rules listed below:
- It is better to install new clamps on the radiator pipes, which will ensure complete tightness of the heating system;
- It is advisable to lubricate the outlet and inlet fittings of the device with soap or some detergents to simplify the installation of the pipes, as well as improve their fit to the fittings;
- The central pillars of the panel need to be secured especially well, since they are responsible for the main functions of driving the car;
- after the panel is installed and secured, you need to check that the cable settings are correct, and also make sure that the faucet and valves are open to the proper level;
- When filling the system with coolant, you need to make sure that there is no air in it. After the antifreeze level has been restored, be sure to start the engine and make sure that the pipes and their connections to the radiator are tight.
If you follow all these rules, you will be able to ensure the perfect operation of the heater in your car, as well as minimize the risks of its repeated failure due to clogging of the system.
How much does it cost to replace a radiator at a car service? The price for this service is quite high, since specialists usually remove the control panel, which takes much more time and requires considerable effort. Using the method described above, you can replace the part yourself and save money.
Cooling System Maintenance
In order for the cooling system to function properly, it must be maintained and its condition periodically checked. The most important of these operations is the timely replacement of coolant. It is due to the fact that during circulation through the coolant system it undergoes repeated heating and cooling, as a result of which its chemical composition changes and the cooling properties sharply decrease.
In order to replace the coolant on time, you need to focus on the following important rules:
- Antifreeze should be completely changed every 2 years, and antifreeze - every 5 years;
- with high mileage, replacing antifreeze is required after approximately 15,000 km, and antifreeze after 40,000 km (these figures may be slightly more or less, depending on external conditions);
- If there is a significant change in the color of the coolant, it must be replaced, regardless of the time of use and mileage.
As you can see from the above rules, the use of antifreeze is more profitable, and preference should be given to it.
Coolant replacement
In order to avoid serious mistakes, correct coolant replacement should be done as follows:
- Completely drain all old coolant from the system.
- Tighten all plugs tightly.
- Fill the system with purified (distilled) water up to the maximum mark.
- Start the engine and let the system warm up well (overheating of the engine should be avoided, and the idle speed should be maintained around 3000).
- Turn off the engine and leave the car to stand for about 7-10 minutes.
- Drain all distilled water from the system.
- If the water flows out dirty, repeat the entire operation again.
- After clean water begins to flow out, pour coolant into the system.
If during the operation of the car the coolant level drops, then it can be periodically topped up, but after the allotted time (the timing was indicated above), it is still necessary to completely replace it.
Possible breakdowns
As for breakdowns in the cooling system, the most common occurrences are:
- problems with the radiator (leakage or blockage);
- thermostat failure;
- destruction of the water pump (most often the bearings fail or the impeller breaks off);
- fan failure;
- leakage in the pipe system.
Cooling system pipes
While problems with the radiator and other components of the system cannot be solved in one minute, problems with the pipes can be quite easily eliminated - if they have lost their elasticity and began to crack, then they should simply be replaced with new ones. And in most cases, simply tightening the clamps will be enough to solve the problem of coolant leaks from the cooling system.
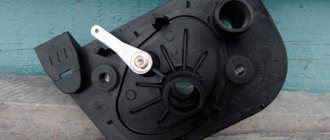
Replacing the heater valve VAZ-2114
We drive onto a pit or overpass. We put the car on the handbrake and first gear. Drain the coolant into the prepared container. To do this, first, with the expansion tank cap closed, unscrew the drain plug on the engine cylinder block (if the tank cap is sealed and tightly screwed, then antifreeze will hardly flow). Then, instead of the drain plug, we screw in a hose (from a mixer works well) and open the reservoir cap - the coolant flows neatly into the container with minimal losses and without getting dirty on the engine.
We loosen the clamps of the pipes going to the valve from the engine. From the engine side, use a metal brush to clean the threads of the 2 bolts securing the faucet to the engine compartment bulkhead. Then we conscientiously treat these threads with WD-40 or brake fluid. This is a mandatory condition, failure to comply with which can lead to serious difficulties when unscrewing the nuts. We leave the dirt and rust on the threads to “acidify” and do not tighten the nuts yet.
We remove the pipes. Let's go to the salon. We dismantle the side trim of the torpedo in the middle at the feet on the passenger side. Loosen the clamps of the pipes at the tap. We prepare a rag to collect a small amount of antifreeze that may leak onto the carpet when removing the pipes. Disconnect the pipes. We return under the car. Using a 10mm wrench (socket or socket), unscrew the nuts of the faucet mounting bolts.
HOW TO CHANGE THE STOVE TAP WITH YOUR OWN HANDS?
You will need a pit to work with because the heater valve is located at the bottom of the hood, under the side trim on the passenger side. Replacing the stove valve on a VAZ 2114 is carried out in several stages:
- On the faucet, you need to brush the fasteners, rinse them with brake fluid, and leave them for a while so that the fluid cleans the threads on the studs and the nuts are easier to unscrew. To wash studs, it is better to use WD-40, if available. This is an important stage in the work, because rusted bolts can grab the nut so much that unscrewing them becomes problematic. Sometimes when unscrewing nuts, the bolts need to be held with an additional wrench or pliers.
- In the cabin, remove the side trim. Now you can see the pipes leading to the tap. Loosen the hose clamps and remove the hoses one by one. At the same time, keep a container with antifreeze near you, which you immediately place under the emptied pipes so that the remaining antifreeze flows out.
- If you decide to replace the hoses, they must also be released from the radiator. But if they are in satisfactory condition, then when you start assembling, you will only need sealant.
- Return to the pit and use a 10mm wrench to unscrew the nuts holding the tap in place.
- Go back to the body again and try to remove the heater valve of the VAZ 2114 towards the passenger seat. In this position, remove the lock and release the cable that controls the tap.
- Now you can install the new faucet. First put the cable on it, secure it with a spring clip, and only then can you screw it into place. Install O-rings between the valve and the body. Use sealant to secure the stove pipes in place. Don't forget to pour the antifreeze back into the radiator at the end.
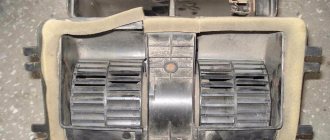
Replacing the VAZ-2114 heater fan
In the cabin under the steering wheel, using a 10mm wrench, unscrew the nut securing the heater to the body and remove the fan motor ground wire terminal (in black insulation) from the stud, and then disconnect the power supply positive wire connector.
Remove the cabin air filter. located under the windshield in the middle. Using a Phillips screwdriver, unscrew the 5 screws that fasten the air supply side grilles. We remove the grates. We unscrew the 4 screws securing the protective casing, which we then remove. Unscrew the 2 screws securing the fan to the base of the heater.
We pull the electric motor power wires out of the passenger compartment through the rubber seal. We remove the fan from its housing (air supply box). Remove the seal from the fan casing. We use a flat screwdriver to pry up the latch of the casing, which we separate into 2 parts. Having released the 2 mounting brackets, remove the motor cover and remove the electric motor along with the impeller.
Installation of a new fan is carried out in reverse order.
Flushing the system and replacing the coolant
Repairs related to replacing the coolant on a VAZ-2114 car are carried out if:
- The color of the mixture in the expansion tank has changed. This usually happens after 20 - 40 thousand kilometers;
- repairs were carried out that required a complete drainage of the mixture.
In general, coolant replacement is carried out in the following order:
- 1. Completely drain the cooling solution. To do this, you need to open all the plugs and taps, and also remove the radiator and expansion tank caps. Drain the mixture only after the engine has cooled down (In a hot engine, the temperature of the solution can be more than 100 degrees Celsius).
- 2. Rinse the cooling system with distilled or clean water. Begin the washing procedure after all the old mixture has drained. It is recommended to flush the engine block and radiator with warm water. Otherwise, it is recommended to fill in cold water, warm up the engine, and then drain the water. The color of the water determines how dirty the system is and repeats the flushing process until the flowing water becomes clean. Only after this they begin to replace the mixture.
- 3. Pour a new cooling solution into the system, having previously closed all plugs and taps. Pour liquid into the tank in a thin stream until the maximum mark is reached. Air pockets are not allowed. Then the expansion tank and radiator caps are closed. In order to prevent the rubber pipes from drying out, they must be lubricated with silicone grease.
- 4. Start the engine and let it idle until the heater radiator fan turns on. After this, you can turn off the engine and, after cooling, check the fluid level in the tank. If the fluid level has not changed, then everything is normal and the work is completed. If the liquid level in the tank has decreased, you need to make sure by visual inspection that there are no leaks. If they are not there, then add fluid, start the engine again and repeat the test.
The cooling system of the VAZ-2114 car uses 4 rubber pipes:
- upper supply pipe - supplies cooled liquid from the radiator to the engine;
- lower outlet pipe - removes the heated liquid below from the engine to the radiator;
- two short pipes that connect the water pump and thermostat to the system.
If the pipes fail, they must be replaced. In this case, it is best to purchase silicone pipes.
To remove old and install new silicone (rubber) pipes, you need a set of wrenches, several screwdrivers and silicone lubricant.
Repairs associated with replacing pipes must be carried out in the following order:
- 1. Disconnect and remove the battery;
- 2. Drain all coolant mixture;
- 3. Remove the fan, soundproofing upholstery, trim and frame trim from the windshield;
- 4. Clear access to the air collector by removing its fastening elements;
- 5. Remove the front housing and release the clamps that hold the pipes;
- 6. Remove the pipes from the fittings and install new ones (silicone or rubber) in their place. Secure the new pipes with clamps. Before installation, it is recommended to lubricate the rubber pipes with silicone grease. It is also advisable to lubricate the clamp screws with silicone grease. Subsequently, this will allow you to easily unscrew them;
- 7. Install all the removed parts in their places, flush the system and fill it with new coolant mixture.
Replacing the VAZ-2114 heater radiator
We drain the coolant as described in paragraph 2 to replace the valve. We remove the glove compartment, which consists of three parts, and the side panels at the foot of the passenger seat. In this case, it is necessary to unscrew absolutely all the screws that are visible. You should not miss the fastenings to the floor (2 screws on the sides, on the left and right sides of the panel at the bottom near the ECU) and 2 screws at the passenger door pillar. Another one is hidden under a flap in the upper left corner of the panel near the buttons.
We unscrew all the screws securing the cables on the passenger side - on the right and left, closer to the middle of the cabin (here are the most “difficult” ones - 3 pieces). Gently pull the main panel on the passenger side towards you. If it goes with difficulty, then you should check whether all the fasteners are unscrewed. You can additionally remove the plastic tips from the damper and heater adjustments.
When the panel moves away from the body, you need to place an object (for example, a plastic bottle) into the gap that appears. We place some larger dishes under the radiator so as not to flood the floor with antifreeze leaking from the radiator and the system.
Loosen the pipe clamps. We free the radiator from the pipes and wait until the antifreeze stops leaking. Unscrew all the nuts securing the radiator to the body.
It takes two people to remove the radiator - you will need the help of one person. One person lifts the panel as high as possible, and the second one at this time removes the radiator - pulls it down, turns it and pulls it towards himself.
The new radiator is installed in the reverse order. After installing the radiator, do not immediately begin installing the panel and glove compartment.
First you need to check the tightness of all connections - fill the system with coolant and start the engine.
If everything is fine, then we finish replacing the radiator.
In cars of domestic manufacturers, engine cooling occurs using a cooling system; in the VAZ-2114, this task is performed by antifreeze. Only with the right choice of antifreeze can you ensure efficient operation of the cooling system:
- Factory antifreeze fluid is worse; due to the smaller amount of additives, the thermal protection of the vehicle suffers significantly. Antifreeze was developed specifically to cool vehicle parts and components, so it is exceptionally useful.
- Factory fluid has one big drawback - it quickly spoils the pipes, which in turn leads to fluid leakage and radiator defects.
Having convinced himself of how important it is to use high-quality antifreeze, the driver of the VAZ-2114 begins to replace the old fluid with a new one. In this case, after a couple of weeks an antifreeze leak is detected, what’s the matter? The owner of the car did not take into account that along with the antifreeze, the pipes through which leaks occur must also be replaced.
Experience shows that old hoses are absolutely unusable; antifreeze corrodes them very quickly. Therefore, it’s time to learn how to replace pipes, and finally close the question of the correct operation of the cooling system. Service station specialists will tell you how to implement your plans.
Dismantling and replacing the stove valve on a VAZ-2114
It seems that to replace the faucet on a VAZ-2114 you need to remove the instrument panel. In reality, it will be enough to remove the side trim piece, as well as the glove compartment. The main rule is to unscrew all the screws that you can see.
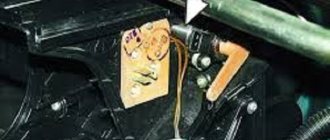
Right sidebar
The result of our efforts is what is shown below.
The result of dismantling the cladding
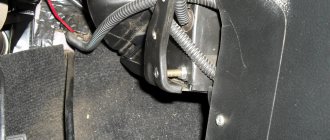
And now you can see two “internal hoses”. What to do next is clear to everyone.
What can you see under the cladding on the right?
Loosen the clamps installed on the faucet side and remove the hoses. By the way, antifreeze may leak here (it is poisonous).
Under the hood
Below, near the partition, you can see two “external hoses”. Loosen the clamps and remove the hoses from the pipes. Next, use a spanner to unscrew the two nuts (see photo).
All the actions performed under the hood
Let's go to the salon.
In the cabin
Without disconnecting the rod, remove the faucet (photo 1). Then immediately remove the “holder” (photo 2). And then, by pulling the assembly outward, it will be possible to remove the mechanical rod completely.
Three final steps
As you can see, everything is simple. Installation is carried out in reverse order.
Under the hood
Let's go to the salon.
In the cabin
Three final steps
How to correctly replace pipes in a VAZ-2114
The first question that experts hear from car enthusiasts is which pipes should be purchased for the VAZ-2114? Products made from silicone are considered the most durable and at the same time ideally compatible with the cooling mechanism of the VAZ-2114. The diagram below shows the location of the pipes we are interested in:
- The short ones are mounted on the couplings of the thermostat and the pump pumping water.
- Next comes the conductive hose.
- The pipe located in the lower part is responsible for removing antifreeze from the radiator unit.
What set of tools will be needed to replace the VAZ-2114 pipes
- New hoses.
- Keys of different sizes.
- Screwdrivers of different formats.
- Silicone-based lubricant.
Now let’s talk about how the well-known antifreeze differs from antifreeze. The latter is produced by a domestic manufacturer, antifreeze is produced abroad, so the composition may differ.
Therefore, ask the seller about foreign-made coolant.
A little theory
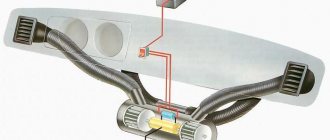
The heated liquid moves from the thermostat to the tap, and then it either enters the radiator “30” or exits directly into the outlet pipe. These are two different cases corresponding to the extreme positions of the engine (MAX/MIN). If you look at the drawing, everything will become clearer.
This is what the heater assembly looks like
Shown here: 6 – outlet hose; 8 – supply hose; 7 and 27 – clamps (4 pcs.); 26 – internal outlet hose (to the radiator); 28 – supply internal hose (from the radiator), 33 – clamp.
Instructions for replacing the cooling system pipes of the VAZ-2114
Step-by-step replacement of cooling system pipes in a VAZ-2114 car looks like this:
- Remove the battery cable that comes out of the negative socket.
- Carefully drain the old coolant, but wait until the engine has cooled completely before doing so. Otherwise, there is a risk of getting burns from the coolant.
- Remove the following components: set aside the upholstery that provides sound insulation, the fan, the trim going to the windshield frame, the facing material.
- Now your goal is to get to the air collector; to do this, unscrew the brackets in the form of springs and the screws responsible for fixing them. A screwdriver is ideal for spring clips; for screws, you need a wrench.
- To loosen the clamps, remove the front housing, and then remove the old hoses from the fittings.
- All that remains is to install new silicone hoses in a specially designated place; it is preferable that the parts are manufactured abroad - they will last longer.
- Reinstall the other components by following the reverse order of this step-by-step instruction.
Another video with an example of replacement
The stove valve in the car opens or blocks access to warm air into the car body, thereby regulating the heat supply to the cabin. Sometimes the heating and cooling system refuses to function properly, stops supplying heat, or supplies it in unlimited quantities. What this may be connected with and how to eliminate such malfunctions, you will find out below.
A working faucet is the key to a warm car interior
The VAZ-2114 car uses a hidden engine cooling circuit with an injector. It is highly complex and includes 28 elements. Traditionally, the assembly of the cooling system of this car is not of high quality. Therefore, throughout the entire period of operation, it requires constant monitoring, regular maintenance and repair.
- 1. How to properly replace the coolant mixture?
- 2. How to flush the cooling system?
- 3. How to remove air from the VAZ-2114 cooling system?
- 4. How to properly replace the cooling system pipes?
Subtleties of filling new antifreeze
Before you start filling in new coolant, you need to drain the old one, and also thoroughly clean the entire cooling system of contaminants. To do this, it is better to use a special cleaning agent that can be purchased at a car enthusiast store. Make sure that all taps and plugs of the VAZ-2114 are open. You can determine whether the system has been flushed or not based on the color of the antifreeze flowing out.
The plugs and tap are closed only when the product becomes transparent. If the manufacturer describes in the instructions the specifics of using the cleaning mass, follow these rules for effective cleaning. As for the level of antifreeze filling, some drivers prefer to fill to the limit mark, others deliberately do not top up, and later, after a successful test, add more fluid.
After the antifreeze has been replaced, all that remains is to close the expander and start the car engine. The motor should idle until the furnace fan starts running.
Maintenance
Regular maintenance of the cooling system comes down to checking the level of the coolant mixture in the expansion tank and monitoring its color. It is recommended to check before each trip or, in extreme cases, regularly every 500 - 600 km.
The level of the coolant mixture in the tank must constantly exceed the minimum level by 2...3 cm. Checking the level and adding fluid must be carried out only on a cold engine. The mixture intended for topping up must be of the same type as the liquid poured into the system. Mixing different types is not recommended.
Wear of pipes
Coolant may leak from the heating system through the inlet/outlet pipes. This result is usually caused by their wear under the influence of aggressive substances that are components of the liquid, combined with high temperature. The appearance of leaks in the pipes can also be caused by excessive efforts when tightening the clamps during their installation (for example, after replacing leaky old pipes).
The heating system of the VAZ-2114 car includes 4 pipes, half of which are located in the engine compartment, ensuring the passage of antifreeze between the power unit and the heater, and the other two are located in the cabin, ensuring coolant circulation between the radiator and the heater tap. Liquid leakage can occur in two different scenarios.
- decreasing coolant level in the expansion tank;
- the appearance of a persistent unpleasant odor in the cabin;
- presence of smudges in the passenger compartment or under the engine protection.