There is nothing perfect in the world. This becomes especially clear when it comes to modifying (upgrading) the stove on a VAZ 2110. No one wants to freeze in a car in winter, not to mention the windows covered with ice. Upgrading the VAZ 2110 stove becomes for motorists not just a momentary whim, but a cruel necessity dictated by the harsh Russian frosts.
Modification of the VAZ 2110 stove
In order to withstand the imperfections of the world in the form of the VAZ 2110 heating system, it will be enough to arm yourself with a tube of silicone or sealant, polyurethane foam, simple plumbing tools, and also a certain amount of patience. Without theoretical foundations, of course, there is no way either.
Modifying the stove, simple techniques
Modernizing the VAZ 2110-2112 stove is a thorough and multifaceted process. If you don’t have the time or opportunity to fully remodel the stove system, but you need a positive result in the shortest possible time and with minimal effort, because winter is almost upon us, you can try to listen to the following advice.
- 1. The easiest way to increase the air flow of the heater for heating the feet of the front seats in the cabin is by blocking the heater ducts for the rear ones. Any tool at your disposal will do. Thus, you sacrifice the comfort of your passengers, but is this really important if, for example, you prefer to drive alone;
- 2. A similar result can be achieved by blocking the air channels of the central deflector oven by cutting a suitable plug from a sheet of aluminum. Obviously, in this case, the heat flow directed to the side windows and other furnace ducts in the car increases.
- 3. Often, standard VAZ 2110 door seals are not enough for reliable sound and heat insulation. Simply gluing additional insulating tape around the perimeter (for example, from K-Flex) can significantly improve the comfort inside the VAZ interior with minimal time and money investments;
- 4. Replacing the 5-hole thermostat with a more modern 6-hole thermostat, which controls the engine cooling and heating system in VAZ cars. These thermostats are completely interchangeable, so there should be no problems. A 6-hole thermostat is technologically more advanced, and therefore the heating of the stove radiator in a car will be more efficient. Such pleasure costs about 350 rubles.
Which heating radiator to choose?
The main source of heat in the car interior is the radiator, which modern manufacturers produce from two materials - copper or brass, and aluminum. Which heater radiator is better - copper or aluminum for a VAZ 2110 - 2112 remains to be seen, since not only the efficiency of the heater, but also comfortable driving in winter depends on this choice.
Advantages of an aluminum radiator
To find out which heater radiator is better to install on the seven, let’s make a comparative comparison. To do this, you need to find out all the advantages and disadvantages of the two types of stove heat exchangers. First, let's figure out what the pros and cons of aluminum units that are installed on classics from the factory.
- Cost is one of the main advantages of such devices, since it is precisely because of the low price that many choose models made of aluminum alloy. The price difference between copper (brass) and aluminum devices can be up to two times.
- Large selection - these models are more popular, despite some of their disadvantages. The reason for this popularity is their price, but you often have to make sure that it is better to buy a copper unit for the stove. Among the advantages, heat transfer should also be noted, however, practice shows that heat transfer rates are significantly inferior to brass devices.
It is important to know: For “ten and twelve” manufacturers do not produce three-row heat exchangers made of aluminum, which actually causes low heat transfer. Only two-row ones are produced.
Advantages of copper heater radiators VAZ 2110 - 2112
Now let’s find out why a copper stove radiator is better than an aluminum one. The advantages of these units include:
- Thermal conductivity - even if we take into account the fact that copper ones are only called such, since they contain much more brass than copper, they have high thermal conductivity. It is this indicator that is fundamental when choosing a heat exchanger from which you can get more heat to heat the interior.
- Easy to repair - even the slightest mechanical damage can be repaired at home. Moreover, after soldering work, the unit can last a long period of time (which also depends on the quality of the soldering). The entire radiator is made entirely of plastic without the use of plastic.
- Not only are the plates made of copper, or rather a brass alloy, but the body itself is also made of a similar material. This is a big advantage, because due to this design, operational parameters are increased.
Three-row versions of radiators are produced. This brings more heat into the cabin. With so many advantages, one wonders if these devices have any disadvantages.
It is necessary to note some disadvantages of the copper heat exchangers under consideration. They also exist, and sometimes play a decisive role in choosing the appropriate units. The main disadvantage is the cost, which is 2 times higher than the price of aluminum analogues. It is precisely because of the big difference in price that most car owners give preference to aluminum competitors, having never experienced copper heater radiators on a VAZ 2110 - 2112
We recommend: Changing the oil in the automatic transmission of the Hyundai Getz
Refinement of the air duct system of the VAZ furnace, dismantling the standard installation
If you have a little time and desire, modifications to the VAZ 2110 stove can be done much more thoroughly, namely:
- sealing the cracks in the front panel of the torpedo air ducts;
- modernization of the car stove damper;
- modernization of the heating system for the rear seats and driver's feet, installation of corrugated heating ducts.
All this will certainly result in the desired result and significant heat transfer from the stove, but first you need to remove the dashboard along with the dashboard and heater air ducts, for which you need to:
- 1. Remove the floor tunnel lining cover and the interior heating air ducts of the VAZ 2110, and then the body itself, screwed with self-tapping screws to the bottom of your car;
- 2. To remove the instrument panel, you will first need to dismantle the glove box by unscrewing it from its hinges and turning off the glove box light;
- 3. Through the formed niche, unscrew the mounting bolts of the instrument panel;
- 4. Having unscrewed all the fastening screws of the panel in its upper and lower parts, as well as on the controller bracket, we can finally remove the instrument panel from the mounting studs;
- 5. In order to remove the panel from the car interior, you will need to disconnect the electrical connectors for connecting the devices.
Repair and restoration of the stove damper
The deformed heater damper of the VAZ-2110 cannot be repaired; it only needs to be replaced. In this case, it is better to purchase a replacement metal part that is not so susceptible to temperature effects.
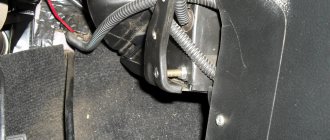
Whatever heater is installed on the VAZ-2110, to carry out repair work, the heater must be completely disassembled. In this case, the process of dismantling and disassembling depends on the design of the stove.
A positive aspect of the heater design on the VAZ - 2101 is its location - to get to it and the dampers you can from the engine compartment and you don’t have to remove the front panel.
Disassembling an old-style stove
For example, let's look at how to disassemble an old-style heater:
- Remove the terminal from the battery.
- We remove the windshield wipers, the seal, remove the air intake near the windshield (“jabot”) from the car, in the process you will need to disconnect the windshield washer nozzle tubes.
- We dismantle the insulation that separates the stove body from the engine compartment.
- We remove the gear motor.
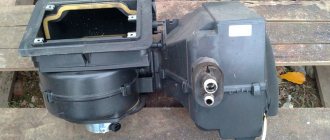
- We divide the housing of the stove and air filter into two halves. To do this, unscrew the coupling bolts around the perimeter of the housings and remove the mounting brackets.
- Disconnect the fan power wires.
- Remove the outer half of the air filter and heater housing (along with the fan).
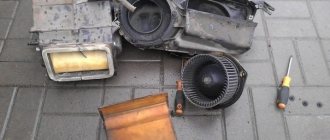
- We dismantle the inner part of the fan housing.
After this you will have access to the dampers. If you are only planning to repair or replace the heater dampers, there is no need to drain the antifreeze, since the heater radiator will remain in place and will not be removed.
Before removing the dampers, carefully inspect and remember their position and the way they are engaged. Further actions depend on the nature of the damage. Deformed damper parts cannot be repaired and only need to be replaced. As for damaged rods and levers, try to repair them or simply replace them. The damaged seal is replaced.
When assembling the stove, pay special attention to the engagement of the dampers. Do it as it was before disassembly, otherwise the dampers will not work correctly, which will affect the performance of the heater.
Disassembly and repair of a new type heater
The new model stoves are disassembled differently:
- disconnect the battery terminal, drain the antifreeze;
- dismantle the frill and insulation;
- disconnect the power wires of the fan and micromotor gearbox;
- unscrew the fasteners that secure the stove body to the body;
- disconnect the coolant supply pipes to the heater radiator;
- We remove the heater from the car along with the filter housing.
After this, we disassemble the stove body, dividing it into two halves, after first disconnecting the air filter housing and removing the mounting brackets. Next, we change or repair the damper, assemble the heater and install it on the car.
Note that the general algorithms of work are indicated above, but in reality, dismantling the stove is not so easy, since many fasteners are located in hard-to-reach places, sometimes you have to disconnect or remove elements that make it difficult or interfering with the removal of the unit.
Video: Why the VAZ 2110 stove does not heat up. Modification of the damper.
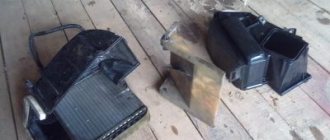
Sooner or later, any, even the most reliable and simple part in a car, wears out and requires replacement. First of all, this concerns technological and complex design elements. The VAZ-2110 heater radiator is just such an element of the interior cooling and heating system. If we have a copper radiator installed that is not standard, it can be successfully repaired and installed back. Regular DAAZ aluminum radiators, unfortunately, cannot be repaired. Therefore, today we will replace two heater radiators at once on the tenth family - the old and new models.
Sealing the cracks in the front panel of the torpedo air ducts
The main problem with good blowing of side windows is the presence of a large number of cracks in the dashboard air duct system, which should only be sealed, thereby reducing heat loss and significantly increasing the pressure of the air flow for blowing the side windows of the car.
Heater duct routing
You will need silicone or anti-squeak (modelin). We seal around the perimeter all the cracks in the upper and lower parts of the torpedo panel. Also, do not forget to “silicone” all the mounting holes. At this point, you can consider the first stage of work completed.
Tuning the VAZ 2107 stove, what tools and components will be required
First of all, in order to make changes to the stove and radically solve all its problems, you need to stock up on snail from the “Eight”. Next, you will also need plastic, plexiglass, textolite (all these materials can be used to build a new building). Finally, to convert the stove to the "Seven" model, you will need bolts, nuts and sealant. Important information! Before you start work, carefully read the instructions for the VAZ 2107. One incorrect operation can lead to you being left without a stove altogether.
Before you start modifying the stove, you need to dismantle its lower and middle parts. After this, the parts are thoroughly washed. Then the entire lower part is cut off (you only need to leave a little plastic and the fastening points). The side walls are cut out of plexiglass or plastic. Their sizes must be adjusted to the location, since everything depends on the material chosen. The cut blank is attached to the side wall of the stove. The same manipulations are performed with the second wall. When this stage is completed, you can move on to the middle part of the stove. The diffuser is cut here
Here it is important to pay attention to the presence of two bulges on the sides (supports for the radiator). There is no need to trim them. After the middle and lower parts are ready, you can start trying on the snail
It should become as high as possible, but at the same time not go beyond the level of the radiator stops. Finally, the bottom needs to be cut and installed. It is important to remember that the back of the stove will be the narrowest point. It is made as small as possible. The snail nozzle is placed in the center in order to obtain uniform airflow. When all these manipulations are completed, the structure is coated with sealant. After this, you can install the front wall and try on the stove in the car.
After the middle and lower parts are ready, you can start trying on the snail. It should become as high as possible, but at the same time not go beyond the level of the radiator stops. Finally, you need to cut and install the bottom
It is important to remember that the back of the stove will be the narrowest point. It is made as small as possible
The snail nozzle is placed in the center in order to obtain uniform airflow. When all these manipulations are completed, the structure is coated with sealant. After this, you can install the front wall and try on the stove in the car.
After fitting, you can remove the side air ducts and prepare for the final work. For the duct system, you can use regular plumbing hoses. To do this, holes are drilled in the body into which cuffs are inserted, and then plumbing hoses.
Here it is important to ensure that some of the hoses are used to heat the passengers sitting in the rear. After this, the hoses are put on standard blowers
To ensure that there is no air loss at the joints, you can additionally secure them with self-tapping screws and coat the seams with sealant.
What is the result? Air blows evenly from all deflectors. Moreover, even at the first speed of the stove, the air flow exceeds the same figure at the second speed in the standard version. The windows no longer fog up (by the way, with such modifications you can also get rid of fogging of the rear window). And when the car is moving, the operation of the stove is not audible at all.
Modernization of the VAZ stove damper
The problem with the stove damper is that the cracks in the housing are not properly sealed. As a result, regardless of the position of the damper, the flow of warm air is significantly lost, passing not where we would like it.
Furnace damper modernization
You can combat this by installing an additional seal (the same model and double-sided tape will serve you well). After removing the factory seal, completely glue the entire valve body, eliminating any gaps. You also tape the damper itself. Thus, you have significantly reduced losses in the air flow directed to the driver’s face, legs and windshield.
But to seal the gap at the beginning of the channel for blowing the driver's window, a conventional seal will not be enough. It is recommended to use polyurethane foam to reliably seal unwanted air channels, thereby eliminating significant losses.
Modernization of the heating system for rear seats and driver's feet in VAZ cars
Laying corrugated heating ducts
As for the module for distributing air flow to the driver’s feet, front seat passenger and rear part of the cabin, this also has its own factory flaws. They are also associated with insufficient sealing of cracks. You can fight with modelin or silicone, as in the case of a torpedo, if you do not want to disturb the factory aesthetics of the parts.
Airflow for rear passengers' feet
It would be much simpler and more reliable to cut off the ill-fated Christmas tree that distributes air flows and use three separate 40 mm corrugated pipes for heating ducts. What do you gain in this case:
- you get reliable sealing of the channels;
- three corrugated hoses take up much less space, which greatly simplifies access to the VAZ 2110 electrical wiring system, located there (there are really a lot of wires and access to them is extremely difficult).
Corrugation gasket for heater
We also remove the partitions of the old air distribution system. We seal the hoses using polyurethane foam. It should also be taken into account that the textured internal coating of a corrugated hose can cause whistling and howling of air, so we do not make the pipelines very large.
Possible causes of a malfunction of the heater fan on a VAZ-2114
Renault Megane Logbook replacement, repair of the interior heater engine
Heater fan installed on a car
Before eliminating a malfunction that has occurred, it is necessary to establish the causes of its occurrence.
So, according to the experience of many motorists, the most common reasons are:
- Fuse blown.
- Failure of the contact group.
- Relay failure.
- Resistor.
- Switch.
- The fan motor burned out.
Now that the causes have been discussed, we can move directly to elimination methods.
Elimination methods
Many motorists think that a heater fan failure is associated only with a fuse or combustion of the motor that turns it, but this is far from the case. Let's consider all possible reasons in more detail.
Fuse blown
Mounting fuse block where the heater fan fuse is installed
So, in the case of a fan, the first thing you need to do is check the integrity of the fuse. If it is burnt out, it must be replaced with a new one. If this does not help, then you need to look for the reason elsewhere.
The heater fan fuse is marked with an arrow in the diagram.
You can find the fuse in the mounting block marked F7.
Failure of the contact group
Another reason that is quite common in cars is oxidation of the contact group. To eliminate this malfunction, you need to clean the contact connections or simply move them.
Since the mounting block is located under the hood and water can get into it, it is necessary to protect it from moisture. You can do this in this simple way.
It often happened that the connections and connectors themselves had to be changed because they failed and were completely destroyed due to corrosion.
Relay failure
Relay block on a car
Sometimes, as practice shows, it may not turn on the first time, or only when the power unit is heated. The solution is quite simple - replacing the relay. You can find it under the dashboard of your car.
Resistor
The process of dismantling the heater resistor
In this case, power will not be supplied, but only in the right position it is supplied directly, bypassing all other elements. Therefore, to eliminate the malfunction it is necessary to replace the part that has failed.
Switch
Of course, it is not recommended to carry out repair operations, since incorrect restoration of an element, especially in the electrical part, can lead to the others breaking down. So, the manufacturer suggests that car enthusiasts with experience in DIY repairs recommend replacing the complete heater control unit.
Fan motor burnt out
Location of the heater fan under the hood
So, you will have to replace the stove fan completely, which will entail expensive parts. Some motorists, in this case, look for used motors at salvage yards, which are much cheaper.
On the left is a burnt out motor, on the right is a new one.
Of course, it is unknown how long such spare parts will last, so it is better not to skimp and buy a new one.
Refinement of the thermostat and its connection diagram
The previously discussed modernization of the VAZ 2110 stove by replacing a 5-hole thermostat with a 6-hole thermostat is not least related to the diameters of the bypass channels of the devices that regulate the flow of Antifreeze between the small cooling circuit and the radiator of the heating system.
The standard size of the bypass channel on a 6-hole thermostat is 11 mm, and on a 5-hole thermostat the hole is measured with a diameter of 16 mm. Regardless of what type of thermostat you have installed, you can always further adjust the flow of coolant. Thus, the interior of the VAZ 2110 will warm up better at idle engine speed.
The main malfunctions of the stove in the domestic model VAZ-2110
Many stove problems occur during the changing seasons. With the onset of cold weather, drivers notice that the VAZ 2110 stove in their car does not heat well or does not work at all. No one ignores this malfunction, because it is always better to drive in a warm car. Among the types of breakdowns that may require stove repair:
- inability to regulate the heater temperature,
- malfunction of the damper or gear motor,
- flow into,
- ceiling temperature sensor malfunction,
- malfunction of the ACS control unit.
conclusions
Thus, through far from the most complex manipulations, you can achieve a truly amazing effect. Just sealing the cracks of the VAZ 2110’s thermal channels can improve the temperature balance inside the interior of your car, not to mention a lot of simpler and more reliable methods.
Before you jump into upgrading your heating system, it’s still worth checking the operation of the stove itself. Do not forget to change the air filter of the VAZ 2110-2112 furnace every 15 thousand kilometers. Poor heating of the interior can also be caused by a faulty fan or a leaking coolant radiator.
The modification of the VAZ 2110 stove is carried out in order to improve the operation of the system. Problems with the heater will cause discomfort to the driver and passengers during the trip.
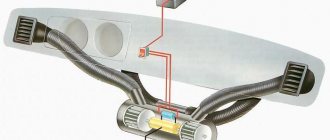
Diagram and design of the heating system in the VAZ-2110
The heating unit itself is represented by several components:
- Electric motor. A ventilation device is fixed on it, designed to pump a hot air flow.
- A radiator device, the failure of which will lead to the inoperability of the stove. On old-style heating systems, the radiator assembly is not equipped with a valve designed to shut off the flow of coolant through the device. Therefore, the unit practically does not leak, since leaks are usually associated with the faucet. The absence of this element ensures the fastest heating of the car interior.
- Three dampers. One of them is designed to close and open the heating channel, the second is used for recirculation, and the third is necessary to control the heater.
- The resistor device is designed to regulate the blowing speed.
Components of the heating system
Main parts of the heating system for the interior of a VAZ 2110 car:
- 1 - electro-pneumatic valve device;
- 2 — front housing of the air intake of the heating unit;
- 3 - water deflector device, presented in the form of an air intake flap;
- 4 — valve device for controlling the damper of the air flow recirculation system;
- 5 — recirculation system damper;
- 6 — rear part of the air intake housing of the heating unit;
- 7 — heating channel damper;
- 8 — damper of the heating unit control system;
- 9 — radiator unit;
- 10 - protective plastic casing of the radiator device;
- 11 - bushing installed in the steam outlet pipe;
- 12 — bushing for the supply line of the heating unit;
- 13 — bushing of the outlet pipe;
- 14 - electric motor of the heating system;
- 15 — electric motor housing;
- 16 - supporting surface of the damper drive lever used to control the stove;
- 17 — drive handle for controlling the damper of the heating system;
- 18 — gear motor of the drive device, presented in small sizes;
- 19 - resistor element;
- 20 - protective cover for the heating unit lining.
Connection diagram for blowers and controls
Main components of the stove:
- 1 - air ducts designed to warm up the rear of the car;
- 2 — plastic lining running from the center console to the rear seats;
- 3 - blowers designed to blow feet;
- 4 - main nozzles for ventilation of the car interior;
- 5 — side nozzles for interior ventilation;
- 6 — nozzles intended for heating the glass installed in the front doors;
- 7 — control knob for the interior heating unit;
- 8 — plastic housing of the air distribution device;
- 9 — damper for the foot warming system;
- 10 - plastic flap designed to warm up the windshield;
- 11 - heating unit.
The difference between old and new stoves
Old and new type heating systems have some features in connection diagrams as a result of the following differences:
- Radiator design. Heats in cars of different years of manufacture have different radiator assembly designs. In older heating systems, radiators are equipped with taps to drain the refrigerant.
- Different designs of SAUO controllers. Cars manufactured before 2003 used five position controllers. In newer versions of the car, devices numbered 4 and 5 were removed from the design.
- Micro-gearbox design. The main difference is the different type of resistor elements. When replacing elements, you need to consider whether these parts are interchangeable or not.
Design Features
For the VAZ 2110, it is possible to install two types of stoves - new and old. Regardless of the engine used (injection or carburetor), there are no fundamental differences in the designs of the stoves.
But what is the difference between the new and old type stoves? Let's try to figure it out.
- Radiator design. This is the main difference between the devices. Therefore, when replacing a radiator from an old one to a new one, be sure to take into account the installation nuances;
- The controller knob on stoves is slightly different. Old-style heaters have a main problem - they have been discontinued. They cannot be an analogue for 4 and 5 position controllers, which began to be equipped with dozens of them in the fall of 2003;
- The micro-gear motors for the stoves are different, starting in September of the same 2003. The difference lies in the shaft position sensors (resistors). Therefore, when making repairs, make sure that the devices are truly interchangeable and that you bought old-style resistors for your old stove, not new ones. Otherwise the gearmotor will not work.
We recommend: Characteristics of the generator for the VAZ 2101, diagram of its connection, disassembly and assembly
Disadvantages of the heater in the VAZ-2110
The main disadvantages, as a result of which car owners are forced to improve and modernize the heating unit:
- Weak air flow to the side mirrors and driver's feet. This problem often occurs during normal operation of the heating unit.
- Often consumers encounter a leak on a radiator device. The unit is equipped with a special tap, which wears out over time and begins to leak coolant. The faucet requires repair, but often the problem can only be solved by replacing the radiator assembly.
- The central air duct of the system includes two parts that are not sealed together. From the radiator device, this blower must supply a heat flow to the feet of the passengers sitting in the rear. If we take into account all the bends, then this is at least 2.5 meters. Of course, the heat flow does not reach the rear passengers.
Symptoms of a heater malfunction
The main signs by which you can identify problems with the heating unit:
- The temperature mode of the heater is not regulated. The problem usually lies in the control unit or in the operation of the heater dampers.
- The sensor located on the ceiling does not function. It is designed to determine the temperature inside the car.
- The heating unit does not function; only cold air flow is supplied to the vehicle interior.
- The side windows of the car or the feet of the driver and passengers are blown with hot air ineffectively.
- The volume of refrigerant in the cooling system decreases. The problem can manifest itself covertly or overtly. In the latter case, a leak can be noticed from the lines of the heating system or radiator device.
- The heating unit functions, but is very noisy.
The channel In Sandro's garage spoke in detail about replacing the electric motor of the heating unit on the "ten".
Causes of poor foot airflow
Heater malfunction
Air through the cabin filter is taken from the street by the rotating blades of the electric heater motor. Through a damper system, air is distributed through air ducts and supplied into the cabin through deflectors and non-adjustable grilles.
Air, like any gaseous medium, tends to follow the path of least resistance. Therefore, it is logical that the air flows first come out of the central and side deflectors. The feet of the driver and passengers are blown last. Structurally, the air ducts to the central deflector and the upper side airflow points have a larger cross-section, and it is much easier for air to pass through them.
Initially, you need to make sure that nothing interferes with the intake of air from the atmosphere. After all, if the air is supplied in insufficient volume, then it will not be enough to supply all airflow points with the intensity that was calculated at the design stage of the car.
Check the condition of the cabin filter. To do this, remove the wipers and frill. The cabin filter is located on the right side of the vehicle under the windshield. It is covered with a plastic casing, which is secured with four self-tapping screws. Unscrew the screws and remove the cabin filter. We start the engine, warm it up to operating temperature and check the operation of the stove. If the situation has improved, change the cabin filter and close the issue.
The second common cause is a clogged heater core. In this case, the heating of the interior will be weak, because warm air does not come out of all the deflectors well, and not just into the legs. But the fact is that when driving for a long time, your feet begin to freeze first, so it seems that the problem is in this part of the airflow.
Video: Why the stove does not blow at the feet of VAZ 2111,2110
This malfunction is easily diagnosed. We find two pipes for supplying antifreeze to the heater radiator (rubber hoses on the left side in the direction of travel of the car). With the engine warm, carefully touch the two pipes one at a time with the heater running at full power. The difference in temperature between the pipes should be minimal. If one pipe is hot and the second is cold or barely warm, we wash or replace the heater radiator.
Checking the operation of the dampers
There are nine exit points for air flows from the heater on the VAZ-2110:
- central deflector;
- two side deflectors and two windshield air vents;
- heated feet of the driver and front passenger;
- two outputs for heating the feet of rear passengers.
In an ideally operating system, the pressure generated by the heater motor is sufficient to create an effective flow to warm the feet. However, over time, gaps form in the joints of the air ducts, and the dampers of the VAZ-2110 heater begin to fit loosely to the body. This leads to atomization of the air flow. As a result, a minimum amount of air reaches the distant exit points.
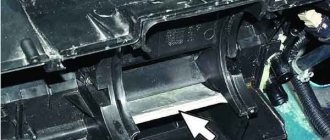
First, dismantle the panel with the central deflector. It is held in place by four plastic clips. To remove it, simply pry it off one of the sides with a suitable object, such as a flat-head screwdriver. Be careful: the clips are fragile.
Evaluate the operation of the damper. In older cars with a manual damper drive, pay attention to the play in the linkage of the rods. A broken rod system will not allow the damper to fit tightly to the body in the extreme position, which will cause air to leak from the cold circuit. The problem is corrected by adjusting the damper. In a mechanical drive, it is possible to shorten the rod due to a movable lock on a gear rod or a threaded tip. During the adjustment process, check that the position of the switch on the panel corresponds to the actual position of the damper.
Another reason why the VAZ-2110 stove does not blow into your feet is a malfunction in the operation of the automatic heater control system (AHC) unit or the gear motor of the VAZ-2110 stove. In this case, there is usually insufficiently warm or even cold air from the stove operating in maximum heating mode. This is due to the incorrect position of the damper in which the gearmotor sets it.
Evaluate the operation of the gear motor of the VAZ-2110 stove. To do this, visually check how it closes the damper when switching modes. The easiest way to do this is to remove the panel with the central deflector. Move the temperature knob to the extreme position (for example, set the minimum temperature), then sharply switch to the opposite mode. The damper should completely block the channel visible from the driver's position. If this does not happen, the problem lies in the gear motor or the automatic control system unit. Check the serviceability of the gearmotor and unit.
Video: Airing the legs of VAZ 2112, 2110
How to modify and modernize the stove with your own hands?
There are many options for tuning and improving the operation of the heating unit, which you can do yourself. To implement each task, you will have to completely or partially disassemble the heating unit.
Before remaking the heating unit of the VAZ 2110, it is necessary to seal the main air duct as much as possible.
Improved side ventilation
There are two ways to improve side ventilation:
- lay the corrugation, which will be aimed at blowing the glass of the side windows;
- modification of the VAZ 2110 stove may involve sealing all the cracks that lead to loss of air flow.
The first option is more effective for blowing the feet of passengers sitting in front and behind. In fact, practice shows that this method has no effect for blowing glass on windows. Therefore, to solve the problem, all the cracks in the panel are sealed.
The task is carried out using silicone sealant or a special anti-creaking agent. All cracks located around the perimeter on the upper and lower components of the center console panel are sealed. All holes located around the fasteners are treated with silicone.
Damper modernization
In cars manufactured after 2003, setting the damper to blow the feet does not produce results, since the heater blows in all directions. In older versions of the car, the damper works better.
The upgrade procedure is performed as follows:
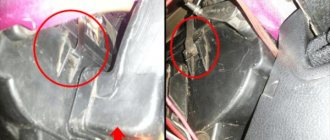
- Using a metal saw, you should cut out the end parts of the damper. There is no need to dismantle the elements of the heating system. The place that needs to be cut is marked in red in the photo below.
- The flap intended for blowing the windshield does not need to be touched. If the consumer cuts off the end parts on it, then the airflow along the edges of the windshield will be worse.
- To increase air intake, a piece is cut out onto the windshield on the driver's side. This part is marked in green in the photo above.
- It will take a long time to cut out, it must be done carefully. The task may take several hours to complete.
- Next you will need a piece of soft aluminum. Alternatively, you can use iron from a coffee can, as shown in the photo. The iron is cut out with a regular knife and fixed on the stove elements.
Trouble-shooting
Eliminating the inability to regulate temperature
There may be several reasons for this malfunction:
- malfunction of the control unit,
- damper malfunction.
Any of these breakdowns leads to incorrect operation of the heating device.
If the heater controller fails, the command to extend the damper may not be given. Therefore, you should immediately check the temperature sensor located next to the ceiling lamp. To check, you need to turn the temperature control lever several times from left to right. The temperature of the air flow can be controlled tactilely. This test is based on identifying the operating condition of the temperature sensor in the extreme position of the handle. If the flow temperature changes only when the sensor is in the extreme position, then it must be replaced. If it does not change significantly, you should look for the cause of the breakdown elsewhere.
Troubleshooting the heater
To check the functionality of the heater, you need to remove the central deflectors. To do this, you need to bend the special antennae and move the flap by hand. You can get to the latter through the engine compartment. When choosing this spare part, it is better to give preference to the aluminum rather than the plastic version. The radiator of the VAZ-2110 heater requires the largest amount of work when replacing it, because for this you have to remove the entire heater. If you do the work yourself, you can save a lot of money. Read more about how to change a radiator.
Troubleshooting gearmotor
When the heater fan begins to “drive” only cold air, then we can assume that the heater has failed. In modern models, dampers and regulators rarely fail, due to the fact that aluminum is used for their manufacture at the factory. The gear motor is to blame for 90% of stove failures. This part definitely needs to be replaced.
In this case, car repairs are carried out in the following order:
- We dismantle the wipers, remove the frill,
- move the frill to the side, use a short Phillips screwdriver to unscrew the three fastening screws,
- unfasten the wires,
- connect a new gear motor,
- install it back.
It is better to perform this type of repair with an assistant. It will switch the air supply from hot to cold mode and back. After installation, the removed parts are reassembled in reverse order.
Elimination of poor flow of hot air into the area of the feet and side windows
This problem is very common in domestic cars. For this reason, in winter your feet get cold and your windows fog up. Driving a car in such conditions is very difficult. The only solution is to modernize the air flow channels.
The operating procedure is as follows:
1. Make sure that the stove is functioning perfectly. When its operation is ideal, you can begin modernization.
2. Remove the panel and disassemble it into its component parts.
3. Solving the problem of blowing side windows. This can be solved in two ways:
- We install a new corrugated hose.
- We seal all the cracks on the panel.
To improve efficiency, it is better to choose the second option. We continue to work.
4. We cover all the cracks between the bottom and top of the panel using anti-creak tape.
5. We glue all the holes that have fastenings.
6. We are modifying the heater dampers, which help direct air to certain areas. At the factory, this damper is poorly pressed to the body, because of this, part of the heated air is lost between the cracks and wanders somewhere in the panel.
7. We proceed to dismantling the damper. We remove it and completely remove the yellow factory seal.
8. We glue the valve with modelin and seal all the cracks. This procedure will help the air flow to ideally exit the damper as intended. On the body, instead of a sponge, it is better to use Bitoplast 10, which is diligently glued in several layers.
9. A lot of hot air is lost on the way to the driver's side window. This large gap needs to be sealed with mounting material. It will not creak while moving.
10. We are modernizing the air ducts leading to the feet of the front passengers. The block that distributes the warm flow to the feet has a huge gap that definitely needs to be sealed. For this purpose, the use of a corrugated tube is allowed.
11. We remove the completely standard air distributor from its original place, insert corrugations into all the resulting holes and fill everything with foam. The diameter of the pipe used must be exactly 40 mm.
12. It turns out that corrugations will be installed: one for the passenger’s feet, another for the driver, and a third for the rear passengers’ feet. We install all this in place and connect it.
Troubleshooting poor air heating by the stove
In this case, you can modify some elements of the stove:
1. Replace the heater damper with an aluminum one. This will help retain heat and prevent fragments from deforming.
2. Replace the heater installed on the model:
- “2112-01” - does not have a filter for air purification.
- “2112-02” - equipped with such a filter, but does not have an air recirculation function.
These filters can withstand a mileage of 15 thousand kilometers.
3. Install pre-heaters that will help warm up the engine and interior of the car even faster.
For more significant damage, the stove may need to be replaced. Most often, replacement is made during.
You can see in the video how to remove the VAZ-2110 stove and replace it.
Heater prevention
To prevent damage to the heating unit, it is necessary to follow the preventive measures of the system:
- The refrigerant level in the expansion tank is periodically checked. If there is a shortage, antifreeze is added, the causes of the leak must be eliminated.
- To ensure high-quality operation of the cooling system, only high-quality antifreeze is used.
- The engine temperature must not be allowed to increase. You can monitor this parameter using a sensor located on the instrument panel.
- Water is not used instead of refrigerant, since this liquid has a lower boiling point compared to antifreeze. Using tap water will cause rust and rapid wear of system components. Filling with water is allowed only as a last resort - if a leak occurs, the problem is discovered on the road, and there are no car shops nearby.
When to change the radiator?
A heater radiator leak is an indisputable failure; it is immediately noticeable, if not by traces of antifreeze under the car, then by a drop in the liquid level in the expansion tank.
It is much more difficult when there seem to be no leaks, but at the same time, the radiator does not heat even at a high antifreeze temperature. In this case, the reason for the drop in heater temperature may be either a clogged or coked radiator, or a number of other reasons:
- air lock in the cooling system;
- non-working thermostat;
- breakdown in the hot air distribution system;
- air leakage through leaks in air ducts (this is a proprietary disease of the entire tenth family);
- low level of antifreeze in the expansion tank.
Antifreeze leaks under the radiator are a clear reason to look for a leak.
Heating system diagnostics
In short, before buying a new radiator or removing an old copper one for repair, you need to check the entire cooling system in detail so as not to throw money away.
By the way, about money and wind - at the service station they will ask for at least 2 thousand rubles to replace the heater radiator. Therefore, it is cheaper to do all the work of replacing the heater core yourself.
Video “Guide to replacing the damper gear motor”
The channel In Sandro's Garage presented instructions for changing the damper gearmotor in a garage environment.
Cars produced in Tolyatti are not distinguished by consistency in both quality and defects. Here it can turn on and turn, but on another car of exactly the same year of manufacture - like enchanted. It turns, but does not blow, or blows, but in the wrong direction, or blows, but with cold air. We are talking about the VAZ 2110 heater. Many people drive for years and do not complain, and the temperature is fine, and the automation works. Others have the opposite picture. To understand all this, let's look at the design of the dozens of stoves, air ducts and curtains. Maybe we'll come up with something.
Content:
Gearmotor repair
Hyundai Accent silver Logbook Replacing the heater fan
If you still have a desire to repair the gear motor, and not just replace it with a new one, then the next part of our article will be of interest to you. It’s worth mentioning right away that the details of the new model are significantly different from their predecessors.
Old style part
First of all, let's look at the principle of repairing gear motors on an old-style VAZ-2110. Such a part may have a plastic or metal body. The first option is much easier to work with, but a gear motor in a metal case will be difficult to remove without denting it.
We already know how to dismantle such an element, so let’s proceed directly to disassembling it and identifying faults. We remove the adapter from the shaft, which is inserted into the damper and serves to transmit rotational energy. You can safely pull it towards yourself, since there is no glue or stoppers here.
There are latches along the entire perimeter of the case. To deal with them, you need to use flat screwdrivers, which need to be driven between the latch tongue and the body. Raise the eyelet quite a bit and insert a second screwdriver next to the latch. The halves will open due to the turning movement. Similar actions will need to be performed several times throughout the entire body.
You need to make sure that small parts that may get lost do not fall out. We completely remove the second half of the housing, pull it up from the axle and remove the three gears. On the second half of the housing there should be an electric motor with a gear and shaft.
When removing the electric motor, you need to pay attention to the worm gear, at the end of which there is a segment responsible for centering the shaft and holding the pair of gears in mesh. The item is small and can easily get lost
The motor housing has a locking screw that prevents the motor from turning inside the housing.
We remove the motor, remove the gears and segment from the shaft. We carefully inspect all parts for breakage and defects. If nothing like this is found, then we will examine the gearmotor further. In the place where the wires are connected, the motor parts are secured. We unbend it with available tools and release the bottom part.
Again, we act carefully and carefully so as not to break or lose anything. Inside there is a permanent magnet, which, due to the magnetic field, holds the motor armature in place
In order not to cause trouble, you need to take the unit in your hand and press it with your finger on the shaft. Using the fingers of the other hand, we grab the anchor and separate the motor into parts. Do not grab the windings as they are easily damaged. We see two brushes that are attached to the bottom part. Using a screwdriver, pull the brushes by their holders. At the end of the armature there is a washer that prevents the brushes from being easily removed. There is no reason to remove the washer.
The armature has three windings, which are subject to careful inspection and ringing with a tester. We also inspect all dismantled elements for critical abrasions, melting, and soot deposits.
Reassembling the gearmotor is carried out in the reverse order, carefully and with extreme caution.
New sample part
Dismantling of the new type gearmotor is carried out according to a similar scheme as described above. When the part is in your hands, you need to disassemble the body, which is held in place by clamps. They need to be carefully pryed off with a flat screwdriver. First of all, you need to examine the motor for any malfunctions. To do this, you need to connect it to the connector located in the engine compartment. The micromotor must be disassembled, for which it will be necessary to bend the pressed side
It is important to note the position in which the cover is located relative to the body. This will help maintain the correct polarity of the electric motor during assembly.
If you find a fault in the motor, you will need to look for a break. When the part is running, it is necessary to lubricate it and the gears on the gearbox. Silicone-based lubricant is ideal and can be used over a wide temperature range
It may be necessary to replace the damper position sensor; it is worth paying attention to. Assembly of the part is carried out in strictly reverse order.
Repairing and replacing a heater gear motor is not the easiest job a car owner may encounter. But there is nothing super complicated about this either. If you have the desire, minimal experience and imagination, you can successfully fix the problem with the car heating system and create a comfortable climate in the cabin of your car.
VAZ 2110, stove device
The car has a flow-exhaust ventilation and heating system, and all the air enters the cabin through the windshield lining, either under natural pressure while the car is moving, or forcefully, under the action of a heater supercharger. The inlets are equipped with valves that prevent warm air from escaping from the passenger compartment. The air flow is formed so that it can exit between the cracks in the panel onto the windshield, into the deflectors at the ends of the doors and through the ventilation holes in the driver's and passenger's feet.
The air that enters the cabin can be heated by passing through the heater radiator if the air duct damper is placed in a certain position. Warm air is also supplied to the windshield, to the front side windows through the deflectors, at two points to the driver's and front passenger's feet and to the rear of the cabin through the trim on the tunnel and through the air duct under the front seats. The stove can operate in air recirculation mode, but only if the engine is turned on.
A recirculation button is installed on the instrument panel, which activates an electric vacuum valve that shuts off the supply of outside air. Moreover, the system is designed in such a way that warm air in recirculation mode will inevitably be heated up as it passes through the stove radiator. In general, there are all the prerequisites that it won’t be cold in the top ten in winter.
The radiator is the basis of the automotive heating system
Special tubes are connected to the radiator, through which coolant flows inside. Its circulation is possible due to the operation of the pump - a kind of pump that promotes the movement of liquid through the heating and cooling system. The radiator is a real heat exchanger. When the engine heats up, antifreeze takes heat from the power unit. After which the liquid enters the heater radiator. Then the radiator is heated, like a regular battery. The second stage of heat exchange occurs at the moment when the driver, using the ACS unit, adjusts the position of the dampers.
The heater fan forces cool air through the radiator. If the lever position is set in an intermediate position, then part of the air passes through the radiator, while the other bypasses it. The radiator gives off some of the heat to the air, and the cold flow thus reduces its temperature. In order to become more familiar with the structure and operating principle of a car heater, we recommend that you pay attention to the complete diagram of the heater design.
If the heater fails, then a comprehensive approach must be taken to solving the problem. As a rule, if the stove stops functioning correctly, this is evidence that one of the system components has failed.
The most common malfunctions of the car interior heating system:
- Malfunction of the ACS unit.
- Drive failure.
- Failure of the temperature sensor.
- Leak in the heater radiator.
- Poor quality sealing of air ducts.
Even a novice motorist can solve most heater breakdowns. Of course, there are a number of problems associated with the heating system, when a beginner cannot practically do anything on his own. In this case, it is best to contact a service center.
Has the stove stopped heating? It is necessary to immediately check the quality of sealing of the air ducts through which the air flow moves. The resulting cracks through which heat escapes must be treated with silicone. Eliminating the gaps will help the air to heat up faster and enter the cabin with a sufficient amount of heat. Another problem that brings headaches to VAZ-2110 owners is a leak in the radiator. There are not many ways to eliminate this ailment: either solder and extend the life of the device, or replace it with a new one.
If, after a thorough inspection and testing of all components for functionality, the stove still refuses to function correctly, then make sure that there is no air lock in the system, and that the radiator itself is not clogged with dust and dirt. These are also very popular problems that novice drivers often ignore.
Experienced car enthusiasts conduct a comprehensive check of the heating system twice a year. Novice drivers need to understand the system in order to quickly, efficiently and independently fix any problems that arise. This not only saves money, but also your time. It is advisable to always have the diagram at hand, so as not to put off troubleshooting until later. Timely care and repair of the VAZ-2110 stove will guarantee that the interior of your car will have comfortable conditions in any weather.
The heater in the VAZ-2110 car is represented by a separate system. Its first element is the heater itself - the unit responsible for preparing the incoming air. This device is located under the hood of the car. It regulates the air supply speed and its temperature. The next element is the air distributor, the air ducts of which are located in the car interior. For tens, a special heater “2110-01” is produced, which is distinguished by the presence of an evaporator in the air conditioning system.
The heater control circuit for this VAZ model is shown in the photo:
VAZ 2110, heater damper and air flows
In fact, the situation is completely different and if you set a goal to make the interior truly comfortable in winter, it is necessary to modernize the VAZ 2110 stove. In general, all work with the 2110 stove should be carried out only when there is one hundred percent confidence that the stove is functioning normally, from the point of view from the manufacturer's point of view. That is:
- there are no air pockets;
- The heater radiator is fully operational, there are no leaks, no damage;
- all furnace mechanics work properly - dampers, deflectors and screens;
- the interior is more or less insulated, blowing and drafts, leaks in door and glass seals have been eliminated;
- The stove electronics show no signs of malfunction, modes switch, and the motor pumps air.
Only then can you begin to redesign the stove design.
The simplest thing that can and should be done is to modernize the damper as much as possible. Naturally, we will not present any patented pattern from coffee cans and TV boxes. Let's just pay attention to the fact that the damper has three positions - all on the glass, both yours and ours, and all on the feet. Frankly, in cars after 2003, none of these modes really work, thanks to the headless design of the damper. And corresponding execution. If the damper does not direct air correctly in any of the modes, you need to investigate the reasons locally, since each car is full of individual surprises and leaks. We'll deal with them.
Instruction No. 1
It often happens that the engine temperature does not rise to the optimal temperature during operation. For example, on the body of a thermostat device, 90 degrees is marked, and the temperature is not higher than 85. This problem can be solved with the help of a simple modification - modifying the rod. The fact is that in the process of opening the thermostat, the rod rests against the cover. If you expand the special recess in the lid, the thermostat will operate later. Therefore, it is easier to replace the rod with a bolt of the appropriate size.
Now the temperature will remain 90-92 degrees, as stated on the thermostat housing.
Source
Leaks and heat leaks
If you still get angry and dismantle the entire interior of the VAZ 2110, you can discover a lot of new things in the laws of aerodynamics. It turns out that, as conceived by the designers, the central air duct, consisting of two halves that are not sealed in any way, must somehow supply heat from the heater radiator to a total distance of about two and a half meters, including all bends.
Naturally, at the end of this tunnel there can be no talk of any warm air. Here is the first conclusion, and perhaps the main one: before you remodel the stove and air ducts and put sewer pipes into the car instead of them, it is still worth sealing the central air duct as much as possible, from which the warm air disperses not only through the sleeves and deflectors , but it is spent completely uselessly.
Insulation
Sometimes hot air does not flow well to the feet and side windows. Although the stove works fine, for some reason my feet are cold, and the side windows are foggy. Even if you install a new corrugation, it is unlikely to help much.
It is also necessary to eliminate all the cracks so that the warm air does not fight with the cold air, but goes straight to the target. Everything on the panel needs to be sealed with anti-squeak, and in some places with polyurethane foam, which will not creak and will also help retain heat for a while.
Radical measures to reconstruct stove 2110
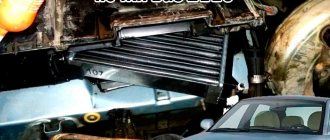
Not for the faint of heart, but these measures will really help bring order to the temperature in the cabin, even without completely disassembling it. First, let's take on the side air ducts. To bring them to life, you need about 5 meters of corrugated hose of suitable diameter and a can of construction foam. You shouldn’t pay much attention to aesthetics, the main thing is warmth, and the air ducts are still hidden under the panels. The corrugations are laid into the side air ducts to the middle and carefully filled with foam along the diameter of the shrinkage. The same applies to central air ducts. To prevent the hoses from shaking on bumps, they can be secured with a little tension.
There is another radical measure to increase the temperature of the coolant in the heater circuit and improve its circulation - installing an antifreeze pump for the GAZelle. It fits perfectly near the base of the battery; all that remains is to display the activation button on the dashboard. As a result of all these manipulations, the temperature in the cabin will rise to a normal level and a couple of days spent on upgrading the VAZ 2110 stove will not be in vain. Now even in winter it will be possible to travel comfortably in a ten-wheeler, which is what we sincerely wish for everyone.
Cooling system diagram
All the main elements are described below.
1 – heater radiator; 2 – steam removal hose of the heater radiator; 3 – outlet hose; 4 – supply hose; 5 – coolant temperature sensor (in the block head); 6 – pump supply pipe hose; 7 – thermostat; 8 – filling hose; 9 – expansion tank plug; 10 – coolant level indicator sensor; 11 – expansion tank; 12 – exhaust pipe; 13 – liquid chamber of the carburetor starting device; 14 – radiator outlet hose; 15 – radiator supply hose; 16 – radiator steam outlet hose; 17 – left radiator tank; 18 – sensor for turning on the electric fan; 19 – fan electric motor; 20 – electric fan impeller; 21 – right radiator tank; 22 – drain plug; 23 – electric fan casing; 24 – timing belt; 25 – coolant pump impeller; 26 – supply pipe of the coolant pump; 27 – coolant supply hose to the throttle pipe; 28 – coolant drain hose from the throttle pipe; 29 – coolant temperature sensor in the outlet pipe; 30 – radiator tubes; 31 – radiator core.