Where to begin?
From the choice of soundproofing material, of course! On the modern market, the choice is huge; some even advise processing the foam rubber yourself, impregnating it with rubber-bitumen mastic; it is much easier to purchase ready-made material.
And this is what you will need:
— Vibroplast (or its analogue)
Vibroplast is a single-layer plastic material covered with foil that absorbs vibrations.
Vibroplast
Vibroplast effectively eliminates vibrations, so it sticks to all surfaces where metal is present.
Splen (isolon, isotone or analogues)
Splen is a universal heat-insulating material that absorbs noise and vibration.
It is laid on top of the vibroplast and wherever possible.
— Bitoplast (analogs are also possible)
Sound-absorbing material like foam rubber.
Bitoplast is used on the inner parts of doors and front panels.
— Anti-squeak tape
The tape is pasted in places of friction.
Aluminum tape (aluminum tape)
Serves for gluing splenite joints.
Application of materials by zones
Vibroplast - glue the outer and inner surfaces of the door, the first layer is placed on the roof, trunk lid and hood, dashboard, engine compartment panel, floor in the cabin and trunk.
Splen (on sealant) - glued on top of vibroplast on the floor in the cabin and trunk and on the engine compartment panel.
Splen (on glue) - goes to the walls and roof.
Bitoplast - glued to the inside of the dashboard and door trim.
Anti-squeak tape - cut into strips and glued to the instrument panel, door trim, and flammable plastic around the perimeter in places of possible surface friction.
Aluminum tape – fastens the joints of the splenium.
Maximum required amount of material
VAZ sedan and hatchback:, 2110, 2112, 2114, 2115, Priora, Granta, Kalina
Vibroplast – 32 sheets, 4 mm splen with sealant - 11 sheets, 4 mm splen with glue 7 sheets,
bitoplast – 1 roll, anti-creak tape – 1 roll, aluminum tape (aluminum tape) – 2 rolls.
VAZ coupe: 2112, 2113, Priora
Vibroplast – 23 sheets, 4 mm splen with sealant - 6 sheets, 4 mm splen with glue - 6 sheets,
bitoplast – 1 roll, anti-creak tape – 1 roll, aluminum tape (aluminum tape) – 2 rolls.
VAZ station wagon: 2111, Kalina, Priora
Vibroplast - 39 sheets, 4 mm splen with sealant - 14 sheets, 4 mm splen with glue - 8 sheets,
bitoplast – 1 roll, anti-creak tape – 1 roll, aluminum tape (aluminum tape) – 2 rolls.
In addition to the material itself, you will need
- Durable and sharp knife.
- Scissors.
- Technical (construction) hairdryer.
- Iron rolling roller or its equivalent.
- Marker.
- Roulette.
- White Spirit.
- And 2-3 days of free time if you do everything alone.
Let's get started
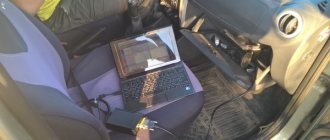
After you have decided on the materials, you need to disassemble the interior of your car - remove the seats and all the interior trim, the front panel, as well as the standard sound insulation, if any.
In the photo we see the interior of the car without seats and floor mats.
When disassembling the interior, it is important not to confuse or lose the fastening parts; we recommend putting them in boxes or jars and labeling them, and gluing small fasteners with tape to the unscrewed part.
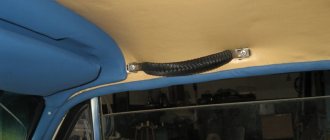
We begin pasting the interior from the ceiling and doors
- First, we glue vibroplast to the ceiling and doors, having previously cleaned and degreased them with white spirit. It is necessary to glue as quickly as possible, before the material cools down.
Attention: It is advisable to heat the vibroplast with a technical hair dryer or a regular heater with a fan, so that it sticks better and fits in shape.
- When installing, use a metal roller; if you don’t have one, use any round tool.
- Avoid air bubbles; condensation may subsequently accumulate in them, which will lead to corrosion of the body.
- Vibroplast is mounted on doors and ceilings in cross-section strips, which is stronger and more durable.
Attention: For ease of installation, it is recommended to roll the vibroplast into a roll and unfold it as it is glued.
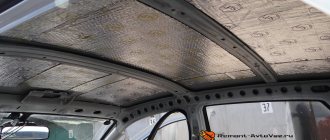
- We glue splen on top of the vibroplast on the ceiling.
Ceiling covered with vibroplast.
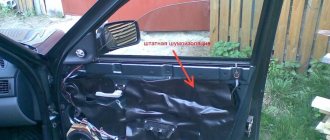
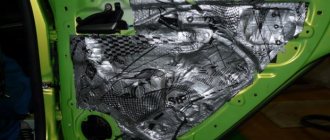
Sound insulation of VAZ 2110 doors from the inside using vibroplast.
We glue splen on top of the vibroplast.
Then we cut out and glue the vibroplast on the outside of the door.
Sound insulation with vibroplast outside.
Helpful advice:
Buy at least a dozen spare door pistons, they break easily, and the ceiling pistons (those at the back) need new ones, since they are disposable.
On top of the vibroplast there is splen again. When gluing doors, it is important to ensure that the insulating material does not interfere with the operation of mechanisms and locks.
Door covered with splen.
Bitoplast is glued directly to the door trim itself from the inside.
The door trim is covered with bitoplast.
You can do without vibroplast when insulating the rear wheel arches, spare wheel well and rear doors. It is convenient to glue isolon to bare metal with polyurethane foam, which itself is a sound insulator. The foam can be used to treat the seat attachment points and roof rails on the side.
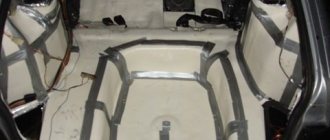
Let's move on to pasting the interior from below
Glue the bottom in the same order: vibroplast, then splen.
The bottom is covered with vibroplast.
Splen is glued on top of the vibroplast.
The same operation with the trunk.
Trunk covered with splen.
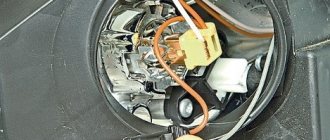
Let's go to the dashboard
We cover the space behind the instrument panel with the same tape as in the picture,
and we insulate the instrument panel itself from the inside with bitoplast, choosing 10 or 5 mm, depending on the tightness of its fit. Then we screw everything into place.
Sound insulation by splendid space behind the front panel.
The hood soundproofing looks like this
Hood with glued sound insulation.
If suddenly something remains unclear to you, be sure to watch the training video.
What will we get after soundproofing the trunk of a VAZ 2110
The VAZ 2110 has the lowest costs for sound insulation among all models of the tenth VAZ family - only about 2000-2500 rubles for the material.
The golden rule of a “quiet car” is comprehensive sound insulation, as is done in the production of trucks. Since even when installing sound insulation from one continuous layer, its effect may not be felt at all and will turn out to be a waste of financial resources. By the way, all the work described above (if carried out correctly) will also help you get rid of trunk squeaks.
Hello people! Well, what I want to say: “We built, built, and finally built!” Just not a house, but better)), a wooden floor in the trunk.)) Owners of the tenth models will understand what the smell is like in the trunk after winter. Condensation does its job...
The idea itself had been spinning in my head for a year, but everything was somehow forgotten. Having assembled the CV in the winter, I began to understand that something had to be done with the trunk! Namely with the spare wheel... Having purchased everything necessary, quietly, in the evenings, on weekends, everything began to be built) About I won’t say anything about the dimensions, since everything was done locally, otherwise it might not work out!
After I took off the top carpet, I found behind the spare tire a bonus that I didn’t need at all)) Champion windshield wipers, like new, but time took its toll, so I threw it out)
I decided to start this topic because of questions like “What should I do?” To bet or not?? and the like, which are periodically repeated by new ten-managers. I don’t pretend to be complete and completely objective; after all, I’m not a professional expert or tester. True, everything listed below has been tested on myself, so what are the pros and cons? not advertising, but real ?life? impression. I will also note that my list will not mention frankly tuning things, there will only be those that, with a relatively small investment, improve the overall consumer qualities of the car. So, you have become/are the owner of a car of the tenth family. What else, besides the typical set of tectyl/fender liners/mats/music? it is worth spending money, and what results should be expected from this spending. The must-have set in my opinion looks like this: 1. Front strut strut. Preferably? adjustable (to avoid installation problems). Manufacturer ? any, as long as it is installed properly and done conscientiously. For eight-valve cars, an option with an additional engine mount is very desirable. Price? 800-1500 rubles. Pros: — increased body rigidity; — a rigid connection between the supports of the front pillars, which allows you to maintain the body geometry specified at the factory; — reducing the movement of the power unit (for a spacer with additional support); — clearer response to the steering wheel. Cons: — in case of a side impact it can “go?” not one, but both supports. Photo: Spacer: Spacer with additional motor support for 8V:
Useful tips
- Be sure to vacuum the interior, the surfaces to be pasted must be cleaned of rust and dust, degreased and dried. Cleanliness of the areas to be pasted is the key to successful sound insulation sizing.
- Attention: you are working with flammable liquids and materials, follow fire safety rules, ensure ventilation in the work area and have a fire extinguisher on hand.
- All sound insulation elements should be glued only using their own mounting layer; the use of glue or additional fasteners is not recommended. Remove the protective layer (paper or film) and glue the material to the installation site.
- Smooth the coating from the center to the edges. Wear protective gloves when working.
- Degrease the surface before applying the second layer of insulation.
- Get spare plastic fasteners, if available.
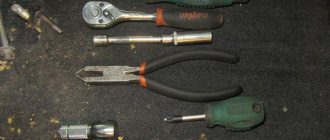
Tools
The necessary tool when working on soundproofing the trunk:
- Screwdriver Set
- Solvent or alcohol for degreasing surfaces
- Rags
- Shoe knife and scissors
- rolling roller
- Hairdryer (if the temperature is below +30)
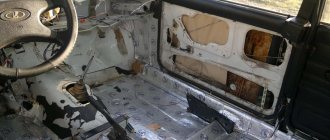
Disassembling the trunk
Soundproofing the trunk in 2110 begins after preparing the tools and purchasing materials, choosing a day off and driving the car into the workroom (if it’s warm, you can do it outside):
- Empty your trunk completely
- You dismantle the carpet that was lined from the factory, remove the upholstery from the trunk lid. The end result should be only bare metal.
- The work here is so simple that this stage is unlikely to cause difficulties or problems for anyone
- The metal in a car is usually treated with an anti-corrosion agent from the factory; it will need to be removed using a solvent.
- There is no need to worry about this, the metal will not rust, because all soundproofing materials themselves have excellent anti-corrosion properties
- But if this product is not removed, then the soundproofing material will peel off from it and there will be no benefit.
- Then (after washing off the anticorrosion solvent) you need to wait a little so that the metal is completely dry and only then can you stick on our soundproofing material
Completely disassembled trunk to bare metal
- The first layer is vibromaterial, any instruction will confirm this; the basis of such material is usually bitumen or bitumen-mastic fraction
- Simply measure the required piece of vibration-isolating material (or make a template from cardboard) and cut it out with scissors
- Then you should heat the cut piece with a hair dryer until the black bitumen side becomes sticky (heating may not be necessary in the summer heat)
- Then you apply it to the surface of clean metal and begin to roll it out with a rolling roller from the center of the piece to the edges, applying some effort
- The main task here is to ensure 100% adhesion of the vibrating material to the desired surface, and without air bubbles so that after it cools, the structure becomes monolithic
- For better adhesion, it is allowed to heat the front side of the material (foil) during the rolling process.
- The sheets are laid with a slight overlap
- It is important to ensure that there are no air bubbles left after rolling, otherwise the effect of vibration isolation will be reduced.
VAZ 2110 trunk, noisy with vibration insulation
- Apply a second layer (for example Accent) on top of the first
- Everything will be much simpler here, plus there is no need to heat the material
- Cut off the desired piece of Accent
- Remove (remove) the protective layer and glue it in place
- Smooth the material around the entire perimeter
- It is important to pay special attention to the sound insulation of the arches, which is also part of the trunk.
- The trunk lid is soundproofed in the same way, but here it is worth remembering the extra weight
- If you follow the two-layer scheme (vibration isolator, noise absorber), then the weight of the cover will increase significantly
- And thus the springs that lift the lid may no longer lift it
In this case, you need to do one of two things:
- Either use the first layer that is less heavy, or do not glue it at all, but use only a layer of noise absorber
- Immediately replace the springs with new ones, or install additional stops for the trunk lid
Advice: when performing sound insulation, try to use pieces of the largest possible size and vibration and noise materials, this will make the effect, after the work done, larger and more noticeable.
- Anti-creak is glued at the points of contact of the panels
- Here are the basic rules, the observance of which will help you to properly soundproof your trunk, photo below
The trunk is glued with a second layer of sound absorber