How to properly configure the DVR yourself date and time
- Setting the setting language. We exhibit - Russian;
- Recording permission. Here you can configure, in addition to the resolution itself, the number of frames per second. The ideal option is Full HD 1920×1080 30p. In some cases, the manufacturer may recommend setting other indicators; Set the camera rotation. Here you can select the options rotation, top-bottom. With a standard camera installation, the “top-bottom” indicator is selected;
- Adjusting the length of the recording cycle. Most models have the ability to set time periods for one file from 1 to 45 minutes. For greater convenience, it is recommended to select a period of 5 minutes. In this case, after taking up all the space on the memory card, new segments will be recorded over the oldest recordings;
- Be sure to turn on the time function. This may be necessary if there is a need to dispute with the insurance company or another participant in the accident in court. Find the time tab, usually there is a “time stamp” mode. It should be switched to the ON position. Next, set the date and time. Some models allow you to synchronize time via satellite;
- The light frequency allows you to adjust the lighting flicker filter. In our country, lighting is used with a frequency of 50Hz, we set this value;
- Auto-record. This function allows you to turn on the camera when moving within the field of view of the sensors. This way you can control what is happening to your car while it is parked. Don't forget to set the shutdown time. It is recommended to do 30 seconds after the end of the object's movement;
- Setting up a GPS receiver. This allows you to display movement speed and coordinates on video. Please note that not all DVRs have this capability;
- Setting up the G-sensor. This is necessary to protect the recording in case of an accident or when driving on bumpy roads. When driving on poor surfaces, it is recommended to disable the function completely;
- For use in winter, it is advisable to delay the start time by 10-20 seconds. This will allow the camera to turn on only after a certain period of time after the engine starts. The function is also useful in case of ignition problems;
- Setting the exposure. It is better to choose automatic;
- We set the contrast to the “normal” position, and also do the same with sharpness and brightness;
- Day and night exposure. Automatic mode is suitable for daytime operation. Night exposure can be turned off.
- If you leave it on, the camera will independently select the exposure mode depending on the time of day.
AutoFlit.ru
How to reset to factory settings
The recorder sometimes ceases to meet the requirements, shows unreliable values, and malfunctions are observed in the characteristics. Repair or reset to factory settings helps. Updating indicators leads to complete clearing of information from memory. The user resets the settings, but he must remember the ways to set the previous indicators. The memory is cleared after saving the required video recordings on a foreign media.
The operating procedure can be seen using the example of a 1080p Full HD recorder:
- in the menu, find the reset option to factory settings, press the button;
- waiting for changes for a certain time.
Set the settings on the recorder, set the language, time and date, then adjust the quality, screen resolution and other indicators. The parameters are set gradually; in case of forgetfulness, study the manual for the navigator. The recorder works smoothly often after updating. If the problems do not stop, then contact a repair shop. The device is mounted on the car window after setting the necessary parameters for operation.
source
Review of car DVR DNS EV-200 tests
Classification of memory cards
The appearance on the market of video recording products combined with positioning devices is due to the fact that in some cases, in order to fully prove innocence, traffic police officers need to provide not only a visual display of events, but also data on the vehicle’s own speed. The GPS module supplements video information with accurate movement data (vehicle speed, its coordinates, route display on maps).
The DNS EV-200 car video recorder is equipped with a GPS function and allows you to record speed and coordinates and synchronize this data with video. The GPS module is not located in the gadget itself, but in the holder. This allowed manufacturers to expand the functionality of the device without increasing its size. The DVR is connected to the module using a special cable.
Software that allows you to combine video with GPS data is included with the gadget. The video sequence is accompanied by the display of a map section with the ability to change the scale, as well as a graphic image of the vehicle speed.
The DVR allows various recording modes, characterized by different resolutions and speeds. The maximum resolution at a speed of 30 frames/second corresponds to the FullHD format. The ability to activate the appropriate video recording mode is provided to the user and is carried out by selecting the desired item in the settings menu.
The picture quality allows you to see its smallest details, even in low light. In the daytime, it is possible to identify, for example, car registration plates from a distance of several tens of meters. To ensure optimal recording conditions at night, the DNS EV-200 DVR has four infrared spotlights.
The device's camera has an increased viewing angle; the manufacturer claims this parameter is equal to 170°. The almost-full angle allows you to monitor changes in the situation not in a narrow sector, like with conventional DVRs, but throughout the entire space in front of the car. The video quality at the edges of the picture is a little worse, but it is quite enough to recognize details.
The lens focuses automatically, and everything that at first glance is intended for manual adjustment in the device is nothing more than decoration.
In parallel with image recording, audio recording is carried out thanks to the built-in microphone. The sensitivity of the microphone allows you to record, for example, communication with traffic police representatives.
Video recording is cyclical and produced in small files. When the memory resource is full, the oldest fragments are deleted and new ones are written in their place. Video files obtained when the G-sensor is triggered are protected from overwriting.
To store all information, the device uses an external storage device (microSD memory card) with a capacity of up to 32 GB. Such a large memory card resource allows you to save several hours of video and a corresponding amount of GPS information.
The liquid crystal screen located on the front side of the DNS EV-200 registrar is small in size (screen diagonal is 2.7 inches). This is quite enough for the initial acquaintance with the recorded video. A more detailed study of the recording with identification of small parts is best done on a computer or TV. For this purpose, the design of the gadget provides appropriate connectors, and the delivery set includes special connecting cables. It is possible to view the video directly from a memory card via a computer or laptop.
An example of a photo taken during the day in the sun, on a cloudy day and at night.
The autonomous operation of the DVR, due to the small capacity of the battery, does not exceed 30 minutes. This is one of the weakest indicators among similar devices. Uninterruptible power supply is provided from the vehicle's on-board network through the cigarette lighter.
Drivers will no doubt appreciate the ease with which the DVR can be removed from the holder. This quality of the gadget will be useful for those who often leave the car and do not want to leave the DVR in sight.
An example of a daytime DVR video.
Night photography in low light
ravid.ru
GPS module
The navigation function is necessary to track the vehicle's movement with reference to map coordinates. This addition allows you to see the movement of the car on the route diagram, simultaneously synchronizing with the camera recording. Thus, the track receives a video image with data about the time and location of the action.
By setting the navigator parameters properly, the user will receive good help on the road:
- The standard system is focused on maps that quickly become outdated and lose relevance until the next update. It would be optimal to install a cloud-type kit, using Yandex.Navigator as an example - information is constantly updated and you can download a file with maps more often than the official update is released.
- The guide offers travel options. If the driver knows the area better, then you should not blindly trust the readings of the device. Or manually build a route based on your preferences.
- You should not set the settings to maximum values and accuracy: movement will be influenced by too many external factors, which will complicate the construction of a route and increase the size of the tracking file.
Exposure metering mechanism
Error e05 for Canon mp250 mp280 printer reset e05
Depending on the set mode, the exposure meter measures exposure and transmits the received data to the camera processor. The processor analyzes the information and exposes the image using software algorithms.
Modes for measuring the brightness of an object in digital cameras are selected either by the photographer during manual control, or by the camera microprocessor during autoexposure.
Automation provides satisfactory image quality in most cases, however, to obtain photographs of a high artistic level, you need to know and understand what exposure metering is and how to use it in practice.
There are several types of exposure metering:
- Spot metering - In this case, exposure metering is carried out on a limited area of the frame (1-5% of the entire image), usually in the center. The brightness of other areas is not taken into account. Thanks to this, the measurement accuracy in the selected area is very high, which ensures its correct exposure. Typically used for photographing a single subject against a uniform, darkened background, when it is required to obtain a clear, high-contrast image. Complex mode used by professionals.
- Center-weighted (average) metering - Metering is carried out within the central area of the frame, limited by the viewfinder markers. The measurement area ranges from 60% to 80% depending on the camera model. This mode ensures optimal use of the most sensitive areas of the matrix, since the ISO of the photo scanner gradually decreases from the center to the edges. The mode is ideal for portrait and reportage photography.
- Partial measurement - Not available on all cameras. This is a mode in which the area of the frame on which the metering is performed (10-15%) is larger than with spot metering, but smaller than with center-weighted metering. It is used when it is necessary to photograph an object, ignoring excessive brightness or, conversely, strong shading of the edges of the frame. In this mode, the detail of the image can suffer greatly (especially at the edges).
- Matrix (multi-zone) measurement - The most common measurement method, which is installed by default in the automatic modes of most cameras. It consists in the fact that the frame is divided into several zones, in each of which the illumination is measured. Then the processor brings all the data together, calculates the average illumination value and, based on it, selects the exposure. In most cases, it provides good image quality, but in difficult lighting conditions it can lead to exposure errors. Suitable for beginners at the beginning of their acquaintance with photography.
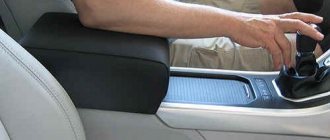
Setting up the DVR
The first step is to position the camera correctly.
Review
To do this, choose a point with the most satisfactory view. Try not to let the device itself distract you from driving, otherwise you may face a fine.
Incline
Rotate the camera so that it shows as much of the hood as possible and as little of the sky as possible. This is necessary for two reasons:
- to be able to prove that the filming was actually made from your car;
- to improve picture brightness correction.
If the device is oriented according to the sky exposure, all darker objects included in the recording will be shown darkened.
Calibration
If the device has a lane departure warning function, you will have to calibrate the horizon line and hood level.
This operation will have to be repeated every time the camera position is changed.
Permission
Filming should be done at a resolution of 30 fps. This is the optimal value for driving within the city. For a route where the speed is much higher, it is better to set Full HD to 60 fps. This is how you can achieve a smooth image and capture small details while moving.
@Adoa.ru
Super HD
Some cameras support 4K format. If such a function is present, it should be enabled. In this case, the lens will work in harmony with the matrix and processor. The video will be of much better quality when you need to transfer it to your laptop screen.
Bitrate
The video quality should be set to the maximum. This will improve the detail of the frames along with color rendition.
Typically, exposure, contrast, sharpness, and white balance settings do not need adjustment. It's better to leave the factory settings. If you reduce the contrast, the detail will deteriorate. By increasing sharpness, reduce the naturalness of the image. By disturbing the white balance, the camera will begin to show blue or yellow tints.
The brightness, if desired, can be set within the range of -0.3-0.7. This setting will allow you to clearly see vehicle license plates when driving at night.
Roller length
This parameter is set taking into account personal preferences. Recommended duration is 3 minutes. But you can also set other time periods.
This parameter allows you to easily find the required fragment in the memory card. And even if the on-board power supply is turned off, the videos will be saved.
Short videos are convenient because they are easier to transfer to a flash drive or save to a smartphone using Wi-Fi. If you need to present the video to a traffic inspector or in court, you won’t have to do any editing.
Myth 1
Recovering Canon Memory Card Data
If the recorder box says Full HD, this automatically means that you have a portable video camera with an excellent picture in your cabin.
This is wrong. Or rather, not quite like that. This is true for well-known manufacturers and brands. But the valiant “Kulibins” from the Middle Kingdom long ago mastered a wonderful technology called “interpolation”. What does it mean? Only that, in fact, the image in such recorders has a low resolution, and high resolution (HD and Full HD) is obtained by simply stretching the image. Which, naturally, will not be reflected in the best way in terms of quality. The simplest solution is to watch videos on YouTube with an example recording of the model you are interested in before purchasing. Here is an example of shooting Highscreen Black Box Radar plus, obviously with “honest” 1080p.
Video quality and resolution
Resolution settings apply to all images sent by the instrument. The device detects movement, transmits and records it under different lighting conditions. Choose DVRs with high resolution, which allows you to configure the device so that individual details in the picture are viewed in the dark. The numbers characterize the quality of the frame; for a clear image, the number of pixels is selected horizontally and vertically.
Recorders are produced with the following resolution:
- SD format, the number of pixels is 720x576.
- HD - 720x1280.
- Super HD - 1296x2304.
- Full HD - 1920x1080.
- UHD - 2160x3840 or 4320x7680.
The HD value is used; a device with such parameters transmits images with high definition. Super HD and Full HD formats represent the HD series models. Resolution indicators are the best values for night and day vision devices on a car. The UHD format is rare because it does not feature full-scale video recording.
The clarity and contrast of the signal is achieved if you know how to properly configure the DVR. The number of frames is set in parallel with the choice of resolution and the rotation of the camera lens is selected. The upper - lower position is set, the recording speed is selected. The last characteristic affects the smoothness of the broadcast signal and should not be less than 30 frames.
Review of car DVR and GPS navigator DNS GSV1
The high class of the device is confirmed by the capabilities that this gadget has:
- The Android 4.0.4 operating system allows you to install additional software and enjoy numerous entertainment options.
- Video recording quality – FullHD.
- The screen size (4 inches diagonally) is not a very outstanding characteristic for a navigator. However, for a DVR such a screen is more of an exception than a common feature.
- The presence of a GPS module significantly expands the capabilities of the DVR, adding information to video recording. The user can track the entire route on GoogleMaps and see spatial and speed characteristics at any time.
- Simultaneous operation of the DVR and navigator is allowed. In this case, navigation information is displayed on the screen while video recording occurs in the background.
2GIS is used as a pre-installed navigation program with a detailed display of most populated areas of the Russian Federation. If desired, the user can install other navigation software, either instead of 2GIS or in parallel with it.
All control of the gadget’s capabilities and selection of the necessary functions occurs through the LCD touch screen. It also allows you to view navigation information, captured video files, and multimedia files. The screen resolution of 800×480 pixels allows for comfortable viewing with the ability to detail the picture.
What may cause inconvenience for the driver is the fact that the screen does not allow horizontal rotation, so it may be difficult to adjust for comfortable viewing. Minor rotation is possible only in the vertical plane.
The sound accompaniment of the positioning system is provided using the built-in speaker.
The GPS module, which communicates with satellites, is located in the device mounting bracket. Thanks to this, the DNS GSV1 is small in size and lightweight.
As a DVR, the device has the ability to shoot in FullHD format (1920×1080 pixels at a recording speed of 30 frames per second). The choice of video resolution is left to the user and is carried out from the main menu of the gadget.
Video recording is carried out in cyclic mode, that is, when the memory resource is full, old fragments are deleted and new ones are recorded in this place. The duration of recorded files can be from 1 to 5 minutes according to the user's choice. Video recording is carried out in MP4 format.
This device does not support photography.
The device’s camera based on a CMOS matrix (2 MP, 1/2.7″) allows you to shoot high-quality video in any conditions. Even in the absence of additional illumination, the quality of night photography (or shooting in low light) is quite satisfactory.
The gadget does not have built-in memory, so video is saved to external media (micro SDHC memory cards with a capacity of up to 32 GB).
The DNS GSV1 has two slots for memory cards, allowing two modes of their use:
- Both memory cards are used to store captured video. In this mode, the user has access to a large memory resource, but multimedia capabilities and the use of other navigation programs are not available.
- One memory card is used for recorded video, the second for multimedia files and navigation software. In this case, the data on the second card is protected from possible recording and destruction.
To view the recorded video in detail, the gadget has the ability to connect to external devices. For this purpose, its design provides HDMI and USB connectors.
Unfortunately, manufacturers did not provide the ability to use all the resources of Android 4.0.4. First of all, we mean communication capabilities - Internet access is not provided.
An example of video shooting during the day.
An example of night photography.
ravid.ru
Setting up via the Internet
Quite often you can find options for DVRs with the ability to connect to the Internet. Typically, they are used in the presence of satellite signaling. To connect such a camera you will need a static IP. For this purpose, an agreement is concluded with the provider. After receiving the settings, we proceed to configuring the system. The standard setup instructions recommend using ADSL, but in practice any modern network can be used. The main thing is to have a static IP
.
In this case, you need to save its IP in the registrar and register the gateway through which the information will be transmitted. Connection to the computer occurs through the Internet Explorer browser.
This will be more difficult to do in other browsers.
, you will have to install additional extensions. Here you should go to the browser tools and add the IP to trusted sites. After that, you can connect to the camera. To do this, enter the IP into the search bar and the port number separated by a colon. All you have to do is enter your username and password. If there is more than one camera, then distribute them by number.
Conclusion
. A modern car is unthinkable without a DVR. After all, this is often the only way to prove the truth in court. Now you know how to properly configure the DVR yourself (+ date and time). This will help you save money on visiting a service center to have this work done.
source
What is loop recording in a car DVR?
Car recorders usually support two video recording modes: continuous and cyclic. Continuous mode allows you to record video in one large file. This size can only be limited by the available memory of the device (internal or external). When the free memory is full, continuous video recording ends.
The advantage of this type of video recording is the absence of gaps in the video even for short periods of time. The obvious disadvantage of continuous recording is that it stops when the memory is full. In some cases, the driver is even deprived of the opportunity to quickly reconfigure the DVR to continue filming.
Against this background, the cyclic video recording mode looks much more functional. It has two significant features:
- Recording is carried out not as a continuous file, but in fragments that are small in volume and duration.
- As soon as the device’s memory is full, the oldest (by recording time) files begin to be deleted. A new video is recorded in the free space, and the whole cycle is repeated again.
The cyclic video recording method also has its positive and negative sides. The positive aspects include the independence of the fact of shooting from the availability of free space in memory. Video recording will be carried out in any case, even if the memory is full.
A negative aspect of cyclic recording is the inability to save videos of long duration and volume. Only the most recent small files will be saved.
Some DVRs (especially older models) are not able to provide continuous video when recording cyclically. This refers to gaps in the picture at the junctions of fragments adjacent in time to recording. Modern DVRs, as a rule, do not have this drawback. Fragments are recorded in such a way that the recording of each subsequent file begins when the recording of the previous one has not yet finished. It is this overlay of video files that ensures that there are no gaps.
The duration of fragments during cyclic recording, as a rule, does not exceed ten minutes. There are no standard values for the duration of video fragments, and each recorder manufacturer sets them independently. Setting the time during which one fragment will be recorded occurs in the DVR settings. The user can choose the duration that he deems necessary.
Operating the DVR in cyclic recording mode allows you to implement another important and useful function for safety. We are talking about protecting video files from being destroyed or overwritten as a result of the operation of the G-sensor (or shock sensor). This sensor monitors the position of the vehicle in space and the smoothness of its movement. With any sudden changes in these parameters, the sensor marks the video files that are being filmed at the moment, thereby protecting them from possible destruction. The driver does not have to worry about the safety of video files and at the same time he has full access to them.
When saving fragments in the DVR memory, they are assigned names containing numerals in the order in which they were recorded. This ensures a quick search for the desired location in the video if you need to watch it.
The cyclic recording method is most popular among car owners. It provides uninterrupted recording of events into memory of any size. In addition, the safety of video files received in emergency traffic situations is ensured.
In this video you will see a live example of this function on the device.
ravid.ru
Secrets of Garmin Dash Cam mini's charm in everyday life
Some things are designed to be catchy and bright, while others are more suitable for secrecy and inconspicuousness. Especially when it comes to surveillance devices, such as car DVRs. And now I want to tell you about the baby Garmin Dash Cam mini, designed to be invisible. This is one of the tiniest dash cams available on the market today.
The size is surprising
As soon as you see the little Dash Cam mini, a smile involuntarily appears on your face. This recorder captivates with its minimalism and size smaller than a car key. What about a key, almost any other wearable gadget and a WEB camera for a PC. Compared to it, even a miniature action camera no longer seems so small. In terms of numbers, it is 53x31x29 mm, like a small keychain for a bunch of keys.
I was also surprised by the weight of 29 grams, barely noticeable in the palm of your hand. Due to its light weight, the recorder sticks to the glass like a glove and does not shake when driving over uneven surfaces. And for fixing to the windshield, a simple hinge mount with a 3M adhesive base is used. A pair of such mounts is included in the kit, plus two micro-USB cables of different lengths and a dual 2.1A power adapter for the cigarette lighter. As miniature as the recorder itself.
Set it and forget it
The main feature of the Dash Cam mini is its invisibility - this is emphasized by the official Garmin advertising video. Of course, not every car will be able to place the recorder so secretly behind the interior rearview mirror. Especially if it has a radar and rain sensor unit. It can be placed a little lower, or it can be carefully fixed in a corner, for example on the passenger side.
In combination with an additional parking power cable from Garmin, the Dash Cam mini recorder can be made a full-fledged part of the car and not be touched when leaving the car. To install the adapter, just connect it to two wires at the head unit terminals and the common negative, and then carefully route the micro-USB power under the rack and ceiling trim. That’s it, now the recorder can independently start recording when recording movements in the frame - anything can happen in a parking lot while you’re not around.
Control according to your taste
The Garmin Dash Cam mini's light weight and size easily justify the lack of a battery. There's not even a power button here. It automatically turns on and starts recording as soon as you connect power via micro-USB. On the opposite side of the case there is a slot for a microSDXC card up to 512 GB and a small microphone activation button. The second button saves the recording in a special folder, and short presses save the frame as a photo. If you don’t press anything, recording will start automatically and will be saved in a shared folder in minute-long clips, and when the free space on the flash drive runs out, new clips will be saved instead of old ones.
But before installing it in a car, I recommend installing the Garmin Drive application on your smartphone. In a couple of touches, it will notice a working Dash Cam mini recorder and connect to it, and you will have a convenient viewfinder at your disposal to select the optimal angle of the picture.
The application offers a minimal range of settings and a convenient video editor for trimming a video. File synchronization is fast and carried out over a Wi-Fi connection. The video you are interested in can be downloaded directly to your smartphone, or you can later transfer the data from a flash drive to your PC.
Recording quality
The current winter in the capital is better than the prolonged autumn, and assessing the quality of photography in cloudy weather is gray and dull. Fortunately, while the Garmin Dash Cam mini was in my hands, I managed to catch some sunny days.
Using the example of daytime recording, you can clearly appreciate the wide dynamic range and high level of detail throughout the entire frame. There are no jerks or artifacts during recording, and the saved images look good on the monitor.
At night, the recording quality is closer to that of expensive recorders with screens and a bunch of additional features. The minimal noise level and precise exposure were all a pleasant surprise. Even in complex scenes (with a bunch of light sources), you can see license plates from a distance of three buildings, and driving through tunnels is completely free of delays in exposure adjustment.
By the way, from the picture settings you can only choose a resolution of 1280x720 or 1920x1080. The examples were shot in the latter, and the frame rate is limited to 30 fps, but without lag in the twilight and a fairly high bitrate.
360-degree view from Garmin
I can’t ignore another feature of the Garmin Dash Cam mini: the ability to work with other Garmin recorders for 360-degree viewing. In the Garmin Drive mobile app, you can synchronize recordings from several (up to four) recorders and save the recording in one video. For example, you can install a second Dash Cam mini at the back and record what is happening from both sides at once.
Impression
Among the objective shortcomings of the Garmin Dash Cam mini, we can only highlight the limitation on the frequency of 30 fps when recording video - in 2021 you expect 60 fps as a standard. But this is perhaps the most significant drawback of the DVR, because in terms of convenience and ergonomics, the baby is truly one of the most compact in the class. What makes it more attractive is the pleasant control via the Garmin Drive app on your smartphone, and the high picture quality and reliability make you take a closer look at this model.
Operating instructions for the Full HD 1080p DVR. Briefly about the main thing
- DVR;
- Car holder with suction cup;
- USB-AV cable;
- HDMI cable;
- Charger (12-24 V);
- In addition, a 4 GB flash drive may be included.
- Permission. The higher this indicator, the higher quality the recording will be. It is not recommended to use maximum quality with a small memory card installed;
- Date and time, timestamp;
- Recording cyclicity. It is usually recommended to divide files by 5 minutes;
- Scenario. Here you select the shooting mode. It is best to select "auto". In this case, the recorder will independently select the appropriate mode, depending on the lighting;
- Show coordinates. This will allow you to prove, if necessary, that you were in exactly that place.
AutoFlit.ru
Instructions
It would seem that such a task as setting the time should be solved in the simplest way. Yes, it is worth noting that there is nothing overly complicated in this action, but it is almost impossible to reach it using the “scientific poke” method, as in the case of connecting a camera to a DVR. However, this does not negate the importance of setting the correct time.
People who deal with legal proceedings and video material as evidence of something will perfectly understand the seriousness of this seemingly trifle. Also, it is worth mentioning that the time setting process may differ due to the characteristics of a particular device. We will look at the most commonly used method.
1. To begin, remove the SD card from your DVR. After that, connect it to your personal computer (read more about connecting the DVR to a PC here).
2. Within a couple of seconds, a notification about the successful connection of the card should appear on the computer screen.
3. Now you need to format the memory card. Remember that all data stored there until formatting will be deleted; be careful to save all important information on another medium.
4. After formatting, use the file manager to access your memory card. You need to create a new text file. This can be done by calling the context menu with the right mouse button and selecting “Create” .
Once you've created your document, name it "time". Now, you should enter the real date and time into the body of the text file you created. Please note that you must save this type of record in the following form - “2013.01.01. 15:30:25.” Write the characters inside the quotes into the file, of course changing the numbers to the actual ones.
Important setting in car DVR Exposure
One of the most important settings on a car DVR that allows you to get a high-quality picture is exposure. Incorrect exposure can ruin video frames, regardless of the ambient lighting conditions in which they were taken. The video may be darkened or, on the contrary, overexposed; problems may appear both throughout the entire frame and in a separate section of it, and so on.
What is exposure in a DVR, and how does it affect video quality? Exposure is a setting that allows you to change the amount of light that falls on the camera matrix and actually forms an image on it.
In clear sunny weather, a lot of light enters the camera lens, and if the amount of this light is not reduced, the picture will most likely be too light, even faded. At night, unadjusted exposure will result in overly dark frames. There are several ways in which you can adjust the flow of light.
- Changing the amount of time light is exposed to the camera sensor. This is the so-called shutter speed, that is, the time during which the electronic shutter of the DVR camera is open to form one video frame. It is clear that the less time the shutter is open, the less light will fall on the matrix and vice versa. Therefore, the brighter it is outside when shooting, the shorter the shutter speed should be.
- Changing the size of the aperture, that is, the gap in the lens through which the light flux hits the matrix. A larger aperture also provides more light passing through the camera lens.
As a rule, in car video recorders, exposure adjustment does not imply separate adjustment of shutter speed and aperture. The exposure itself is adjusted, and the parameters of both shutter speed and aperture change accordingly. The exposure level can vary from the minimum value, which is recommended to be set in sunny weather, to the maximum value, used in low light conditions.
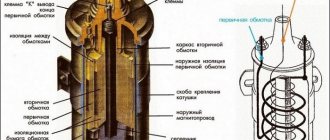
An important factor affecting video quality is the characteristics of the camera matrix on which the image is formed. These are its dimensions, number of pixels, sensitivity to light flux. Naturally, these parameters cannot be adjusted during operation of the DVR; each matrix has its own characteristics.
High-quality matrices from well-known manufacturers have high sensitivity and consist of a large number of dots (pixels). This ensures the possibility of high-quality shooting in any conditions, both in low and excessive lighting.
Recently, some models of DVRs are equipped with the WDR function, which does not directly affect exposure, but improves video quality by changing the exposure time when shooting one frame. When the WDR function is activated, the DVR makes two copies of each individual recording frame: one version of the frame with a short shutter speed, the second version with a long shutter speed. In the final video, both of these options are combined, and the resulting picture will be practically devoid of the shortcomings of individual frames.
Setting the exposure is very important to get truly high-quality video. The driver should make the necessary changes to its adjustment for any changes in external lighting. It is quite possible that to obtain high-quality video you will have to experiment with exposure settings for a particular DVR.
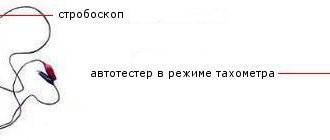
Changing the exposure on the recorder.
https://youtube.com/watch?v=GMrmYUJWWhM
ravid.ru
INSTRUCTIONS
It would seem that such a task as setting the time should be solved in the simplest way. Yes, it is worth noting that there is nothing overly complicated in this action, but it is almost impossible to reach it using the “scientific poke” method, as in the case of connecting a camera to a recorder. However, this does not negate the importance of setting the correct time.
People who deal with legal proceedings and video material as evidence of something will perfectly understand the seriousness of this seemingly trifle. Also, it is worth mentioning that the time setting process may differ due to the characteristics of a particular device. We will look at the most commonly used method.
1. To begin, remove the SD card from your DVR. After that, connect it to your personal computer.
2. Within a couple of seconds, a notification about the successful connection of the card should appear on the computer screen.
3. Now you need to format the memory card. Remember that all data stored there until formatting will be deleted; be careful to save all important information on another medium.
4. After formatting, use the file manager to access your memory card. You need to create a new text file. This can be done by calling the context menu with the right mouse button and selecting “Create” .
Once you've created your document, name it "time". Now, you should enter the real date and time into the body of the text file you created. Please note that you must save this type of record in the following form - “2013.01.01. 15:30:25.” Write the characters inside the quotes into the file, of course changing the numbers to the actual ones.
5. After completing the steps, insert the memory card into the DVR and turn it on. The date and time have been set.
Check the methods for setting the time and date with the official settings data for your specific device model. Both the manufacturer’s official website and the operating instructions will help you with this.
If you want to buy an AutoPASS E6 radar detector, see the model review
The AutoPASS E6 radar detector is an inexpensive Chinese radar detector, its cost is about 20 dollars. At this price, the device has all the standard functionality: it catches in all ranges used in Russia: X, K, Ka, the scale is expanded due to the Ku frequency, which is exotic for our country. To prevent the processor from being overworked, it is better to immediately turn off everything that is not in use. In addition, the detector responds to short shots from Ultra-X, Ultra-K and POR radars. To prevent vigilant highway patrol officers from detecting the presence of this device in your car, it is protected from VG-2 and Specter scanners and direction finders. This must be taken into account when traveling abroad.
What we can thank the Chinese engineers for is the use of a particularly sensitive VCO waveguide, which ensures good reception of all systems. However, according to reviews, the device reacts to everything, and even switching from Highway to City mode does not help. It is also noted that frequencies are not always displayed correctly on the LED display, which may result in another fine.
The Chinese were not pleased with the high-quality laser receiver; the optical lens covers only half a circle of 180 degrees in the direction of movement, and radar lasers hitting the back will not be detected. But nevertheless, the reception range outside the city is more than two kilometers; in the city limits this value decreases.
Additional functions include four-level adjustment of display brightness and signal volume, which will definitely come in handy in a city where there are a lot of false positives. The device is attached with a suction cup to the glass or with Velcro to the dashboard. Do not forget about its correct installation, so that the road is visible to the lens and horn antenna, and there are no foreign objects between the radar detector and the glass.
This device is one of a kind: at a low cost it has good characteristics, although in the city it will constantly disturb you on business and idle time. We can recommend it to novice drivers who adhere to the rules and rarely exceed the speed limit.
If you like fast driving on city highways, then it is better to buy some more expensive analogue. With a high-speed driving style, it will pay for itself in a few days.
ravid.ru
Myth 6
If the registrar captured any incident, the filming will become direct evidence in court.
And again, this is only partly true. To begin with, it is desirable that the shooting be carried out at a frequency of at least 30 frames per second. Otherwise, the result is a video with noticeable jerks, which maximizes the likelihood of refusal to attach the video to the case
You should always check that the date and time set are correct; inspectors pay attention to this first. At the scene of the accident, it is advisable to have your watch, the latest issue of a magazine, or other information that will serve as authoritative confirmation of the time of the incident in the frame.