It is known that locks for VAZ-1118 car doors have an interesting property - you can replace their cylinder without removing the mechanism from the door itself. On previous models, dismantling is more difficult: you need to press the bracket holding the cylinder with a paper clip or an awl, getting into the hole on a mechanical drive. In the Kalina model, that is, VAZ-1118, this bracket is pressed out by pressing with a ruler or a screwdriver. Which, in turn, is done on the installed lock (there is no point in removing it). Next, the replacement operation is discussed in more detail.
Design of VAZ-2109 locks and disadvantages
The lock cylinder is a cylinder that is equipped with a secret mechanism. In all locks with a flat key, the cylinder is replaceable. For example, on VAZ-2109 cars it is replaced like this.
The rotating part that is connected to the rod is called the “drive”. As we can see, this drive has a hole for removing the cylinder. By applying pressure with a thin axle or an awl, the larva is pulled out.
There is only one drawback - it is hardly possible to complete the steps indicated here without first removing the lock completely.
It should be noted that even when the mechanism is removed, it will not be easy to pull the larva out of it.
Therefore, before dismantling, be sure to insert a key into the cylinder and turn it left or right 90 degrees. The purpose of this action is to be able to dismantle the larva. This action is performed effortlessly, and the key is then simply pulled towards you.
Replacing the larva in Kalina
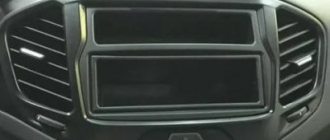
First of all, replacing the lock elements means that the door trim will be completely missing. Therefore, first we will figure out how to dismantle the trim on Lada Kalina cars. The second chapter is devoted to how to remove the larva and install a new one in its place. The last step will actually be the simplest.
Removing the door trim yourself
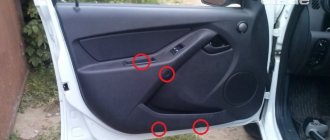
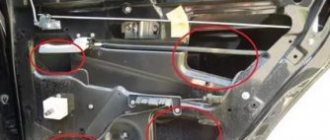
The casing is attached not only to screws, but also to plastic pistons. The number of screws holding the part in question is four:
Numbers here indicate all fastening elements. But to get to them, you need to remove the screw cap “3”, as well as the inner door handle. The pawl handle also needs to be unscrewed.
If these actions are completed successfully, the casing begins to be dismantled, moving it away from the metal. Dismantling is carried out starting from any of the corners, but care must be taken: the pistons holding the plastic are fragile.
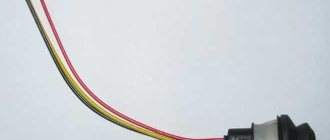
If the package includes power windows, you will need to disconnect the connector connected to the button block. Also, another similar connector is present in most trim levels - where there is a central lock. Both connectors must be disconnected.
All the steps described here involve electronics in any case.
Therefore, at the stage before dismantling the trim, you need to open the hood, take the “10” key and unscrew the negative terminal. We are talking about the battery terminal, which can be connected last (when the last screw is screwed in). Anyone who breaks this rule will look for blown fuses. Draw a conclusion.
How to get to the door mechanism
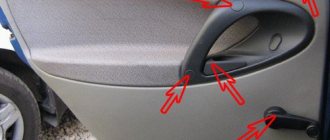
According to the recommendation of the magazine "Behind the Wheel", in the absence of casing, access to the lock is always available. Simply put, there will be no need to remove the inner lining made of metal. The steel sheet is simply bent to the side.
The rotating part with the protrusion is called the “drive”, and this is what you will need next.
Replacing the larva will be easy:
- The key in the cylinder currently fixed in the door is turned 90 degrees;
- Using a steel ruler, knife or thin screwdriver, you need to press the locking tongue located opposite the slot in the body of the cylinder. You need to place a screwdriver between the rotating and stationary parts of the mechanism. Know that in the driver's door the slot is made from the bottom (looks “to the floor”), in the passenger doors - from the top!
- By pulling the key towards you, the larva is pulled out;
- The new cylinder is installed like this: with the key inserted, it is pushed into the lock until it stops. The locking tab will need to be pushed inward.
Wiring diagram of Lada Granta how to figure it out yourself
Lada 2109 oRUNgeWAYya Logbook Here is information about the engine 2111-80
Elegant Granta
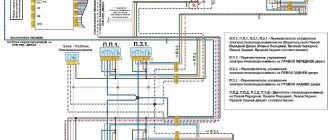
The Lada Granta is equipped with modern electrical equipment, which increases the comfort and safety of the car. Electrical wiring in the Lada Granta connects all electronic and electrical devices, as well as their control elements. It has 2 fuse blocks. One of them, containing 5 power fuses, is located in the engine compartment immediately behind the battery. The other mounting block is located on the lower left side of the instrument panel, to the right of the headlight control module. The interior block of the Lada Granta in the “norm” configuration contains 32 fuses (including 6 reserve ones) and 12 relays.
Granta's electrical circuit is quite complex, and it is very difficult to understand it on your own without special education. Since there is no such diagram in the instructions supplied with the car, we will describe it in parts.
Front and rear wiring diagram
The wiring diagram for the front of the Lada Granta is quite simple, the main thing is not to confuse it with the wiring of the ignition system.
The following devices are available here.
Car front wiring diagram
- Right block headlight.
- Room lighting bulb.
- Left block headlight.
- Electric washer motor.
- Accumulator battery.
- Mounting block with power fuses.
- DC generator.
- Klaxon.
- The plug connecting the front wiring harness to plug 1 of the instrument panel.
- Plug connecting the front harness and plug 2 of the instrument panel.
- Plug connecting the front harness to plug 2 of the instrument panel.
- Reverse indicator switch.
- Radiator fan.
When replacing wiring, pay attention to the color of the wires. You can connect wires of certain colors only to those contacts to which they are connected in the diagram. If connected incorrectly, the fuses will constantly melt
If connected incorrectly, the fuses will constantly melt.
The electrical circuit for the rear of the car is more complex, it has more elements and connects to 6 wire harnesses.
Wiring diagram of the rear part of Granta
- Socket to connector 3 of the tidy.
- Socket to connector 4 of the tidy.
- Right side turn signal.
- Left side turn signal.
- Handbrake position sensor.
- Rear window heating element.
- Interior lighting lamp.
- The switch is in the driver's seat belt.
- Luggage compartment lighting.
- Fuel pump module.
- Right rear light.
- Trunk lock drive.
- Interior lighting switch.
- Stop signal.
- Left rear headlight.
- Clamp to the left rear door harness block.
- Clamp to the right rear door harness block.
- Clamp to the harness block of the right front door.
- Clamp to the left front door harness block.
- Airbag control unit.
- Clamp to the license plate light bulb harness block.
Dashboard wiring
The electrical circuit of the instrument panel is the most complex, since it contains 34 devices. But you can figure it out too. Here is a list of available devices.
The instrument panel is a complex device
- The plug to which plug 9 of the front wiring is connected.
- Plug for connecting plugs 10 and 11 of the front wiring.
- The connector to which socket 1 of the rear wiring is connected.
- Connector for connecting socket 2 of the rear wiring.
- Control unit for dimensions, low beam, emergency lights.
- Mechanical ignition switch.
- Route bookmaker mode switch.
- Wiper switch.
- Dashboard.
- Light switch.
- Switch for the electric trunk lock.
- Diagnostic block.
- The connector to which the air intake box harness plug is connected.
- Rear window defroster switch.
- Emergency light switch.
- Brake light switch.
- Connector for connecting audio system speakers.
- The connector to which the car radio is connected.
- Device on the steering wheel.
- Driver's airbag module.
- Absent.
- Fuse block.
- Power steering (ESR).
- Cigarette lighter socket.
- Climate control console illumination lamp.
- Tidy light bulb.
- The socket to which the ignition system wiring plug is connected.
- Control device.
- Clutch pedal position indicator switch (only on cars with a manual gearbox).
- E-gas.
- Climate control system resistor.
- Electric motor for interior heater.
- Interior heater switch.
- Door lock control module.
The wiring diagrams for the Lada Granta ignition system vary depending on the type of engine installed, so when replacing the engine, the wiring of this system must also be changed.
Recommendations from the magazine “Behind the Wheel”
Let’s turn again to the “Behind the Wheel” review, which discusses how to remove door locks in a VAZ-1118 Kalina. If the casing has been dismantled, this is not bad. Next, according to the recommendations, unscrew the screw securing the inner handle:
The lock mechanism is connected to two rods made in the form of rods. Both of them are dismantled by disconnecting the plastic clips:
To disengage the latch, press on the plastic tab with a screwdriver.
At the last step, as you might guess, all that remains is to unscrew the screws holding the mechanism motionless.
But first, you need to dismantle the external handle. To do this, unscrew two bolts equipped with an “8” hex head.
By the way, if the central locking connector is attached to the mechanism module, it is also disconnected.
Let the wiring harness for the central locking drive remain in the door.
Of course, all door locks must be unlocked with one key, which is supposed to be used in the future.
The work indicated here is carried out on each of the four doors. In addition, it is very desirable that the ignition key also unlocks the doors. However, replacing the cylinder on the steering column will not be so easy. Can you handle the total amount of work that needs to be done? Decide for yourself.
Changing the secret code yourself
Often, after time has elapsed on a Lada Granta car, the doors begin to open and close with some effort. To fix the problem in question with this car produced by AvtoVAZ, you have to contact a service station. In this case, you need to purchase door closers and door stops for Lada Granta.
Sometimes the owners of the Lada Granta Liftback, produced by the famous AvtoVAZ company, have to deal with various modifications after purchasing the vehicle. This happens for the reason that after even a short mileage, minor breakdowns or problems often appear at first, and if they are not eliminated in time, they develop into more serious ones. Many owners consider the most common defect to be the fact that the front door locks do not function well and open with great difficulty.
You can, of course, buy Lada door closers and door stops and make repairs in accordance with the instructions. But this operation can be performed in a more productive way. To carry it out you need:
A common symptom of a broken lock is that a loud sound appears before the door opens/closes. The design of the front door lock is made in such a way that the metal can sometimes rattle. In order to eliminate this problem, you need to remove the lock itself and put rubber tubes of the required size on the levers. Immediately all sounds coming from ahead will disappear. When closing the doors, only a bang will be heard, and all sharp and loud sounds will be a thing of the past.
Adjusting the rear door lock
You will need a screwdriver, hammer and file. The bolts that will help you make adjustments are located under the casing. After removing it, begin the adjustment. Instructions:
- Loosen 2 bolts at the end: upper and lower. When moving the mechanism up and down, it is important to catch the moment when the lock button works clearly. Once the position is selected, the screws are tightened.
- The glass is lowered by a handle or window lifter, and the door is latched. There should be a small gap between the body element and the glass.
- A stopper (a steel tube with notches) is inserted into the lock so that it does not close. He grabs the glass sheet with his hands and pulls it towards himself.
- The closing teeth are split, giving them a rounded shape.
- Metal parts are lubricated with silicone.
It is important to check the functionality of the device and only then perform reassembly.
If the problem does not go away: there is still a creaking or difficulty opening/closing, you can use another method. To do this, use a screwdriver to loosen the fasteners of the bracket and adjust it up and down. During this, close and then open the door several times. As soon as the creaking disappears, the bracket is firmly fixed.
Adjustment process
If the gap is smaller, lower the glass all the way down. Then close it with one click, take it by the top edge and push it towards you a couple of times with a little effort. And if the gap on the front door turns out to be wider, then you need to open it with the window down and, resting your foot on the trim, pull the door to the inside several times. Then it will be possible to move on to the main problem associated with the poor functioning of the lock.
- special screwdriver;
- Silicone Grease;
- limiters.
When there is a slight bulging outward, you need to put a soft and durable gasket in the opening and on the central post, in the place where the hinges are, and then try to close the door. If the door is slightly recessed relative to the body itself, then you need to support the outside with your knee in the hinge area and pull the open door towards you. By making such adjustments to the rear doors, you can achieve soft operation without various side effects.
You can install them either on the opening or on the door itself. Due to the presence of springs, closing/opening will be smooth and the sound will not be too loud. Basically, those who are faced with a similar problem most often try to solve it with the help of lubricant. In a way it helps, but only for a short time. And it can only get worse in the future.
The article describes the process of removing the exterior door handle of a car. The handle is removed when replacing it, as well as for the convenience of replacing the lock cylinder.
You will need: an “8” wrench, flat-blade and Phillips-blade screwdrivers.
Adjustment: procedure
To adjust the lock on the front doors of Lada Grants, first check the gaps on the sides, top, bottom and sides. Most often, problems with opening arise due to incorrect geometry - for example, the top of the door fits tightly to the drain and body. To adjust:
- The glass is lowered.
- The doors close with a click.
- Pull the upper part towards you by the edge.
- Making adjustments to the rear doors.
To correct the position from below, the doors of the Grants are opened and then closed with palm strikes. The gaps between the body and the door structures should ultimately be the same. No force is used to avoid damaging anything.
Source
Operations for removing the outer handle of a Lada Granta
1. Remove the door trim (see the article “Removing the door trim of a Lada Granta”)
2. Use a screwdriver to pry up the plastic end of the lock switch rod and move it out of engagement with the lock switch lever.
3. Using a screwdriver, pry and disconnect the lock drive rod from the outer handle lever.
4. Unscrew the nut that secures the front handle to the door panel.
5. Remove the rear bolt securing the outer lock drive handle to the front door.
6. Pull forward in the direction of vehicle travel and remove the outer lock drive handle from the opening in the outer door panel.
7. Remove the outer lock drive handle.
8. If it is necessary to replace the switch mechanism, use a screwdriver to press the lock cylinder latch and remove it from the handle.
9. Install the removed parts in the reverse order of removal.
Rice. 1. Location of the lock (D), lock drive rods, outer (B) and inner (8) front door handles (A): 1 - outer panel of the front door; 2 — lock switch rod; 3 — external handle of the lock drive; 4 — door glass; 5 — door lock switch button; b - door trim; 7 — rod of the lock switch button; 8 — door lock; 9 — internal handle of the lock drive; 10 — rod of the internal drive of the lock; 11 — guide of the lock switch button; 12 — rod of the external handle of the lock drive; 13 — nut securing the external handle of the lock drive to the outer panel of the door; 14 — lock fastening screw
Replacing the front door lock on a Lada Grant
- Set the glass to the upper standard position.
- Remove the front door trim as described earlier.
- Remove the operating mechanism of the power window.
- Disconnect the pair of rods on the outer handle of the front doors.
- Lift the rod on the inside handle and remove it from the plastic holder on the door panel from the inside.
- Remove the plastic locking rod holder from the hole on the inside door panel.
- Using a cross-head screwdriver, unscrew the three screws of the fastenings towards the end, remove it in the assembly with an electric drive and a pair of rods through the corresponding hole on the inner door panel.
- Pull out the block retainer, disconnect the wiring harness block from the electric drive, and remove the lock.
- To remove the rods, squeeze out the plastic clips, wrap them around the axle, and remove the rods themselves.
Then the door lock on the Lada Granta with an electric drive is installed in the reverse order.
General practical information about the structure of the larva
If the main reason for the malfunction of the system is precisely the cylinder, it will be enough to correctly replace the cylinder from the inside. This will make it possible to do without completely replacing the element, and will also increase protection and allow you to install a new key instead of the old one.
Installing a new cylinder changes the mechanical design of the lock, so instead of the old key, you will need to make another one.
Reasons for replacing the lock cylinder:
- difficulty entering the well;
- lack of normal opening when using a key;
- the presence of obvious visual signs of a break-in;
- lost key;
- unreliable fixation of the lock in the basic structure, instability.
Removing the lock and replacing the cylinder
The design of the trunk lock on the Lada Kalina consists of two parts: the cylinder where the key is inserted and the door locking mechanism itself. All this is disconnected separately and will be written about this in more detail below.
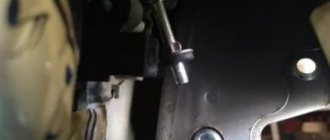
- If you need to replace the larva, it is quite easy to remove it. You can do this using an 8mm socket and a flathead screwdriver. Below is shown which bolts need to be unscrewed to release this part along with the body.
- Now that the bolts are unscrewed, take a plastic screwdriver and use it to pry off the plastic retainer that secures the rod to the body of the cylinder. For clarity, below is a photograph that clearly shows what needs to be done:
- Then, carefully take the larva so that its spring, which is located inside, does not jump out. If you need to replace a part, then replace it with a new one and assemble everything in the reverse order.
- If it is necessary to completely remove the entire mechanism, then you will have to do a little more work. We unscrew the door locking mechanism itself with a large Phillips screwdriver, there are only two bolts:
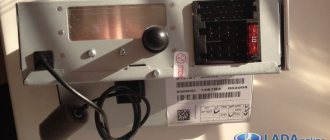
When everything is done, you need to pull it a little towards yourself and it can be easily removed; all that remains is to disconnect the plug with the power wires from this structure:
That's all the repairs, which will take about half an hour if you have the right tools and this manual. We install all the removed parts, which can be bought at absolutely any auto store, in the reverse order. I hope that I helped someone with this photo report using the example of my Lada Kalina station wagon.
Adjusting the front door lock
On Lada Granta, the lock may jam. This happens due to sagging doors or poor installation. Adjustment is carried out in several ways:
- Checking the lock latch. It is located on the door pillar. The screws are loosened with a screwdriver, the door is adjusted, then the bolts need to be tightened.
- Setting up the response. The door opens, in this state the bolts are adjusted.
- Tapping with a hammer on the body part where the bracket is located. This is necessary when displacement has occurred.
Loosening and tightening is a simple algorithm that will allow you to adjust any door.