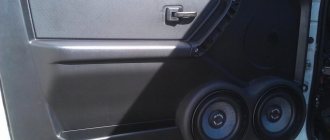
The classic “seven” has enormous potential in terms of creating conditions for installing good music. The acoustic shelf, located under the rear window in a VAZ 2107, is the best place to install large speakers. Finished parts of this kind are sold in auto parts and accessories stores and are quite expensive. They are usually molded from plastic, but in order to achieve high-quality sound, it is recommended to use a wooden podium.
A base made of this material eliminates parasitic vibrations and allows you to achieve maximum purity when playing musical compositions. Most VAZ 2107 cars, in which really high-quality audio players are installed, are equipped in special workshops or all operations are performed by hand.
Materials and tools
A good shelf for speakers is now made from wood-based composite materials. To manufacture this part, it is recommended to use the following materials:
- Chipboard - 16mm or plywood 10-12mm thick for making the base.
- Carpet, leatherette or other decorative material for covering the shelf.
- Two-component epoxy resin.
- Thin fabric such as nylon, you can use old women's tights or stockings.
- Construction foam.
The work is done with your own hands using electric and manual tools, according to the list below:
- furniture stapler;
- electric jigsaw and a set of files;
- drill with continuously variable speed control or screwdriver;
- Phillips and flathead screwdrivers.
Making a high-quality rear shelf for a VAZ 2107 from the above materials with your own hands is only possible if you strictly adhere to the technology.
Preparatory work
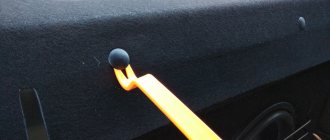
Before starting work, you need to dismantle the standard shelf of the VAZ 2107. This work will not take much time, all you need is a screwdriver. Once removed, the shelf will serve as a template for making an acoustic shelf. To do this, you need to lay it on a sheet of chipboard and use a pencil to mark the outline of the future shelf and the slots for the seat belts.
After the first stage, using templates, we mark the holes for the speakers. You can draw the templates yourself or make them in a computer program and print them out. It all depends on the master’s capabilities and skills.
Making parts yourself
A quality shelf with podiums for installing speakers begins with preparing the base. We dismantle the standard part with our own hands and use it as a template. We lay it on top of a sheet of chipboard or plywood and trace it with a simple pencil. Using a jigsaw, we cut out the base and carefully process it along the contour of the sandpaper. We cut out the upper part of the podium from the same material and make supports for it from scraps of wood.
We attach the resulting structure to the base using self-tapping screws. A cardboard piece is installed on the inside of the podium, forming the inner surface of the podium. The resulting recesses are filled with construction foam and left alone until it dries completely. Now the base for the shelf is ready, the excess hardened foam is cut off and thoroughly cleaned.
The base for installing speakers under the rear window of the VAZ 2107 is ready; now it needs to be covered with decorative materials with your own hands. This operation is performed carefully with smoothing of the coating, which, in addition to the main method of fastening, is also fixed from the wrong side with a furniture stapler.
Making an acoustic shelf for a VAZ-2107
Standard-type acoustic shelves for the VAZ 2107 cost about 1000 wooden ones on the market, which is just over 30 Baku. Of course, there is a range in prices, but it’s a no brainer that a good shelf costs good money. And since this money is always not enough and you want to save money, but still get high-quality sound from your acoustics, you can get a little hands-on, namely, make this shelf yourself, but so that it is no worse, and even better, than those sold on markets and shops. So let's get started!
The following materials were required: 18 mm chipboard, 1 meter carpet, polyurethane foam, epoxy glue, and some other little things. We take a standard plastic shelf, put it on a sheet of chipboard, outline it and cut it out, taking into account the cutouts for the seat belts:
We mark and make templates for ovals. One is included in the kit - this is the internal diameter, for the external one we make it ourselves (MS Word, Photoshop or some other editor will help you with this)
We make the base of future podiums from chipboard (you need a jigsaw):
We make spacers from timber (20*40 mm) for structural rigidity and attach them to self-tapping screws:
We attach the podiums to the shelf blank and trace them. We mark round holes for air flow into the trunk and cut them out:
We fill the voids of the podium with polyurethane foam, lay cardboard inside so that the foam does not spread before it dries, and leave to dry:
When the foam has dried, carefully cut it off and sand it with sandpaper:
To strengthen the structure, we wrap it with nylon impregnated with epoxy glue:
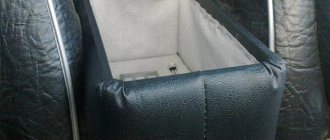
The podiums are ready. We return to the shelf. We make a box for the seat belts (as you can see in the photo, the belts go into the box from the side):
Let's put everything in place and see what happens. And the result is already starting to look like a factory shelf:
It seems that everything is as planned and now we are starting to cover the structure with carpet. To attach the carpet I used small nails. If you have a furniture stapler, then everything is much simpler and faster:
To cover the boxes for the belts with carpet, I used clothespins:
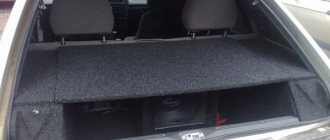
We screw the boxes into place under the belts and the shelf is ready!
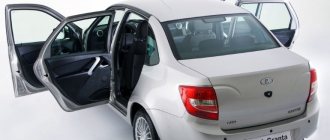
Now, satisfied with ourselves, we run to install the shelf in the car. For me it is bolted to the metal, the nuts are tightened from the trunk side:
Connect and install acoustics:
As you can see, our homemade shelf is very similar to the store shelf, which costs 1000 rubles, but it cost us much less. I don’t know about you, but I’m happy!!! The permanent address of the topic on the forum is where you can express your opinion, ask questions, make suggestions, thank the author, in general, whatever your heart desires within reason 
The procedure for installing an acoustic shelf
The finished part is mounted in place of the standard one using bolts that are removed from the trunk, where the nuts are tightened on them. An acoustic shelf, made by hand for a VAZ 2107 car, is first tried on, then drilled together with the body parts. Bolts are inserted into the holes, with the heads being flush into the material.
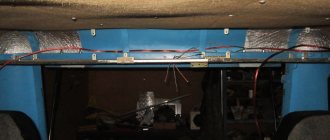
All preparatory operations have been completed, and the self-made shelf can be installed in its place in the VAZ 2107 car. Wiring is first laid around the cabin, with the help of which the speakers are connected. The work is finished, and now you can enjoy the result; high-quality music sound is guaranteed with this foundation.
Making a shelf
Below is the process of making an acoustic shelf. We remind you that you can buy a shelf, especially since the price is not so high, but in this case you will not be able to add your own individual touches to the design. In our case, the acoustic shelf will be single, but we will install the speakers on high podiums.
What do you need
Template for an acoustic shelf on a vase
First, let's prepare properly:
- We buy polyurethane foam to give shape to acoustic podiums;
- Plywood, which you can find in your own garage if you look hard enough;
- Glue, preferably good glue in the amount of 1 jar;
- Carpet material is about 2 meters;
- Several screws;
- Pencil;
- Old shelf;
- Electric jigsaw;
- Brush and spatula;
- Other tools you may need.
Process algorithm
- We needed the old shelf to use as a template.
Note. On the other hand, the template can be downloaded from the Internet to choose from. Here, as they say, it’s up to your taste and color.
- We take an electric jigsaw and start cutting out the desired shape from the plywood. In the process, you can use a file to grind out the irregularities;
- Now we cut out oval shapes from plywood for the speakers. It would be desirable to have speaker templates.
Advice. To cut out the inner oval, you need to make several holes with a drill on the plywood, and then insert a jigsaw file into it.
- After the ovals are ready, you need to put them on the stops. You can use wooden blocks or just scraps from boards. We make a stand under one edge, raising it by 7 cm.
Note. At the counter, one edge should be smooth, and the other should be ground off with a stationery knife, at an angle. By the way, the oval can be placed on two racks.
Acoustic shelf for VAZ 2107 and its manufacture
- We firmly fix the racks and ovals to the plywood base using self-tapping screws;
- We put speakers inside, check everything, how it sits, etc.;
- Now you need to protect the main parts of the oval with the stand from foam with cardboard;
- Fill the polyurethane foam around the podiums;
- We wait until everything dries. We take a knife and begin to cut off, like an avid sculptor, everything unnecessary. We give the necessary shape to the podium;
- We cover the shelf with carpet;
- We install it in the car;