VAZ 2106 replacement of front shock absorbers
Replace the shock absorber if there is a shock absorber fluid leak or loss of vibration damping efficiency. Caution: Replace faulty shock absorbers only in pairs (front, rear) or as a set (all four).
Replacement
Before you start replacing the front shock absorber, take the keys “13”, “6”, “19”, “17”.
Open the hood and find the technical mounting hole for the shock absorber rod to the body. Unscrew the rod. To do this, use a wrench to stop the rod from turning at “6”, and use another wrench to slightly loosen the fastening nut. Then we remove the cushion washer and the rubber cushion itself.
We move under the car. We unscrew the two fastening nuts connecting the shock absorber bracket and the lever. We remove the nuts together with spring washers and pull out the marter through the technical hole.
Now remove the other cushion (lower) of the upper hinge from the shock absorber.
Then disconnect the shock absorber from the mounting bracket by unscrewing the mounting nut. Remove the lower hinge bolt and easily remove the shock absorber from the vehicle.
This completes the removal of the shock absorber. Carry out all repairs and install the shock absorber in a clear sequence, the reverse of dismantling.
Driveshaft faults follow the link.
How to change
Tools and materials
To carry out the entire scope of work, a limited number of tools and materials will be required. First of all, you need to acquire:
shock absorbers; key at 6, 17, 13, 19; locksmith tool.
This is quite enough to do all the work efficiently. Before starting it, you should think about installing the car on an observation deck or lift. This is the only way to easily reach the element being replaced. The car must be on wheels, and the distance from its bottom to the ground should be approximately 50 cm.
Sequence of work
First you need to remove all the fastening elements of the shock absorber. First you need to loosen the nut and remove it, and then remove all the other elements. We are talking about special pillows, as well as a spring pressure washer. Now you can lift the car, if of course the work is done on a lift.
The bracket is in any case attached to the system lever. In order to separate them you only need to unscrew a couple of nuts. After this, the spring washers should be removed. Now access to the old shock absorber is completely open. It is removed through a special mounting hole in the lever. The pillow must also be removed. The car's shock absorber is tightly fixed to the bracket. To remove it, you will have to perform a number of manipulations.
In fact, it all comes down to unscrewing one single fastening nut. When it is removed, you can easily and simply pull out the mounting bolt and, accordingly, remove the shock absorber itself.
In principle, all work related to removing the old shock absorber has been completed, which means that installation of a new one can begin. It is installed in reverse order. A new shock absorber with a rubber-to-metal hinge is installed.
Some useful tips
Before starting the installation process, the working rod is pulled out to the full length of the working stroke. Before assembling the upper part of the mount, it is necessary to lower the car from the lift so that it creates a force equal to its weight, that is, the VAZ 2106 must be completely free.
If, when installing a new shock absorber, the rod does not protrude outward enough, then an additional cushion washer should be put on it.
The nut is screwed in such a way that the rod can then be extended to its maximum length, resting on the mudguard.
So, the work is completed, which means that we can sum up its results. As you can see, replacing the shock absorber in this case is extremely simple. In fact, during its implementation, various kinds of troubles may arise associated with the oxidation of one or another part, but this is rather an exception to the rule. Replacing front shock absorbers on a VAZ 2106 should not cause any difficulties even for inexperienced car enthusiasts.
If it is quite problematic to do the whole range of work yourself, then you should seek help from a specialized center. As noted earlier, this will avoid subsequent troubles in terms of operating the car.
Installation
1. Using an appropriate tap, clean the threaded holes in the steering knuckle for the lower shock absorber mounting bolts. Reinstall the shock absorber and screw on the new shock absorber upper mount mounting nuts.
2. Align the steering knuckle with the shock absorber, making sure the steering knuckle protrusion fits into the hole.
3. Insert the upper bolt securing the steering knuckle to the shock absorber and screw a new nut onto it. Partially install two new bolts securing the lower part of the shock absorber to the steering knuckle. Press the steering knuckle until it is aligned with the shock absorber and in this position tighten the upper shock absorber mounting nut and then the two lower bolts.
4. Remove the jack supporting the lower arm of the front suspension, then tighten the nuts securing the upper shock absorber mount to the required torque.
Shock absorbers VAZ 2101, 2106, 2107
Replacing front shock absorbers VAZ 2107
1. Ratchet wrench 1/2″ (large head);
2. Two extensions or one large 1/2″;
3. Key for 17, Key for 6 (a good one for 7 or 5.5 will do);
4. Hex heads 13 and 17;
7. Two bolts, two nuts, two bolts for the shock absorber bracket;
8. Hand clamp/long-nose pliers or assistant.
9. For KYB Premium shock absorbers there is an additional key for 14!
Replacement process: I did the following sub-disassembly on the carburetor classic:
1. Removed the carburetor pan;
2. Removed the battery;
3. Removed the wire from the ignition coil.
Further? We go through all threaded connections with a liquid wrench. According to the manual, using a 6 wrench to hold the shock absorber rod from turning, use a 13 wrench to unscrew the nut. You don’t need to keep the key on 6 all the time, just rip it off.
Let's go into the pit. Alternately, use a candle or lighter to heat the shock absorber bracket mounting nuts and tear them off
Only then do we begin to unscrew. I recommend cleaning the threads with a wire brush or at least a rag.
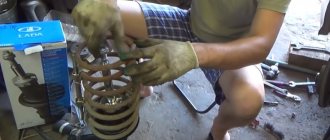
Then everything depends on the width of the pit and manual dexterity. Personally, I didn’t jack up the car, but folded the shock absorbers through the slots in the spring and took them out.
Somehow they don't look very similar
lots of thick pillows
Now it all depends on how much you value time: whether you cut the bolts or try to unscrew them. It’s better to cut the bolts down and here’s why: the front shock absorbers last longer than the front shock absorbers. The fit of the bolts is very tight, the environment is aggressive - solid iron oxide. But they don’t unscrew anymore for the first reason.
This is where I started thinking about what I was holding in my hands. The shock absorber only fits tightly into the right bracket
Kayabovsky's eyelet is slightly larger
The new shock absorber should be installed so that the assembled bracket, when placed on the floor, is perpendicular to the floor (looks at the ceiling without tilting).
Further - easier. Everything is in reverse order. The rod does not need to be immediately straightened to its full length, because you have to play the game “Get into the hole” (the rod into the mudguard). You can straighten the rod by slipping an open-end wrench between the coils of the spring (like a lever). Using slow movements of a forward-returning nature, so that the rod does not fold, we look for a hole, push the shock absorber through, attach the cushion to a couple of turns of nuts, and check from above. If everything is ok, pull out the rod as described above and screw on the bracket.
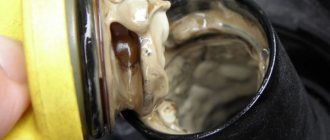
The Japanese, apparently, have never repaired the Zhiguli; the pillow sandwich is impressive in its thickness. But the driver of the Zhiguli, who has seen hell on earth more than once, will not be frightened by this.
We grab the rod with a manual clamp with a lock and with rotational movements we lower the pillow and throw on the plate. You may have to go under the car again to lift the rod through the spring. Take a 14mm wrench (for the original 13mm) and tighten the nut. We take the key to 6 and tighten it.
Replacing rear shock absorbers on VAZ 2101-2107
On cars of the “classic” family, starting from VAZ 2101 and ending with 2107, rear shock absorbers are usually changed at least every 70,000 km. It is worth remembering that when operating with a trailer, the rear shock absorbers fail very quickly.
It is possible that they will not leak after 10-20 thousand kilometers, but their performance will clearly deteriorate. When driving along the highway at a decent speed, above 80 km/h, the rear of the car begins to float, which negatively affects handling. When you fall into a hole, a characteristic knock appears in the rear, which indicates that it is time to change the shock absorbers.
Necessary tool for replacing rear shock absorbers on VAZ 2101-2107
1. Open-end wrench or socket wrench 19
2. Head with a 19 mm wrench or ratchet
3. Crowbar and hammer
4. Penetrating lubrication
Instructions for repairing (replacing) shock absorbers on a “classic”
So, before starting the repair, the first thing you need to do is lift the VAZ 2101-2107 with a jack, namely its rear part, or carry out the work in a pit, but still slightly fix the slight lift of the car with a jack.
Immediately apply penetrating lubricant to all threaded connections to make unscrewing easier. After a few minutes, we try to unscrew the lower fastening bolt, placing a wrench on it on one side, and trying to rip it off with a wrench on the other. When the effort when unscrewing has become more or less weak, it is best to use a ratchet to do it faster and more conveniently:
After the nut is completely unscrewed, knock out the bolt with a hammer, making sure to use some kind of backing so as not to damage the thread:
Now the lower part of the shock absorber is completely freed, as we can see in the photo below:
Then you can start working on the top part. There you will only need one key or a head with a knob, since you don’t need to hold anything:
And to release the shock absorber, you can use a pry bar to slightly pry it to the side, as is clearly shown in the photo below:
Now the rear shock absorber is completely removed from the car and you can remove it, and the result of the work done is shown in the picture:
After this, we carry out similar actions with another shock absorber and replace the old ones with new ones. Installation proceeds in reverse order. The price of new shock absorbers for the VAZ 2101-2107 is from 400 rubles apiece, and their cost also depends on the type of device (gas or oil), as well as on the manufacturer.
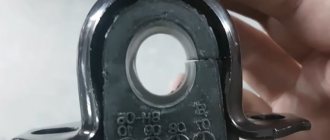
Shock absorber mounting, with a broken lever pin VAZ 2101-2107
The following problem happened - I was experimenting with shock absorbers, and all the studs on the lower arms broke due to old age...
Last time, when I changed the springs, the studs that hold the stabilizer broke, no problem, I drilled through and screwed it onto a bolt and nut!
And now the shock absorber mounting pin had already fallen off, I didn’t want to change the lever now, it was cold, and I only had money for my original one, but I don’t want my original one. I really want to save some money and install already tuned levers with a large inversion of everything.
I got out of the situation like this:
I drilled a hole in place.
And inserted a bolt and nut!
It sits dead, and there is no load there to break it.
Therefore, if this happens to anyone, you can get out of the situation this way.
Shock absorbers KYB (Kayaba) review from installation and operation
The need to replace the shock absorbers arose about a month or a month and a half ago: the car’s performance had sharply worsened. This became noticeable on the highway when taking gentle turns at speed: the car began to roll more than before, the wheels tried to leave the ground. And in the city, when turning at low speeds, I began to feel an increase in roll. I finally realized that “the time has come” a couple of weeks ago. While passing a long-familiar arc at the usual speed (somewhere around 85 km/h), the car suddenly shook, swayed several times, the rear moved slightly... In general, frankly speaking, I managed to crap myself a little, since I clearly could have rolled over. But everything worked out - I caught the car...
Shock absorbers KYB (Kayaba) Gas-A-Just
I bought it back in the fall. Then this purchase was a desire to slightly tune the suspension and make a change in the behavior of the car. Now the issue of replacement has become even more pressing, since driving has become simply unsafe.
Yesterday morning the service center installed front shock absorbers for me. I installed the rear ones in the garage myself in the evening. (By the way, during installation I had to use a jack! The shock absorbers turned out to be so rigid that I didn’t have enough strength to squeeze them to insert the lower mounting bolt! I had to lift the car to align the “ear” of the shock absorber with the “ears” on the bridge)
Purpose and design of shock absorbers VAZ 2106
The design of the front and rear suspension of the VAZ “six” uses shock absorbers to dampen sudden vibrations. Since they, like other elements of the car, fail over time, it is worth dwelling in more detail on the signs of malfunctions, selection and replacement of these suspension parts.
Shock absorber design
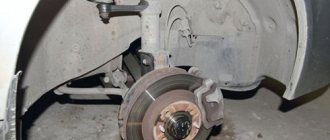
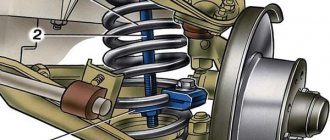
The VAZ 2106 is usually equipped with two-pipe oil shock absorbers. The difference between the front and rear dampers lies in the size, the method of mounting the upper part and the presence of a buffer 37 at the front shock-absorbing element, which limits travel during reverse movement. The design of the rear shock absorber is made of a reservoir 19 with a mounting ear, compression valves (2, 3, 4, 5, 6, 7), a working cylinder 21, a rod 20 with a piston element, and a casing 22 with an eye. The reservoir 19 is a tubular element made of steel. An eye 1 is fixed in its lower part, and a thread is made on top for a nut 29. The eye has a recess into which the body 2 is placed together with the valve discs. It is supported against the recess by cylinder 21.
Front shock absorber VAZ 2106
Replace the shock absorber if there is a shock absorber fluid leak or loss of vibration damping efficiency.
Caution: Replace faulty shock absorbers only in pairs (front, rear) or as a set (all four).
Replacement
Before you start replacing the front shock absorber, take the keys “13”, “6”, “19”, “17”.
Open the hood and find the technical mounting hole for the shock absorber rod to the body. Unscrew the rod. To do this, use a wrench to stop the rod from turning at “6”, and use another wrench to slightly loosen the fastening nut. Then we remove the cushion washer and the rubber cushion itself.
We move under the car. We unscrew the two fastening nuts connecting the shock absorber bracket and the lever. We remove the nuts together with spring washers and pull out the marter through the technical hole.
Now remove the other cushion (lower) of the upper hinge from the shock absorber.
Then disconnect the shock absorber from the mounting bracket by unscrewing the mounting nut. Remove the lower hinge bolt and easily remove the shock absorber from the vehicle.
This completes the removal of the shock absorber. Carry out all repairs and install the shock absorber in a clear sequence, the reverse of dismantling.
Driveshaft faults follow the link.
How to change
To carry out the entire scope of work, a limited number of tools and materials will be required. First of all, you need to acquire:
shock absorbers; key at 6, 17, 13, 19; locksmith tool.
This is quite enough to do all the work efficiently. Before starting it, you should think about installing the car on an observation deck or lift. This is the only way to easily reach the element being replaced. The car must be on wheels, and the distance from its bottom to the ground should be approximately 50 cm.
Sequence of work
First you need to remove all the fastening elements of the shock absorber. First you need to loosen the nut and remove it, and then remove all the other elements. We are talking about special pillows, as well as a spring pressure washer. Now you can lift the car, if of course the work is done on a lift.
The bracket is in any case attached to the system lever. In order to separate them you only need to unscrew a couple of nuts. After this, the spring washers should be removed. Now access to the old shock absorber is completely open. It is removed through a special mounting hole in the lever. The pillow must also be removed. The car's shock absorber is tightly fixed to the bracket. To remove it, you will have to perform a number of manipulations.
In fact, it all comes down to unscrewing one single fastening nut. When it is removed, you can easily and simply pull out the mounting bolt and, accordingly, remove the shock absorber itself.
In principle, all work related to removing the old shock absorber has been completed, which means that installation of a new one can begin. It is installed in reverse order. A new shock absorber with a rubber-to-metal hinge is installed.
Some useful tips
Before starting the installation process, the working rod is pulled out to the full length of the working stroke. Before assembling the upper part of the mount, it is necessary to lower the car from the lift so that it creates a force equal to its weight, that is, the VAZ 2106 must be completely free.
Methods for replacing shock absorbers on a VAZ 2106
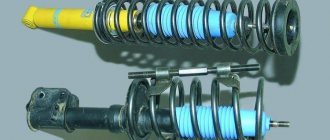
The shock absorber is an important part of the suspension, which is responsible for damping unnecessary vibrations of the car, absorbing shocks on the road and impacts of the car body on the wheels and axles of the car by creating thermal energy from mechanical energy. On cars of the classic VAZ line, including the 2106 model, shock absorbers are used in conjunction with such an elastic element as a spring.
Working in pairs, the spring absorbs most of the vibrations of the car's suspension, and the shock absorbers prevent the body from swaying along with the springs.
Serviceable shock absorbers guarantee smooth movement of the car, driving safety and the shortest braking distance, so replacing shock absorbers when they fail is an important part of car maintenance.
Maintenance
We are interested in replacing the more wearable shock absorbers on the VAZ 2106 - the front ones. They are more susceptible to wear and tear since they are directly involved in operating the machine. It is worth noting that all shock absorbers can last up to 70 thousand kilometers before they have to be replaced during the next maintenance. However, before starting work, it is worth making sure that they do not seem to be completely worn out. First of all, you need to visually inspect the shock absorbers - if there are traces of heavy oil leaks, then they definitely need to be changed. Indirect signs that it is time to change the shock absorbers on your VAZ 2106 are a deterioration in the car's stability when cornering and the appearance of an annoying knock in the front suspension. There is also one popular method for determining their condition.
You need to approach the car from the back or front, depending on what mechanisms you suspect, and press firmly on the hood and trunk. If, after you remove your hands, the car rocks as if on waves, the shock absorbers need to be replaced.
If the body immediately returned, then everything is in order and the cause of the indirect signs is something else.
Replacing shock absorbers
Having carried out such simple diagnostics and decided that replacement is still necessary, then before you start disassembling your VAZ 2106, you need to select new shock absorbers. Any car store will tell you which ones are best to use, depending on your driving style and use of the car.
The tools we need are:
- Set of spanners.
- Set of open-end wrenches.
- WD-40.
- Spring ties.
Now let's get to work. First we need to spray all the bolts that we have to unscrew with Vedashka. After waiting for the layer of rust to come off the bolts, first unscrew the bolts securing the strut and remove them. Next, unscrew and disconnect the steering tip and immediately remove the brake hose. Now we begin to remove the shock absorber, unscrew the three bolts securing the shock absorber cushion to the car body. Now you need to compress the spring, otherwise you won’t be able to remove it. Next, unscrew the last fastening nut and remove it and the boot, bumper and strut. Then we simply assemble it in the reverse order, but with a new one. As you can see, there is nothing complicated in the independent procedure for replacing shock absorbers.
Sequence of work
First you need to remove all the fastening elements of the shock absorber. First you need to loosen the nut and remove it, and then remove all the other elements. We are talking about special pillows, as well as a spring pressure washer. Now you can lift the car, if of course the work is done on a lift.
The bracket is in any case attached to the system lever. In order to separate them you only need to unscrew a couple of nuts.
After this, the spring washers should be removed. Now access to the old shock absorber is completely open. It is removed through a special mounting hole in the lever. The pillow must also be removed. The car's shock absorber is tightly fixed to the bracket. To remove it, you will have to perform a number of manipulations.
In fact, it all comes down to unscrewing one single fastening nut. When it is removed, you can easily and simply pull out the mounting bolt and, accordingly, remove the shock absorber itself.
In principle, all work related to removing the old shock absorber has been completed, which means that installation of a new one can begin. It is installed in reverse order. A new shock absorber with a rubber-to-metal hinge is installed.
Car suspension and our roads
When driving, the car suspension absorbs all vibrations from the road surface and dampens them, excluding the transfer of the latter to the vehicle body.
Of course, it is impossible to completely damp out vibrations, given the state of our roads, but the suspension still absorbs most of them. In this case, the main work in damping vibrations is performed by the shock absorber.
But due to constant heavy loads, this element may fail.
All this will be accompanied by a decrease in controllability, increased body vibration, and knocking when hitting large bumps.
The manifestation of these signs indicates the need to replace shock absorbers.
While shock absorbers have not been created that can work forever, you can, of course, install devices from KYB KAYABA, but they also do not last forever.
Therefore, over time you will have to change them, regardless of what car they are installed on - an old “penny” VAZ-2101 or a Lexus LX570.
But not so many people own Lexus cars, but there are a lot of VAZ owners, and most of them prefer to repair their cars themselves.
Therefore, let's look at how to replace front shock absorbers on different VAZ models - from the Classic to the VAZ-2110 family.
Some useful tips
Before starting the installation process, the working rod is pulled out to the full length of the working stroke. Before assembling the upper part of the mount, it is necessary to lower the car from the lift so that it creates a force equal to its weight, that is, the VAZ 2106 must be completely free.
If, when installing a new shock absorber, the rod does not protrude outward enough, then an additional cushion washer should be put
.
The nut is screwed in such a way that the rod can then be extended to its maximum length, resting on the mudguard.
So, the work is completed, which means that we can sum up its results. As you can see, replacing the shock absorber in this case is extremely simple. In fact, during its implementation, various kinds of troubles may arise associated with the oxidation of one or another part, but this is rather an exception to the rule. Replacing front shock absorbers on a VAZ 2106 should not cause any difficulties
even for inexperienced car enthusiasts.
If it is quite problematic to do the whole range of work yourself, then you should seek help from a specialized center. As noted earlier, this will avoid subsequent troubles in terms of operating the car.
Checking the serviceability of shock absorbers
But before we describe the work process, we will consider ways to identify a shock absorber malfunction.
The first sign, as already indicated, is a knocking sound on one or both sides of the car when passing strong bumps.
A visual inspection will also help to identify the malfunction. Oil leaks can often be seen on the outside of the damaged element.
This indicates that the shock absorber has lost its seal and some of the oil is leaking out.
You can also assess the condition by rocking the body. To do this, you need to go to one of the front wheels and with both hands press firmly on the body to overcome the resistance of the springs.
You need to press several times to set the amplitude of oscillations as large as possible, and then suddenly stop swinging.
If the shock absorber is working properly, the body will immediately return to its original position, without any vibrations.
Shock absorber problems
When operating a car, it is important to know when suspension shock absorbers fail, because the car’s handling and safety depend on their serviceability. Malfunctions are indicated by characteristic signs that are worth considering in more detail.
Oil leakage
You can determine that the damper is leaking by visually inspecting it. There will be noticeable traces of oil on the case, which indicates a violation of the seal of the device. It is possible to drive a car with a leaking shock absorber, but it should be replaced as soon as possible, since the part is no longer capable of providing sufficient elasticity when the body rolls. If you continue to operate a vehicle with a faulty damper, the remaining shock absorbers will be subject to loads that they were not designed to handle. This will shorten their service life and require replacement of all four elements. If leaks were noticed on several shock absorbers, then it is better not to use the car until they are replaced, since due to strong swinging, other suspension elements (silent blocks, rod bushings, etc.) will begin to fail.
A shock absorber leak indicates the need to replace the element.
Knocks when driving
Most often, shock absorbers knock due to leakage of working fluid. If the damper is dry, then you need to check its serviceability in a simple way. To do this, press on the car fender from the side where the knock comes from, and then release it. The working part will ensure slow subsidence and return to its original state. If the shock absorber has become unusable, the body will swing under the influence of the spring, quickly returning to its original position. If you notice knocking noises from damping elements with a mileage of more than 50 thousand km, you should think about replacing them.
Video: checking the serviceability of the VAZ 2106 shock absorber
Sluggish braking
When problems occur with shock absorbers, the wheels have poor contact with the road surface, which reduces traction. As a result, the tires slip briefly and braking becomes less effective, meaning it takes longer to slow down the vehicle.
It bites and pulls the car to the sides during braking
Malfunction of the damper due to wear of structural elements leads to incorrect operation of the mechanism. With a slight impact on the brake pedal or when turning the steering wheel, body sway occurs. One of the main signs of a faulty shock absorber is a dive when braking or strong body roll when turning and the need for steering. Driving becomes unsafe.
Uneven tread wear
When brake performance decreases, tire life also decreases. This is explained by the fact that the wheels often bounce and catch on the road surface. As a result, the tread wears off unevenly and faster than with a working suspension. In addition, the wheel balancing is disrupted and the load on the hub bearing increases. Therefore, it is recommended to periodically inspect the tread of all four wheels.
If your tires wear unevenly, one of the likely causes is problems with the shock absorbers.
Poor road stability
If the VAZ 2106 behaves unstable on the road, the cause may not only be faulty shock absorbers. It is necessary to inspect all suspension elements and check the reliability of their fixation. If the rear axle rod bushings are heavily worn or if the rods themselves are damaged, the car may roll to the sides.
Broken mounting ear
The mounting eye can break on both the front and rear shock absorbers. Often this phenomenon occurs when installing spacers under springs to increase ground clearance, as a result of which the damper stroke decreases and the fastening rings are torn off.
When installing high springs in the rear suspension and using original shock absorbers, the lugs break
To avoid such an unpleasant situation, it is necessary to weld an additional eye on the shock absorber, for example, by cutting it off from an old product or using a special bracket.
Video: reasons for breakage of shock absorbers on Zhiguli cars
Replacing front shock absorbers on a VAZ “Classic”
Structurally, the front suspension of VAZ cars belonging to the “Classic” (VAZ-2101-2107) is the same, the sequence of work on replacing shock absorbers for these cars is identical, so let’s consider it using the example of the VAZ-2107.
The replacement work is not that complicated, so you can do it yourself. At the same time, you don’t need so many tools:
- Special key for holding the shock absorber rod;
- Open-end and socket wrenches 17;
- Open-end or socket wrench 13;
- WD-40.
Naturally, before starting work you need to stock up on new front suspension shock absorbers. It is better to drive the car into a pit or overpass.
First, the upper shock absorber mount becomes loose. To do this, you need to open the hood and find technological holes in the wings that provide access to the shock absorber rod mounting nut.
Before loosening, you need to wipe the nut from dust and treat it with WD-40.
To unscrew the nut, you will need to hold the shock absorber rod, for which you will need a special wrench with a small slot for its upper edges.
In the absence of such a wrench, you can use a regular open-end wrench size 6.
But there is a small nuance in this - over time, the fit of the nut becomes so tight that in order to hold the rod, it may be necessary to extend the arm of the wrench with a piece of pipe that holds the rod.
And since the open-end wrench is quite small, a significant force can simply break it. Therefore, it is better to use a special key, which will be more difficult to break.
So, while holding the rod, use a 17mm wrench to unscrew the nut of the upper shock absorber mounting as shown above.
After this, the spring washer installed under the nut is removed, as well as the pillow washer and the upper pillow itself.
Next you need to move under the car. The shock absorber at the bottom is attached to the lower arm using a bracket.
To disconnect it from the lever, you need to unscrew the two bolts securing the bracket. To do this, you will need a 13mm wrench; to make work easier, it is better to treat the joint with WD-40.
After unscrewing these bolts, you can pull the shock absorber down along with the bracket. Then the bracket is disconnected from the removed shock absorber.
To do this, you need to use two 17mm wrenches, an open-end and a socket.
Don't forget to remove the bottom cushion.
Before installing a new shock absorber, a bracket is attached to it, using new rubber elements - silent blocks.
First you need to secure the shock absorber to the top. To do this, the rod is completely pulled out, a new lower cushion must be put on it, after which it is inserted into the upper hole.
At the top, to prevent the rod from falling out of the hole, it must be secured with a nut, not forgetting to first install the top cushion, its washer and spring washer. In this case, there is no need to tighten the nut; the main thing is to prevent the stem from falling out.
Then you need to screw the shock absorber bracket to the lower arm, the bolts should be tightened completely.
Then the upper nut is tightened, which requires holding the rod back with a wrench.
The front shock absorber is replaced in the same way on the other side.
If the work was carried out on a lift or the car was jacked up for ease of work, the fastening bolts must be tightened with the car lowered so that the suspension is under the load of the weight of the car.
Lada 2107 “There was a history” › Logbook › Replacing front shock absorbers
We open the magazine “Murzilka” or google “Replacing the front shock absorbers of a VAZ 2107” and read: “You will need two keys for 17, a key for 13 and a key for 6.” OK. You must understand that the literature on repairs at AvtoVAZ enterprises differs from “Murzilok” and “Funny Pictures”.
Therefore, we will need: *Ratchet wrench 1/2″ (large head); *Two extension cords or one large 1/2″; *Key for 17, Key for 6 (a good one for 7 or 5.5 will do); *Hex heads 13 and 17; *Bulgarian; *Candle/lighter; *Two bolts, two nuts, two bolts for the shock absorber bracket; *Hand clamp/long nose pliers or assistant. * For KYB Premium shock absorbers there is an additional 14 key!
By the way, the contents of the book “We Repair It Yourself” are mostly valid only for a new car!
Go. On the carburetor classic, I did the following sub-disassembly: *removed the carburetor pan; *removed the battery; *removed the wire from the ignition coil.
Next, we go through all threaded connections with a liquid wrench. According to the manual, using a 6 wrench to hold the shock absorber rod from turning, use a 13 wrench to unscrew the nut. You don’t need to keep the key on 6 all the time, just rip it off.
Let's go into the pit. Alternately, use a candle or lighter to heat the shock absorber bracket mounting nuts and tear them off
Only then do we begin to unscrew. I recommend cleaning the threads with a wire brush or at least a rag.
Then everything depends on the width of the pit and manual dexterity. Personally, I didn’t jack up the car, but folded the shock absorbers through the slots in the spring and took them out.
Now it all depends on how much you value time: whether you cut the bolts or try to unscrew them. It’s better to cut the bolts down and here’s why: the front shock absorbers last longer than the front shock absorbers. The fit of the bolts is very tight, the environment is aggressive - solid iron oxide. But they don’t unscrew anymore for the first reason.
The new shock absorber should be installed so that the assembled bracket, when placed on the floor, is prependicular to the floor (looks at the ceiling without tilting).
Further - easier. Everything is in reverse order. The rod does not need to be immediately straightened to its full length, because you have to play the game “Get into the hole” (the rod into the mudguard). You can straighten the rod by slipping an open-end wrench between the coils of the spring (like a lever). Using slow movements of a forward-returning nature, so that the rod does not fold, we look for a hole, push the shock absorber through, attach the cushion to a couple of turns of nuts, and check from above. If everything is ok, pull out the rod as described above and screw on the bracket.
Replacing front shock absorbers on VAZ-2108-099, 2110-2115
As for the VAZ-2108-099 cars, as well as the 2110 family, replacing their front shock absorbers is somewhat more complicated.
This is due to the fact that the shock absorber strut also acts as a steering knuckle.
But it is quite possible to replace shock absorbers yourself, although you will need more tools:
- Special socket wrench 22;
- Powerful flat screwdriver;
- Special key for holding the shock absorber rod;
- Keys for 19 (2 pcs.);
- Key to 27;
- Ball joint remover;
- Special ties for springs;
- Hammer;
- Wooden tip;
- WD-40;
- Marker.
On these cars, work begins in the engine compartment. But before this, the car is placed on the pit, and the side from which it is being made is jacked up and the wheel is removed.
Use a screwdriver to pry off the rubber plug securing the upper support. Then, using a 22mm spanner, unscrew the nut securing the rod, while it is held in place with its own special wrench.
At this point, work at the top stops and moves down.
Before disconnecting the strut from the hub, you first need to remove the tie rods.
To do this, you need to unscrew the tip fastening nut, and then use a puller to press the tip itself out of its seat in the rack.
To disconnect the strut from the hub, you need to unscrew the fastening nuts with 19mm wrenches and pull out the bolts.
But keep in mind that the top bolt is an adjustment bolt, so you need to mark its position before loosening it. During assembly, this will help to at least approximately determine the camber angle.
Often these bolts fit very tightly in the holes, so after unscrewing the nuts, they may need to be knocked out.
This is where a hammer with a wooden handle comes in handy so as not to damage the bolt threads.
Once the bolts are removed, it will be possible to lower the hub down and free the lower end of the strut. In this case, you need to monitor the tension of the brake pipe.
Having freed the bottom of the pillar, work again moves into the engine compartment.
The final step in removing the rack will be to unscrew the three fastening nuts using a 13 key on the upper support.
After this, it will be possible to remove the rack down.
But this is not the end of the work, since the shock absorber itself still needs to be removed from the strut.
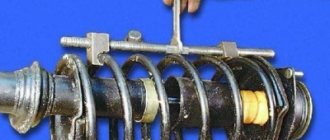
This will require the use of spring ties. By placing them opposite each other on the spring, the spring is evenly compressed.
To remove the support and be able to remove the shock absorber, you need to hold the rod with a special wrench and unscrew the nut securing the cushion with a 27 wrench.
Next, the support, rod protective casing and bump stop are removed from the rod.
Then the shock absorber is removed from the strut.
A new one is placed in its place and the rack is assembled in the reverse order.
When installing the rack in place, it is important not to forget to align the marks on the adjusting bolt.
After complete assembly, you will need to check again the tightness of all connections. This element is replaced on the other side in the same way.
And then it is imperative to go to the nearest service station to perform a wheel alignment adjustment.
Tools and materials
To carry out the entire scope of work, a limited number of tools and materials will be required. First of all, you need to acquire:
- shock absorbers;
- key at 6, 17, 13, 19;
- locksmith tool.
This is quite enough
to do all the work efficiently.
Before starting it, you should think about installing the car on an observation deck or lift. This is the only way to easily reach the element being replaced. The car must be on wheels, and the distance from its bottom to the ground should be approximately 50 cm
.
Payment via Yandex Cashier
After selecting payment via Yandex, the Yandex Cashier payment system will launch, where you need to select a convenient payment method (bank card, QIWI, Yandex Money account, etc.)
After specifying payment details and confirming payment, payment for the goods will occur.
If you have a bank card in a currency other than the ruble, then the money will be debited from the card at the rate of the Central Bank of Russia at the time of the purchase.
This payment method is optimal for residents of Russia, Kazakhstan and Belarus.
Official website of the Yandex Kassa payment system https://kassa.yandex.ru
Payment via Portmone
After selecting payment through Portmone, the payment system will launch, where you need to select the payment method: bank card or Portmone account.
The price in the Portmone payment system is converted into dollars at the exchange rate of the Central Bank of the country where you are located.
If you have a bank card in a currency other than the dollar, then the money will be debited from the card at the rate of the Central Bank of your country at the time of the purchase.
After specifying payment details and confirming payment, payment for the goods will occur.
Official website of the Portmone payment system https://www.portmone.com
Payment via PayPal
After selecting payment via PayPal, the PayPal payment system will launch, where you need to select the payment method: bank card or PayPal account.
If you already have a PayPal account, then you need to log into it and make a payment.
If you do not have a PayPal account and you want to pay using a bank card via PayPal, you need to click on the “Create an Account” button - shown with an arrow in the picture.
PayPal will then prompt you to select your country and provide your credit card information.
After specifying the information required to make the payment, you must click on the “Pay Now” button.
Official website of the PayPal payment system https://www.paypal.com
Payment via WebMoney
After selecting payment via WebMoney, the payment system will launch, where you need to select the payment method: bank card or WebMoney wallet.
If you already have a WebMoney wallet, then you need to log into it and make a payment.
If you do not have a WebMoney wallet and you want to pay in another way, you need to select any of the methods that WebMoney offers and make the payment
After specifying payment details and confirming payment, payment for the goods will occur.
Official website of the WebMoney payment system https://www.webmoney.ru/
Downloading a book
After successfully completing the payment (by any method) and returning to the KrutilVertel store from the payment system website, you will be taken to the successful payment page:
On this page you need to indicate your e-mail, where access to download the book will be sent.
If you are already registered on our website, then simply follow the link to your personal account.
The book you purchased will be in your personal account, from where you can always download it.
Please note that after making the payment, you need to return back from the payment system website to the KrutilVertel website.
If for some reason you did not return back to the site and closed the payment system tab with a message about the successful completion of the payment, please let us know - we will send you a letter indicating access to download the book.