Articles
- 2 Let's start with the hood
2.1 Let's move on to the motor shield
- 5.1 First layer
Sound insulation of the trunk of a VAZ 2112 is carried out together with the bottom
Applying soundproofing to your car is not so much an achievement of comfort as it is an urgent necessity. In all interiors of domestic cars there is no sound insulation, and even if there is some, it still lets in extraneous sounds. Therefore, you have to eliminate such a deficiency with your own hands.
What is it for?
Soundproofing today is needed not only by lovers of good music:
- Extraneous noise in the cabin interferes with normal conversation
- In addition, noise has an irritating effect on the driver, reduces his reaction and thereby poses a threat to his life.
- Spending a long time in a cabin with constant noise disrupts nervous activity, increases a person’s irritability, and impairs sleep.
- Finally, loud noise constricts the blood vessels in the body, which increases the load on the heart and can cause angina over time.
- You can’t buy health, so you need to take care right away
- Soundproofing the VAZ 2112 itself will solve all problems
- So that you don’t have to worry about time and money, it is recommended to do it in stages, starting with light areas that do not require disassembling the interior
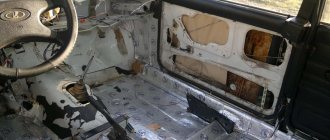
Tuning the interior of a VAZ 2112 – a selection of photos
A cool selection of photographs of the most varied tuning of VAZ-2112 salons - from the most striking options to very sophisticated ones. Perhaps some of these photos will inspire you to tune your VAZ 2112
Sources
- vazdriver.ru/tyuning_salona_vaz_2112_podborka_foto.html
- tuningkod.ru/tyuning-avtomobilej/tyuning-russkix-avto/tyuning-vaz/tyuning-salona-vaz-2112-metody-preobrazheniya.html
- ladaautos.ru/vaz-2112/kak-sdelat-tyuning-salona-vaz-2112-svoimi-rukami.html
- drive2.ru/l/544540281555387922/
- bumper.guru/klassicheskie-modeli-vaz/tyuning/tyuning-salona-vaz-2112.html
Let's start with the hood
The hood cover and the engine compartment partition are the simplest areas where you can start and practice at the same time:
Vibration insulation is glued exclusively between the stiffeners
- It reduces the noise level from the engine into the cabin, plus it provides thermal insulation, which the engine needs in winter
- To achieve a noticeable effect, it must be carried out in conjunction with the treatment of the engine shield.
- Competent sound insulation is carried out in three layers
- The first layer is always a vibration damper, as the instructions say
- The vibration damper must certainly have a foil layer to better reflect heat waves, because the temperature under the hood when the engine is running reaches a fairly high level
- You apply the material on flat surfaces between the stiffening ribs, as in the photo above
- The second layer is made of foil insulating material, for example, Splen
- This second layer plays the role of thermal insulation and sound insulation; it covers the entire area, including stiffeners
- The third layer is usually standard (factory, standard) sound insulation
- We process the trunk lid in a similar way.
Let's move on to the engine shield
To make high-quality sound insulation of the engine panel in the cabin, you need to remove the dashboard:
- Therefore, together with the hood, the outer side is processed, which does not require disassembly
- Everything is the same, two layers of the same materials, and in the same sequence
- And the procedure in the cabin is combined with soundproofing the dashboard
- The first layer will also be a vibration-insulating material, Vibroplast or Bimast is ideal
- A vibration damper should also be applied to all side surfaces, as well as technological holes, only a thinner one
- The second layer involves gluing with noise-insulating material, here the entire surface is also covered with Accent (inside the cabin, Accent is more advantageous than Splen)
- The thickness of the sound insulator is ten, or preferably fifteen centimeters
- Experts recommend sealing the contact points between the dashboard and the panel body with 10 mm bitoplast to reduce squeaking, and in places where it does not fit, using a thinner anti-creaking material - Madeleine
- Install factory sound insulation as the next layer, if there is any.
- If standard sound insulation is unsuitable for further use, you can purchase a new one
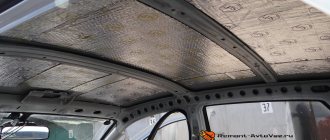
Treating the roof
The work of soundproofing a roof is the simplest and at the same time the least expensive:
- Here, for high-quality sound insulation of the roof, it is enough to install only two layers
- As always, the first layer is vibration insulation; you cover the entire flat surface of the roof with it.
- Vizomat is recommended as a vibration-insulating material, two millimeters thick
- The second layer is a noise-insulating layer from Accent
- Bitoplast, with a thickness of 5 millimeters, or 10 millimeters, is applied to the ribs of cruelty, the entire flat surface is Accent, with a thickness of 10 millimeters. In the space under the handles and shades, it is sealed with Bitoplast 4 millimeters
Roof treated with vibration insulation
Soundproofing the bottom
When the VAZ 2112 is soundproofed, you will have to disassemble the interior yourself, remove all the rugs and seats:
- In addition, remove the standard Shumka, if present
- Only after complete disassembly of the interior, the laying of vibration insulation with Vizomat, Vibroplast, or Bimast Bomb (the price of which you like better) begins; you process the entire flat surface of the tunnel, and the bottom
- When installing vibration-absorbing material, it is important to stick it tightly and roll it tightly to remove bubbles
Soundproofing the bottom of the cabin
- An Accent or Isoton sound absorber is laid on top of it
- The thickness of the soundproofing material for the bottom is required at least 10 millimeters
- A 10 mm layer of Bitoplast is recommended for noise insulation of a tunnel.
- An 8-mm-thick accent is applied to the trunk, including the niche for the spare wheel.
- Install standard sound insulation as the third layer
- It is recommended to treat the outside of the bottom with “liquid” Shumka, and it is also used to treat the outside of the wheel arches
- It is easy to apply and convenient for treating difficult areas, plus it is durable and protects against corrosion.
- It is much lighter than sheet insulation, which is important
- Can be applied faster using a sprayer
Lada 2112 › Logbook › Soundproofing the doors
Having driven with people who had their car completely done, I really liked it, because... The car is very quiet, no extraneous noise, which even allows you to talk calmly at high speeds. And it is especially a big plus for those who are interested in car audio. And so we need: 1) scissors 2) industrial hair dryer 3) vibration isolation - I used 2 companies: a) Outline - in all 4 doors
Then I’ll post some photos of how it was all done: 1) I won’t show the process of removing the casing, because... I think this is no secret to anyone and will not be difficult. 2) we wipe the entire inside of the door from dust so that the vibration insulation adheres better 3) we cut out the pieces we need, so that it would be more convenient for us to insert them into those. holes and stick
Well, who cares, I decided to seal those too. holes in the door with vibration
I’ll say right away that, as it turned out, it’s easier to work with the front doors, because... tech there The holes are larger, which makes it easier to crawl into.
Conclusion: the car has become quieter, with less extraneous noise. Now I began to hear the sound of the engine, I hardly heard it before, because... My engine runs quietly. For complete comfort, I’m thinking of making the arches noisier, because... they were now very audible.
p/s/ I forgot to add, for one door, on average it takes 1.5 sheets of vibration for a VAZ 2110-12
Thanks everyone for your attention
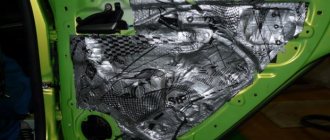
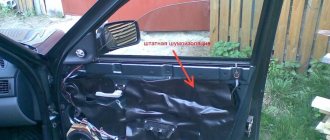
Door noise
First, the door trim is removed (this operation is the same for all doors):
- Then soundproofing materials are installed, first the surfaces are treated with a degreaser (alcohol or acetone)
- An exception will be the lower part of the door, where an anti-corrosion coating is applied.
- Sound insulation will also be made of several layers
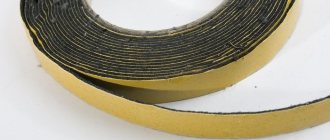
First layer
The vibration isolator is glued to the inner surface of the outer side (panel) of the car door:
- For convenience, it is better to cut it into pieces in advance.
- The material is inserted through technological holes in the inner lining, having previously been heated with a hairdryer for better fastening.
- Lay it overlapping
- The more area you cover, the better.
- To eliminate air bubbles, roll out the material with a hard roller or the handle of a screwdriver.
Doors treated with the first layer - vibration insulation
- Then, soundproofing material (preferably Accent) is applied on top of the vibration insulation, however, it is advisable to cover the maximum area
- Then all technological openings on the inside of the door are completely covered with vibration insulation (at least with foil)
- Use Madeline to “hide” the contact points (as well as wires, speaker mounting areas and where the trim fits to the door)
- Some car enthusiasts additionally install Bitoplast on the inside of the trim
- After soundproofing the door, the trim is installed in the reverse order
- We recommend not using the car for about two days after this, you need to let the Shumka stick well
Sheathing glued with bitoplast
Tips for improving the process:
- All wires must be signed or marked during disassembly with multi-colored tape or a marker
- Self-tapping screws should also be marked and arranged by size and order of removal.
- When gluing materials, avoid gaps; it is much better to overlap
- Do not use a hairdryer at home to heat materials.
- Start laying the material in solid pieces, and then cut small pieces as needed
- Heat the vibromaterials until their black surface becomes sticky
- When processing the trunk, use thinner sheets
- Leave holes for fasteners free
- Don't forget to degrease all surfaces
- Additionally, check out our video material
Interior renovation costs
And everyone is healthy again!