When is replacement necessary and what is needed for this?
During the depreciation period, the timing
begins to peel, tear, or otherwise known as slip.
If a breakdown occurs while the engine is running, it stalls and is impossible to start. When operating a VAZ 2114
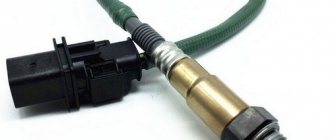
with an engine equipped with an injection device for supplying fuel, an indicator on the device panel will light up, notifying you of a phase sensor error.
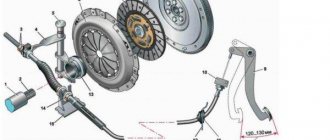
If the car is equipped with a 1.5 liter, 8-valve unit, then the repair itself will only require purchasing and replacing the belt. If a 1.3 liter engine is installed, this breakdown will lead to damage to the entire gas distribution mechanism
. You need some repairs. The timing belt replacement on a VAZ should take place after 45 thousand km of vehicle operation. We need constant control over the mechanism with the intention of prevention. The sequence of actions is as follows.
How to properly tension the timing belt of a VAZ 2110.
- Purchase and replace the tension roller.
- Remove possible free play in the pump.
- Lubricate the roller mechanism.
If you have regular plumbing tools, changing the timing belt is possible at home. List of tools needed to repair the unit in question.
We carry out what remains to be done for our client without panic and in no hurry. What remains for our client to do is trivial, weakly tightened, strongly weakened. Roller when moving
- Wrenches in sizes 10, 13, 17,19;
- Socket wrench with pipe.
Return to contents
When to tension the timing belt
The timing belt of the VAZ-2112 and other VAZ models is tensioned in the following cases:
If the cause of the intervention is a broken or “slipping” belt, you must first ensure the integrity of the valves. A broken gas distribution mechanism (drive) leads to engine damage on 16-valve 1.5-liter power units. However, in cases of drive failure at high speeds, valves and CPGs are also destroyed on other engines.
They check the operation of the timing belt on the VAZ-2114 and other models equipped with 8-valve units by turning the camshaft manually. A working mechanism should turn with some effort. A faulty one, as a rule, cannot be affected.
During the procedure, it is necessary to check the compression in each of the cylinders. The easiest way to do this is to tightly cover the spark plug hole with paper. If there is pressure in the cylinder, the plug is knocked out of its seat at a certain stage of camshaft rotation. » alt=»»> A similar check on 16-valve engines is not recommended. The risk of damage to an initially good valve mechanism is too great. There are no grooves in the pistons of one and a half liter engines of this type. Therefore, valves that move down bend when they contact the piston surface.
How to replace a VAZ timing belt?
FIAT Brava TYPE F Logbook Replacing the timing belt on a Chevrolet Lacetti
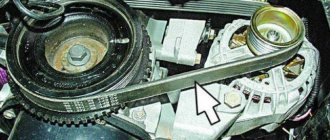
Place the car on a horizontal platform. After a while, release the handbrake. Engage 5th gear on the gearbox. Remove the front cover protecting the gas distribution mechanism using a 10mm wrench. Remember the placement of the VAZ 2114 timing mark and unscrew one bolt on the side of the cover and one in front. In order to weaken the tension force of the belt, it is necessary to rotate the crankshaft counterclockwise until the timing marks of the VAZ 2114 move to a distance of two gear teeth from the antenna of the rear cover.
Dismantle the generator belt drive. After removing the device pulley, install the bolt to the mounting location. Return the gearshift lever to the neutral position. Rotating the crankshaft, observe the appearance of the VAZ timing mark 2114
opposite the center of the flywheel. The alignment mark should be aligned with the mark mounted on the pulley. Having loosened the nut on the tensioning mechanism roller, we dismantle the timing belt.
How to properly tension the timing belt of a VAZ 2112.
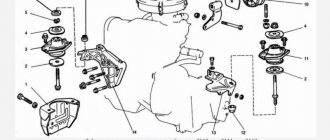
VAZ camshaft drive diagram 2114
Then we install a new belt, pull it on the roller with the left side and put it on the pump pulley, then on the crankshaft pulley
We carry out the tension in the opposite direction from the movement of the clock, taking into account the avoidance of kinks and kinks. Turn the shaft forward and set the timing marks of the VAZ 2114 to their destination before removing the belt
You need to do this yourself. If the passage does not match, carry out the entire process from the beginning.
If the marks match, unscrew the bolt on the crankshaft and install the generator pulley in its original place. Tension the belt using a roller. In compliance with safety precautions, start the engine in working condition. After 2-3 minutes, turn it off and make additional adjustments to the belt tension. Install the previously removed timing
to the area.
Belt tension on 16-valve VAZ engines
Tensioning the timing belt on Priora and other cars equipped with 16-valve engines is generally done in the same way.
However, there are slight differences. Thus, the gas distribution mechanism cover of these engines is mounted on 6, and not on 3 bolts, as in the previous case.
In addition, the timing belt on VAZ-2112 power units (16 valves) is tensioned using two rollers. One of them is movable, used for tension. The second one is the support one. » alt=»»> When tensioning the belt of a “Prior” motor or motor 2112, special care must be taken. After putting it on and tightening it, you must definitely try to crank the engine by hand.
If the crankshaft cannot be turned, you should once again check that the marks are installed correctly. On these engines, an error almost always leads to damage to the valves and piston group.
After replacing the timing belt, it should be properly tensioned. Let's talk about this...
Possible malfunctions in the electric generator drive and ways to eliminate them
Replacing the fuel line of a VAZ 2110 with your own hands
Malfunctions in the belt drive of an electric generator during use, of course, manifest themselves in different ways:
- you will like the whistle of the unfamiliar drive layout;
- This is a weak generator voltage, due to weak tension and repeated slipping of the belt drive. Slippage occurs even with normal, standard belt tension due to water, antifreeze or oil getting on the working elements of the drive;
- more unsafe for the motor and very strong tension in the drive. Due to excessively huge loads, bearings are destroyed (how to change a bearing on a VAZ 2114 generator?), gears or shafts are damaged, and in addition, sometimes the belt breaks. Here the upcoming movement will be unrealistic until it is replaced with a new, working one. The worst situation is when a gust occurs on the highway, in a deserted place. Driver practice suggests that this does not happen very occasionally.
We carry out what remains to be done for our client without panic and in no hurry. What remains for our client to do is trivial, weakly tightened, strongly weakened. Roller when moving
This is my personal method for tensioning the timing belt.
, I think many people will need this. And if you need it, there will be belts.
Attention! Experts and experienced car enthusiasts advise having a new belt in a spare set in the trunk, although a driver can learn how to correctly tighten the alternator belt on a VAZ 2114 in 10 minutes. And they recommend reading how to remove the alternator belt, so that you can be “savvy” for any occasion
Since the condition of the belt drive
Since the generator is a fundamental problem, monitoring it is the responsibility of the driver. Checking the belt is quite simple - you just need to simply press it with a force of 10 kg to check the deflection. For an electric generator of brand 9402.3701 it is 0.6 - 0.9 cm, for brand 37.3701 - 1.0 - 1.5 cm. Today, you need to inspect the cleanliness of all parts of the drive.
If the driver hears that the generator belt is whistling, then immediately, immediately, you need to check the condition of the belt drive. It exists that if the belt is really loose, it can twist and break at high speeds.
When, if during inspection it is determined that weakening occurs, then it is necessary to tighten the generator belt. For this purpose, you need to perform a number of easy steps and keys from “10” to “13”.
- Place the car on a level surface and set it to speed and handbrake.
- Open the hood and before tightening the
alternator belt on the VAZ 2114, use a key set to “13” to loosen the nut securing
the alternator housing
to the adjusting rail.
Loosening the lower bolt of the VAZ 2114 generator
Using a key set to “10”, tighten the adjusting screw of the tensioner mechanism, while the body of the electric generator should move along the rail towards the front of the machine.
Alternator belt tension
- As the tensioner screw rotates, the belt deflection must be kept under control. If it is within the norm for the type of electric generator installed on the machine, you need to use a “13” key to firmly tighten the nut on the adjusting rail
. - When the fastening nut is tightened, you need to turn the crankshaft twice by hand and check the deflection again. If it turns out to be within the normal range, then, after starting the engine, you need to check the operation of the belt drive in operating mode. During this check, there is no extraneous noise; the belt should spin without bending and without moving to the side.
Replacement process detailed instructions
Replacing the air filter on a VAZ 2110 with your own hands
We will look at options with 8- and 16-valve engines, which are present in the VAZ 2112 and 2110 models. Regardless of the number of valves, the same set of tools will be required for replacement. The list includes standard tools that can be found in almost every driver's garage.
Timing belt for VAZ 2110 16 valves
In addition to the timing belt itself and the roller for the VAZ 2110 or 2112, you will need:
- a special key that regulates the degree of tension of the roller;
- spanner set to “17”;
- key to “15”;
- key to “10”;
- installation, as an alternative - a powerful screwdriver.
Replacement on an 8-valve engine
Replacing the VAZ 2110 8 valve timing belt is as follows:
- First of all, we de-energize the battery - for this you need to get the negative wire;
- We unscrew the bolts that hold the timing belt protective casing, and then remove the casing;
- On the passenger side, it is necessary to remove the engine compartment mudguard along with the protective element and the right wheel;
- Our task is to ensure that the marks on the cover and, accordingly, on the pulley match, as indicated in all the diagrams. To do this, you need to twist the part clockwise;
- We go to the gearbox and remove the plug from it;
- We need to check the alignment of the marks in this hole;
- We block the flywheel - for this you can use a mounting tool or a powerful screwdriver;
- Now you can remove the timing generator pulley;
- We got to the nut that holds the timing belt pulley - it needs to be loosened, but not unscrewed;
- Now we have reached the required element of the VAZ 2110 or 2112 timing belt. Now it can be removed. All parts that it covered must be cleaned with detergent. After removing dirt, the area should be wiped with a clean rag;
- Next, a new timing belt and tensioner roller are installed - follow the direction indicated on the arrow. Sometimes it happens that the manufacturer does not indicate the arrows, in which case, you need to place the element so that the inscription is read from left to right;
- To tension, you need to turn the roller counterclockwise.
- The next step is to test the timing belt and its tension. You need to check the element with a cold engine, and the temperature in the garage or box should be within +15-+30C. We start the engine and inspect the timing belt.
If there are no unnecessary sounds or vibrations, then all the elements can be installed back - these are the wheel, casing and mudguard.
Replacement on a 16-valve engine
Despite the fact that there are more valves, replacing the timing belt is no more difficult than on the version with 8 valves. So, replacing the VAZ 2110 16 valve timing belt is performed as follows:
- As in the case of the VAZ 2110 or 2112, where there are 8 valves, we need to dismantle the belt protection. It is held in place by 6 bolts.
- Next, you need to remove the chip from the crankshaft sensor - unscrew the mount and take out the sensor itself. For clarity, you can study the photo.
- If you dismantle the gas distribution mechanism yourself, then you probably noticed the absence of one tooth. This is done so that the sensor can independently find the dead center. This feature can also be used to lock the crankshaft.
- Blocking can be done when a tube of a suitable size is placed in the hole under the sensor. Now the pulley is blocked, as a result, it can be safely dismantled.
- Next, the work scheme is practically no different from removing the 8-valve timing mechanism with your own hands - loosen the roller fastening and remove the faulty or worn belt.
- There are two ways to install a new element: remove the tension roller and then install the belt along with it, or do it by turning the camshaft.
- When the new element is installed, you can return everything to its original position. You should start by fastening the pulley - tighten the bolt and align the gear - the marks on the oil pump will help with this. If they are missing, then you can make a mark yourself.
- The parts must be combined carefully, since the timing gear should not get knocked out.
- Using a special wrench, we must tighten the belt. Not everyone has such a wrench, but as an alternative you can always take a powerful screwdriver and two nails. It is also worth remembering the nut, which must be tightened tightly.
- We check the tension; the rubber should move away from the gears, but there should be no folds.
- All that remains is to turn the crankshaft 2 times and make sure that the marks remain in the same place - the work is completed
Check the gas distribution mechanism every 10 thousand kilometers, and then you will not have to spend money on expensive repairs.
Step-by-step replacement instructions
The VAZ 2109 car is designed in such a way that if repair work is necessary, it can be carried out by the car owner himself. The process of changing the tensioner roller is quite simple, and it will take no more than 1.5 hours.
Step-by-step instructions for carrying out technical work on the timing system:
hidden spring roller
roller with external spring design
If after the work carried out, the car owner has no complaints about the operation of the engine, then the process of replacing the timing rollers in the engine is over.
Malfunctions after replacing timing rollers
In most cases, after replacing the timing belt tensioners, the car owner does not encounter any problems. However, as practice has shown, malfunctions can manifest themselves after some time.
Malfunctions and solutions:
Fault 1: The battery does not charge well; after several hours of inactivity, the car does not start. Voltage drops are also observed in the on-board electrical network.
Solution: Most likely, when installing the timing belt, the driver incorrectly adjusted the position of the shaft gears in relation to the generator gear. As a result, malfunctions in the on-board network began to appear. They arise due to the asynchronous operation of the gears described above. To eliminate this problem, you just need to debug the position of the shaft gears and the generator. After additional configuration, the problem goes away.
Malfunction 2: After replacing the rollers, the timing belt cracked or even broke.
Solution: In most cases, this problem occurs when a modified timing panel panel is installed. Such breakdowns occur due to the fact that the position of the rollers was not calibrated, as a result of which the belt was overtightened. To eliminate this problem, remove one of the rollers, then put on the belt. After this, install the removed roller back on the panel. Then adjust its position. The adjustment itself must be carried out using a special wrench, which must be used to tighten additional screws on the tensioner. When adjusting the position of the roller, you should also rotate the belt to ensure that there is no excessive pressure on it.
If any other problems occur in the engine after replacing the rollers, a simple solution would be:
Despite everything, I would like to emphasize that the VAZ 2109 car, although it is the brainchild of the domestic automobile industry, can serve its owner for many years with proper care.
VAZ 2112 timing belt installation
On VAZ 2110, VAZ2112 cars, engines with a 16-valve cylinder head are installed. Of course, an injector with sixteen valves adds agility to our Lada and this is pleasantly pleasing, although there is a fly in the ointment. The timing belt must not be allowed to break due to wear; this leads to damage to the cylinder head. Namely, due to the fact that the camshafts are stationary and at the moment when the piston approaches top dead center, the valves remain open, resulting in the piston hitting the open valves, this leads to the valves bending and in some cases destroying the seats and guide bushings. Repairs are of course expensive.
This can be avoided by installing pistons in the engine that have recesses for the valves, such as in the photo. It is not advisable to do this on purpose, since engines have a significant service life, and there is no point in disassembling a working engine. Therefore, it is easier and cheaper to simply change the timing belt in a timely manner, especially since it does not require extensive experience in locksmith work and deep knowledge in the field of car repair, but just attentiveness and knowledge of some of the nuances when installing the belt itself.
Where to start replacing the belt. First, you need to remove the alternator belt drive pulley. It’s convenient to do this if you remove the right front wheel and the protective cover, if you still have one. Unscrew the pulley mounting bolt. Then remove the timing belt protection covers and the entire mechanism before your eyes. Unscrew the nuts securing the tension rollers; if the belt gets stuck, it is also advisable to change the rollers, and remove them, then remove the belt itself.
We install the crankshaft so that the piston of the first cylinder is at top dead center, this position should correspond to the mark on the crankshaft timing pulley, it should be aligned with the rib on the oil pump housing
In addition, there is a mark on the flywheel; it should be located in the center of the ignition timing scale; it is clearly visible through the inspection window located on the flywheel housing.
Having installed the crankshaft, we install the camshafts so that the valves have a position corresponding to the moment of compression of the fuel in the cylinders when the piston is at top dead center.
For this purpose, there is a mark on the camshaft timing pulley.
must align with the slot on the body of the protective casing
this is typical for both pulleys
Having installed the tension rollers, install the belt as shown in the photo
the hole for fastening the left tension roller is offset relative to the center, due to this the timing belt is tensioned using holes into which a special key is inserted (a screwdriver is also suitable)
After tensioning the belt, turn the crankshaft two turns and align the marks again, this is necessary for self-checking; if this time the marks coincide clearly, then after installing the generator drive pulley and protective covers, the engine can be started.
Tensioning the timing belt with your own hands, work progress step by step
Having acquired everything you need, you can proceed directly to tensioning the timing belt:
- Open the hood of the car;
- Remove the protective shield from the timing belt;
- Loosen the nut that secures the tension roller;
- Using a special wrench, we adjust the tension roller itself. Clockwise loosens the timing belt, and counterclockwise tightens it accordingly;
- After adjustment, having fixed the roller in the required position, you need to tighten the nut securing the tension roller directly;
- Checking the timing belt tension;
- If the belt is adjusted correctly, install the protective shield in its place.
How to set timing marks on a VAZ-2114 8 valves photo and video
Marking the gas distribution mechanism on the 8-valve VAZ-2114 is an important part of repair operations. So, this process will be needed directly when adjusting the valve mechanism or replacing the timing belt
Incorrectly placed TMV tags can lead to catastrophic consequences.
What is timing belt?
Timing mechanism diagram
The gas distribution mechanism is a mechanism in which the valve timing of the power unit is controlled. For normal engine performance, there are special marks by which the timing belt must be set.
Some are on the block, while others are on the pulleys. When the cylinder is in the first upper position, all these marks must coincide.
The timing marks are misaligned if the drive toothed belt is broken or if it is replaced incorrectly. So, in these cases, the engine will not work correctly and the marks will need to be re-set. Doing this is quite problematic and not everyone can do it.
Setting the tags: step-by-step instructions
Tools for working with timing marks
In order to correctly set the timing marks, you will need the necessary tools. So, what is directly required in order to perform this operation:
- Key for 10.
- Thin flathead screwdriver.
- Jack.
The process itself
Now that everything is assembled, you can proceed directly to the work process itself:
- Jack up the right side of the car.
Setting up the car on a jack - Under the hood, unscrew the timing belt protective cover.
Unscrew the mounting bolts of the timing caseRemoving the lower mounting of the timing case
Remove the unscrewed casing from the motor
- Rotate the right front wheel until the camshaft mark matches the pulley and the block.
We set marks on the camshaft and block - Remove the plug on the gearbox housing.
We look, if the marks on the flywheel and the housing coincide, then everything is fine, if not, we rotate the wheel until the mark on the camshaft and flywheel coincides with the marks on the block. Remove the crankcase plug, where the mark on the flywheel should coincide with the block - If the marks do not match even when turning the crankshaft 4-6 times, then you will have to remove the timing belt. Read more about removal and subsequent installation with the correct tension here. The camshaft mark matches, and only at this moment do we remove the strap. Next, rotate the crankshaft until the marks match on the flywheel. After performing these operations, you should put on the belt.
- Thus, the timing marks are set, and you can begin to perform other operations.
Consequences of incorrectly setting timing marks
The consequences of incorrect placement of the timing marks on the car can be both minor and very severe.
A torn timing belt on an 8-valve valve does not threaten to bend the valves, but the 16-valve version of the VAZ-2114 is already deprived of this advantage.
Let's consider the main options for the development of events:
- Misaligned timing will cause the valves to burn out.
- Bent valves (bent valves) are also an unpleasant option. The 8-valve version of the VAZ-2114 does not bend the valve.
- As a result of the above actions, the cylinder head may become deformed, guide bushings may fail, and cracks may form inside the main power elements.
- Burnout of the piston mechanism also becomes a consequence of incorrect placement of the gas distribution mechanism marks.
- Oil residue on the spark plugs, as well as poor ignition timing of the fuel mixture.
- Other consequences.
As practice shows, setting the ignition on a VAZ-2114 is quite simple, but not every motorist can do it. So, it is necessary to have knowledge of the operation of the engine and its design. Therefore, if a motorist is not able to do this type of repair on his own, he must contact a car service center.
Recommendations
Excessive belt tension causes increased wear on the water pump bearings and tension pulley. If the belt tension is weak, the valve timing may be disrupted due to the belt jumping over the teeth on the camshaft pulley. In addition, improper adjustment leads to increased belt wear.
Rotate the crankshaft only by the bolt securing the pulley to it (do not turn the crankshaft by the camshaft pulley).
The tension roller is turned with a special key. If it is not available, you can use a screwdriver and two suitable pins ∅ 4 mm (for example, drills) that fit tightly into the holes of the roller.
Correctly tensioning the timing belt on production vehicles is a simple procedure, but it requires certain special knowledge.
The algorithm of actions may vary slightly depending on the model of the power unit, and not on the make of the car. There are differences in the procedure for replacing and tensioning the belt on 8-valve and 16-valve engines. Read on to find out how to tighten the timing belt on both types of car hearts.
Four-cylinder eight-valve power units are more often found on:
Sixteen-valve engines are mainly used:
A number of cars of the Samara 2 family were also equipped with 16-valve engines. In addition, such engines were also installed on models 2110-2111.
Replacing the timing belt VAZ 2110 16 valves
Not every car enthusiast knows how to replace the timing belt on their own. For 16 valves this procedure is carried out slightly differently than for 8 valves.
First of all, you need to remove the protection casing.
Remove the “chip” from the crankshaft sensor and unscrew the bolt. After this, remove the sensor itself.
The pulley is missing a tooth that allows the crankshaft sensor to find top dead center. In addition, the missing tooth is necessary to lock the crankshaft and tighten the pulley mounting bolt.
We loosen the tension by unscrewing the tensioner nut and remove it.
We insert a new belt. You can do this in two ways, depending on what is convenient for you. This is done by turning the right camshaft with a wrench or by removing the tensioner roller.
We fasten the bolt that serves to secure the pulley, then align the marks of the belt drive gear. If there is no mark on the oil pump housing, you can use the flywheel marks as a guide. Afterwards, you can make a mark yourself to make it more convenient.
We combine the marks on the camshaft pulleys, pay attention to the fact that the drive gear marks must certainly match
We use a tensioner roller and a special key to tension the part. If you don't have such a key, you can use two nails and a screwdriver or pry bar that needs to be inserted between them. You can also use forks by first removing the two front teeth and shortening the two outer ones to half by bending them. Finally, be sure to tighten the tensioner nut.
Check the tension by pressing your finger up and down.
- We turn the crankshaft exactly two turns, and then check each mark. If they all match, the pulley can be screwed on. Otherwise, repeat steps 6 – 9.
- After everything is done, we return everything to its place and start the engine.
Now the replacement can be considered completed. As we now see, this procedure takes a little longer, but it is not much more complicated.
Useful recommendations for selection and replacement
Depending on the design features and materials of manufacture, timing belt tensioners have different service lives and require repairs at different mileage. The least durable models are characterized by classic mechanical models (slider and eccentric), which are manually adjusted and wear out quickly.
At the same time, auto experts advise replacing the rollers along with installing a new belt or after each technical inspection. Therefore, timing rollers are sold together with a set of other components of this system.
Automated devices are less subject to wear and tear and can be operated until the engine is overhauled. They are replaced only if they fail. To change the mechanism, you need to familiarize yourself with the technical characteristics of the vehicle and select the model that is installed at the factory. To do this, you need to look at the markings and make sure that they correspond to the factory ones. Otherwise, the normal functioning of the gas distribution mechanism and power unit may be at risk.
Installation of a new part is carried out both with the belt drive removed and with the belt drive installed (if the engine configuration allows it). Automatic releases only need to be assembled and installed, while mechanized ones need to be adjusted using special devices, such as a key for rotating the eccentric roller and a dynamometer, which allows you to set the optimal tension. Actions are carried out in compliance with the manufacturer's instructions and recommendations.
What is a timing belt tensioner?
The timing belt tensioner roller (tension roller, tensioner) is an auxiliary component of the timing belt drive, providing the belt tension necessary for normal operation of the drive. Additionally, this device can perform the functions of a deflection roller.
The timing belt drive is sensitive to belt tension. Excessive tension leads to intense wear of timing parts - pulley bearings (water pump, generator, tensioner, etc.), the belt itself, and others. In addition, a tight belt stretches faster and its service life is reduced. Too weak a tension is fraught with more serious problems - slipping of the belt along the timing pulleys of the camshafts, which leads to disruption of the valve timing and deterioration of the entire engine.
Therefore, a tensioning device is introduced into the timing drive in the form of rollers of one design or another, which maintain optimal belt tension during engine operation.
Tensioner rollers
There are two main components in any tensioning mechanism:
- Directly tensioner.
- Video clip.
A roller is a pulley made of metal or plastic; its working surface is smooth. It is mounted on single or double row radial bearings.
On the roller the working surface is in contact with the back of the belt. When the internal combustion engine is running, this element rotates freely. The design of the rollers can be either perfectly smooth or with shoulders so that the belt does not move during operation.
Depending on the length of the belt, the drive design of the gas distribution system may have one or two rollers. In the design of the timing belt 2110, there is only one belt tensioner roller. On 16-valve engines, two elements are used, but one of them - bypass - is not involved in tension adjustment.
When to change the timing belt
First, it’s worth considering the signs that can be felt or visually determined:
- extraneous noises are coming from the engine compartment;
- the exhaust turned black;
- difficulty starting the engine;
- When the motor is running, noticeable vibrations appear.
These signs do not always indicate a malfunction or damage to the timing belt, but if they occur, you first need to pay attention to this element. To check the element, you need to dismantle it: disconnect the negative wire from the battery, remove the plug, then remove the generator belt and six bolts securing the protective cover
After this, you can evaluate the condition of the item.
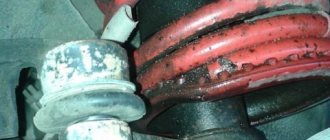
Wear of the VAZ timing belt
'); if("undefined"===typeof loaded_blocks_drive){loaded_blocks_drive=[]; function n(){var e=loaded_blocks_drive.shift(); var t=e.adp_id; var r=e.div; var i=document.createElement("script"); i.type=”text/javascript”; i.async=true; i.charset=”utf-8″; i.src=»https://www.drivenetwork.ru/data/»+t+».js?async=1&div=»+r+»&t=»+Math.random(); var s=document.getElementsByTagName("head")||document.getElementsByTagName("body"); s.appendChild(i); var o=setInterval(function(){if(document.getElementById(r).innerHTML&&loaded_blocks_drive.length){n(); clearInterval(o)}},50)} setTimeout(n)}loaded_blocks_drive.push({adp_id:e ,div:t})})(47602)
Replacing the VAZ 2110 or 2112 timing belt is required if you find the following damage:
- rubber delamination;
- there are oil stains;
- the presence of abrasions, cracks and folds;
- bulges, cuts;
- presence of broken threads.
How to tension a timing belt without special tools
Rating 4.5 out of 5. Votes: 46
| The timing belt is a rubber belt, with notches on the inside, designed to synchronize the crankshaft and camshaft of the engine. It is important that it is not only installed correctly, but also tensioned. Do you know how to properly tension the timing belt with your own hands? |
After replacing the timing belt, it should be properly tensioned. Let's talk about this... To adjust the belt tension, turn the crankshaft counterclockwise so that the mark on the camshaft pulley moves down from the rear cover antenna by two teeth.
Checking the timing belt tension means that the front branch of the belt is twisted 90° with the thumb and forefinger of the hand with a slight force of 15–20 N (1.5–2.0 kgf). Here questions arise: how to calculate the force? Everyone’s finger strength is different, how do you determine the required strength? You need to tighten the timing belt so that in the longest section try to turn it 90 degrees with 2 fingers, and if this is almost possible, then the belt is tensioned normally. Try to tighten the timing belt and keep in mind that
- If the belt is too tight, you won't be able to turn it 90 degrees with any fingers.
- if you don’t tighten it enough, the belt will dangle and hit the plastic casing (this shouldn’t happen). We tighten it until the sound disappears at idle and when accelerating.
As a result, if the timing belt tension is correct, then when the casing is removed, its long part will fluctuate within 1 cm. from the axis. Using a special wrench, tension the timing belt using a tension roller. If it is not there, then you can tighten the timing belt using two nails and a screwdriver, which will be installed between them. You can also convert a table fork into a suitable tool by breaking off 2 central teeth, and shortening and bending the outer ones.
Having turned the crankshaft two turns in the direction of rotation, we check the alignment of the installation marks. We check the tension of the toothed belt in the middle part of the branch between the camshaft pulleys. The belt deflection should be 5.4±0.2mm. under a load of 100 N (10 kgf). And how to check the timing belt tension without a special tool? How do you know how hard to press on the timing belt?
Method number 1. Use 10kg. weights and ruler. Place a ruler on the belt between the pulleys and a weight on the ruler. We pull so that the deflection from the plane is no more than 5mm.
Method number 2. Use steel scales. Attach the hook of the scale to the center of the belt between the pulleys and pull them up until the reading on the scale is 10 kg. After this, we measure the distance by which the timing belt has deviated (should be 5.4 ± 0.2 mm). By the way, the same tool is used to tension the alternator belt and nuts:
By analogy with 8th grade. motors: if you don’t tighten it enough, the belt will dangle and hit the plastic casing. In conclusion, let’s say that if you overtighten the timing belt, then it will squeal, and its service life, as well as the bearings of the coolant pump and the tension roller, will decrease. It's better to under-tighten than over-tighten. And yet, measurements must be performed on a cold engine.
By the way, do you know which rollers and timing belt are better to choose?
Tension the timing belt
Photo source:
Keywords:
Interesting site? Share with your friends
Setting timing marks for VAZ 2112 16 valves
Dear visitors of the Autotrack website! We will be very grateful for your comments on the video clip “Inserting timing marks on a VAZ 2112 16 valves”; registration is not required for this. We also ask you to let us know if you have any problems playing the video.
are they drunk???
Tension roller upside down
I've been dreaming about a Priora since birth
Fuck it... LOMASTER... The tension roller is positioned incorrectly... And how did he unscrew the generator drive pulley... PPC... Complete bullshit
Delete the video, don’t confuse people, mechanics are cross-handed.
the hat is full They seem to be doing this for the first time And at the end of the video the belt turned and wow the head
some kind of fucking shit, why I don’t know how to turn the nuts, show me how to set the ignition
Error in roller tension. It is pulled counterclockwise until the groove and the notch on the roller itself align.
gentlemen, everything is correct, but the roller is tensioned counterclockwise and not...
Dumb or what?
hmm... a visual aid of WHAT NOT TO DO.
idiot, he probably sees Priora for the first time in his life. How did he determine that he had tensioned the belt correctly? I wonder how long this video goes when placed with its horns down?
The roller is on the opposite side, the slider indicating the belt tension should be at the top, but here it is directed downwards. It is very important to know whether it works or not and the roller is tensioned counterclockwise and not for me. I sincerely feel sorry for the owner of the car, who probably ended up with expensive repairs.
Shorashkina office
The fucking roller is tensioned counterclockwise.
I didn’t even bother watching, it was enough for 3 minutes
I bought a new Priora, after how many km do I need to change the timing belt???
mileage 20 thousand. I'm worried about the timing belt. :-
I'm not very good with cars, but I replaced the timing belt and pump myself after watching a video on YouTube, and I've seen enough of local car mechanics that it's a pity to give them the car
the tension counterclockwise seems to stretch
How to check timing belt tension using a wrench and a special device
On many modern internal combustion engines, the timing belt is tensioned automatically; the mechanic only needs to fix the position of the tensioner roller. But there are also quite a few power plants where the belt is tensioned with manual checking. As a rule, the hands of an experienced craftsman cope with this task with a bang. It will be much more difficult for a beginner to do this. In this article we will try to provide recommendations and advice that will greatly facilitate the task of diagnosing the tension of the timing rubber ring.
VAZ "Ten"
A popular car equipped with an engine with a timing belt drive. The manufacturer recommends replacing the rubber band of the GRS mechanism after 40-45 thousand.
Tensioners
Tension mechanisms allow you to ensure the most efficient position of the roller for work. Devices come in the following types:
- Automatic - tension is adjusted without human intervention.
- Manual - adjustment is made during repair or maintenance of the gas distribution mechanism.
Manual tensioners can be slider or eccentric. The latter use a special bushing in which the axis is offset. This bushing is located inside the roller. When this tensioner rotates around the axis, the roller changes its position relative to the belt. Consequently, the tension force changes.
It is according to this design that the Priora timing belt tensioner rollers are made. But the slider devices move at right angles to the plane of the belt, thereby ensuring normal tension. Adjustment is carried out using a special screw. Such designs have not been used for a long time, since they are more complex and massive than eccentrics.
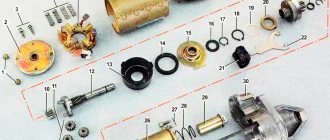
Description of disassembling the mechanism
Disassembling the timing drive assembly on a VAZ 2110 with 8V and 16V engines is somewhat different; in the case of a 16-valve engine, some additional elements must be removed. Therefore, a description of the process will be posted specifically for it with reservations for the 8-valve unit. At the very beginning, you need to remove the protective plastic casing and, for greater ease of operation, remove the air filter housing and move it to the side. A sensor is installed below, opposite the crankshaft pulley. You need to disconnect the connector from it, unscrew and remove the sensor itself (this is not necessary in an 8-valve engine). Next, in both types of engines, you need to rotate the crankshaft to align all the marks on the camshaft pulleys and the engine housing. This alignment is checked by matching the mark and the slot on the flywheel; to do this, remove the rubber plug from the socket on the gearbox.
Carefully rotating the crankshaft, align all existing marks on the pulleys
Next, in order to disassemble the mechanism and remove the timing belt, you will first need to loosen and remove the alternator belt from the pulley. When performing this simple operation, the latter should be carefully examined. It is quite possible that it is also in poor condition, and at the same time the VAZ 2110 alternator belt will also need to be replaced. In cars equipped with power steering, this is an additional operation, which will be discussed below.
The next step is to loosen and unscrew the pulley bolt on which the VAZ generator belt of the tenth family is put on. To do this, jam the crankshaft with a screwdriver or a small pry bar and loosen the bolt with a spanner, after which you can remove the pulley itself. Now you can unscrew the roller, the timing belt tension will decrease, which will make it possible to unscrew and remove the support roller.
It is important not to lose the special washers that are located under the rollers (there is only one roller in the 8V engine). Disassembly is complete, the old timing belt can be removed
Hydraulic timing chain tensioner: chain tension is always normal
Most modern timing chain drive engines use hydraulic chain tensioners. Read everything about hydraulic tensioners, their existing designs and operating features, as well as the correct selection and replacement of these devices in the article offered on the website.
What is a hydraulic timing chain tensioner?
Hydraulic timing chain tensioner (hydraulic chain tensioner) is an auxiliary unit for the timing chain drive; a hydraulic cylinder of a special design that provides the required magnitude and constant over time (independent of current temperature conditions, loads and wear of parts) chain tension.
The camshaft chain drive is still widely used due to its reliability and resistance to high loads. However, the chain is subject to thermal expansion (since it is made of metal), and over time it wears out and stretches - all this leads to a change in the chain tension, which is manifested by an increase in vibrations and noise, and ultimately can result in sprocket teeth slipping, phase changes and even the destruction of individual parts. All these problems are solved by using a special device - a hydraulic chain tensioner.
Design of a hydraulic chain tensioner Design of a hydraulic chain tensioner without a reserve cavity
The hydraulic tensioner performs two key functions:
- Automatic maintenance of chain tension when it is worn out and pulled out;
- Damping of chain branch vibrations during engine operation.
The use of this device makes manual adjustment of the degree of chain tension unnecessary, and eliminates the negative consequences of gradual wear of drive parts. Also, due to its design, the hydraulic tensioner dampens vibrations and oscillations of the chain, reducing the load on parts and the overall noise level of the mechanism. A faulty hydraulic tensioner can cause problems and should be replaced as soon as possible. But before you buy or order a new hydraulic chain tensioner, you should understand the design and operation of these devices.
Types, design and principle of operation of hydraulic chain tensioners
Diagram of operation of the spring-hydraulic chain tensioner for VAZ engines
Fundamentally, all modern hydraulic tensioners have the same design and operating principle, differing only in details and additional functionality. The unit consists of a metal cylindrical body, in the front part of which there is a plunger, and in the rear part there is a valve assembly. A closed working cavity is formed between the plunger and the valve assembly.
Installation diagram and purpose of the VAZ 2114 alternator belt
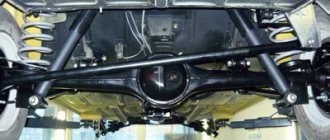
Since the engine installation on the VAZ 2114 is transverse, then the VAZ 2114 alternator belt is located on the right side of the car or on the left side of the engine, if you look there with the hood open, not familiar with the cooling radiator.
At the end of the crankshaft opposite the flywheel there is a timing belt drive pulley, which spins the camshaft and oil pump shafts with a pump, as well as the electric generator drive pulley. The timing drive is covered by a plastic cover, and the belt drive runs outside, on top of this cover, and connects the electric generator drive pulley on the crankshaft to the alternator pulley. On the VAZ 2114 there is no belt tensioner pulley, like on the VAZ 2110. Tensioning the alternator belt is done using a different method.
The belt drive is marked 21082-3701720 and when selecting it you need to find a belt with a length of 698 mm. During the use of the machine, the myth drive is exposed to severe loads, not only mechanical, but also thermal and chemical. Therefore, the highest demands must be placed on the quality of the belt drive. Probably experts and car owners advise using belts of the “BOSCH” brand, also called “GATES”. Although their cost is about 500 - 550 rubles, versus 200 - 300 rubles for products from a Russian manufacturer, the quality of these drives is significantly higher.
Main types, structure and principle of operation
The design of the tension mechanism consists of two parts:
Eccentric-type products are equipped with a bushing with an offset axis, which is located inside the roller. As the part rotates, the roller changes position and maintains the required tension.
In slider models, the roller rotates along the slider in a perpendicular direction, maintaining optimal tension. A screw is used to adjust the placement. However, due to the lack of compactness and reliability in comparison with eccentric models, such tensioners are installed quite rarely.
All manual mechanisms have several disadvantages:
The listed problems are eliminated by installing automatic tensioners. They are equipped with a special element that provides tightening of the belt drive with subsequent compensation of tension during wear of the part, temperature changes, changes in engine loads and other influences. In addition, automated products can act as shock absorbers that suppress belt vibrations, shocks, jolts and other mechanical vibrations.
There are 2 types of tensioners available for sale:
The first include models with compression and torsion springs. In two versions, the intensity of the spring tension is determined at the factory, so it does not need to be adjusted when installed on the car.
Oil mechanisms have a complex design and high cost, but this is justified by their efficiency and operational advantages. The system not only maintains belt tension, but also eliminates tension variations over a wide range. The tensioner is based on a hydraulic cylinder, which is installed using two methods:
Manufacturers of automated tensioners (both mechanical and hydraulic) sell them in a compressed state. The rod mechanism is held in place by a pin, which is removed after mounting the device on the power plant. As a result, the roller moves to the desired position, maintaining tension without prior adjustment.