Domestic manufacturer AvtoVAZ regularly tries to introduce something new into its products. The plant often focuses on the wishes of consumers, so the advice of most drivers of previous Lada models was no exception.
As you know, the old VAZ-2110 and VAZ-2112 models did not provide audio preparation, which is why the owners of these versions of the Lada were forced to completely redo the interior to accommodate the acoustic system. Audio preparation in Grant was provided for during design.
All the necessary wires for the acoustics are present in the stock car. There is also the possibility of placing the multimedia system in a special opening in the dashboard. There is also electrical wiring for the radio, rear and front speakers.
Taken together, this makes for a PRETTY SIMPLE connection to the AUDIO SYSTEM YOU WANT to do. However, once you understand the electronics of the machine and allocate a sufficient amount of time for this, you can carry out the installation yourself.
The feasibility of conducting audio training in the Lada Granta largely depends on the assembly of the car. On the “Norma” and “Standard” fret trim levels, the owner only needs to connect the audio system to the controls, because the manufacturer independently carries out the audio preparation.
Lada Granta Norma
In the Lada Grant Norma, the audio preparation is configured in such a way that the door wires are connected to the head unit, which already powers the audio system itself. The car owner will only have to connect the radio and speakers.
The Lada Granta series has a flaw: the AvtoVAZ connectors for audio systems do not match the connectors of audio equipment manufacturers. Because of this, you have to additionally purchase the necessary wires and connect them directly, while paying attention to the corresponding symbols.
For example, the space for the speakers on the Norma doors is indicated by a corrugated pattern. It will be necessary to cut an opening to connect the speakers.
Removing the standard radio in Grant Lux
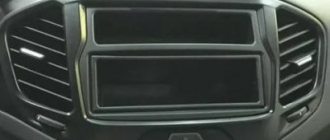
The difference between grants of the luxury configuration: the MMS (multimedia system) installed from the factory. This is a 2 din device.
To remove standard acoustic grants:
- take a knife or plastic spatula to dismantle the acoustics and disconnect the decorative trims to the right and left of the radio. It is not necessary to take pictures;
- in the gap between the cover and the panel we find the head unit lock. There are two of them on both sides. Press it out with a screwdriver;
- we take out the GU on ourselves.
Everything is described in detail in the video:
Replacing the standard MMC in Grant
The process - after removing the acoustics, we install a new system.
Difficulties: you may have to finish the fastenings of the new system for VAZ ones. Plus you need the right frame. The factory MMC frame may not fit.
Lada Granta Standard
The audio preparation of the Lada Granta Standard is arranged as follows: the car has power wiring harnesses connected to the head unit. Such wires are present only in the radio; there are no visible outputs of wires for the speaker on the doors.
Therefore, on the basic configuration of the car, the wires do not reach the audio system speakers. Under the panel on the driver's seat side there are wire outlets for the radio.
In order to connect them into one system, you need to find the corresponding audio system wire outputs on the Lada doors. After finding all the necessary outputs, the wires located on the panel are connected to the wires that are built into the doors.
On a car of this configuration, you will need to run the wires to the dashboard alone.
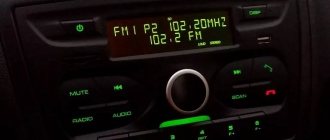
A few words about this configuration. The “Lux” assembly has a factory pre-installed radio with speakers. The radio has at its disposal such additional functions as a 5-inch touch screen, which also has a line input, a Bluetooth headset, and the ability to read flash media.
Features and capabilities of the radio
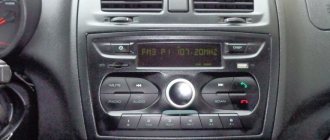
The Lada Granta Lux and Kalina-2 are equipped with a standard radio, and these stereo systems are gradually being improved. The external difference of this device is primarily that it is deeply recessed into the center console and it is not easy to remove it from there. The large monochrome touch display with an accessible and clearly designed interface also catches your eye.
According to reviews from Lada car enthusiasts, the radio is equipped with its own Windows-based operating system, the potential of which is enhanced by firmware. You can create something like a desktop, like on a computer, and connect an Internet browser. You just have to plug a 3G modem into a special connector, and all the functions of the global information network become available in your car.
In this case, data can be entered using the on-screen keyboard. These software functions must be recorded on a separate SD card, since the radio's own memory no longer fits into the increased demands of users. This is one of the reasons why the Russian system is still far from being comparable to foreign devices, although it is, of course, ahead of much that was installed and sounded in our Ladas earlier.
The radio receiver also has a nice feature: it can be configured in such a way that when there is a news broadcast on a particular radio station, it will automatically retune to a news wave from any other frequency. The standard Granta stereo system with an LCD display plays music from MP3, WMA, WAV files and video files with the WMV extension.
Conclusions and recommendations
Conducting standard audio preparation in cars such as, for example, the Lada Granta has now become much easier, because there is no need to conduct the wires themselves and the owners only have to make their proper connection.
Thus, the corresponding wires are connected to the power connector of the radio, as well as the connector for the speakers. Do not forget about the insulation of wires that are supplied directly.
After this, we cut out an opening in the door, where we insert the speaker and secure them with the appropriate fasteners. Most often, 5-inch speakers are mounted in doors.
Remember that independently connecting an audio system to existing factory outputs is in no way considered an excuse for refusing warranty service.
“Voicing” the Lada Granta is not at all difficult - provided that one set of acoustic systems (speakers) is enough for you.
LADA > Granta
The “norm” package includes the so-called audio preparation, that is, blocks with connected electrical wiring harnesses for connecting the head unit and speakers in the doors. The hardest thing is to do everything beautifully
Other features of standard multimedia
The general feelings of owners who have a standard radio in their car are positive. The display is informative and easy to read. The touch keyboard functions flawlessly. The standard radio itself is capable of high-quality reproduction of sound programs from micro-SD cards. However, using USB format media can be challenging.
The device also has some nice options:
- equalizer;
- activated replay mode;
- random sequence of playing tracks (“Random”).
Multimedia LADA Granta is capable of supporting images in 5 formats, which allows you to view photos without any problems. But not everyone can make the correct settings for the “phone” option on the first try. This function will be convenient for a busy owner who is forced to communicate by telephone even while on the road.
The standard speakers of the LADA Granta disappoint many, since even at a 45 percent volume level they emit wheezing, characteristic of bass overload. Some timid music lovers are alarmed by volume jumps when switching to “radio” mode.
Here is a list of shortcomings that provoked many Grantavods to purchase an alternative version of the radio. Today, the progressive version “2191” claims to replace the outdated standard device “2190”. The new device will please you:
- improved sound;
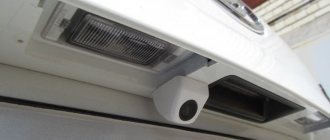
- interface for connecting with a rearview camera;
- navigation complex;
- integrated input for connecting a subwoofer.
LADA Granta
And the plant promises to bring Granta to the market with a standard audio system in the middle of the year. Let's see! Let's listen!
Acoustics in Lada Granta
It's no secret that acoustics in a car are very necessary and perform various functions. Installing it is a bit of a concern for novice motorists: they find it difficult to choose the right speakers, they do not have enough money for high-quality installation, etc. This article was written solely to help everyone in this matter and we will find out how to install acoustics in a Lada Granta with our own hands. The Lada Granta and the acoustics, installed correctly in its interior, taken together, will create a completely different car, which even the owners of some foreign cars will look at with envy.
Car radio installation
Acoustics in Lada Granta
The car radio for the Lada Granta must be selected in such a way that its connection corresponds to the 1 din connector.
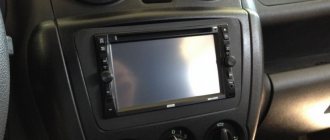
Note. You can also install a car radio with 2 din on the Lada Granta, but then you will have to cut out the partition and adjust the frame in the console to the size, which is very, very labor-intensive.
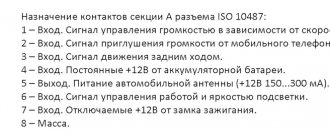
- We dismantle the plastic pocket that stands in place of the future car radio. We use a flat blade screwdriver. On the back of the pocket we see slots where you will need to insert ISO connectors.
Installation of car radio in Lada Granta
- The metal frame is removed from the radio and installed in the same place where the pocket was removed. We unbend the frame's antennae and securely fix it.
- We connect the connectors to the car radio. Then we insert it into the frame.
We check the operation of the car radio, and if it is functioning normally, then we move on to the next stage of our operation.
How to install a head unit on a car with basic equipment?
Since the Lada Granta base is not equipped with musical equipment, and only a push-button radio is installed on board, the question justifiably arises: how is the standard radio installed in the cabin? In reality, this is a simpler procedure than it might seem at first. The occurrence of problems during installation is excluded, since a seat is already provided for the standard device on the Lada Granta panel, regardless of the level of equipment.
You can purchase the device in a retail chain or on an Internet site, where you can actually find an improved version, equipped with a navigation system with a detailed map of the Russian Federation. Don't forget to buy an additional luxury panel. Although multimedia will fit into the standard panel without any problems, the appearance will not be so beautiful. The price for this device reaches 2.5 thousand rubles.
Next comes the installation of the radio. The design feature of the landing niche in the Grants panel does not provide for the need for additional wiring.
- The first step is to remove the plastic pocket in the audio system opening. This is done using a flat-profile screwdriver. There is access to several connectors that involve connecting a radio.
- We remove the frame from the head unit and fix it at the location of the pocket.
- Next we move on to the connection. To do this, connect a couple of connectors and install the device in the landing niche.
- After this, you can install the speakers in the front door cards. The procedure involves the need to dismantle door trims with unlocking handles and adjust the position of the glass. Using a special template, we begin cutting out the mounting holes.
We attach the speakers to the cards using self-tapping screws. We insert the cables from the speakers into the input connectors intended for this on the rear panel of the car radio. We install the decorative door panels in their original places and evaluate the sound provided by the standard head unit. Thus, the radio is connected.
Installing front speakers
Acoustics for Lada Granta
Before moving on to the actual algorithm for installing the front speakers (see How to choose speakers for a car radio on your own), let us remind you that this car has already been equipped with standard seats and there is no need to do anything new. But a serious problem arises when installing two-component acoustics. And yet, modernization will have to be carried out, since the diameter of the standard seats is quite limited, however, as on other car models.
Note. If, for example, we want to install high-quality 16 cm acoustics on a Lada Granta, then another intractable problem will arise. The front windows may not open all the way and will hit the speaker. You will have to make special spacers from plywood or chipboard.
Making podiums
- The first thing to do is to make podiums.
DIY acoustic podium
- Cut out a paper stencil to fit the diameter of the speaker. Don't forget to cut out the inner circle too.
Note. For 16 cm acoustics, you should get a ring with the same diameter and a 15 cm circle cut inside it.
- We glue together 2 pieces of plywood, cut according to a stencil. We use PVA glue and self-tapping screws.
- We should get rings 11 mm thick. This is quite enough for most speakers, although the thickness can be increased, if necessary, later by adding additional rings.
- Now we need to install these same acoustic podiums in the door of the Lada Grant. Without removing the trim, we make markings by attaching a homemade ring to the door.
- We remove the casing.
- We take a drill and start drilling holes in the metal of the door.
- We put up podiums and fasten them well.
Note. During this work, it is recommended to at the same time make high-quality sound insulation of the door. It will make the sound from the speakers much fuller, and music lovers will be satisfied.
- We lay wiring in the door.
- We put the trim back in place.
- We install the decorative speaker grille. You can attach it in various ways.
Installing rear speakers in Lada Granta
Acoustic systems in Lada Granta
As a rule, without rear acoustics there can be no talk of any high-quality sound. Of course, the main thing is the front speakers, but the sound coming from the rear is an undeniable addition to the overall sound stage created in the cabin of any car. Speakers from Morel Tempo Coax are ideal for the rear doors of the Lada Granta. This is a two-way speaker with a power of 6 dB. Rear speakers in the car door:
- We remove the door trim.
- We try on the speakers for the doors.
- To ensure that the speakers are firmly fixed and the sound quality is not lost, you need to cut off the protruding edges of the metal, and screw the cut pieces of plywood into this place. Material with a thickness of 10-15 mm is quite suitable for this.
Rear speakers in Lada Granta
- We also install crossovers from the inside so that they are not visible and do not interfere with the trim.
- We are modifying the rear door trim so that the peculiar pancakes for the speakers do not protrude. It is recommended to install aluminum mesh. They will need to be cut according to the pattern, and then secured to the rear doors using hot glue.
Note. If the color of the Lada Granta is light, then the metal of the door may be visible through the mesh cells. In this case, it will be enough to hide everything with a model or a piece of carpet.
- The wires are usually already laid here. You just need to connect them to the speakers.
How to flash MMC 2190 Granta firmware
To flash the MMS you need an SD card
To flash the MMS, you need an SD card. The firmware procedure is incredibly simple. You will also need an SD card. In order for the card to be used, it will first need to be formatted in the FAT16 system. Sometimes during the firmware a problem arises, which is that the Lada logo freezes. Why is this happening:
- formatting options do not meet system requirements;
- sometimes it could be an outdated SD card.
This is why special attention needs to be paid to formatting. If there are difficulties with the firmware, then you need to check everything
You can select NewMenu V7.391Nitro as the new software. To do this, you need to find and download it on the Internet, and then unpack the archive onto a card.
Professional rear acoustics in Lada Granta
Acoustic shelf in Lada Granta
If the owner of a Lada Granta is a true connoisseur of sound, then the above methods for installing an audio system will not be enough for him. Therefore, we will present another method that involves installing professional acoustics in this car. To begin, prepare the necessary materials and equipment:
- Coaxial acoustics, preferably 6x9 from Pioneer. As for the rated power, 120 W will be enough.
- An acoustic shelf that you can make yourself, or you can buy ready-made.
- Kit for connecting a 4-channel amplifier, preferably from Supra.
- One roll of Splen.
As an amplifier, it is advisable to choose, again from Pioneer, a 2-channel option. As for the 4-channel option, this will be superfluous. The 2-channel amplifier exactly matches the selected acoustics.
Note. The kit for connecting a 2-channel amplifier can be used as for a 4-channel amplifier. The wires in this case are of higher quality and better.
The actual installation process itself:
- We dismantle the old shelf. We press out holes in the new one using hydraulics and cover it with two sheets of vibrating mat, and on top with a roll of Splen.
- We make podiums for the shelf to match the size of the speakers.
- We install everything in place.
This concludes the process of installing acoustics in the Lada Granta. The instructions will help you do everything correctly and will prevent you from making mistakes if you also use photo and video materials in the process. The price in this case will be very low if you do everything yourself.
Connecting an audio amplifier and subwoofer
The sound provided by the standard Granta 2190 multimedia system does not suit everyone. Some owners are happy with the 2190's display, but not the sound quality, so they find ways to install custom amplifiers and subwoofers to get a more acceptable sound that suits their needs.
In order to independently connect the amplifier and subwoofer to the standard radio, you must first remove the lower part of the central panel. Having removed the console, we see mini iso type connectors and into one of them, the yellow one, we insert the plug of a pre-purchased adapter. Leave the blue and green wires as is. Those who have done this have noted that standard wires can no longer be used here, so mini iso is used.