Your favorite car can be considered almost another family member. The iron horse is often ready to help out at the most crucial moment and is quite capable of claiming the status of one of man’s best friends, after dogs, of course (alas, VAZs have not yet learned to wag their tail cutely). So why not please yourself and your car with stylish and simple tuning by installing additional lights on your Lada Largus.
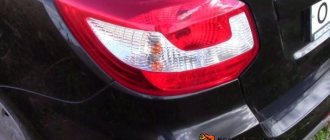
Appearance of the rear lights
If you are also annoyed by the unpresentable appearance of the rear plugs on your car, this article is just for you. The price is affordable for almost any motorist. Exactly like, there are practically no difficulties in installation. That is why the information offered will be of interest to any Lada Largus owner and is intended to teach them independent garage repair skills.
2283-15-14-07
By pressing the lamp and turning it counterclockwise, remove the combined brake signal and side light lamp from the holder.
By pressing the lamp and turning it counterclockwise, remove the combined brake signal and side light lamp from the holder.
By pressing the lamp and turning it counterclockwise, remove the combined brake signal and side light lamp from the holder.
We install the new P21/5W lamp in the reverse order. The protrusions on the base of the combined brake signal and side light lamp are located at different levels and during installation must fit into the corresponding grooves in the holder socket.
Replacing fog lamps on Lada Largus: which ones are suitable
Replacing lamps in the lighting fixtures of any car is not particularly difficult and can be done by almost any car owner. To make sure of this, we will try to independently replace fog lamps in Largus.
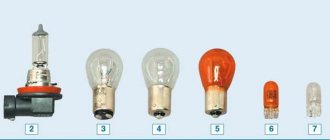
Lamp type
Before you begin this, albeit small, but still repair, you need to prepare. Of course, first of all you need to buy a new light source. What kind of lamp is in the fog lamp of the Lada Largus?
Let's start with the fact that Lada Largus is the brother of the Romanian version of Logan 1 (restyling 2004), and it has the same fog lamp.
Lada Largus station wagon
Since the fog lamp is the same, the lamp it uses is the same as in Renault Logan 1 - halogen with an H11 socket. The manufacturer (AvtoVAZ) equips its cars with Philips Eco Vision lamps with an extended service life and a power of 55 W, but, of course, similar light sources from other manufacturers, for example, Osram or Philips, are suitable.
Original fog light bulb Lada Largus
Today, AvtoVAZ on its Largus has replaced Renault fog lights with Bosh products, which have the same design and type of bulb, but are equipped with flat glass. Bosh fog lights installed in Lada Largus
Lamp replacement process
How to replace a PTF light bulb? This process in Lada Largus is quite simple, although it requires some disassembly of the car. Therefore, in addition to light bulbs, you need to stock up on:
- Torx key 20.
- A 17-gauge spray gun (optional, but it makes the job easier).
- Cotton gloves or clean cotton cloth.
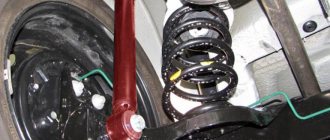
We drive the car into a pit or overpass, although if you want to replace the light bulbs in the Lada Largus PTF it is quite possible to use a jack and on bare ground. True, you will have to wallow in the mud, but you don’t have a choice of what to do on the road.
To get to the fog lights, you need to remove the fender liners. For greater convenience, I would recommend removing the wheel: it won’t take much time, but it will be much more convenient to work with.
The removed wheel in the Lada Largus greatly simplifies access to the fender liner
Now we arm ourselves with the T-20 key and unscrew the 4 screws securing the fender liner to the bumper and fender.
Partial dismantling of the fender liner on Largus
We bend the front part of the fender liner and get access to the Largus foglight.
Bent plastic fender liner Over time, the fender liner material dries out and becomes brittle. To play it safe, I would recommend dismantling the fender liner completely by unscrewing the remaining screws securing it .
We disconnect the power supply from the fog lamp, for which we press the latch and simply pull out the block itself.
Removing the power supply from the Largus fog lamp
Take the fog light bulb by the socket and turn it counterclockwise a quarter turn. Now it can be removed. All that remains is to figure out how to replace the burnt out bulbs in the PTF with new ones.
Removed fog lamp
2283-15-14-08
Similarly, we replace the turn signal lamp (PY21W) and the fog light lamp (P21W) (reverse lamp in the right lamp).
Similarly, we replace the turn signal lamp (PY21W) and the fog light lamp (P21W) (reverse lamp in the right lamp).
Similarly, we replace the turn signal lamp (PY21W) and the fog light lamp (P21W) (reverse lamp in the right lamp).
Replacing rear lights - Lada Kalina Blog
To independently replace the rear light assembly, one 8-mm wrench will be enough, preferably a socket with a ratchet and a Phillips screwdriver. This procedure will not take more than half an hour and will not cause much trouble. Everything is described in order below.
Guide to removing and installing rear lights on Lada Kalina
- The first step is to open the Velcro windows in the trunk trim, which give access to the headlight mounting bolts. Although, I would recommend bending the corner of the trim completely in the right place. To do this, you need to unscrew two screws. The first one is located on the threshold of the trunk, closest to the corner:
- The second bolt is on the plastic panel at the top, unscrew it completely, since the casing is located under this fastener, and below we take out the piston, which also secures the upholstery. In the photo below these elements are marked with arrows:
This is what it should look like after the work has been done, as shown in the picture below:
- Now that we have free access to all fasteners and electrical wiring, we can begin removal. To do this, take a head with a ratchet size 8 and unscrew the three nuts securing the rear light, which are marked with yellow arrows, and immediately insert the rubber seal of the wiring harness inside, marked with an orange arrow in the picture:
- Now disconnect the rear light wiring plug by pressing the latches on both sides:
- After which you can safely begin to remove the rear light of our Kalina, simply by pulling it from the outside, since nothing else holds it.
- We install the rear lights in the reverse order of removal. This manual is suitable for all owners of Kalina in a Station Wagon or Sedan, although for the Hatchback there are no fundamental differences in dismantling, all work is done by analogy - the only difference is in the mounting locations of the headlights themselves.
List of materials on the same topic
2283-15-14-09
The turn signal lamp has two protrusions, located asymmetrically relative to the axis of the lamp, which must fit into the corresponding grooves in the holder socket.
The turn signal lamp has two protrusions, located asymmetrically relative to the axis of the lamp, which must fit into the corresponding grooves in the holder socket.
The turn signal lamp has two protrusions, located asymmetrically relative to the axis of the lamp, which must fit into the corresponding grooves in the holder socket.
Removing Largus taillights - search on DRIVE2
Brighter, brighter reverse (replacing bulbs and adding a light).
1. We do it from the back
PTF
reversing
2. We install lamps of higher brightness. I don't like cars with different lights at the back. That is, on one piece of glass there is a white window for ZH, and on the other there is a red window for PTF.
Removing scuffs above the rear lights - Lada Largus.
Largus has it
Another small problem that I fixed today.
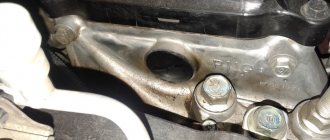
The black trims above the rear
lights have three bumps with which they rest on the body and rub off the paint. The result is this or even worse when it is rubbed down to the metal.
Improved reverse gear without losing the rear PTF - Lada Largus.
Hi everybody! Today I’ll tell you about a modification to the rear
travel and
rear
PTF.
Everyone knows that Largus
only has one
reversing
, and it is located in the right
rear
light.
2283-15-14-10
Each lamp holder socket is marked with the type of lamp.
Each lamp holder socket is marked with the type of lamp.
Each lamp holder socket is marked with the type of lamp.
Install the rear light in the reverse order.
[How to save on maintenance of Lada Largus] [Maintenance of Lada Largus at 15,000/45,000/75,000/105,000 km] [Maintenance of Lada Largus at 30 thousand km] [Maintenance of Lada Largus at 60 thousand km of run] [Maintenance of Lada Largus for 90 thousand km of run] [Maintenance of Lada Largus for 120 thousand km of run] [Independent maintenance - general recommendations] [Safety rules for self-carrying out maintenance] [Tools required for carrying out maintenance Lada Largus maintenance] [Lamps used in the Lada Largus car]
Changing the lamps in the rear light of Lada Largus
Tail light for Largus
The kit included: 1. Two lights 2. Two pieces of wiring with chips for additional lights 3. Plastic nut - 2 pcs.
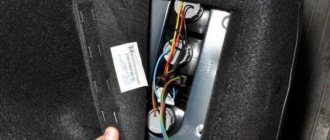
Here are the instructions from the manufacturer of these lights, Tune Auto LLC. Photo 1 instructions
The instructions provide a general installation diagram for these lights. The manufacturer's plant diagram requires improvements. Moreover, these improvements are cheap! And without them, installing lights can bring an unpleasant surprise in the form of water in the cabin! I already encountered something similar on 2112. .
On a seven-seater Largus, you should pay attention to the linings, they are numbered 10 in the diagram. Plastic corners break easily. Without seeing the diagram, I broke one antenna on one. Fortunately, from the side where there are two of them. On the second window, all the mustaches remained intact. I unscrewed the Torx screwdriver in several steps.
Comparison of the standard rear fender trim and the additional Largus rear light.
Standard linings have additional stops to the car body. There are additional holes for them on the body. And a hairpin in the lantern. In general, I sealed everything with pieces of vibration insulation.
The wires coming from the top light were wound on the side, one at a time. Well, vibration rules here too)
Wiring Largus copper wires and aluminum, which is used for twisting on lamps, is of course not comme il faut (But simple and fast) There is a small current flowing there, a good twist of the wires will hold. I cleaned the wires with a lighter. Twisting wires.
This completes the first installation of the lights) Good luck on the roads! Subscribe!
A long-awaited new product for members of the Lada Largus Club forum - additional taillights for the Lada Largus . They are installed without modifications in the body instead of black plastic plugs.
You simply need to remove the black plugs, install the new lights and connect them to the car's existing wiring.
Material of rear lights: body is made of impact-resistant imported ABS plastic, glass is German PMMA, high-quality diodes from “CREE” Product warranty: 6 months Operating mode: dimensions and brake light. You can independently change the operating mode to another scheme (performed independently). Contents: 2 LED lights (left/right light of Lada Largus), wiring harnesses, installation instructions
Excellent match to the color of the factory lights. Thus, the appearance of the car looks complete. A big plus for road safety is that now the car’s dimensions and brake lights are clearly visible.
Please note that the appearance and placement of LEDs may be subject to change by the manufacturer without further notice.
Video on installing additional LED tail lights on Lada Largus
Methods for connecting to the main electrical wiring of Lada Largus
Regarding the issue of electrical commutation, the more relevant discussion will be not how to connect the wires, but with what. Almost everyone has enough skills to connect a couple of conductors. Now you need to be able to connect them efficiently or reliably. We will also discuss with you the best way to insert into the existing electrical wiring and how to do it.
The easiest way, of course, is to make the connection using regular twisting. But this kind of method “is not comme il faut.” Contact will be lost sooner or later. In general, it cannot be called reliable. But this is really the simplest and enough to first test the switching made.
If you have soldering skills, tinning and soldering conductors will be a simple and reliable way. This kind of connection will never oxidize over time, and its strength will be comparable to the strength of the conductor itself. That's why soldering is good.
But it’s not soldering alone that can help you out in the matter of connecting rear lights to the Lada Largus. A cheap and practical way would be to use the most common screw terminal blocks. They cost pennies and are sold in almost any electrical goods store. To avoid cutting the main wiring, bend it at the connection point and thus clamp it with a screw contact.
Well, the most optimal would be to use special terminal blocks, known as clamp couplers. They are specifically designed to connect to live electrical wiring without twisting, soldering or cutting. Perhaps this method can be considered a priority. We will finally move on to the connection process itself.
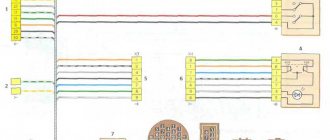
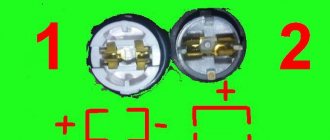
Electrical connection diagram, how to connect the wires correctly
Let's take in our hands a working electrical plug that is connected to the main lights of the Lada Largus. It comes with wires of five different colors, including:
- common wire, also known as “plus”;
- power supply for direction indicators;
- for fog lights;
- in reverse;
- on the brake, as well as the clearance.
Among all this not very tricky interweaving of multi-colored conductors, we are interested in the following colors:
- black - common wire;
- orange - responsible for the brake light;
- blue - responsible for dimensions.
This is exactly the connection scheme that is allowed on the Lada Largus. Rear lights installed instead of trims, of course, can be connected to any other wires in the plug, but this will contradict the technical regulations of AvtoVAZ, therefore we will not invent anything of our own and will not teach you anything bad. Additional lighting conductors have the following insulation colors:
- black - common “positive” conductor;
- red - to be connected to the orange on the plug, it is responsible for the brake light;
- yellow - to be connected to the blue one on the plug, it is responsible for the dimensions.
The electrical connection has no other nuances. Before final assembly of the casing, it is recommended, however, to test the correct functioning of the additional lights. This will help you avoid a “bad job” if you make a mistake. In general, there should be no problems, everything is extremely simple, and soon you will be able to independently drive along the roads in an updated and tuned Lada Largus, to the envy of everyone.
The rear light on a Lada Largus car is removed if it is replaced or during body work. You do not need any specialized tools to remove the taillight. The flashlight is mounted on two plastic mounting pins that can be unscrewed by hand. In this article we will analyze in detail the procedures for removing it, as well as installing it back into place. Photos and explanations will be provided.
Installation instructions
To remove the plug and install additional rear lights instead, perform the work in the following sequence:
- Remove the main light from the rear of the body. To do this, you will need to unscrew 2 fasteners and then disconnect the block.
- After the lamp is removed, remove the upholstery inside the car, located on the rear pillars.
- Remove 3 fasteners holding the trim on the outside, and 1 fastener on the inside of the car. Remove the cover itself. If you have a 7-seater Lada Largus station wagon, you will need to remove the window fasteners, pistons, and mounting bolts for seat belts.
- Remove the pin from the trim. It will need to be screwed into a similar place in the trim on the additional lamp.
- Attach additional optics to the place of the lining using nuts.
- After connecting the wiring and checking the operation of the additional lighting, put the main optics in their original place.
Additional rear lights for Lada Largus
To connect the Lada Largus optics according to the diagram, you will need: