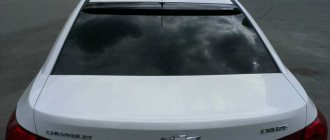
Icy rear window
Today, almost all VAZ models are equipped with a heated rear window, since it greatly simplifies driving; in specific conditions, owners of cars without heated glass install it themselves. Most often, of course, heating is needed in bad, rainy and cloudy weather, then the rear window begins to fog up from condensation forming on it, and even in winter, then the glass may become covered with ice. When such conditions occur, as a rule, problems with the heating of the windows begin to arise; we will tell you how to check the heated rear window of a VAZ 2110 and troubleshoot the problem in this article.
The heated rear window of the VAZ 2110 does not work, what is the reason?
Almost all VAZ 2110 cars have a rear window heating system.
But even if this system is not provided for in some models, it is usually “finished”, since here we are talking about basic comfort today. If the rear window heating does not work on a VAZ 2110, this creates many problems. As a rule, heating is especially needed in cloudy, cold weather in autumn and early spring, when the glass becomes covered with condensation, blocking the driver’s visibility of what is behind the car.
This lack of vision is especially dangerous when parking. The same can be said about winter use, when the frost literally draws patterns that you don’t want to admire at all.
How the system works
The operating principle of heating is very simple; it is used today in almost all cars, including foreign cars. Something simpler and better has not yet been invented. A conductive thread is applied to the rear window on the interior side, which heats up; accordingly, the glass is heated, which eliminates fogging from the inside, as well as snow and ice located on the outside.
This system is made up on a VAZ 2110:
- the thread itself, which provides heating;
- wiring going to it;
- heating relay;
- switch with signal light inside;
- fuse.
That is, nothing complicated for a craftsman. Considering that the size of the rear window of the VAZ 2110 is 121.3x67.6 cm, the heating size is usually only a couple of centimeters smaller, and essentially covers the entire surface, providing complete heating and good visibility of what is happening behind. There is no point in installing a much smaller heating system, because the driver should see the entire road behind, and not part of it.
Causes of malfunctions and their identification
The heated rear window works as soon as the ignition is turned on, and the glass should clear within a couple of minutes. But sometimes it happens like this:
- The power-on signal does not light up, although the button is pressed, the glass does not defrost (remains foggy);
- The heating does not work, but the control light is on;
- The glass thaws in stripes;
- Heating is insufficient. This phenomenon occurs if the glass is heavily frozen.
- In this case, simply clear it of ice mechanically.
The root cause of other phenomena should be sought:
- in relay control;
- check the condition of the fuse in the box;
- Check to see if the connectors on both sides of the rear window are secure.
- They may need to be cleaned;
- also check for breaks in the supply wires in the switch itself;
- if everything is in order here, you should check the conductive thread. With the engine running, you need to check the voltage approximately in the middle of each section (strip) of the thread. If the meter shows about 6 volts, everything is fine. If the readings are about ten, or, conversely, about zero, it means there is a break. A technique will help to determine exactly where the break is: the device has a pointed electrode, wrapped in a wide foil strip, and is led along a “suspicious” conductive strip. Where there is a voltage surge, there is a break;
- but often you can literally see the break - the thread has come apart in some area.
Repair work
The filament can literally be “painted” using conductive varnish or a special repair kit.
If this does not help, you may need to install a new relay.
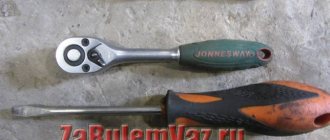
It is located either in the standard relay box or in the passenger compartment fuse box. Installation is simple: take out the old one, put in the new one. But before this procedure, you must disconnect the battery!
If you find an error, please select a piece of text and press Ctrl+Enter.
Troubleshooting and Troubleshooting
Common manifestations of heating malfunctions, which should start working simultaneously with the ignition being turned on, may include the following symptoms:
- If there is a light signal for the system operation, the glass is not heated.
- The same thing happens when the button is pressed, but without a light signal.
- Not all glass thaws (this usually shows up as strips of thawed and frozen water).
- The surface does not thaw completely - due to severe freezing or attempts to mechanically remove ice.
The search for the causes of the malfunction should begin by replacing the corresponding fuse, which is responsible for the operation of this device in the VAZ-2110. In our case, this is a fuse marked F8 in the corresponding block, which protects the heated rear window. This block is located to the left and slightly lower from the steering wheel. For correct diagnosis, the fuse, even if it looks intact, needs to be replaced with a new one and the heating operation checked.
If the previous manipulation did not bring results, you need to check the car wiring from the rear window heating button. Burnt wires or breaks along their route will clearly indicate the cause of the malfunction. It is worth noting that a completely non-functional system is quite rare - much more often only some part of it fails. In this case, all heater filaments are usually checked for breaks, since it is obvious that they do not heat up due to the fact that current has stopped passing through them.
The most common cause of this phenomenon is mechanical damage to the conductors. Despite a fully functional system that will help melt the ice on the rear window of a car in a short time, many impatient drivers are in a hurry to free this surface from the “ice captivity” outside or from fogging from the inside using various improvised means, while harming the performance of the profile device due to vibration or physical contact.
If the system does not work correctly, the car owner checks which heating threads have stopped working. To do this, you just need to turn on the device and visually observe in which areas the glass does not heat up. Next, those places where the system does not work are carefully cleaned and inspected with a magnifying glass - this is how the place where the conductor breaks is located. In this case, it makes sense to check all conductive threads. Firstly, a break even on one strip can occur more than once, and secondly, you can accidentally discover places of future breaks, which can be expressed in the form of burrs, sagging, tears and scratches.
After identifying all emergency and unreliable places, it is necessary to treat them with a special paste (lubricant, spray), which, when dried, forms a conductive substance and completely restores the functionality of the rear window heating system.
How the system works
The operating principle of heating is very simple; it is used today in almost all cars, including foreign cars. Something simpler and better has not yet been invented. A conductive thread is applied to the rear window on the interior side, which heats up; accordingly, the glass is heated, which eliminates fogging from the inside, as well as snow and ice located on the outside.
Rear window heating operation diagram
This system is made up on a VAZ 2110:
- the thread itself, which provides heating;
- wiring going to it;
- heating relay;
- switch with signal light inside;
- fuse.
That is, nothing complicated for a craftsman. Considering that the size of the rear window of the VAZ 2110 is 121.3x67.6 cm, the heating size is usually only a couple of centimeters smaller, and essentially covers the entire surface, providing complete heating and good visibility of what is happening behind. There is no point in installing a much smaller heating system, because the driver should see the entire road behind, and not part of it.
Restoring the conductive layer
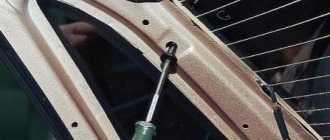
First of all, purchase a special paste that conducts electricity from a car dealership. Then you need to remove the rear window. Prepare the work surface: clean it of dirt and dust, and also treat it with a degreaser. We clean the ends of the damaged thread. Apply tape and leave a small gap.
Apply the purchased paste and leave for a day. Then we remove the tape and make sure that the heating is working. If not, there is nothing left to do but replace the relay yourself. But the audible clicks indicate rather that the mechanism is in good condition. Therefore, most likely the problem in your case is with the thread.
When creating a passenger car, designers pay great attention to the glazing of the car. Glass plays an important role in the design of a vehicle. They protect the driver and passengers from wind, dust and dirt. They serve as a soundproofing barrier that allows people in the cabin to talk without strain.
Car windshield
The problem of windshield icing has been known for a long time, and it is especially relevant in cold countries. Icing on the windshield reduces the driver's visibility, making the trip not only comfortable, but also dangerous. This problem is especially common in older cars that lack proper airflow and heated windshields.
heated windshield
A heated windshield is many times more effective at de-icing than the best standard heater. Thanks to the heated windshield, the car warms up better and becomes suitable for use faster in the cold season.
In addition, the driver receives a better view thanks to the fully heated windshield. In addition, there is no need to clean the windshield with a brush, scraper, etc., as a result of which various scratches do not appear. Which in turn also impair the driver’s visibility and give the car a nondescript appearance.
As you know, in VAZ 2107 cars the manufacturer did not provide such a function as heating
windshield. There is only its air flow, which allows you to remove the “foggy glass” effect. If you want to improve your car, you can become the owner of a heated windshield. This athermal glass is easily delivered on its own as all the necessary components are attached to it.
This type of glass is ideal for the VAZ 2107, so a snowy, frosty morning can no longer ruin your mood. Of course, heated glass is quite expensive compared to its simple counterpart. But you probably won't regret this windshield upgrade.
On VAZ cars, as on most foreign cars, the rear window is equipped with a heating function. This is very useful and is designed to maintain visibility through the glass in bad weather.
Heating
It helps equally in rain and fog, when condensation forms on the glass, and in winter, when it is covered with a layer of frost.
But sometimes it happens that heating
rear window 2114 does not work. There may be several reasons for this. we'll look at them below, but first we need to understand. On what principle does the heating system itself work?
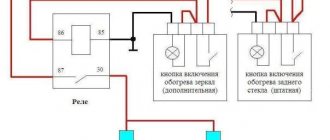
Diagram of elements of the glass heating system
A detailed diagram of the heated rear window system of the VAZ 2110 is shown in the figure below, according to it:
- The glass heating element is activated using an auxiliary relay designated K7 of type 904.3747-10, which is installed in the mounting block
- When the heated rear window is turned on, control light 4, located next to the switch, immediately lights up, it illuminates the switch key in red or orange.
- In VAZ 2110 cars, the heated rear window can only be turned on if the ignition is turned on, because the voltage to switch 3 goes through another relay designated K6, which is activated when the ignition is turned on.
- The power supply to the glass heater is supplied from relay contacts K7 through fuse F7, connected directly to the power source
- If you turn on the heating, but the rear window is not heated, then you need to check the condition of fuse F8, as well as the wires connecting them, and also relay K7 and switch
Complete heating connection diagram
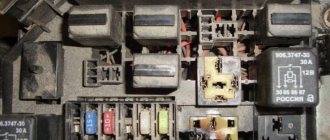
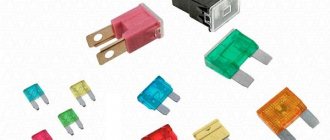
Fuse
If your rear window heating does not work, your VAZ-2110 should be checked for a blown fuse. In the mounting block, check the elements in connector F8 (usually they are rated at 20 amperes). If the fuse looks like the one in the photo below, it needs to be replaced.
What is the reason for this phenomenon? Most often this happens due to a short circuit. At one point, the voltage on the on-board network increased above normal. To prevent the contacts from melting, the system is simply turned off by breaking the connecting elements. In this case, this is +12 V power and conductive elements on the rear window.
Device
First, let's get acquainted with the structure of this system.
It includes the following elements:
- The thread that provides heating.
- Wiring (positive and negative).
- System switch. Equipped with a warning light inside.
- Heating relay.
- Fuse.
- Control buttons.
This system works very simply. There is a conductive thread on the rear window. It warms up when power is applied. This way the glass is heated and condensation is removed from the inside.
Why does the rear window heating not work on a VAZ-2110 car? The reasons may be trivial. After all, the device has no mechanical parts. Therefore, all you need for diagnostics is a multimeter and a test lamp. This is the only way to find out why the heated rear window of the VAZ-2110 does not work. There is a photo of the diagram in our article.
Below we will look at the main elements to check.
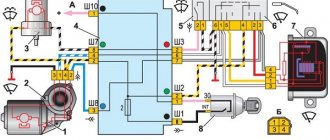
Rear window heating diagram for VAZ 2110, 2111 and 2112
1 – mounting block;
2 – ignition switch; 3 – rear window heating switch; 4 – control lamp for turning on the heating; 5 – rear window heating element; K6 – additional relay; K7 – relay for turning on the heated rear window; A – to power supplies The rear window heating is activated using the auxiliary relay K7 (type 904.3747-10).
When the heating is turned on, the orange lamp 4, which is located next to the button, lights up. The heated rear window only works when the ignition is on, since voltage is supplied to the button through an additional relay K6, which is activated when the ignition is turned on. Power is supplied to the heating threads through the contacts of relay K7 from fuse F7, which is directly connected to the power sources.
Troubleshooting procedure
- We check fuses F8 (20A) and F8 (20A) (mounting block).
- We check the serviceability of the rear window heating button. Is there a “plus” on pin No. 10 of the switch button and after turning on the button on pin No. 9 (a test lamp or multimeter will be useful).
- We check +12V at the Ш5-2 output and at the connector near the rear window.
- We check the wires and their connections.
- We check the rear window heating relay - K7.
- We check the integrity of the glass heating filaments.
The algorithm for determining the cause of a malfunction is similar for most cars, the only differences are in the names of fuses, relays and connectors.
By the way, did you know that to extend the service life of the heating elements, they use a Glass Heating Regulator (DOC), and you can also install a Fresnel lens on the rear window?
A look back: looking for and eliminating a broken glass heating filament
The heated rear window has one good feature: its minor malfunctions can be fixed with your own hands very quickly and cheaply. And if you try, it will also be of high quality. Shall we try?
How does it work and why doesn't it work?
Heating the rear window is a very simple thing. And its operating principle is elementary: current passes through the heating filaments, the filaments heat up and warm the glass itself. A few numbers especially for physics lovers: the resistance of each thread is about 10 Ohms, the current consumption strongly depends on the car and ranges from 10 to 25 A (the larger the rear window heating area, the greater the current). The threads are usually heated to a temperature of no more than 70 degrees, which is quite enough to remove not only fog, but also winter icing.
The design of the heater is simple: several threads are laid on the glass between two tires (their number again depends on the size of the glass, usually about ten). It turns out that they are connected in parallel and this is correct: if one thread fails, the rest continue to work. With a serial connection, any break would lead to the disconnection of all threads.
What could go wrong? The most common problem is a thread break. We will try to deal with it ourselves. But besides this, there are other faults, some of which can be repaired even without the help of fixers. For example, replace a blown fuse.
It’s more difficult if the button burns out. It can also be replaced, but this is rare.
It is also rare for a relay to burn out. Repairing it is usually pointless, and it is much easier to install a known good one.
But breaks in the circuit are more common. Especially on hatchbacks or station wagons, where the heating wiring runs in a corrugation through the rear door. Over time, the wiring wears out and the heating stops working. At the same time, the rear lights or turn signals may stop working if they are also installed on the door. Well, depending on your luck, anything can fall off in the corrugation. The easiest way to detect such a malfunction is with a voltmeter by checking the voltage on the buses. If the fuse, button and relay are working properly, and the heating does not work over the entire surface, you need to check the power supply to it. Sometimes the wiring does not fray, but simply oxidizes at the heating connections. Of course, this happens not only on hatchbacks and station wagons, but also on sedans.
Still, the most common malfunction is the breakage of one or more threads. This is the picture you see most often: some threads stop working, leaving unthawed areas on the glass. This is what we are going to fight with now.
Devices, vision and patience
The first task that will have to be solved is to find damage to the burnt thread. As usual, in our “squint-handed master” materials we make two assumptions: we don’t want to buy anything expensive for repairs (it’s better, of course, not to buy anything at all and get by with duct tape) and we honestly admit that we don’t know a damn thing about technology (which, of course , does not correspond to reality, but forces you to find the simplest ways to solve the problem). Searching for a cliff can be done in different ways. The normal people's method involves using a multimeter.
You can work in two modes: voltmeter mode and ohmmeter mode. In the first case, the easiest way is to connect one probe to the positive wire suitable for heating, and in the second case, measure the voltage along the entire length of the thread from the negative side. Where the voltmeter shows zero, there is a gap. You can also attach one probe to ground, and use the second to look for a jump in the thread. Where it jumps to 12 or 0 V, there will be a break. The disadvantage of this method is the need to work either with the ignition on or with the engine running, because in most cars, due to the large current consumption, it is impossible to turn on the heating when the ignition is off. But you need to turn it on, otherwise there will be no voltage on it.
The second method is to work in ohmmeter mode. It’s a little simpler here: you don’t need to turn on the heating, so you can work more calmly. Well, it's hard to screw this up. We move the probes along the thread, where the arrow jumps sharply, there is a gap.
Operating principle of the rear window defroster
The system works quite simply.
The tracks heat up the glass surface, removing snow, ice and remaining moisture, preventing further fogging. The electrical circuit must pass through the ignition switch, since the heating strips consume a large amount of energy.
The heater power supply circuit is common to almost all cars:
- After turning on the ignition, the electric current passes through the fuse, and then simultaneously flows to one of the power contacts of the relay and the output of the rear window heating switch.
- After pressing it, the relay contacts close.
- Thanks to this, electricity flows to the positive bus.
- It is then distributed over all conductive threads and follows towards the negative vertical track.
- When current passes through the horizontal strips, they release heat, heating the glass surface.
As a result, ice and snow melt from the outside, and all traces of fogging are removed from the inside.
The most common reason why the rear window heating does not work on a VAZ-2110 car is the relay. Over time, it burns out and stops passing current normally. How to check this element for serviceability? You will need a multimeter. But first we check whether the relay is emitting signs of life. We turn on the heating button and listen to its operation.
Damage to the heating filament
For what other reasons does the rear window heating not work? VAZ-2110 is equipped with special threads. A break can happen here too. The threads are a small layer of conductive substance.
It is easily damaged by the slightest mechanical impact (even with such harmless actions as removing tint). You can determine the location of the damage using a magnifying glass. It is advisable to carry out diagnostics during daylight hours. Damage to the threads is one of the obvious reasons why the rear window heating partially does not work on the VAZ-2110.
Phased renovation
The first thing you need to do is diagnose it and purchase a repair kit. There may be several options for a repair kit, and the repair technology in each case is discussed below.
Finding a Cliff
In addition to visual diagnostics of the condition of the threads, there are several more methods that are more reliable and effective:
- Visual diagnostics require activating the heater when the rear window is foggy. Where the threads are broken, the surface will warm up almost instantly, while in other areas visibility will be problematic.
- Using a voltmeter requires activating the ignition and then turning on the heating system. One probe should lie on the vehicle ground, and the second near the center of the heating tape. First wrap the second probe with foil. The break will be localized in the area where the voltage rises to 12 V or drops to zero. Ideally, this parameter should not exceed 5 V.
- The second method of using a voltmeter involves fixing one probe to the positive terminal of the heater, and the second one must be moved along the negative terminal strip. The problem area will be where the voltage is zero.
- Using the ohmmeter requires activation of the kilo mode. The device must be analog, with an arrow. The probes should be located near the system terminals, which are located in opposite directions from each other. Use distilled water to wet the cotton wool, which must be smoothly passed over the tape. As soon as the needle of the device moves, you will be able to detect the cliff area.
Repair with conductive glue
Repair of the rear window heating threads can be carried out using conductive adhesive. It is designed for temperatures from -60 to +100 degrees. You should not choose kits with glue, which cost 150-200 rubles. Often they do not last long or may not be effective at all. A cost of 300-400 rubles would be optimal for such a set.
Work order:
- Please read the instructions included with the kit. You should have a clear understanding of the options for applying the composition and the speed of its complete drying.
- Prepare the problem surface. Soak a rag in the alcohol solution and wipe the area.
- Lightly sand the edges in the break area with grade-grade sandpaper. It is enough to simply remove plaque and carbon deposits in two movements.
- Use tape to cover the strips along the thickness of the sides. It should not overlap the thread, but also avoid going too far away from the tape. Focus specifically on the width of the thread.
- Proceed to apply conductive glue to the prepared area using a brush or syringe. The instructions will tell you how many layers to apply. The overlap on the working areas of the tape should be 1 cm to the left and right.
- Remove the tape and wait until the composition dries completely. This will not happen before 24 hours.
- Check the functionality of the system after drying.
Alternative method
Traditional methods are also suitable for restoring threads. The only difference between them is the material used:
- Wood shavings combined with paint. The first material can be obtained from a bar of copper and brass, which must be processed with files. Choose a paint that matches the color of the heating tapes. Mix the ingredients in equal proportions until you reach the consistency of a soft dough. Use masking tape or tape to create a stencil. Paste the stencil and activate the heating. Contact can be determined by a characteristic hissing sound. Apply the mixture using a stencil. This method eliminates the need to wait a day. You can operate the car immediately after the manipulations.
- Soldering of the broken area is carried out using zinc chloride. Give preference to solder with a minimum tin content - POSS-4-6 or POS-18. A copper or silver core is suitable for repairing a large section of tape.
- The shavings can be used in combination with glue, which replaces the paint mentioned in the first method. A suitable option would be BF-2.
The procedure for repairing a faulty OZS system
Having determined the reason why the rear window heating does not work, you can begin to repair this system.
- If the fuses or relays of the OSZ system are faulty, then the faulty parts must be removed. Replacing them with new, functional ones is not difficult. The main thing is that they are installed as indicated by the on-board electrical system diagram.
- In the case where the culprit of the damage in the OZS system is the terminal connection, restoring the heated rear window is also not difficult. It is enough to clean the contacts in the terminals. The terminal box may need to be replaced, but this will not take much time either.
- If the glue that was used to attach the contact on the rear window turned out to be of poor quality and peeling occurred, then in this case you need to buy a new high-quality conductive glue. Remove the layer of old glue from the peeled contact using a napkin with an alcohol solution. Then apply a layer of new connector and glue the contact in place.
- If a wire is torn off on one of the buses, it is necessary to solder this wire to the old place using the connection diagram. The procedure is as follows:
- remove the remnants of old solder from the wire, stripping the end; in addition, you need to clean the connection point on the bus;
- Using a brush, apply rosin paste as a flux to the cleaned surfaces of the bus and wire;
- Apply solder containing three percent silver to the cleaned and rosin-coated wire core;
- solder the wire to the bus, while avoiding overheating of the surfaces.
- The greatest care when repairing the heated rear window with your own hands is required if a break is detected in the conductive threads of the heating element of the OZS. To make this work easier, special repair kits for this system are available. To correct the damage, perform the following steps:
- in the area of the rupture, clean an area six millimeters long in each direction from the damage site;
- wipe the cleaned area with a napkin or cloth soaked in alcohol or an alcohol solution;
- On both sides of the damaged thread, stick thin strips of repair adhesive tape or ordinary construction tape, if there is no repair kit. Avoid sticking adhesive tape onto nearby threads to avoid damaging them;
- if you have a repair kit, mix the hardener with a silver-colored composition, which, after application, will act as a conductive thread. After mixing, apply this composition with a stick or brush to the damaged area, closing the circuit.
- if there is no repair kit, then the role of a special mixture will be played by glue, which conducts electricity well; it can be applied with a brush, being careful;
- after repairing the damage, you need to give time for the glue or special mixture to harden; you can use a hairdryer to speed up this process;
- after the conductive strip has dried, you must carefully remove the self-adhesive tape; to do this, it is best to cut it with a knife at the junction of the thread being repaired, so as not to damage it when removing the tape;
- After the work has been completed, you need to check the functionality of the OZS by starting the car engine and pressing the OZS power button.
See also video on the topic:
| Heated rear window is useful not only in winter, when you can’t see anything on the glass due to ice and snow, but also in summer, when it rains and the glass fogs up. The malfunction of this option causes a number of inconveniences and makes the train less safe, because visibility is significantly reduced. Let's look at the reasons why the heated rear window of a car does not work. |
Repairing the heated rear window - how and with what?
- There are many options for repairing threads, one of which is a repair kit for rear window heating threads. This category is represented on the market by: Permatex and Quick. Such repair kits allow you to effectively restore large areas of ruptures, up to ten centimeters. The kit consists of stencils, a can of polymer resin, and the heating filaments themselves. The repair proceeds as follows: we find the damaged area, prepare the required piece of thread, remove the protective film and glue the thread to the area using polymer resin. When everything is dry, the procedure can be repeated. After 1-2 days, turn on the heating and check the result.
- The second way to fix heated rear window threads is to use conductive paste, such as Kontaktol. A special paste or glue that is capable of conducting current is applied in a thin, neat layer to the damaged area. For more precise application of the paste, the work area can be covered with tape. The paste takes about a day to dry, but if you have effective heat sources such as a hair dryer or a special heater, the drying time can be significantly reduced.
- There are also alternative “homemade” methods for repairing the heated rear window. So, some people use paint to which they add copper-brass shavings. The paint is matched to the color of the threads, and the shavings are obtained by planing the material. You can use glue instead of paint. Alternatively, you can try to connect the break points using a soldering iron. I would like to note that in this case there will be a result, but it will not look entirely aesthetically pleasing.
I will end here. I hope now you know what rear window heating is, how to find its fault, and how to repair heated glass in different ways. That's all I have, thank you for reading to the end. I would be grateful if you share this article on social networks, this will help us in the development of this project. In addition, more people will know about our existence. Also, don’t forget to leave your comments and add your own tips to this article. All the best and see you again at VAZ Repair.
vote
Article rating
How to repair the conductive layer? Method No. 1
You can do this yourself. To do this, you do not need to dismantle the glass. All you need is to purchase a special conductive paste (available in auto stores or on the market) and apply it to the damaged area. It is important to prepare it carefully. To do this, carefully clean the varnish from the surface and degrease the area with alcohol (use a piece of soft rag). Next, we clean the ends of the damaged threads. We apply adhesive tape or electrical tape to its upper and lower parts so that there is a small gap (no wider than the thread itself). We apply a special adhesive into it. After a day, the composition will completely dry out. Next, you can remove the remaining tape and check the system for functionality. If the heating works only partially, it means that the break occurred in several places. Find the second place where the thread is damaged and treat it with a conductive compound using a similar principle. That's all. We will also consider the old-fashioned method of repairing threads.