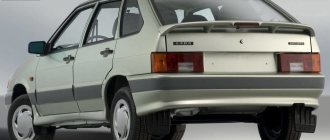
Lada Largus is largely copied from models of the French brand Renault. And this applies not only to components and assemblies, but also to the standard radio. For example, the Renault Duster, Sandero, Logan models have exactly the same audio system head units. There is nothing surprising in this, because the assembly of these cars is completely organized in Russia. On Largus, the standard radio can only be seen in the “luxury” or “standard” configuration.
Return to contents
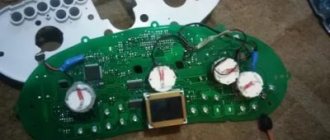
Head unit in Lada Largus
Many people spend a lot of time in their car. This is especially true for residents of megacities, because in order to get to work and back, they often have to sit in traffic jams. The Lada Largus car is equipped with a modern audio system that allows you to brighten up your time on the road. Let's take a closer look at what capabilities the standard radio in Largus has. The radio installed in the car comes with a user manual, so it won’t be difficult to figure out how and what works. Schematically, the instructions indicate two devices: a double-din version and a standard one. The difference between them is mainly in the form of buttons and the inscriptions on them. Four speakers allow you to reproduce clear and high-quality sound.
The radio provides good sound through four speakers
The most useful and necessary characteristic of the radio is the ability to connect it via a wireless Bluetooth connection to a mobile phone. This is not only convenient and comfortable, but also safe, because now you can talk on the phone without using your hands. And the quality of such communication is quite decent, the interlocutor hears perfectly, and there is no need to shout.
This is interesting: Removing and installing the Kalina trunk lid lock
Replacement of standard radio and speakers
| Author: BFGlargus Published: 2402 days ago (December 20, 2014) Logbook: BFGlargus Category: Uncategorized Edited: 1 time - December 20, 2014 | +1↑ Votes: 3 |
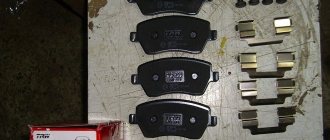
I decided that it was time to change the standard music to something more serious. A set was purchased
The image has been reduced. Click to see original.
The image has been reduced. Click to see original.
Alloy wheels R 16 for the summer →
Create your own logbook, and you will be able to share with forum members your opinion about Largus, useful developments, installed additional information. equipment and tuning, trips and travel! To create a logbook, you must register on the site.
Tags: radio, speakers
Popular in in-flight magazines
DRL Traveling on Largus Fuel consumption Armrest Mileage Discs Radio To1 First impressions Buying Largus Electrics Covers for Largus Bumper net Modifications HBO Speakers Rear view camera Wipers Interior lighting Brake light Tuning Tires and wheels Check valve Tuning lights Noise insulation Winter tires Rugs Largus DVR Rki-19 Winter operation Roof box PTF Tail lights Izhevsk Car audio Injectors Mudguards Washer reservoir Hood stops Low beam lamp Installing a cabin filter Parking sensors Thresholds Lada Largus LED Carpet covers Floating idle speed Trunk lighting Tinting Trunk shelf Trip to the sea Hood seal Accident Owner's review Fender liners Walkie Talkie Additional Socket Eyeglass case Replacement 5th gear
Comments (19)
| BFGlargus December 20, 2014 at 12:14 pm 0 | |
|
| megaelektrik December 20, 2014 at 03:47 pm 0 | |
|
| BFGlargus December 20, 2014 at 5:24 pm 0 | |
|
| 036 December 20, 2014 at 04:35 pm 0 | |
|
| BFGlargus December 20, 2014 at 5:27 pm 0 | |
|
| 036 December 20, 2014 at 5:52 pm 0 | |
|
| Kabanchik December 20, 2014 at 08:30 pm 0 | |
|
| Zuf December 20, 2014 at 11:58 pm 0 | |
|
| BFGlargus December 22, 2014 at 6:10 pm 0 | |
|
| BFGlargus December 22, 2014 at 6:06 pm 0 | |
|
| gerc December 24, 2014 at 11:22 pm 0 | |
|
| BFGlargus December 25, 2014 at 08:34 pm 0 | |
|
| busik950 December 25, 2014 at 00:46 0 | |
|
| BFGlargus December 25, 2014 at 08:32 pm 0 | |
|
| DonKihot December 25, 2014 at 07:45 0 | |
|
| BFGlargus December 25, 2014 at 08:35 pm 0 | |
|
| DonKihot December 26, 2014 at 07:09 0 | |
|
| BFGlargus December 26, 2014 at 10:59 am 0 | |
| gerc December 26, 2014 at 08:53 0 | |
|
| Add a comment | RSS comments feed |
Additional comments:
Instructions
According to the diagram in the instructions, two versions of the radio are indicated:
- double din (2 din);
- standard.
There is nothing complicated about the first category, it’s just the name that is incomprehensible. These two versions differ only in different buttons and what is written on them. The most useful and practical feature is the ability to pair with some wireless devices via Bluetooth, such as connecting to a mobile phone. In this case, the standard radio on the Lada Largus will provide you with the opportunity to talk on the phone even without using your hands, thereby not violating traffic rules. If you think that you will have to talk very loudly or shout so that the interlocutor can hear clearly, then nothing like that. A normal tone of voice will be sufficient.
Device characteristics
It can't be called complicated. In addition, the instructions and user manual supplied with the system will help you understand the structure, functionality and characteristics of the device. Structurally, a car can be equipped with either a conventional 1 Din or 2 Din radio. The differences between them are minimal and lie in the location of the buttons and inscriptions.
To reproduce high-quality sound, the audio system provides four speakers:
- two in front;
- two at the back.
One of the main features and at the same time advantages of this device is the ability to connect to a smartphone via Bluetooth wireless channel. In addition to comfort and convenience, this function provides passive safety, since the Hands free system allows you to talk on the phone while driving without using your hands. The quality of communication is decent, communication with the interlocutor is not associated with difficulties, the driver does not need to raise his voice, and passengers hear him well.
The standard radio on Largus does not have much functionality and advanced capabilities, for some this is quite enough, but for others the characteristics of the radio are not enough. In terms of appearance, the device blends harmoniously with the standard car interior. All buttons and other controls are easy to use, and the inscriptions are easy to read and intuitive. The device is tightly fixed in the seat, there is no play or other defects.
Return to contents
Capabilities of standard audio device
Music in the car can be played both through removable media and via the Bluetooth wireless communication channel. At the same time, the genre of music does not matter, the sound quality remains at the proper level. To listen to radio stations, a standard antenna is provided, which can pick up even a weak and unstable signal. If necessary, you can save up to 6 radio stations in the device’s memory for quick playback, in each of the available bands.
In addition to the Bluetooth channel, you can listen to music via SD, USB media or CD, MP3 discs.
The radio supports most popular formats, for example:
- MP3;
- WAV;
- WMA;
- AAC and some others.
Via the Bluetooth channel, you can control playback, i.e. pause the song or rewind to the desired segment. For convenience, it is possible to display the artist of the song and its title on the monochrome display. The radio can also recognize Russian fonts.
There are several connectors for connecting removable devices:
- Jack;
- USB;
- Bluetooth.
The unit is also equipped with several inputs for playing sound through third-party gadgets. The panel of the standard head unit is not removable, but this is no longer considered a disadvantage, since most car owners store the removable panel directly in the car rather than carry it with them. The purpose of each button, which is quite small, usually does not cause any difficulties. It would be much more informative to consider here other hidden features that are not mentioned in the detailed user instructions.
Return to contents
“Secret” menu of the Lada Largus radio
To go to the section with individual settings, use the SET button located on the front of the radio panel. Not every car owner knows that this button has hidden capabilities. Just press this key and hold for 6–7 seconds. The device will go to the engineering menu, where a number of special settings become available. The instructions included with the standard radio contain no information about such a tab.
The “secret” menu opens three sections (“Diagnostics”, “Configuration”, “Radio Monitor”). On the right is a rotating knob, which allows you to navigate up or down between these sections. To select the desired one, press the handle. To go to the previous level, press the “Back” key, which is located to the left of the rotary knob.
In the “Radio Monitor” section you can see the current frequency at which the received signal is located and some other data. In the “Diagnostics” section there is an additional subsection with the items “Autotest”, “Monitor” and “Errors”. The “Errors” block was created to inform the driver about existing problems in the BC (on-board computer). If there are no problems, the display will be blank. The “Autotest” item contains information about the current state of the equipment (OK on the screen means “functional equipment”).
The best option would look like this
| Inscriptions | What does it mean |
| FM, Am ant OK | The radio module is working properly. |
| Microphone OK | The microphone is working. |
| VT-Module OK | Bluetooth works fine. |
| CD OK | The disc player operates normally. |
| Fascia Button OK | The keys work properly. |
| Power IC OK | The on/off button works. |
The “Monitor” item provides information about the vehicle’s operating parameters. Simply put, the radio display displays information from the electronic control unit. In this menu, you can find out about the status of the current network, the functionality of the car’s backlight (to check the mode, just turn on or off the side lights - accordingly, the information about the backlight will change properly).
It also displays data on battery charging and its current voltage, whether a removable device is connected or not, data on the correct decrease or, conversely, increase in volume when the vehicle speed changes (only if the wire required for this is connected to the appropriate connector).
In general, the engineering hidden menu on the Lada Largus radio was a good addition to the standard functionality. It won’t be difficult to figure out what’s here and how.
As for the electrical circuit and connection method, including pinout, this information can be clearly seen in the user manual or in the photo.
Return to contents
How to unlock (decode) the radio on a Lada Largus if you lose your password
- How to find Pre-code
- Entering the code
- Other unlock options
The standard head unit used on the Lada Largus has a security code that must be entered after the battery is disconnected or the fuse in the power circuit fails. The password is printed on a separate insert in the service book, which is given along with the car upon purchase. If documentation is lost or the head audio unit is replaced with an analogue one, the owner needs to know how to unlock the radio on the Lada Largus.
How to find Pre-code
Largus cars use a head acoustic device, unified with Renault-Nissan products. To protect the radio from theft, there is coding that does not allow access to the device's functions without first entering a 4-digit number. The prerequisites for the appearance of a text message like “Radio Code 0000” on the screen are as follows: a terminal has been removed from the positive or negative terminals of the battery to install additional equipment, repair electrical circuits, or install a new battery.
Another reason for enabling encoding is poor contact in the power supply plug, which is connected to the rear wall of the head unit. In this case, the radio operates for a few minutes and then turns off. When you turn it on again, you will be prompted to enter a password.
The code required to unlock the radio can be calculated using a special calculator. It requires entering a 4-digit alphanumeric code printed on a paper label that is pasted on the top cover of the head unit.
Access to the plate requires removal of the equipment.
To dismantle the radio from Largus (and how to find out the code), you need to:
- Prepare a special removable device, unified for Renault radio tape recorders. The equipment has a factory code 7711381821 and is purchased through official dealers or spare parts stores. To reduce costs, ballpoint pen refills or metal rods of suitable diameter with rounded tips are used.
- Insert pullers into the 4 holes located in the corners of the radio. Press down on the elements to release the clamps; it is possible to remove the spring clips alternately from the left and right.
- Carefully pry off the bottom of the front panel using a plastic spatula or an old bank card.
- Pull the head unit completely out of the mounting shaft. Disconnect the power plugs and check their condition (in case of periodic spontaneous shutdowns).
- The pre-code is a part of the barcode that is applied to the square label with the Renault markings. You need to write down the last 4 characters, which include 1 letter and 3 numbers, on a piece of paper.
- Install the removed elements in their original places. The radio is mounted without distortions until all latches are activated.
- Enter the code value into the online calculator, which generates a code to unlock the head unit.
Entering the code
To decode the car radio on Lada Largus, you need:
- Press the button with icon 1 located on the front panel to turn on the equipment. The display will show the text message Code, next to which there is a field like 0000 for entering a number. The first register of the code range must operate in flashing mode.
- To enter the first number, you need to successively press key 1; the number of short actions corresponds to the value of the number. Input using a standard joystick is allowed.
- To proceed to entering the second digit, you need to press the button marked 2, and the corresponding field on the head unit screen will begin to flash.
- Enter the value of the number by analogy.
- Program register 3 and proceed to entering the last character.
- Press button 4 on the panel until the last digit of the password is displayed.
- After entering, press and hold button 6 until the head unit controller reads the password and writes it into memory. Once the lock is unlocked, a short confirmation beep will sound.
- Check the functionality of the device.
If an error was made when entering a number, a message like Code Error will be displayed on the screen. To try again, you need to wait 2 minutes; each subsequent error increases the pause by 2 times.
The principle of operation of the radio
You can't please all people. Some people like the original standard audio system that comes with a new car, while others want a more advanced option. So what is it like - the original Lada Largus radio? The appearance harmonizes very well with the interior design. Convenient control buttons help you quickly figure out what to press or scroll where. The radio tape recorder fits into its proper place tightly and without unnecessary play. The sound is also good, music for every taste sounds excellent and clear. The radio picks up the signal well, even if the reception is so-so.
You can play music from discs or via the Bluetooth connection of your smartphone. It should be noted that the quality does not suffer. Yes, and tuned radio stations can be recorded so that they do not disappear. In addition to disks, you can also use a USB connector, to which you can easily connect a flash drive and play music from it. The device reads basic formats perfectly.
You can rewind and pause even in the middle of a song without having to start over every time. The display shows information about connected devices if a song is playing, that is, the title and artist. In general, connecting devices and operating them is a simple task.
If necessary, you can connect to it, in addition to the above, also headphones via the Jack connector. Some people don’t really like that the outer panel is non-removable, like the previous options. But to think that this is not a problem at all, because if someone wants to steal it, then the absence of an external socket is unlikely to stop the attacker. And he didn’t come for her, but for the radio.
So, the Lada Largus factory head unit has a good set of functions. As soon as the thought arises that something is missing, you need to take the instructions and read them carefully. It is possible that we simply do not know about some possibilities.
This is interesting: Lamps used in the Lada Largus car
How to Unlock Radio in Largus
Renault car radio unlock code generator
The code generator is suitable for any standard Renault and Lada Largus car radio.
If you don't know the unlock code for your Renault head unit as well as Lada Largus, get the PRODUCTS:
Access to Renault Radio Code Generator is available immediately after registration. Don't be afraid. It's free!
After receiving the code. how to connect and configure the radio (gu). duration: scooter license / traffic police for me. Lada Largus radio code: how to unlock and how. As a thank you, you can transfer any amount through the Yandex form (above) to support the site.
May your karma be a plus!
When you register, a radio code calculator window will appear at the top.
You can access the site with any social login. The network is normal and absolutely free.
You can also order Renault VIN decoding on our website and purchase a discount card to save on the purchase of spare parts or services from Exist, Emex, Autodoc and others.
If the radio with the previous code is not "notified", you must remove the radio and find the previous code on the sticker:
Description of the radio removal process below
Previous code:
In this case V248
Correct code entry for Renault, Largus.
Our contacts: Online radio decoding: release of complete tape blocking and binding to.
Head unit "Rozobokovaniye" Renault
Code generator links How to find the radio
Renault car.
In this case D833
In this case H635
Example Renault Trafic, the first letter of the code is O (we remember the previous radio code. 1 letter 3 numbers)
Example Renault Logan 2:
Previous code: T657
BMC MEDIA
if you are a radio
Media Nav (touch buttons), then carefully remove the desired channel and you will see the barcode without removing the radio. > To select the radio, connect the radio to the radio on the scooter. The photo below is an example of the previous V589 code.
What to do if PRE-CODE cannot be found?
There are times when the main block contains a set of barcodes and a set of numbers, but the required composition (1 letter, 3 numbers) is nowhere to be found.
To do this, try using Android and Ayos barcode scanner.
Read all the barcodes in order and look for the results obtained by searching on the Internet, in the data obtained you can find the combination that suits us. PRE-CODE.
How to enter Renault radio code?
Renault car radio personnel code
contains 4 numbers.
If the radio lights up error, don't worry, you haven't broken it. Pressing buttons 1 and 6 will return the screen to code entry again.
To enter, you need to dial it using a standard joystick or radio switch, after entering, press and hold the “6” button.
1. How to unlock the main block 8 chord hello. Tell me how to unlock the radio on Lada Largus after such an incident as. I took out the battery, after reinstalling the radio did not turn on, I started typing. Press button 1 on the panel one by one until the desired value for the first code number appears. 2. How to connect the radio correctly, how to connect it to which scooter. Press button 2, the second digit will flash. 3. To find the previous code on the standard, first remove the radio in Largus to view the previous one. Unlock the radio on a Nissan, instructions for. Press button 2 on the panel one by one until the required value for code number 2 appears. 4. Tell us how to delete custom radio in Fiat Linea Fiat Doblo Panorama 2007. Press button 3 and the third digit will flash. 5. Press button 3 on the panel one at a time until the desired value for the third code appears. 6. Press button 4; the fourth digit will flash. 7. This article explains how to connect a radio on a motorcycle as a scooter. Press button 4 on the panel one by one until the desired value for the fourth code number appears.
When the hidden code is completely displayed, to store it in the radio's memory, press and hold button 6 on the panel until the confirmation sound.
See also:
- Renault VIN Checking and Decoding
- Discounts on Renault-Drive cards on emex.ru, exists.ru and much more.
- Knowledge base and repair tips
DISCUSS OR QUESTIONS FOR THE FORUM
Your gratitude is welcome!
Don't forget to share the code generator link with your friends on social networks,
just click one of the buttons and share:
Functions of the standard Largus audio radio
The audio device that is present in the Lada Largus allows the owner to acquire such useful options as:
- search and memorize radio stations broadcasting in the traditional FM or AM bands;
- the ability to display the names of tuned stations with a convenient “RDS” function;
- playback of audio programs recorded in the following formats: “MP3” and “WMA”, as well as “AAC” and “WAV”;
- connecting external sources to the head unit for the purpose of subsequent playback of information programs through standard speakers (for this, the radio has “USB” and “Jack” connectors, as well as a “Bluetooth” option;
- switching with the “Hands Free” wireless kit, which allows telephone communication with subscribers while driving.
Useful tips
Instead of a 1 DIN device, you can install 2 DIN on the Lada Largus. To accommodate it, you need to update the front trim on the dashboard. It is impossible to improve the original one. It won't look neat. In the panel, remove the jumpers located near the connector for the radio and climate control controls.
The front panel with a wide window will require some work. You need to install control keys for additional equipment. They are borrowed from Renault Logan. Elements from Largus cannot be placed. Initially, the panel was designed for oval buttons.
The original wiring has colored insulation. It is not ISO compliant, which means you will need to match the functionality of the items on the machine and on the device.
How to connect a radio
Connecting the head unit depends on the vehicle modification. When installing the radio, you need to firmly snap the ISO plugs in place, and then reinstall the antenna connector.
If the product is equipped with a wired remote control, it is located on the steering column or the front of the instrument panel. The wire is laid inside the panel along the standard lines of the electrical harnesses.
With 2 speakers
The 2-speaker circuit is used only on cargo vans; the loudspeakers are located in the doors under the plastic panels.
The radio is ready for use immediately after connecting to the standard connectors. The car owner can install additional speakers in the cabin by laying separate speaker wires to them.
With 4 speakers
On passenger versions, 4 speakers are used, which improves the sound quality in the cabin. The wiring has a separate harness leading to the speakers in the rear doors.
The connection does not require any additional modifications to the vehicle wiring.
No speakers
The layout without speakers is found on the basic configuration. The car has connectors for connecting the radio and front speakers, as well as an antenna output. After switching the radio, you need to disassemble the door trims, which will allow you to mount the speakers in their standard places.
Loudspeakers are attached to factory mounting points, and wooden adapter rings may be used. After installing the elements, it is necessary to return the removed parts to their place.
Some car enthusiasts love their favorite car so much that they cannot live a day without it. And considering that many people live in huge cities, it takes a lot of time just to get to work and back. If you add traffic jams, you can spend almost half your life in a car. It’s good that at least the Lada Largus has modern acoustics at its disposal. This feature allows you to brighten up a little downtime in long lines, when your last nerves give out.
Head unit
But it also happens that we have a standard Lada Largus radio, but understanding all its functions is not an easy task.
Sound via bluetooth
A standard car radio in combination with dynamic speakers “reads” music programs equally well, “digesting” any genre without much difficulty. The manufacturer has addressed radio lovers with a powerful antenna device that allows them to pick up a signal of even minimal power. The radio allows you to memorize 6 stations in each frequency range.
Renault Sandero DIY repair
Renault Sandero wiper blades
Compare Renault Captur and Hyundai Creta
Listening to music is available via CD drives or flash devices. Also for the same purposes, switching using Bluetooth is possible.
Recognized formats:
- "CD" and "MP3";
- "AAC" and "WMA", as well as "WAV".
With a wireless connection, it is possible to rewind not only between music programs, but also directly within a track.
The display clearly displays the charge level indication (if “Bluetooth”), as well as the “RDS” line. There is a Russified font in “IDTag”.
Other methods of connecting to this device are the “Jack” and “USB” sockets.
Some owners are not satisfied with the lack of a removable decorative panel for the radio. We consider this point to be unimportant, since it is not able to protect against fraudsters.
Payment via Yandex Cashier
After selecting payment via Yandex, the Yandex Cashier payment system will launch, where you need to select a convenient payment method (bank card, QIWI, Yandex Money account, etc.)
After specifying payment details and confirming payment, payment for the goods will occur.
If you have a bank card in a currency other than the ruble, then the money will be debited from the card at the rate of the Central Bank of Russia at the time of the purchase.
This payment method is optimal for residents of Russia, Kazakhstan and Belarus.
Replacing car radio Lada Largus
Suddenly you decide to replace the device. Or maybe you just want to clean it, change the firmware, install a code, or repair a tired standard device. Another relevant question arises: how to remove the Lada Largus radio without any visible external latches, keys and locks? If you have seen the removal process on Renault cars, then you know that there are four holes along the perimeter of the front panel. This is where the tricky latch and the answer to the question of how to remove it are hidden.
You will need 4 short rods at once, something similar to metal knitting needles or wire 2-2.5 mm thick. You need to first insert our two pins into the left side, and then the remaining two into the right. By simultaneously pressing all four, you need to pry the plastic card from below, and the radio will come out of its grooves. Now you can do anything with it: change the firmware, program the code, repair, etc. You will especially need this procedure when you disconnected the battery terminals.
After this procedure, you need to enter the code again, and if you don’t know it or don’t remember where you put the documents, you will need information from the back panel. There we will find a barcode, the last four characters of which we will need in order to generate a new code for the Lada Largus radio. It is advisable not to forget it. Without the correct code, the radio will not even turn on.
Firmware for Lada Largus radio
It was already mentioned a little higher that sometimes the radio needs new firmware. Why is it needed - you tell me. It's simple, at the factory setting our standard Lada Largus radio sometimes displays fonts clumsily, especially Cyrillic. Otherwise, she writes everything humanly, but in some options there are only hieroglyphs. This is where you will need to install updated firmware. How to make it? At one's own risk. If something goes wrong, all you have to do is remove and throw away the non-working device. It’s better to find out everything right away and find out before installing the firmware.
If the radio is still under warranty, flashing the firmware will void the warranty. In this case, why not remove it and take it to a service center and do everything wisely, without the risk of losing even those functions that already work well. Self-installation will also require certain skills. First you need to find out everything, find and download the firmware onto a flash drive. The installation will take place with the radio in place by pressing certain keys. The procedure itself will last several minutes. If everything works out and the installation finishes correctly, you will know about it right away.
Lada Largus › Logbook › Installing a 2 Din radio on Android + joystick (setup, programs)
The article will be long, I even wanted to break it into several. Final result:
A long time ago (about 4 years ago) I was impressed by the GU on Android from Romario-163 here, but somehow I couldn’t get around to buying it, but the toad was choking me. And then I saw that Android radios now cost around 3 thousand for 7 inches, so I decided to order one. Moreover, on 4pda there is a topic here about this radio “Head unit ML-CK1018 and similar ones, based on the MT/AC8227L processor” Characteristics:
Radio connection diagram
Largus radio block diagram
Delivery took about a week (I ordered from the Russian Federation), delivered by courier. With delivery in the Russian Federation, it was possible to buy only with a universal connector, but I already had an ISO adapter - FR-12 and ISO-Ant1, the wires on the radio were all labeled, so connecting it was not difficult. By the way, the connector on the Android 2DIN radio is called Alpine, if anyone suddenly needs to buy an adapter at an auto parts store. I ordered a frame on Avito for 2,500 rubles (the Largus shop also has it, but the wait is long). Fits perfectly, I had to cut the panel a little.
Screwed it on with self-tapping screws.
I glued the GPS sensor on double-sided tape to the upper right windshield. I ran the wires along the rack. It picks up satellites well.
On the plus side, the screen is 7 inches, the play market works, I installed Yandex navigator, YouTube and other programs, installed a 128 GB flash drive, now I have a multimedia archive with cartoons and music in the car.
But the standard launcher on this radio is something like a cross between a Pavasonic and Abibas radio. Fortunately, there is a free, advertising-free Car Launcher (4pda.ru/forum/index.php?showtopic=672503) and similar ones. Setting up the radio - in the standard launcher you can change the default Navigator and player. In the settings, look for the “Developer Mode” item, password 8888
You can change the default navigator and player. There are still a bunch of settings. You can set the automatic download of some programs when you turn on the radio. I set the Navigator, the store and the DVR to turn on automatically.
Smart YouTube TV (YouTube without advertising) 4pda.ru/forum/index.php?showtopic=932360 (tried to install, it starts loading some libraries, that’s all. I haven’t solved the problem yet
You can change the boot logo and animation. I did it according to the instructions and it worked.
You drop the prepared archive with the animation onto a flash drive, select it in the menu, and your zip archive on it, refuse the preview in the pop-up window and that’s it, the animation is installed. When you reboot you will see it. The animation is copied to the system partition and remains there forever; it is not erased when resetting the settings. If, when you select an animation, the archive with it is not visible on the media, then rename it bootanimation.zip; other file names are not displayed in the file window. When making your own boot animations, adhere to the following recommendations: frame format for our GI is 1024x600, frame extension is jpg (must be jpg, otherwise you will get a bootlap!), be sure to pack it in a zip archive without compression.
There is an ILL wire in the radio, when +12 is applied to it from any blue wire from the button illumination (for example, central locking keys or power windows), the touch buttons on the radio are illuminated and you can dim (reduce brightness) the screen. Apparently, some kind of stray current arose on this wire. About 4 years ago I installed the DRL as a high beam at full intensity (Scandinavian light) on a PWM controller. Like this: or here he is. And I noticed this strange thing - when the DRLs are on, the screen flashes, i.e. Then it goes out, then it lights up in full force. Most likely there is some kind of stray current running on this wire. There were thoughts of putting diodes on all the wires from the DRL controller, but I decided to start by putting a 20 kOhm resistor in the ILL gap. And it helped
While I was still trying to figure out the resistor, I found the Dimmer program (play.google.com/store/app…id=giraffine.dimmer&hl=ru). The advantage is that it is free, without advertising. When you click on the shortcut, it decreases the brightness. Can be set by time. I blanked the screen from 17:00 to 7:00 and I was happy. But with the ILL wire it’s somehow more correct, it seems to me.
Operation has shown that a touch screen in a car is evil. The knobs and buttons of the old radio are much more convenient. I even thought that this is not what I need this Android for. But fortunately, during disassembly, I came across a radio joystick from Duster for 500 rubles. The radio has key1 and key2 connectors. The wise man SOVA at the Duster Club (www.dusterclubs.ru/vb/sho…thread.php?t=7564&page=52) makes adapters for Arduno, and there I noticed that
I also immediately looked at Drive2 from Igoritt. I didn’t want to cut the wires on the joystick, in case nothing would work out, but on the adapters from Sova I saw that it uses wires from Arduno. I bought a pack for 50 rubles. They are called "Dupont dad-dad for Arduno." Or something like that.
And voila, the joystick worked. I just had to teach the radio. I did this - the top buttons are “forward” and “back”. Volume up/down and Mute/Hang up left unchanged. The bottom button is programmed as “Back”. It’s convenient that you just need to press it a couple of times and you can go to the central screen from any application. The simultaneous volume clamp was set not to “Mute”, but to “Blackout screen”. Now, when leaving, I turn on “Shut Up” first, then turn off the screen. There is training in the radio settings
The disadvantage of connecting the joystick this way is that the encoder (song switching wheel) does not work. If you really want to switch tracks with a wheel, then you can buy at DusterClub from SOVA a normal adapter for Arduno like here: or here: (but the price is stinging - 1500 rubles) or you can make it yourself, in principle, except for hands from shoulders, no other special equipment is required. Full instructions here: www.drive2.ru/l/6899697/. For now I ordered an Arduino Nano 3 on Ali for 150 rubles, until it arrives I’m just ready to redo it.
How to remove the Lada Largus standard radio and enter the code
- Files
- Engine
When removing the battery or for other reasons, the Lada Largus head unit requires entering a 4-digit code.
The code is usually written in the service book, but anything can happen - they lost the book, changed the radio, etc.
The radio code can be restored using our Renault and Lada Largus standard radio code generator
To do this, we need to find out the so-called PRE-CODE , which is contained in the information on the radio itself; to find it out, we remove the radio.
How to remove the standard radio of Lada Largus
The standard radio on the Lada Largus is removed in the same way as removing the standard radio on many Renault models, for example: Megane
For removal there is an original tool from Renault, code - 7711381821
But there is no need to buy it; 4 or even 2 regular ballpoint pen refills are suitable for removal.
Other unlock options
Another way to remove the blockage is to contact an authorized dealer. Specialists transmit the vehicle's VIN number to the manufacturer and receive the code for the installed radio. The method does not work if the head unit was replaced with a similar one under warranty or by the owner himself. In most cases, the official will remove the radio and read the information on the label. The code number is then determined by the calculator.
On early releases of Largus there was a radio tape recorder that broadcasts a preliminary code to the display. To display the value, you need to simultaneously press and hold keys 1 and 6 for 5-6 seconds. A text explanation and a 4-digit code will be displayed on the screen, which must be entered into the calculator using the method described above. But such equipment is rare. There are no other methods for decoding the Largus radio. Reflashing the software does not remove the hardware from the code.
Update process
Now you can connect the media to the radio in your car.
- Before starting the procedure, be sure to turn on the ignition. Otherwise, the radio will automatically turn off and the firmware process will be interrupted, which may lead to device failure.
- When reading information on the media, the radio will determine that the contents on the drive are material for flashing. After analyzing the information, the device will offer to update the software. You should select "Yes" to refuse to click "No".
- Confirm the information by clicking the “OK” button.
Payment via Portmone
After selecting payment through Portmone, the payment system will launch, where you need to select the payment method: bank card or Portmone account.
The price in the Portmone payment system is converted into dollars at the exchange rate of the Central Bank of the country where you are located.
If you have a bank card in a currency other than the dollar, then the money will be debited from the card at the rate of the Central Bank of your country at the time of the purchase.
After specifying payment details and confirming payment, payment for the goods will occur.
Radio malfunctions and methods for diagnosing them
As you know, the Lada Largus is equipped with an audio system with a set of speakers already from the factory (depending on the configuration). The amplifiers are located in the front and rear door panels. To connect non-original speakers, several wiring harnesses are provided (including for increasing power using an amplifier when connecting a subwoofer).
A standard car radio sometimes brings not only the pleasure of listening to music, but also some problems. The device may not work or function incorrectly for various reasons. In general, the list of faults includes only those that an ordinary driver (without special knowledge of electrical engineering) can fix with his own hands, without the need to contact a specialized center.
When it comes to repairs, it can often be cheaper to replace the device. Especially considering the availability of alternative options in different price categories and with different capabilities. At a cost of no more than 6,000 rubles, repairs can cost half this amount.
How to enter the Renault radio code?
If, after entering an incorrect code, the radio displays the “ERROR” message, then pressing buttons 1 and 6 again will return the screen to its original position for entering the code.
To enter, you need to dial it using the radio joystick or keys. After entering, press and hold the “6” button.
- Consistently press the “1” button on the panel until the required value for the first digit of the code appears.
- Press the “2” button, the second digit will start flashing.
- Consistently press the “2” button until the desired code digit...
When the secret code is completely entered, in order to save it in the radio’s memory, hold down button 6 on the panel until a characteristic sound signal sounds.
The Lada Largus model is a joint brainchild of the designers AvtoVAZ and Renault-Nissan. Its design is based on the popular universal public car Dacia Logan MCV. When creating this car, the main focus was on the category of practical and family car enthusiasts, because the set of technical and operational features of the model fully correspond to its image.
The basic version of the equipment of the Lada Largus implies the presence of a standard radio, which the Korean company Daewoo kindly shared with Tolyatti residents. However, sometimes the firmware of the radio is required. In addition to the head unit, the developers addressed 4 loudspeakers located around the perimeter of the interior space, or rather in the door panels. Owners notice that this device fits harmoniously into the interior and has quite simple and convenient functionality. All controls and buttons are intuitive and do not cause “stupor” even for “wild” drivers. The high-quality fit of all components of the audio complex is also noted, since during operation it was not possible to find any backlashes or squeaks in the buttons.
Payment via PayPal
After selecting payment via PayPal, the PayPal payment system will launch, where you need to select the payment method: bank card or PayPal account.
If you already have a PayPal account, then you need to log into it and make a payment.
If you do not have a PayPal account and you want to pay using a bank card via PayPal, you need to click on the “Create an Account” button - shown with an arrow in the picture.
PayPal will then prompt you to select your country and provide your credit card information.
After specifying the information required to make the payment, you must click on the “Pay Now” button.
Payment via WebMoney
After selecting payment via WebMoney, the payment system will launch, where you need to select the payment method: bank card or WebMoney wallet.
If you already have a WebMoney wallet, then you need to log into it and make a payment.
If you do not have a WebMoney wallet and you want to pay in another way, you need to select any of the methods that WebMoney offers and make the payment
After specifying payment details and confirming payment, payment for the goods will occur.
Downloading a book
After successfully completing the payment (by any method) and returning to the KrutilVertel store from the payment system website, you will be taken to the successful payment page:
On this page you need to indicate your e-mail, where access to download the book will be sent.
If you are already registered on our website, then simply follow the link to your personal account.
The book you purchased will be in your personal account, from where you can always download it.
Please note that after making the payment, you need to return back from the payment system website to the KrutilVertel website.
If for some reason you did not return back to the site and closed the payment system tab with a message about the successful completion of the payment, please let us know - we will send you a letter indicating access to download the book.