We will show you how to correctly and quickly replace the front brake pads on VAZ 2114, VAZ 2115, VAZ 2113 cars in the field.
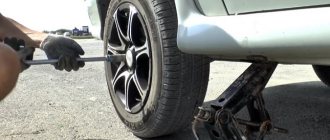
We tear off the wheel bolts, lift one side of the car on a jack, unscrew the bolts and remove the wheel.
We put wheel chocks under the rear wheels; if they are missing, ordinary bricks will do. So that the old pads can be easily pulled out, you need to use a strong screwdriver or other suitable object to loosen them, pressing the cylinder:
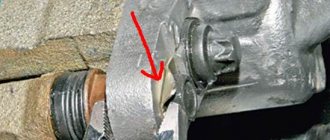
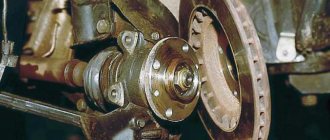
We bend the washer, loosen the lower bolt a little, unscrew the upper one completely, using a 13mm wrench:
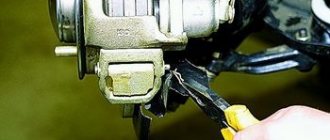
We move the caliper a little to the side and take out the old brake pads. We thoroughly clean the seats from accumulated dirt, shavings, etc. For these purposes, we used a screwdriver and sandpaper, but a metal brush works best:
We check the operation of the guides; they should move smoothly. In any case, every time you replace the pads, it is better to take them out, clean them and re-lubricate them; this will not take much time and effort, but you will be confident in their operation. Do not use lithol as a lubricant; you need a special high-temperature lubricant for calipers and guides; some manufacturers put a small bag along with a set of new pads.
It is convenient to tighten the boots with a screwdriver, at the same time check their integrity so that there are no even small holes, change them if necessary, they cost a penny. Now we need to completely press the brake cylinder inward, we do everything in the field with our own hands, so we use a wheel wrench for this purpose, but it is much more convenient to do this with a regular clamp.
We put the new pads in place and lower the caliper. We assemble in reverse order. I recommend lubricating the threads of the bolts with copper grease so that they do not stick during operation and can always be easily unscrewed.
Before you start driving, press the brake pedal all the way down several times.
Video of replacing front brake pads in VAZ 2115, VAZ 2114, VAZ 2113:
Backup video on how to replace front brake pads in VAZ 2115, 2114, 2113:
When is it necessary to change front brake pads? There is no exact number of kilometers traveled for the pads; a lot depends on the manufacturer, the driver’s driving style, the general condition of the brake system, etc. The most important rule that must be followed is that the thickness of the lining should not be less than 1.5 mm. If you drive on worn linings, in addition to increasing the risk of getting into an accident, your caliper may also jam, and replacing it is expensive and time-consuming.
Every car has a spare part that is most susceptible to wear; in the VAZ 2114, these are brake pads. Any signs that they are worn out should not be ignored, as they are a component of the braking system that is responsible for the safe movement of the vehicle.
It is important to know that if in a VAZ 2114 the car’s braking system is configured correctly, then the pads wear out evenly and they need to be changed on average after 10-12 thousand kilometers.
Reasons for replacing pads
- Their thickness is below acceptable.
- The presence of cracks, chips of various origins, and tubercles on them.
- Visible wear of the disk, there is its deformation, misalignment (when replacing disks, the linings are also changed at the same time).
This process, as you know, consists of two operations: the front pads are replaced separately and the rear pads are replaced separately. There are some differences here. Of course, the driver can do the work himself, but some skill in mechanical car repairs and a trivial set of automotive tools will be required.
VAZ 2114, 2115, 2113 replacement of front brake pads. Video and photo instructions
We will show you how to correctly and quickly replace the front brake pads on VAZ 2114, VAZ 2115, VAZ 2113 cars in the field.
We tear off the wheel bolts, lift one side of the car on a jack, unscrew the bolts and remove the wheel.
We put wheel chocks under the rear wheels; if they are missing, ordinary bricks will do. So that the old pads can be easily pulled out, you need to use a strong screwdriver or other suitable object to loosen them, pressing the cylinder:
We bend the washer, loosen the lower bolt a little, unscrew the upper one completely, using a 13mm wrench:
We move the caliper a little to the side and take out the old brake pads. We thoroughly clean the seats from accumulated dirt, shavings, etc. For these purposes, we used a screwdriver and sandpaper, but a metal brush works best:
We check the operation of the guides; they should move smoothly. In any case, every time you replace the pads, it is better to take them out, clean them and re-lubricate them; this will not take much time and effort, but you will be confident in their operation. Do not use lithol as a lubricant; you need a special high-temperature lubricant for calipers and guides; some manufacturers put a small bag along with a set of new pads.
It is convenient to tighten the boots with a screwdriver, at the same time check their integrity so that there are no even small holes, change them if necessary, they cost a penny. Now we need to completely press the brake cylinder inward, we do everything in the field with our own hands, so we use a wheel wrench for this purpose, but it is much more convenient to do this with a regular clamp.
We put the new pads in place and lower the caliper. We assemble in reverse order. I recommend lubricating the threads of the bolts with copper grease so that they do not stick during operation and can always be easily unscrewed.
Before you start driving, press the brake pedal all the way down several times.
Video of replacing front brake pads in VAZ 2115, VAZ 2114, VAZ 2113:
Backup video on how to replace front brake pads in VAZ 2115, 2114, 2113:
When is it necessary to change front brake pads? There is no exact number of kilometers traveled for the pads; a lot depends on the manufacturer, the driver’s driving style, the general condition of the brake system, etc. The most important rule that must be followed is that the thickness of the lining should not be less than 1.5 mm. If you drive on worn linings, in addition to increasing the risk of getting into an accident, your caliper may also jam, and replacing it is expensive and time-consuming.
Instructions for replacing front pads
The first thing to do is to secure the rear wheels in the car with special stops. Using a jack, you need to lift the car, and then follow a strict sequence of processes:
- Remove the wheel and rubber rings that are attached to the brake hose.
- Using a regular screwdriver, press the caliper piston into the cylinder.
- Bend the lock washers away from the guide pin mounting.
- Unscrew the fastening bolt on the guide pin, simultaneously fixing the hexagon.
- Remove the front pads by lifting up the stupor bracket.
Before installing the linings on the VAZ 2114, it is recommended to thoroughly clean the seats from corrosive deposits.
The next stage of repair is to inspect the clamping springs, which should be placed in a parallel plane relative to the top of the part being replaced. Do not forget about the state of the stupor finger. If necessary, clean and lubricate it.
Replacement
Replacing brake pads on a VAZ 2114 is quite simple; using the instructions below, this work can be carried out by anyone, even those far from cars.
First you need to prepare the tools that you will need to carry out the work.
Required tool:
- Jack;
- 13mm key;
- Powerful flat counter;
Instructions for replacing pads
- We remove the front wheel from the side on which the replacement will be made;
- Press in the caliper piston using a screwdriver;
- Unscrew the bolt securing the guide pin;
- Raise the caliper bracket up and remove the old pads;
- We install new pads and reassemble in the reverse order;
Instructions for replacing rear pads
Here we recommend following the following algorithm:
Removing the braking system element
- Remove the wheel and unscrew the guide bolts.
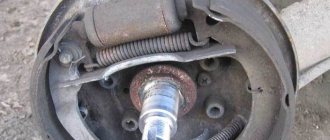
- Remove the brake drum. If the drum is jammed and there is no way to manually remove it, then use a hammer, tapping it lightly. Removed spare parts from the VAZ 2114 must be lubricated.
- Use pliers to remove the tension spring, and then proceed to removing the guide - it holds the block that needs to be replaced on the shield. Many car enthusiasts use a wear sensor for spare car parts, which makes the process of diagnosing breakdowns much easier.
Installation of new braking elements
- Transfer the drive lever from the worn element to the new one;
- Install and tension the springs. The brake linings must fit strictly into the grooves of the mechanism cylinder, and the handbrake bar must be installed exactly in the slots on the pads.
- Hook the end of the handbrake cable onto the drive lever;
- Align the pistons of the rear cylinder, put on the drum and reinstall the wheel.
Checking the correct installation of new pads
At this stage, you need to press the brake pedal several times. Then you should adjust the handbrake cable and tighten the nut on the handbrake equalizer, checking the tension. After lifting the parking brake handle, count the clicks. If there are more than eight, then the nut needs to be tightened a little more and checked again. The optimal number of clicks is from 2 to 7. Remember that the wheels must be locked if you have the parking brake up. When the parking brake handle is lowered, the wheel rotates freely and there should be no rubbing of the pads.
If the wheel can be turned by hand when the handbrake is raised, or vice versa, when the handbrake is lowered the wheel does not rotate freely, then the handbrake needs to be adjusted again.
If this process seems complicated to you, then it is better to contact specialists at a car service center.
In previous articles we have already learned how often you need to change brake pads, when to replace them, and how to check wear:
In this article we will move directly to replacing the front brake pads.
So, for work we need:
- spray can;
- wd-40 - we use it wherever it is impossible to unscrew the fasteners;
- wrenches, spanners set to “13”;
- new set of brake pads;
- car jack;
- flat screwdriver.
Before starting work, be sure to place your car on a flat surface, put it in first gear, and put the handbrake on. Place “shoes” (halves of bricks) under the rear wheels on both sides.
How to remove front brake pads?
- The very first thing to do is to loosen the wheel bolts on both sides, note: just LOOSEN!
- Place the jack under the car and lift the front wheel (place the jack on a flat surface).
- Completely unscrew the front wheel mount and remove the wheel.
- For convenience, we turn the steering wheel completely towards the disassembled wheel: if the left wheel has been removed, then we turn the steering wheel completely to the left side.
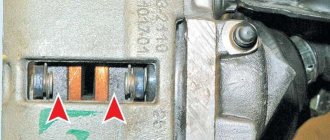
- Pay attention to the picture: take a 13mm wrench and unscrew this bolt, having first bent (straightened) the counter key. Do not lose the bolts, because... you will have to install it back (It is worth noting that some brake pad manufacturers put new fasteners in the box).
- We open the brake fluid barrel, use a syringe to pour some fluid into the jar in order to leave a reserve in case the fluid rises up in level. If the liquid is at the min level, which is very dangerous, then there is no need to drain anything.
- We move the caliper (under number 1 in the diagram) and gain access to the pads.
- Next we need to push the brake piston back into the cylinder. Because As the pads wear, the piston is forced further and further out of the cylinder. To do this, we find an inspection hole (indicated by the number “A” in the diagram). Next, take a flat-head screwdriver and thread it into the inspection hole between the pad and the brake piston. And we begin to push the piston back into the cylinder. Do not apply too much force; the piston needs to move evenly and over time.
- We remove the brake hose fasteners so that it does not interfere.
- We move the caliper.
- Remove the brake pads.
How to install front brake pads?
- We take new brake pads and place them tightly in the grooves to the brake disc: we rest the pads with their antennae against the stops and press them against the disc (look at the picture).
- Close the caliper.
- We tighten our bolt and do not forget to bend the control washer.
- We put the brake hose in place.
- We put the wheel on and tighten the mounts crosswise.
- Add brake fluid to the barrel and close it.
Personally, I installed FENOX brake pads for certain reasons. Read my review about them in the article: Review of FENOX brake pads.
The brake system of the VAZ 2114 includes front disc and rear drum pads. During operation, friction linings wear out, so consumables require periodic replacement. It’s easy to do it yourself, and if difficulties arise, it is recommended to watch a thematic video.
Original brake pads for VAZ 2114 have article number 21103501080. Their cost ranges from 360 to 500 rubles. The manufacturer does not standardize the service life of branded consumables.
It is recommended to check the size of the friction lining at intervals of 15 thousand km. When the measured thickness becomes less than 1.5 mm, the pads must be replaced. According to reviews from car owners, the average lifespan of front consumables ranges from 15 to 45 thousand km. It depends on your driving style and operating conditions of the car.
Important nuances
Part diagram
A special feature of front disc brakes is that the disc-to-pad gap is automatically adjusted. The design of the system includes a floating bracket and indicators that indicate pad wear. The bracket is created by a cylinder and a caliper. They are tightened together using bolts. The front brake pads are pressed against the pad guide by their springs.
There is an o-ring on the cylinder piston, which provides the necessary clearance between the rubbing surfaces. Over time and with use, the front pads wear out and therefore require mandatory replacement.
Article number and cost of good front brake pads for VAZ 2114 from third-party manufacturers
The quality of the original front pads is rated below average by car owners. They often rattle and squeak. Therefore, it is better to give preference to analogues of the original products, which are shown in the table below.
Table - Good analogues of the original front pads
| Manufacturer | vendor code | Approximate cost, ruble |
| Delphi | P551 | 1600-2000 |
| ABS | 36576 | 1200-1800 |
| RoadHouse | 222102 | 1400-1600 |
| TRW | GDB469M | 750-900 |
| Ferodo | TAR527B | 450-670 |
Article number and approximate cost for original rear pads of VAZ 2114
The original rear drum pads have catalog number 210103502090. Their price ranges from 1000 to 1500 rubles. At the same time, there are more resources, since:
- when stopping the car, less force is applied to the rear axle brakes;
- the drum covers the pads and abrasive particles do not fall on their surface, as happens in disc brakes.
The manufacturer does not standardize the service life of drum pads. The rear brakes should be checked every 30 thousand km. According to reviews from owners, on many cars, pad replacement is not required until 80-100 thousand km.
Article number and cost of good analogs of original rear brake pads for VAZ 2114
Rear drum brake pads have less impact on braking performance. When purchasing them, a more important criterion is the absence of creaking and other extraneous sounds when the car is stopped. According to owner reviews, the analogues of the original pads, which are shown in the table below, are most suitable for the rear axle.
Table - Recommended analogues
| Pad manufacturer | vendor code | Approximate price, ruble |
| Bosch | 0986487893 | 900-1100 |
| TRW | GS8222 | 1600-1800 |
| Ferodo | FSB59 | 1300-1500 |
| Brembo | S41501 | 900-1300 |
| ATE | 03013702322 | 680-900 |
Choosing new pads
When purchasing new front brake pads, it is important to pay attention to a few key points.
- Quality. Examine the part visually, check the assembly level. Some details even outwardly indicate that they are not worth buying.
- Certificates and packaging. Packaging can often say much more than the part itself. Study it to see if it matches the original. Nowadays, it’s not difficult to find manufacturers’ websites online and study how their products are packaged and certified. Never be afraid to ask sellers for documents for a particular spare part.
- Price. Good pads cannot be cheap.
- Manufacturer.
Set of brake linings
As for manufacturers, a certain group of leaders has now formed who produce high-quality brake pads suitable specifically for the VAZ 2114.
- High-quality fibers are used for the linings, which makes the structure more technologically advanced and lighter;
- An anti-noise plate is used to make the pads, preventing squeaks when triggered
- A special groove is provided to prevent contamination;
- The design includes a lining wear sensor
Step-by-step replacement of rear pads on a VAZ 2114
Replacement of rear drum brake pads is carried out according to the algorithm below.
- Engage forward gear.
- Jack up the car and place it on stands.
- Remove the rear wheel.
It goes without saying that the front brake pads on the VAZ 2114-2115 wear out much faster than the rear ones. This is due to the fact that more force is transmitted to the front, and the front wheels begin to lock earlier. Of course, many owners know how to perform this procedure, but there are also many who will be doing it for the first time. It is for them that this guide will be written.
First of all, it is worth noting that to carry out this maintenance item on the VAZ 2114-2115, you will need a small list of tools, which are given in the list below:
- flat blade screwdriver
- head for 13
- ratchet or wrench
- open-end or socket wrench 13
So, first you need to remove the front wheel, after lifting the car with a jack. After this, you need to use a screwdriver to bend the locking plates (washers) from the inside of the caliper in order to further unscrew the bolts:
Now you can easily unscrew the top bolt with a 13mm wrench:
Also, you should immediately move the brake hose to the side, removing it from its engagement with the strut:
Now you can try to lift the caliper bracket up to gain access to the front brake pads. If you can’t do this by hand, you can first pry it all off with a thick screwdriver:
Then everything should be quite easy and the bracket will rise up without any problems:
As you can see, the pads become completely accessible and can now be removed without any problems:
Next, you can install new pads. You can buy them at a price from 300 to 700 rubles per set for VAZ 2114-2115, depending on the manufacturer. Of course, cheap ones are unlikely to please you with their efficiency, and the durability is not the same as that of higher quality imported ones. For example, companies such as Ferodo or ATE have proven themselves well. Installation is in the reverse order.
There is one more point worth mentioning. It is possible that after replacing the pads, the caliper bracket will not fit into place on top, as the brake cylinder will get in the way. To do this, you then need to press the piston of the cylinder with the handle of a hammer or other improvised device.
Then we repeat the procedure and now everything should work out without any difficulties.
Replacing brake pads is a periodic necessity, which is carried out every 20-30 thousand kilometers. It should be noted that each owner of this car can independently carry out such work on a VAZ 2114.
The note! If you have never replaced brake parts before, contact a service station where they can help you with this procedure.
Condition monitoring
In order to identify malfunctions in time and determine the wear of the pads, they require periodic preventive inspection.
Front brake
The estimated time for replacing the front brake pads is 15 thousand kilometers. But this period can be significantly reduced if:
- The quality of the roads on which the car is driven leaves much to be desired;
- The driver has an aggressive driving style;
- The roads are very busy, you have to press the brake pedal regularly;
- The quality of the previous pads is far from the highest, etc.
In practice, replacing the front pads on a VAZ 2114 is carried out more often than in the case of the rear ones. The fact is that the drums are installed at the rear, and the load on them is less than on the front disk devices. Plus, don’t forget that the VAZ 2114 is a front-wheel drive car.
When is it time to change the pads on your car?
Wear of parts depends on the following factors:
- driving style;
- quality of material;
- technical condition of the car.
Thus, without the help of specialists, it is almost impossible to determine exactly when it is worth changing system parts. That is why it is periodically necessary to contact service station specialists, where they will help diagnose and replace any parts. If such operations at a service station are beyond your means, you can learn how to determine their wear yourself!
Front brake pads
Signs of an imminent replacement:
- 1. Residual thickness less than 1.5 mm;
- 2. Presence of scratches and chips;
- 3. Characteristic sound (creaking) when braking;
- 4. Curvature of the discs and a decrease in their thickness;
- 5. Presence of oil on the surface of the pad and disc;
- 6. Lack of contact between the pads and the base.
In order to find out about all the defects, first we remove the wheels and carry out an inspection.
The note! Replacement and maintenance of the brake system is necessary: every 10-15 thousand km - for the front pair of wheels and 50-70 thousand km - for the rear pair. That is why, if you hear a squeak, do not rush to buy new brake pads; perhaps you just need to clean the discs from any remaining debris.
When and why to change pads
Why, of course, is a rhetorical question.
No motorist wants to be left without brakes. Possible complications will only lead to higher repair costs:
- one of the wheels will jam while driving;
- due to extreme wear, brake fluid will leak;
- the caliper will break.
1. Brake pads; 2. Pad preload spring; 3. Bolts securing the cylinder to the guide pins; 4. Bolts connecting the cylinder to the caliper; 5. Cylinder; 6. Piston: 7. O-ring; 8. Guide finger; 9. Protective cover for finger; 10. Pad cover; 11. Pad guide; 12. Protective cover; 13. Brake disc; 14. Caliper; 15. Front wheel hub; 16. Brake cylinder hose: 17. Guide pins; 18. Piston protective cover; 19. Bolts securing the brake mechanism to the steering knuckle; 20. Fitting for bleeding the brake drive; 21. Brake block; 22. Pad guide spring; 23. Expansion bar; 24. Upper tension spring of pads; 25. Wheel cylinder protective cap; 26. Thrust screw; 27. Fitting for bleeding the brake mechanism; 28. Brake shield; 29. Crackers; 30. Thrust ring: 31. Spring; 32. Fluid supply tube fitting; 33. Support cup; 34. Seal; 35. Wheel cylinder piston; 36. Pad stop; 37. Finger of the lever for manual drive of the pads; 38. Lever for manual drive of brake pads; 39. Parking brake cable; 40. Cable spring; 41. Cable end; 42. Lower tension spring of pads; 43. Pad support plate; 44. Pad guide plate; 45. Rivets for fastening plates.
Front wheel brake mechanism: 1 – brake disc; 2 – pad guide; 3 – caliper; 4 – brake pads; 5 – cylinder; 6 – piston; 7 – sealing ring; 8 – protective cover of the guide pin; 9 – guide pin; 10 – protective casing
How does driving style and pad quality affect? There are average indicators: for the front axle - 15-20 thousand km, for the rear axle (drum) - up to 100 thousand km. But this does not exempt you from regular checks.
Stages of replacing brake pads on a VAZ 2114 car
Replacing rear and front pads is done differently. In order to learn this procedure, you need to understand all the intricacies.
Replacing front pads on a VAZ 2114:
- 1. Loosen the bolts on the wheel.
The note! You need to start unscrewing the bolts from the lock washer. It is necessary to loosen this washer gradually, so you can prevent possible damage to it.
- 2. Using a jack, lift the wheel on which the replacement will be made;
- 3. Remove the wheel and turn the car’s steering wheel in the direction on which you are replacing;
- 4. Find a bolt with a counter key, bend it and remove the bolt;
- 5. Next, check the brake fluid level in the reservoir.
To replace the caliper piston must be pushed in
The note! If the fluid level remains low, there are leaks in the system.
- 1. Push the caliper piston deep into the cylinder, remove the fasteners from the brake hose.;
- 2. Remove the caliper, brackets and pads;
- 3. Install the new pads tightly into the grooves.
The note! Before installing new parts on the VAZ 2114, it is necessary to clean the guides from dirt and reaction products. This can be done using regular sandpaper or a metal brush.
- 4. Install the caliper in place.
- 5. Return all parts back to their place.
Advice! If you drained the brake fluid, be sure to add it back.
The note! There are many ways to replace parts. It is worth noting that to install or remove the pads it is not necessary to completely unscrew the bolts. Sometimes it is enough to make just a few turns of the bolt, then pull out the brake hose and pads. Of course, this method is perfect for owners of VAZ 2114 cars who have already changed them several times.
Replacing rear pads:
- 1. Remove the wheel;
- 2. Near the cable tensioner there is a nut that secures it. Loosen this nut. To do this, it is recommended to use key number 13;
- 3. Having loosened the rear wheel mounting bolts, lift it using a jack;
- 4. Remove the wheel and unscrew the bolts on the brake drum;
- 5. Remove the drum;
- 6. After this, you must first remove the spring, and then the remaining parts along with the lever;
- 7. Start cleaning the grooves where the old pads stood;
- 8. Finally, install new pads and reassemble the entire structure in reverse order.
It is worth remembering that if you have not performed this procedure yourself before, enlist the help of experienced mechanics or contact a service station!
It goes without saying that the front brake pads on the VAZ 2114-2115 wear out much faster than the rear ones. This is due to the fact that more force is transmitted to the front, and the front wheels begin to lock earlier. Of course, many owners know how to perform this procedure, but there are also many who will be doing it for the first time. It is for them that this guide will be written.
First of all, it is worth noting that to carry out this maintenance item on the VAZ 2114-2115, you will need a small list of tools, which are given in the list below:
- flat blade screwdriver
- head for 13
- ratchet or wrench
- open-end or socket wrench 13
So, first you need to remove the front wheel, after lifting the car with a jack. After this, you need to use a screwdriver to bend the locking plates (washers) from the inside of the caliper in order to further unscrew the bolts:
Now you can easily unscrew the top bolt with a 13mm wrench:
Also, you should immediately move the brake hose to the side, removing it from its engagement with the strut:
Now you can try to lift the caliper bracket up to gain access to the front brake pads. If you can’t do this by hand, you can first pry it all off with a thick screwdriver:
Then everything should be quite easy and the bracket will rise up without any problems:
As you can see, the pads become completely accessible and can now be removed without any problems:
Next, you can install new pads. You can buy them at a price from 300 to 700 rubles per set for VAZ 2114-2115, depending on the manufacturer. Of course, cheap ones are unlikely to please you with their efficiency, and the durability is not the same as that of higher quality imported ones. For example, companies such as Ferodo or ATE have proven themselves well. Installation is in the reverse order.
There is one more point worth mentioning. It is possible that after replacing the pads, the caliper bracket will not fit into place on top, as the brake cylinder will get in the way. To do this, you then need to press the piston of the cylinder with the handle of a hammer or other improvised device.
Then we repeat the procedure and now everything should work out without any difficulties.
High-quality video lesson on replacing brake pads on a VAZ 2114 car.
First, I’ll tell you what tools you’ll need:
- wheel wrench
- two keys - thirteen and seventeen
- support post
- jack
- WD-40
- flat screwdriver
- new pads
- brush
- We park the car on a flat surface and place supports under the rear wheels. We also tighten the handbrake.
- Loosen the wheel mounting bolts, jack up the wheel and install the support stand. After installing the support stand, remove the wheel.
- Use a brush to clean the dirt from the brake mechanism.
- We release the brake hose from the holder, which is attached to the shock absorber strut.
- Look under the hood and check the brake fluid level; if the level is at maximum, pump out the fluid a little.
- Using a flathead screwdriver, remove the pads from the disc. This can be done through the viewing window on the caliper.
- At the back of the caliper, on the bolt that is located below, bend the plate and unscrew the bolt with a thirteen key. When unscrewing the bolt by thirteen, you need to hold the pin from turning by the hex head.
- Now lift the caliper up and secure it, for example, with wire.
- Remove old pads.
- Before installing the pads, measure the thickness of the brake disc. If the thickness is less than 10.8 mm, the disk needs to be replaced. Also clean the pad seats from dirt to avoid distortion.
- Screw in the brake piston.
- Install new pads and reassemble.
Do not forget that if you change the pads on one wheel, you must also change them on the other. That is, the pads need to be changed on one axis.
I would like to recommend quality pad manufacturers:
If you have any questions, I advise you to watch the video lesson.
The brake system of the VAZ 2114 includes front disc and rear drum pads. During operation, friction linings wear out, so consumables require periodic replacement. It’s easy to do it yourself, and if difficulties arise, it is recommended to watch a thematic video.
Original brake pads for VAZ 2114 have article number 21103501080. Their cost ranges from 360 to 500 rubles. The manufacturer does not standardize the service life of branded consumables.
It is recommended to check the size of the friction lining at intervals of 15 thousand km. When the measured thickness becomes less than 1.5 mm, the pads must be replaced. According to reviews from car owners, the average lifespan of front consumables ranges from 15 to 45 thousand km. It depends on your driving style and operating conditions of the car.
How to change the front pads on a VAZ 2114
Which pads are better?
This is a question people ask before purchasing, and now you will know the answer.
Several manufacturers' pads were tested. The essence of the test was to identify the most effective pads with the shortest braking distance. The second indicator is comfort when braking, and this is the absence of all kinds of squeaks and other unpleasant noises. The pads were tested on a VAZ-2114 car with almost new brake discs.
The test results are below, first let's see how to quickly change the pads.
Replacing the front brake pads of a VAZ-2114
The caliper holding the pads is screwed on with two bolts; in fact, it’s the same on almost all foreign cars, except for especially charged ones. The bolt is secured with a lock washer, which clamps the edges of the bolt. First you need to straighten this washer, and then unscrew the top bolt.
There is no need to unscrew the bottom bolt completely, just loosen it a couple of turns. We won't completely remove the caliper, we'll just move it away.
To move the caliper, you need to pull out the brake hose that will prevent this, you just need to pull it, and it will come out easily.
Next, we fold back the caliper and there they are, the pads are in front of us, we take them out one at a time. The pads are like new, were used for testing and showed almost no wear.
Before installing new pads on a VAZ 2114, you need to clean the guides along which the pads move from oxides and other adhering dirt. Use sandpaper or a metal brush. A similar tool can be found in every garage.
Now you can install new pads. The photo shows the winner of the tests - Ferodo pads.
Now, to close the caliper, we need to push the cylinder in a little. This is done with a special squeezer, you can use a clamp, and some craftsmen prefer a pry bar.
When the cylinder is pressed in, the caliper closes easily, you can screw everything back in and secure the brake hose.
And now about the results of the pad test
1st place - Ferodo Target - catalog number - TAR 527 21170
These pads showed the best results, the braking distance was the shortest, both during intensive braking and during normal use, the pads did not lose their performance properties.
Also, during a longer test, it was noticed that the pads are quite gentle on the brake disc, without causing much wear on it.
2nd place - ATE pads - catalog number - 311 FF KBA 60 793 0046
3rd place - TRW / Lucas pads - catalog number - LMS 116 90 R-01107/364 GDB 469.8.80.91
This is what the top three with high performance looks like. Next are the average quality pads
EZATI Lux – catalog number – 2108-3501090 T-266 “Lux”
Unexpectedly, quite good pads at an affordable price.
SCT-Germany - catalog number - SP 101 WVA 21170
Even though it says Germany, the quality suffers.
Well, in conclusion, a group of pads that are not particularly good in quality:
TIIR - 273 - catalog number - 2108-3501080
DAFMI - catalog number - F312 D 743
Trans Master - catalog number - DBB 22100 WV 21170 T-779
These pads squeaked and braked poorly, so there was no point in even looking at them.
Replacing brake pads VAZ-2114 video instructions
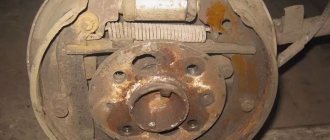
Replacement of rear brake pads of VAZ-2114
The rear pads are changed a little more difficult than the front ones, a little less often, so no tests were carried out, but simply replaced for the company. To replace, you must first unscrew the drum.
Then this drum needs to be knocked off the hub; it is held in place by the blocks, which managed to make a groove in it. You need to take a heavier hammer and tap the drum through the spacer from the back side. It’s not a fact that something won’t break off from the drum.
When the drum comes off, it will be a little easier, because this was the most difficult stage in replacing the rear drum pads. Now all that remains is to remove all the springs
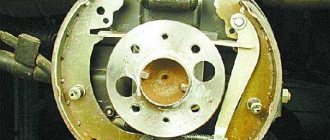
And pull out the pads. There is a plate installed between the pads; you don’t have to change it, the main thing is not to forget to put it in place later.
One of the blocks is driven by the handbrake cable; you need to pull it out of the cable groove.
It's a little more difficult to assemble, especially tensioning the springs. This is done with a regular screwdriver; the spring slides off the screwdriver and is inserted directly into the groove. For those who don't understand, watch the video
Tips for removing and installing rear pads on a VAZ 2114 video
Article number and cost of good front brake pads for VAZ 2114 from third-party manufacturers
The quality of the original front pads is rated below average by car owners. They often rattle and squeak. Therefore, it is better to give preference to analogues of the original products, which are shown in the table below.
Table - Good analogues of the original front pads
| Manufacturer | vendor code | Approximate cost, ruble |
| Delphi | P551 | 1600-2000 |
| ABS | 36576 | 1200-1800 |
| RoadHouse | 222102 | 1400-1600 |
| TRW | GDB469M | 750-900 |
| Ferodo | TAR527B | 450-670 |
Article number and approximate cost for original rear pads of VAZ 2114
The original rear drum pads have catalog number 210103502090. Their price ranges from 1000 to 1500 rubles. At the same time, there are more resources, since:
- when stopping the car, less force is applied to the rear axle brakes;
- the drum covers the pads and abrasive particles do not fall on their surface, as happens in disc brakes.
The manufacturer does not standardize the service life of drum pads. The rear brakes should be checked every 30 thousand km. According to reviews from owners, on many cars, pad replacement is not required until 80-100 thousand km.
Article number and cost of good analogs of original rear brake pads for VAZ 2114
Rear drum brake pads have less impact on braking performance. When purchasing them, a more important criterion is the absence of creaking and other extraneous sounds when the car is stopped. According to owner reviews, the analogues of the original pads, which are shown in the table below, are most suitable for the rear axle.
Table - Recommended analogues
| Pad manufacturer | vendor code | Approximate price, ruble |
| Bosch | 0986487893 | 900-1100 |
| TRW | GS8222 | 1600-1800 |
| Ferodo | FSB59 | 1300-1500 |
| Brembo | S41501 | 900-1300 |
| ATE | 03013702322 | 680-900 |
Step-by-step replacement of rear brake pads of VAZ-2114
When replacing rear brake pads on a VAZ-2114, you should also pay attention to the thickness of the part and measure the inside of the rear brake drum. If its diameter exceeds 202 mm, then it must be replaced as soon as possible. The sequence of work should be as follows:
- the machine is securely fixed using special devices called anti-roll stops, since the hand brake is not used in this case;
- unscrew the mounting bolts a little, use a jack to raise the car to the desired level, remove the first wheel;
- the cable intended for the hand brake should be loosened as much as possible using a special tool;
- unscrew the bolts from the brake drum and remove the drum itself;
- Having access to the springs, you can easily remove them, and then proceed to remove the lever and pads;
- install new parts in place, after compressing the brake cylinder;
- the pressure spring and drum are installed in place. The wheel is secured using mounting bolts;
- the same replacement must be made with the second wheel of the VAZ-2114.
After completing the work, lower the jack and then bleed the brakes by pressing the pedal. Next, you should carefully adjust the handbrake and you can safely go on a trip in a fully repaired car.
If you do not want to carry out such repairs yourself, then you can visit special repair establishments, where a qualified specialist will perform the replacement and explain the price for such a service.
Replacing front pads on a VAZ 2114
Replacing the front pads is carried out according to the instructions below.
- Remove the protective cap.
- Jack up the car and remove the wheel.
- Clean the caliper from dirt.
- Using a wrench, unscrew the upper fastening of the caliper bracket.
- Loosen the lower caliper bracket. It is not required to completely unscrew it.
- Remove the brake hose from the bracket.
- Pull the caliper bracket to the side.
- Move the bracket to the side for free access to the pads.
- Remove old pads.
- Replace the wear sensor on the new pads if it is not included in the new set of consumables.
- Press the brake piston into the cylinder. Before doing this, you need to check the brake fluid level. If it is close to the maximum, then the slurry should be pumped out to prevent its overflow.
- Pressing the piston into the cylinder
- Install new pads and reassemble in reverse order.
Replacing front brake pads on a VAZ 2108 (2109, 21099)
The service life of front brake pads on VAZ 2108, 2109, 21099 vehicles and their modifications is within 30,000 - 40,000 km.
It can vary up or down depending on the operating conditions of the vehicle, driving style, and the quality of the installed brake pads. The recommended frequency of checking their condition is every 15,000 km. You can time the check of the condition of the brake pads to coincide with the seasonal change of tires, since the wheels will be removed in this case.
Brake pads will have to be changed if they are worn out (the total thickness of the lining and pad is less than 6 mm), separation of the lining from the pad, uneven wear, oiling, replacement of the brake disc, vibration and beating, or extraneous noise during braking.
If the brake pad (lining and base) is less than 6 mm, then it should be replaced immediately
The front brake pads on VAZ 2108, 2109, 21099 vehicles must be changed on both front wheels at once to prevent skidding from uneven braking.
Necessary tools, devices, spare parts
— Open-end wrench at “17”
— Socket wrench or socket “13”
— Thick slotted screwdriver
— Two sets of front brake pads
Preparatory work
— If there is an increased level of brake fluid in the reservoir on the master brake cylinder, pump out the excess using a syringe or bulb to avoid overflowing after installing new pads and strongly recessing the pistons into the brake caliper cylinders
— Jack up the car and remove one of the front wheels
— Clean the front wheel brake mechanism from dirt
— Remove the brake hose from the bracket on the rack
The procedure for replacing the front brake pads on a VAZ 2108, 2109, 21099 car
— Unscrew the lower bolt of the guide pin
First, use a slotted screwdriver to bend the edges of the bolt locking plate. We use an open-end wrench set to “17” to hold the guide pin and a spanner set to “13” to unscrew the bolt. See photo above.
— Raise the floating caliper bracket up
If it is difficult to lift the bracket, you need to move it left and right and try again. Or use a screwdriver to pry it under the caliper and use it as a lever to lift the bracket.
— Remove the front brake pad from the guide
We leave the rear brake pad in the guide; it will be useful when recessing the cylinder piston.
Pull the front brake pad up from the grooves in the guide
— We recess the piston of the brake cylinder into its body
To do this, we lower the floating caliper back down, and, using a large slotted screwdriver or pry bar as a lever (inserting it between the brake disc and the caliper), moving it outward, we recess the piston.
We press the piston of the brake caliper cylinder inside using a large screwdriver
— Remove the second brake pad
Lift the bracket up and remove the brake pad.