How to engage reverse gear
The first, second and even fifth gear is engaged, but there is no way back? If you have a manual transmission, then depress the clutch, push the gearshift lever down and engage reverse gear. For those who would like to learn in more detail about how to properly use reverse gear in different gearboxes, this article is intended.
Manual transmission: sequence of actions
1. Under no circumstances try to engage reverse gear at high engine speeds. Structurally, the gearbox is designed in such a way that the synchronization of rotation of the gearbox gears is significantly worse than when engaging a gear to move forward. 2. Turning on moment. On different manual transmissions, the reverse mode can be activated differently. Perhaps the lever needs to be pressed down - without this the speed will not turn on. How to turn on reverse gear on your car - read in the car manual. General recommendations: do not try to apply significant force - this will inevitably lead to breakdown of the manual transmission. 3. Engine idle speed is the law. Set the car to the parking brake, press the clutch pedal, and engage reverse gear. Next, look carefully using mirrors; for beginners, it would be a good idea to turn the body and look around without the help of mirrors. Then everything is simple - start moving.
↑ Description of the gearbox
Transmission
– mechanical, two-shaft, with five forward gears and one reverse gear, with synchronizers in all forward gears. It is structurally combined with the differential and main gear.
The gearbox housing consists of three parts (cast from aluminum alloy):
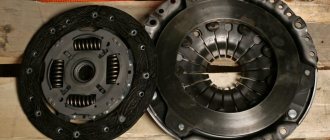
- clutch housing 25,
- gearbox housing 7
- and the rear cover of the gearbox housing 1.
During assembly, a gasoline-oil-resistant gasket sealant (for example, KLT-75TM or TB-1215) is applied between them. There is a special magnet in the crankcase socket that retains metal wear products.
The input shaft 5 is designed as a block of drive gears, which are in constant mesh with the driven gears of all forward gears. The secondary shaft 40 is hollow (for supplying oil to the driven gears), with a removable drive gear of the main gear 17. Driven gears 31, 33, 34, 36, 38 and synchronizers 32, 35, 39 for forward gears are located on it. The front bearings of shafts 18 and 12 are roller, the rear bearings 3 and 37 are ball. The radial clearance in roller bearings should not exceed 0.07 mm, in ball bearings - 0.04 mm. Under the front bearing of the secondary shaft 18 there is an oil sump 19, which directs the flow of oil into the shaft.
Differential
– two-satellite. The preload in the bearings 29 (0.25 mm) is adjusted by selecting the thickness of the ring 28 installed in the gearbox housing housing under the outer ring of the differential bearing. The driven gear of the main gear 27 is attached to the differential box flange.
Automatic gearbox: sequence of actions
1. On an automatic transmission, the reverse mode is usually indicated by the letter R. To engage reverse gear, simply move the lever to the appropriate position and start driving. 2. On an automatic transmission, it is worth taking into account the fact that, due to the design features, you can inadvertently engage reverse gear when moving forward. On new models there is a lock, but on older ones this is possible. Be careful - if this happens, the automatic transmission will fail. 3. For automatic transmissions, the same rules apply as for manual transmissions - switching occurs only at idle engine speed.
What to do if reverse gear does not engage
1. If noises and grinding noises are heard: turn off the engine and stop trying to turn it on - the gearbox or clutch has failed. The solution is to contact a specialist, or push the car out and drive to the nearest workshop, without engaging reverse gear. 2. If there are no extraneous sounds when you turn it on, but you can’t turn it on, try again, taking into account the characteristics of your car: perhaps you do not recess the lever, or do not move it to the side enough. And lastly: any actions to turn on the speed must be carried out with the clutch pedal depressed.
Read how to adjust the gear shift control drive on a VAZ 2110. A diagram of the device is presented.
If during operation of the car you have problems with gear shifting (there is no clear shift), then it’s time to adjust the drive that controls this mechanism. Also, this work must be carried out immediately after you have removed the gearbox, repaired it and reinstalled it, since after such actions the entire gear shift mechanism “diverges”.
We did the setup on a VAZ 2110 car.
VAZ 2110 gears do not shift
Poor engagement is very often treated by adjusting/replacing the clutch, as well as adjusting/replacing the rocker shaft. Knocks out - it is unlikely due to lack of inclusion, but it can happen if the rocker arm or the rocker joint is broken. The cost of overhaul depends on the location, but if they offer you suspiciously cheap prices, they will most likely repair them with used spare parts.
We recommend reading: What documents are needed for compensation for kindergarten in 2020
Aleksandr.Belkevich , most likely the synchronizers need to be repaired. If you do it yourself (only if your hands grow from the right place), it all depends on what needs to be changed (blocking rings 1 piece about 400 rubles (most likely they are worn out)). But before disassembling, try to adjust the linkage and change the oil (most likely the oil has not been changed for a long time)
Adjusting the gear shift control drive
| 1 — reverse locking bracket; | 8 — spherical pin of the gear shift mechanism; |
| 2 — axis stop; | 9 — body floor; |
| 3 — gear shift lever axis; | 10 — ball joint; |
| 4 — axle bushings; | 11 - buffer; |
| 5 — VAZ 210 gear shift lever; | 12 - spring; |
| 6 — spacer sleeve; | 13 - template 67.7834.9527; |
| 7 — spherical washer of the ball joint; | 14 — bracket cover. |
2. In order to ensure free movement of the rod relative to the gear selection rod, the grooves at the end of the rod and the clamp should be widened using a screwdriver. Then place the rod in the neutral position.
3. Next, we go into the car interior and remove the gearbox cover from the handle. You can simply lower it to the very bottom, and install the lever so that its lower (non-bent) end is approximately vertical.
If you have template 67.7834.9527, then set the gear shift knob as follows: with the lever cover removed, install the template in the trim window (number 14 in the diagram above) of the reverse locking bracket.
Next, insert the stop of the axis (2) of the lever (5) into the groove of the template (13) and press it against the template in the transverse direction without causing elastic deformation of the bracket (number 1). Lock the lever (5) in this position.
4. Under the bottom of the car, you need to carefully, without sudden movements of the hand, select the axial play of the rod in the rearward direction and its angular play in the counterclockwise direction (the task is not to move the gear shift lever).
Let's consider the design of the gearbox
The VAZ 2110 five-speed gearbox consists of two shafts, has five front gears, one rear gear, and is equipped with synchronizers for shifting front gears. It is structurally combined with the differential and main gear.
Checkpoint diagram
The VAZ 2110 gearbox housing is made of aluminum alloy and consists of 3 parts: gearbox housing (7), clutch housing (25) and gearbox housing rear cover (1). A gasoline-oil-resistant gasket sealant is applied between the parts. The crankcase socket is equipped with a special magnet on which metal wear residues are collected.
The input shaft (5) is a block with drive gears that are constantly engaged with the driven gears of the forward gears. The hollow output shaft (40) is equipped with a removable final drive gear (17). On this shaft there are driven forward gears 31 - 1st, 33 - 2nd, 34 - 3rd, 36 - 4th, 38 - 5th and their corresponding synchronizers 32 - for 1st and 2nd -th, 35 – for the 3rd and 4th and 39 – for the 5th.
The shafts are equipped with front roller bearings (18, 12) and rear ball bearings (3, 37). The radial distance in ball bearings should not exceed 0.04 mm, in roller bearings - 0.07 mm. On the secondary shaft, under the front bearing (18), there is an oil sump (19), designed to direct the flow of oil inside the shaft to the driven gears.
The differential is two-satellite. The preload in the tapered roller bearing (29) is adjusted by selecting the thickness of the ring (28), which is installed under the outer ring of the differential in the manual transmission housing housing. The main drive driven gear (27) is attached to the differential box flange.
Control drive circuit
The design of the VAZ 2110 manual transmission control drive includes a gear shift lever (3), a ball joint (6), a rod, a PG rod (14), selection mechanisms and a PG. During assembly, special thread glue is applied to the places where the gear lever and rod are attached to the rod. The screws used to secure the lever and hinge have different coatings, lengths and tightening torques.
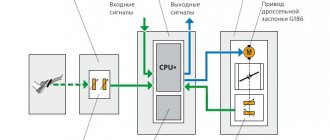
When the power unit moves axially while the vehicle is moving, gears may switch off spontaneously. To prevent such a situation, the manual transmission control drive is equipped with a reaction rod (9). At one end it is connected to the power unit, and at the other end the ball joint clip (5) of the PP lever is attached. A rod lever (10) is attached to the inner gear selector rod (14), acting on the 3-arm lever of the gearbox mechanism (11). This mechanism is manufactured as a separate unit and is attached to the plane of the clutch housing (13).
PP mechanism
Two axes are fixed inside the housing of the PP mechanism (1). One - the lever axis (4) of the PP is equipped with a 3-arm lever and two locking brackets (8, 13), through which the guide axis (3) of the locking brackets passes. The second axis fixes the locking brackets, preventing them from turning.
The lever arm (2) is used to engage forward gears, the lever arm (11) is used for reverse gear, and the PP rod lever acts on the third arm. A reverse fork (10) is installed on the axle (7). At the top of the gearbox there is a breather (14), through which communication with the atmosphere occurs.
All manual transmission parts must be lubricated during operation, so transmission fluid is poured into the VAZ 2110 gearbox. The fluid level is controlled using a dipstick and should be between maximum and minimum.
Loading …
Adjusting the position of the gear shift lever
Read how to adjust the gear shift control drive on a VAZ 2110. A diagram of the device is presented.
If during operation of the car you have problems with gear shifting (there is no clear shift), then it’s time to adjust the drive that controls this mechanism. Also, this work must be carried out immediately after you have removed the gearbox. its repair and reinstallation, since after such actions the entire gear shift mechanism “diverges.”
We did the setup on a VAZ 2110 car.
CPT diseases
VAZ 2110 owners often complain that the first gear is difficult to engage or crashes.
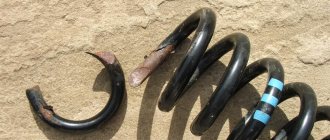
- often the synchronizer is to blame;
- perhaps the clamp spring has burst, the lever is hanging loose, the speeds are switched on as desired;
- The stem and fork may need replacement.
Another complaint is that second gear is difficult to engage and often gets knocked out.
Here you can suspect the main culprits:
- the second one flies out most often because the gear teeth do not mesh well with the clutch that turns on the speeds;
- The tips of the gear teeth and clutch are already worn out, so the speed is difficult to engage. If you don’t intervene, it will soon fly out;
- as an option, when it knocks out on bumps, the clutch dies.
Sometimes (albeit rarely) when the second one does not turn on well enough and falls out, replacing the retaining spring helps. If the speeds often drop out, some of them are difficult to turn on, which means that half-measures will no longer help - the box needs to be overhauled.
Whether you do it yourself, or go to a service center where they will repair it for you and also adjust the gear shift mechanism, decide for yourself, based on your own experience and skills.
how to change gears on a VAZ 2110
Before moving off, carefully study the gear shift pattern and practice shifting gears with the engine not running. Gear shift diagrams are shown in Fig. 1. Using the gear shift lever, the driver can discretely transmit torque from the engine to the wheels of the car. The first gear is the most powerful, transmits the highest torque and is used for starting from a standstill, overcoming difficult sections of the road, and when driving uphill with a large load.
The speed in this gear is up to 40 km/h. Second, third and fourth gears respectively transmit less torque. The crankshaft rotation speed decreases, and the wheel rotation speed increases. The second gear is used to accelerate the car and move it at speeds from 20 to 60 km/h. The third gear is used to accelerate and move the car at speeds from 30 to 90 km/h. Fourth gear (direct) creates less torque and has the largest speed range, from 40 km/h to maximum.
The fifth gear has a reduced gear ratio of 0.70.8. The crankshaft rotates at a lower speed than the wheels. This economical transmission is used for straight sections of the road, without heavy loads, since it is very weak. The reverse gear is also powerful and transmits a lot of torque and has a large gear ratio. It is used for reversing. The neutral position of the gear shift lever disengages all gears.
To engage reverse gear, press the clutch pedal and, after holding for 3 seconds, press the gear shift lever all the way and move it to the reverse gear position. Everyone must learn to move a car away smoothly in compliance with a certain sequence, safety requirements and traffic rules. A little theory. When moving, a car overcomes a number of forces that create resistance to its movement.
The main forces are: the rolling resistance force of the wheels, the air resistance force, the inertia force and the lifting resistance force. The movement of the car is ensured when the adhesion force between the wheels and the road is equal to or greater than the traction force. If the traction is greater than the traction force (the ten has more traction force than most other domestic cars), then the drive wheels will slip. In this case, a large load is placed on the clutch and gearbox, which can quickly fail. Fans of a sporty driving style should especially remember this. On the 10, the gearbox is not from a Mercedes.
When starting off on a flat section of the road, you only need to overcome the rolling resistance force of the wheels and the force of inertia. Before you set off, you must: depress the clutch pedal (develop this habit, it will allow you to avoid many troubles); turn on the ignition; start the engine; carefully inspect the road you intend to enter through the rear-view mirrors, external and internal, and turn your head left and right to check the blind spot from behind and from the sides; Turn on the turn signal if you are sure it is safe. You should not turn on the turn signal if there are other vehicles or pedestrians nearby to whom you must give way; With your left foot, fully depress the clutch pedal and hold it in this position.
The clutch pedal must be pressed sharply, this disengages the clutch, disconnects the rotation of the crankshaft and the input shaft of the gearbox; Hold the steering wheel with your left hand, and with your right hand move the gear shift lever to the first or second gear position (when it is necessary to engage second gear, we will consider below). Comment. The first (second) gear may not engage immediately; there is no need to try to push it in by force. Move the gear shift lever to the neutral position, release the clutch pedal, depress the clutch pedal all the way again and repeat engaging the first (second) gear. At the same time, the gears of the gearbox have turned and the gear should engage easily; again carefully inspect the road through the mirrors and left shoulder, make sure it is safe once again; If you can start moving, then release the parking brake lever down; lightly press the gas pedal with your right foot; feel the crankshaft speed increase slightly.
This is especially clearly visible on the tachometer; With your left foot, slowly and gently release the clutch pedal, gradually turn it on and smoothly transmit torque from the engine crankshaft through the first gear of the gearbox to the wheels, while the crankshaft rotation speed from the load will begin to decrease. You can hear it from the engine noise or see it from the tachometer; hold the clutch pedal at the end and lightly press the gas pedal, increasing the crankshaft speed and traction force, which begins to overcome the rolling resistance of the wheels and the force of inertia; the car starts moving smoothly; After starting to move, continue to smoothly release the clutch pedal all the way, then be sure to remove your foot from the pedal. The clutch pedal in first gear must be released smoothly, held at the end, and then smoothly released to the end. When starting off, drivers mainly make two mistakes, which lead to a strong jerk or stopping of the engine. Reasons for the first error. sharp release of the clutch pedal and strong pressure on the gas pedal (high crankshaft revolutions lead to a strong jerk of the car, and on a slippery road and for drivers with a sporty driving style on dry asphalt, it leads to wheel slipping). Eliminating the error if the engine does not stall: sharply depress the clutch and reduce the pressure on the gas pedal and reduce the crankshaft speed.
Repeat the move. Pay attention to the smooth release of the clutch pedal and less pressure on the gas pedal. Reasons for the second error. sharp release of the clutch pedal and weak pressure on the gas pedal, crankshaft revolutions are low. Error elimination: restart the engine. At the same time, pay attention once again to the smooth release of the clutch pedal and the stronger pressure on the gas pedal compared to the first attempt.
When using two clutch and gas pedals in concert, lightly pressing and releasing the gas pedal should always be slightly ahead of pressing and releasing the clutch pedal. It’s easier to get moving in the top ten with the 2112 engine installed. When starting off, you don’t have to press the gas pedal. This makes management easier. The car picks up speed without high revs. And the traction reserve allows you to change gears less often.
My secret
Hennessey Performance has always been famous for its ability to generously add additional horses to a “pumped up” car, but this time the Americans were clearly being modest. The GMC Yukon Denali could turn into a real monster, fortunately, the 6.2-liter “eight” allows this to be done, but Hennessey’s engine engineers limited themselves to a rather modest “bonus” by increasing the engine power.
3).
In second gear you can drive at speeds from 20 to 40 km/h. But when approaching the threshold of 40 km/h, you need to switch to third gear, which will also save on fuel consumption. We switch to fourth gear at a speed limit of 60 km/h. The engine should run smoothly, and the transition itself should be smooth and without jerking. But, if the car has a five-speed gearbox, then when the speed reaches 90 km/h we switch to fifth gear. Also remember that in fifth gear when driving at 90 - 110 km/h, fuel will be consumed economically. And if the car’s speed is higher than this level, consumption may increase noticeably, which of course will lead to additional costs.
We recommend reading: Social benefits to veterans for veterans of the Samara region
They are characterized by a number of advantages - they are able to withstand higher loads (due to the shape of the tooth and the gear-claw coupling); require less time to change gears (achieved by incompletely squeezing the clutch or without squeezing it at all); eliminate the possibility of destruction of synchronizers (which are simply absent).
The lever and hinge mounting screws vary in length, coating and tightening torques. The lever fastening screw is phosphated (dark color), 19.5 mm long, tightened with a torque of 3.4 kgf.m. The hinge fastening screw is cadmium-plated (golden), 24 mm long, tightened with a torque of 1.95 kgf.m.
I think many people will ask me a question about robots - how is it going with them? Everything is simple here - you won’t be able to engage reverse gear at speed at all, similar to the old automatic transmission. The thing is that they have such designs that prevent the wrong actions of a novice driver.
When you move forward, then oil pressure is transferred from one to the other, that is, it goes. And at speed they rotate the same. As soon as you turn on “N” (or in our case “R”), the machine disengages the connection, the impellers begin to rotate at different speeds. If you apply pressure sharply (that is, turn on “D”), it can damage parts of these turbines, so you must first level it (stop), then move off (I think I explained it clearly).