Cars admin26.02.2020
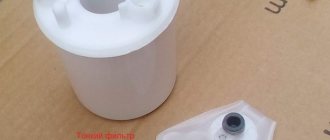
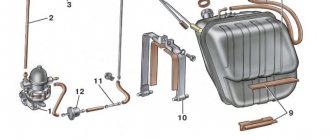
I want to tell you about shit. This is exactly the association I had when I sawed the fuel filter. Preface - I plan to wash the injectors in the near future, but first the fuel filter needs to be changed, and since I’m getting into the tank, then change the fuel pump at once (especially since the mileage is already 115 thousand km) Spare parts: From left to right 1. Coarse filter from VAZ 2110-2112 - 50 rub. 2. Gasket for the gas tank cap (art. no. 17342-95F0A) — 133 rubles. 3. SCT fine fuel filter from some Hyundai (art. No. ST399) - 480 rubles. 4. Bosch fuel pump from VAZ 2110-2112 (art. no. 0580453453) - 1521 rubles. (in a car shop for bugs from 2200 rubles) 5. Gasoline and oil resistant hoses, bought in a car shop for Russian bugs for 80 rubles, together with clamps. I bought hoses of different diameters so as not to confuse the diameter of the check valve tube. It turned out that the smallest diameter stood up as “native”.
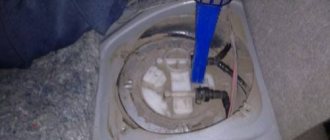
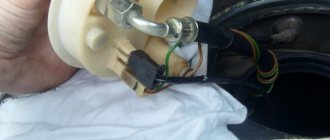
Removing the fuel intake: 1. Remove the underbelly part of the seat 2. unscrew the metal plate 3. disconnect the contact chip 4. start the engine, it will stall, try several times (I did 4 times!) 5. it’s better to take a corpse and wrap the pipe at the point of disconnection from the fuel highway, because the remaining fuel may end up somewhere (in the eyes, on the back of the seat, etc.) 6. disconnect, move the line to the side 7. unscrew the fuel intake cap, I’ll tell you right away that it won’t work by hand, so I took a gas wrench...
Then figure out for yourself what to do! 8. Carefully pull out the fuel intake without damaging the float lever.
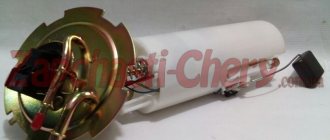
Disassembling the fuel intake: 1. remove the head part 2. disconnect the wires from the common block and from the fuel pump 3. the assembly with the fuel pump and fuel filter is fixed in the body of the fuel intake at three points. Carefully pry it up, pull it out, etc. 4. The coarse filter is tightly seated at the bottom, I had it in some mud, hair, in short, an abomination
Fuel pump for Nissan Almera
The fuel pump delivers fuel from the tank to the engine. This part of the mechanism is influenced by both the quality of the fuel and the fullness of the tank. Constantly driving with a small amount of fuel in the tank can lead to breakdown or rapid wear of the fuel pump. Therefore, it is better to be attentive to the fuel pump, because it is not the cheapest element. If the fuel pump does not turn on , this does not mean that it is faulty.
How to clean a fuel pump
The fuel tank is the main location of the fuel pump. Its operating mechanism is that the control unit immediately after turning off the ignition forces the gasoline pump to turn on and continue its operation for some time. And this makes it easier to turn on the motor the next time.
The crankshaft position sensor is activated when the engine rotates. The control unit here starts the gasoline pump when it receives a signal. But if this signal is not received from the sensor, the internal combustion engine and the electric pump will be stopped. This property increases the battery life. There is a separate relay that helps control the pump in the control unit. If the fuel pump does not turn on, then first you should check the relay specifically.
The uniqueness of Nissan Almera (Nissan Almera) lies in the fact that the fuel pump has an integrated design, which has a filter designed to clean the fuel. The replacement can only be done together, in other words, assembled, because the structure cannot be separated, because it is one-piece.
Replacement interval and location of the fuel filter Nissan Almera N16
Dirty fuel filter
If we are talking about a car fueled with gasoline , then the fuel unit (assembly) must be replaced when the mark reaches 120,000 km . If the fuel is of poor quality, the interval should be reduced to 80 thousand .
An advantage will be the fact that the new fuel filter can be installed separately, i.e. without updating the module. As a rule, the mesh is left as old and simply washed.
If the Almera N16 has a diesel engine, change it after 30 thousand km .
Masuma MFF-T116
Almera H16 is equipped with two fuel filters - coarse and fine. The parts are installed in a single unit, which also includes a pump, float and sensors. The assembly (behind the cover) is accessible by removing the rear seat.
Removing the fuel pump
First you need to remove the rear seat element. The gasoline pressure must be relieved in the fuel line. The fuse box, which is located under the dashboard on the driver's left side, must be open. Usually on the top (cover) there is a designation with which this fuse is easy to find, because it is marked FUEL PUMP. It should be in the 2nd column (4th from the top), and also have the designation 15A. The fuse must be removed from its socket. Start the car, and after 3-5 seconds the engine will stall on its own. This action must be repeated until the engine no longer starts (usually this works after 3-5 attempts). Then wait a minute and repeat the action. If everything is done correctly, then the pressure will actually be released to the maximum, in other words, to the end.
In this case, if you do not want to look for the fuse, you should disconnect the connectors from the flange (located under the seat) of the fuel tank. There is no need to remove the hoses right away.
It is necessary to remove the filler cap and then relieve the internal pressure in the gas tank. We unscrew three dark-colored plastic bolts and remove the hole cover for inspection. Afterwards, the large plastic nut must be unscrewed by hand. We should be able to see a snow-white glass, in the place of which the gas pump . This is a cylinder measuring 10 by 3 centimeters. Some models have an internal mesh, which is usually yellow with dirt.
HOW TO REPLACE THE FUEL PUMP FOR A NISSAN ALMERA CLASSIC?
Changing the fuel pump and filter on a Nissan Almera Classic
. THIS VIDEO IS NOT.
Replacing the fuel pump on Almeria
They cleaned the gas receiver and changed the pump, but did not change the filter. And the speed rose, but the start-up was not very good.
The return hose must be removed by accurately pressing the plastic latch. This hose extends from the beginning of the engine, as well as an arrow that is directed to the fuel pump. With a little pressure, approximately one small glass of gasoline will flow out of the hose. The second hose will also need to be disconnected, but nothing will leak out. The most important thing is that you need to be careful so that they are not damaged when removing them.
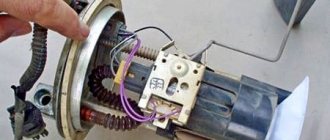
The connector with the harness must be removed and the fuel level meter, that is, the float located in the tank, disconnected. And then you need to remove the fuel pump itself.
Now you can start cleaning the fuel pump itself.
Replacement instructions
You can determine if a component is broken by the jerking of your Almera Classic H16 that occurs when the car is driven at high speed (more than 80 km/h); in some cases, the car begins to shake. In order to avoid fuel filter damage, it is necessary to fill your car with exclusively high-quality gasoline without any impurities.
The fuel pump itself on the Almera Classic and N16 models is located in the fuel tank. A special feature of the Almera Classic brand is the combined, one-piece design of the fuel pump with a cleaning filter. Replacing it at a service station will not be cheap, so if the problem is in the last component, you can try to clean or replace the mesh, which we strongly do not recommend doing.
Fuel pump cover under the seat
- First, remove the rear seat cushion. To do this, you need to relieve the fuel pressure. To do this, look under the dashboard on the left side and open the fuse box. On the top of the cover there is a diagram that will help you find the fuse responsible for the operation of the fuel pump (usually this 15-amp fuse is marked). We need to remove the fuse and then start the car. After a few seconds it will stall. You need to do this two or three more times until the engine stops starting altogether. To completely relieve the pressure, you must perform this procedure several times with an interval of no more than 60 seconds.
- Then you need to remove the filler cap and relieve the pressure inside the gas tank.
- Next, take a wrench and unscrew the three black bolts (usually they are plastic, very rarely metal), and then remove the inspection hole cover.
- Having done this, you will see a white container in which the fuel pump itself, which is a metal cylinder, is located.
Removing the Nissan fuel filter
- Then you need to remove the return hose by carefully pressing the latch.
- We take a previously prepared container and place it under the hose - about 300 ml of fuel should flow out of it.
- We also remove the second hose (fuel will not flow from it). It is important to remember that the hoses must be handled carefully so as not to damage them.
- Next, disconnect the connector with the harness and the float for measuring the gasoline level in the tank and take out the gasoline pump assembly.
- Now we need to carefully disconnect the gasoline hose.
- After removing the float with another sensor, you need to remove the pump casing.
- Now you have reached the fuel filter. We put the new fuel pump and filter in place in reverse order (if you decide to do it “the right way”). If you decide to only clean the fuel pump, then do this, or change the screen on it and also reassemble the entire system in the reverse order.
Don't forget to put back the fuse that controls the operation of the pump. Some craftsmen, after replacing the fuel pump, forget about the fuse, as a result of which they spend another half a day looking for a defect. Without this fuse, the car will not start.
The video shows how to replace the fuel filter in a Nissan car.
Are you also a Nissan owner? Or maybe you changed the fuel pump or fuel filter on the Almera model? Tell our site users more about this!
We remove the fuel module if any of its elements fail. We show replacement of the fuel pump, strainer or fuel level sensor for the possibility of repairs in road conditions and in the absence of original spare parts.
Inside the car, raise the rear seat cushion.
Prying it up with a screwdriver
...raise the fuel tank flap
Press the latch
...and disconnect the wire block from the fuel module cover
Next, you should relieve the pressure in the power system. To do this, we start the engine. After working for a few seconds, it will stop due to lack of fuel. The pressure in the system will be relieved.
Turn off the ignition.
Squeeze the clamps of the fuel pipe tip and remove it from the fitting of the fuel module cover.
The fuel module is fixed in the tank with a clamping ring screwed onto the neck of the tank. The easiest way to unscrew the module's clamping ring is to use a mounting spudger.
Resting against the depressions of the hole cut in the body floor panel, use a mounting spatula to push the ring by its protrusions counterclockwise.
The procedure may have to be repeated several times, resting on different protrusions around the circumference of the ring. And when assembling, when wrapping the ring, this must be done.
Removing the pressure ring
With the tank removed, a simple device bent from a metal rod in the form of a bracket will help you unscrew the clamping ring.
Device for unscrewing the clamping ring
We take out the sealing ring of the fuel module, moving it through the module cover
We remove the fuel module from the tank by removing the float of the fuel level indicator sensor from the hole in the fuel tank
We drain the remaining fuel from the fuel module into a previously prepared container. Cover the hole in the fuel tank with thick paper or polyethylene.
Further disassembly of the fuel module is not provided. The car's developers expect to replace the entire module if any of its components fail. However, in extreme circumstances, you can clean the fuel pump inlet strainer, replace the fuel gauge sensor or replace the fuel pump.
Disconnect the fuel gauge sensor wire block from the connector on the inside of the fuel module cover.
Release the fuel level indicator sensor lock
Removing the fuel level indicator sensor
Using a screwdriver, release the three cup latches
...and remove the glass from the filter housing
The connection of the fuel pressure regulator channel is sealed with a rubber ring.
The glass contains a fuel pressure regulator 1 and an anti-drainage valve 2
Pull and remove the strainer from the fuel pump.
Now it can be washed or replaced.
Using a screwdriver, press out the lock of the fuel module cover
...and remove the lid
...releasing the spring
Disconnect the fuel pump wiring harness from the connector on the inside of the fuel module cover.
Remove the fuel pump from the fuel filter.
Heating the plastic corrugated tube on the pump nozzle with a stream of boiling water from a kettle...
...remove the tube from the pump nozzle
We assemble and install the fuel module in the reverse order.
When installing the fuel module into the tank, the arrow on the module cover should be located opposite the mark on the tank
When installing the fuel module into the tank, the arrow on the module cover should be located opposite the mark on the tank. We put the fuel pipe onto the fitting of the module cover until the spring clips click. At the end of the work, turn on the ignition and check the tightness of the connections of the fuel pump module.
Cleaning the pump
Attention! If this procedure does not produce results, then it is inevitable.
You should disconnect the fuel hose (it is always rigid), as well as the sensor and do not forget about the float. Then you need to bend the latches (there are 3 of them) of the pump casing. There, below, under the casing, there is a filter.
After cleaning, you need to assemble it all in the opposite order.
Materials used in these operations:
- rags (required quantity);
- small basin;
- a small glass, approximately 300 ml, to collect gasoline flowing from the hose;
- a fire extinguisher is a must (you never know what can happen);
- cleaning products (acetone, liquid intended for washing the injector).
Nissan Almera Classic › Logbook › Replacing the fuel filter.
I went to the store and bought a plastic hose and fixed everything.
I decided to test it, took a glass and put part of a gas-resistant hose in it, here is the result in 5 hours, I will have to disassemble and redo it. !Don’t make the same mistake as me, buy a plastic tube, otherwise you’ll have to redo it! Today I changed the fuel filter with a friend, everything worked out. We inhaled gasoline, there was even a little curtain). I did everything one by one: For this we need: - A set of screwdrivers - Some material for impregnation and removal of excess gasoline (preferably medium size, there will be 50-300 g of it), or a container if you will perform all operations inside the car … )) — Well, I also used a hammer, where would a Russian auto mechanic be without it?! )))) - Preferably 4 strong, not crooked male hands. )) — All operations must be performed with the utmost care! — Let’s quit smoking for a while. ) — The whole operation takes from 90 to 180 minutes, depending on the curvature of the hands and your accuracy. =)
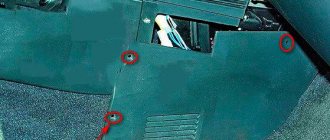
Let's go, part I, “removing the fuel pump”: 1. Remove the rear seats of the car (pull two rings from the bottom at the place of two passengers and pull the seat up). 2. Remove the protective metal casing of the fuel pump compartment (3 shaped bolts, I twisted them with a screwdriver, they go easily). 3. Disconnect/unscrew the power/data terminal (carefully lift the casing, do not pull it straight away!). 4. We move the protective casing aside along with the wire so that it does not interfere with us further (if necessary, vacuum the compartment, excess dust can get directly into the tank itself after removing the fuel pump) 5. In front of us is the fuel pump itself with a fuel outlet tube. Don’t just try to drag it out!
ATTENTION! The website almera-classic.ru clarifies one more important step before removing this tube - you need to unscrew the gas tank cap before removing the tube! Probably to relieve the vacuum in the fuel pump and easily remove it... I don't know. But I did it.
6. We continue - there is a fixing ring directly on the tube. If you look closely, there are grooves on the sides. With simultaneous compression/pressure inward, the blocking occurs and the tube can be easily disconnected from the fuel pump fitting. 7. When we have disconnected it, we can begin to remove the fuel pump fixing plug (so big and round)... 8. First, you need to put a mark opposite the yellow arrow marked directly on the plug, where it is convenient for you. So that after installing the fuel pump, the plug is tightened exactly in accordance with this fixing mark. 9. It will take a lot of effort to remove the plug... The plug is unscrewed counterclockwise. You can master it with two hands. Or special key... I don't know what the truth is. If still not, then we will need just the universal tool of any Russian auto mechanic - a hammer! =D With his help and the help of a friend, we unscrew this plug (the friend turns the plug in the right direction, and in the meantime, you carefully, with a little force, tap the screwdriver installed on the lid in the same direction). 10. After removing the plug, we !CAREFULLY! we remove the fuel pump itself from the fuel tank without bending the fuel injection system. 11. It comes out easily, well, at least it seemed so to us. We removed it like rods from a nuclear reactor